Bear Hugs - Papa Bear Gone Fishin'

by Joanne James14. April 2016 08:05

Today it's time for a new challenge over at Create With Connie and Mary and this week we have a colour combination for you:


This colour combination left me stumped for a while, until I decided that Soft Suede would be a good colour for a bear - take a look:

The low-down on today's card is as follows:

Papa Bear - I stamped my Daddy Bear from the 'Bear Hugs' stamp set in Early Espresso on Soft Suede card stock and cut him out using my Big Shot and co-ordinating Bear Hugs Framelits, curving his arms in slightly so that he could 'hold' on to his fishing pole. 

Gone' Fishin' - The 'Bear Hugs' set comes with lots of fun embellishments; I decided to go with a fish on this card that I coloured in Mint Macaron and Lost Lagoon with my Aquapainter, then painted liberally with clear Wink of Stella to give him shimmery scales. I attached my fish to a piece of white baker's twine, which I in turn knotted to my cocktail stick fishing pole. How cute?!

Geometrical Forest - I decided I needed to conjure up some forest or at least a feeling of the outdoors behind my lake, but was somewhat at a loss as to how to do this with such a limited colour palette. I perused my designer series papers and bingo - this geometrical design, whilst not including trees of any kind, works as a background. I do think those triangles are evocative of trees (ok, I know it's a stretch, but if you have a better suggestion do leave me a comment below - I'd love to hear it!) And where did I find it? In the 'It's My Party' Designer Series Paper stack of all places!

Here is the visual summary of the key products used on today's project for you to pin for easy reference:


You can see all of my 'How To' summaries on my 'How To - Tips and Techniques' Pinterest board in case you've missed any. 

Do visit the other Design Team members to see what they did with this week's colours; there's lots of inspiration over on their blogs too!

Enjoy your day and I'll be back tomorrow with another project; until then, happy stampin'!


Stampin' Up! Supplies Used:

  • Bear Hugs Clear-Mount Bundle
  • It's My Party Designer Series Paper Stack
  • Soft Suede A4 Cardstock
  • Early Espresso Classic Stampin' Pad
  • Lost Lagoon A4 Cardstock
  • Lost Lagoon Classic Stampin' Pad
  • Mint Macaron Classic Stampin' Pad
  • Ovals Collection Framelits Dies
  • Whisper White A4 Cardstock
  • Rhinestone Basic Jewels
  • Whisper White Baker's Twine
  • Clear Wink of Stella

Love You Sew - You're A Cut Above

by Joanne James5. April 2016 07:00

Today I have another clean and simple card for you, this time for this week's challenge over at CAS(E) This Sketch. I love playing along with their sketches, which can sometimes leave me lost at first glance but then often take me in an unexpected direction. This week's sketch is definitely one of those! Here is the sketch:


I spent considerable time thinking about how I was going to interpret this sketch and then ended up with not one but two very different creations! Here is the first one:
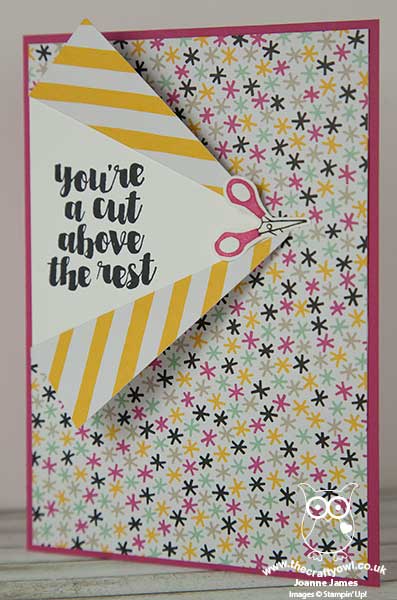
There are a number of key elements that make up this deceptively simple card:

A Cut Above - This great sentiment comes for the current hostess set in the Spring-Summer catalogue 'Love You Sew'. This exclusive set can only be purchased with Stampin' Rewards that are earned with qualifying party sales when you host your own Stampin' Up! party or place an individual order of £150 or more. Perfect for crafters, it includes a number of fun sentiments and craft-themed stamps and has been very popular with party hostesses throughout Sale-A-Bration. It is still available until the seasonal catalogue ends on May 31st, so if you would like to earn it for free then do get in touch to earn yours.

It's My Party - I love the bold and sassy colours and patterns of the It's My Party Suite and this card was perfect for a busy pattern, due to its simple design. What's more, the decision on which side to use was made easy - for today's card, both patterns are visible. Score! I simply cut a line across my DSP with my Stampin' Trimmer, then folded back the sides to create a 'v' in which to stamp my sentiment on the layer below.


Snip, Snip - The scissors stamp can be found in the 'Love You Sew' stamp set too and were the perfect embellishment for my split card front. I coloured them in with my Stampin' Write markers so that I could colour the handles and blades separately and positioned them'in action'.

Sew easy, sew simple! I just love this set and this sentiment makes for a perfect crafty congratulations - I shall probably make a few of these to keep on standby to celebrate my team members' achievements!

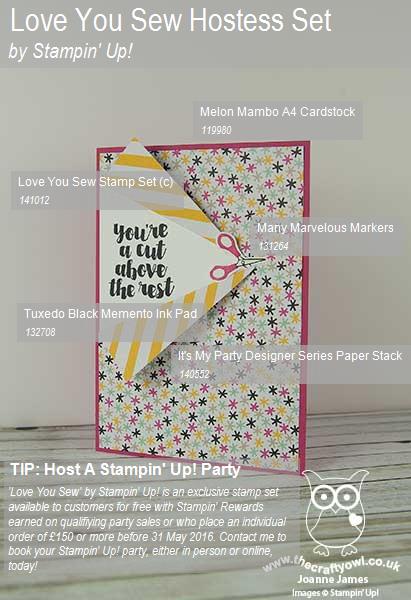
Here is the visual summary of the key products used on today's project for you to pin for easy reference:
 

You can see all of my 'How To' summaries on my 'How To - Tips and Techniques' Pinterest board in case you've missed any. 

I've had a day of hair braiding, manicures and baking in addition to a few household chores today. I'm sure tomorrow will be equally fun! Back tomorrow with another very different interpretation of the same sketch; until then, happy stampin'!


Stampin' Up! Supplies Used: 

Table built using Product Table Builder by The Crafty Owl - Independent Stampin' Up! Demonstrator.

Tags: , , , , , ,

Cards | Host a Party | hosting | Shop Online | Stamping

You're Just The Sweetest Apple Of My Eye Card

by Joanne James11. March 2016 22:35

A busy day so a late post from me today with a card for this week's Retrosketches challenge:

I went with brights and lemons today using my new 'Apple Of My Eye' stamp set and a sentiment with a twist:

This card is all about the lemons! Even with this relatively clean and simple design, they are three key features of today's citrus-themed card:

Apple of My Eye Stamp Set - The focal point lemon and the sentiment on today's card are from this stamp set, which also contains cherries, pears and apples of course. A fun set that will be useful, amongst other things, for teacher's thank you's too. Today's sentiment is one of three in the set and probably my favourite. I know it doesn't totally fit with lemons, but 'You're just the most sour' so doesn't have the same ring to it! This stamp can also be punched out with a 1 3/4" Circle Punch, so easy-peasy - no fussy cutting required.

Have a Cuppa Designer Series Paper Stack - This paper stack has some great cup and teapot designs, but there are also some great generic patterns too. I used three different patterns of paper on my card, all featuring lemons or leaves - great for citrus tea, but also perfect just for lemons! This sketch layout is also perfect for using up those scraps of designer paper that are left over from other projects. 

A Trio of Embellishments - There are also a number of embellishments that I added to this card to make it complete: some Crushed Curry It's My Party Enamel Dots, a small Classy Designer Button tied with a piece of Crushed Curry baker's twine (if you look up close it is ridged just like the segments of the lemon too!) and the flesh of the lemon has been liberally painted with Wink of Stella to add a subtle touch of citrus sparkle!

Here's today's visual summary of the key things needed to make today's card for easy reference:


Yellow is one of my most favourite colours and I just love this bright and lemony monochromatic card - so fresh!

I'll be back tomorrow with another project; until then, happy stampin'!


Stampin' Up! Supplies Used:

Table built using Product Table Builder by The Crafty Owl - Independent Stampin' Up! Demonstrator.
 

Happy Easter From The Friends & Flowers Easter Bunny!

by Joanne James25. February 2016 08:05

Today it's time for a new challenge over at Create With Connie and Mary and this week we have a great sketch for you:


I decided to create a fun Easter card today using the new 'Friends and Flowers' stamp set that co-ordinates with the returning Festive Flower Builder punch - take a look:


This is a great stamp set with lots of pieces that enable you to make bunnies, fish, flowers and more! It's so easy to punch out the various bits and pieces for easy creation with the co-ordinating punch; my Festive Flower Builder Punch got a real work out before Christmas (do a search on it or the 'Reason For The Season' stamp set here on my blog to see the many projects I've created using it) so I'm glad I get to use it with another co-ordinating stamp set too. I simply stamped the bunny face and ears in Smoky Slate on a piece of Whisper White cardstock, added a little Blushing Bride pink using my Stampin' Write markers and punched out (using the 1 3/8" circle for the face). I added a Bow Paper Clip embellishment to one ear for added 'cute' factor and bordered my sentiment panel with two thin strips of blushing Bride glimmer paper - a little glimmer goes a long way! The sentiment is the one you'll find with the 'Easter Lamb' stamp - I simply masked my stamp so that I would only get the words and not the image - which I stamped in Versamark and heat embossed in white for added gloss.

Lastly, do you recognise the pretty pastel paper I used for my background layer? It's actually from the It's My Party paper stack. Whilst this is a pack with lots of bold patterns and colours, the presence of Mint Macaron and Sahara Sand in the colour combination means there are some hidden pastel gems in there too, so be sure to check it out.  

Here's today's visual summary for easy reference:


Do visit the other Design Team members to see how they interpreted this week's sketch; there's lots of inspiration over on their blogs too!

Enjoy your day and I'll be back tomorrow with another project; until then, happy stampin'!


Stampin' Up! Supplies Used:

  • Friends & Flowers Wood-Mount Stamp Set
  • Festive Flower Builder Punch
  • Easter Lamb Wood-Mount Stamp
  • Blushing Bride Glimmer Paper
  • Bow Paper Clips Embellishments
  • Smoky Slate Classic Stampin' Pad
  • Blushing Bride Classic Stampin' Pad
  • Blushing Bride A4 Cardstock
  • Mint Macaron A4 Cardstock
  • Whisper White A4 Cardstock
  • It's My Party Designer Series Paper Stack
  • 1-3/8" Circle Punch
  • Embossing Buddy
  • Versamark Pad
  • White Stampin' Emboss Powder
  • Heat Tool (Uk)

Bravo Congratulations Card

by Joanne James8. February 2016 08:00

Happy Monday everyone! I hope you all had enjoyable weekends; my Sunday saw the completion of Ben's history project with a very fetching Tudor-clothed peg doll, along with an Ann Boleyn and Ann of Cleeves for good measure, so I for one am happier although Ben seems rather relaxed about the whole thing - perhaps that's what happens when you're an 8 year old boy with a crafty Mummy!

Today I have a card for this week's sketch over at Pals Paper Arts:

PPA-286-Feb04 

This is a great sketch and as soon as I saw it I had a card in mind - I so love it when that happens! I need a few congratulations cards at the moment for different friends, colleagues and members of my team who have been achieving goals at the moment so that's what I decided to make using the vertical stamp in the 'Bravo' stamp set:

I took my colour combination from the 'It's My Party' Designer Series Paper - with 12 double-sided designs, this really is the stack that keeps on giving! I used the star-sprinkle pattern for my card today and I love the subtle layering of the diagonals where the patterned paper is cut away and the stripe of Mint Macaron runs across the top. My sentiment is stamped front and centre; I was originally intending to stamp this in Melon Mambo but switched to black to add more emphasis. I coloured in the stripes on some of the letters with my Stampin' Write markers and added a punched Crushed Curry star with a pink enamel dot to finish. This flat card was a relatively quick make for me so I made a few at the same time - bonus!

I have a morning of errands today and a few household chores in store, however I am hoping to get into my craft room this afternoon - wish me luck!

Back tomorrow with another project; until then, happy stampin'!


Stampin' Up! Supplies Used:

Table built using Product Table Builder by The Crafty Owl - Independent Stampin' Up! Demonstrator.


Balloon Builder Party Animal

by Joanne James7. February 2016 21:23

I have a quick second post today following on from my earlier Paper Players post, to share the 'Wylie Kyote' balloon animal that I created to grace my card using this week's sketch over at Mojo Monday:

My earlier post here explains how my balloon animal came to be; I had a quick 5 minutes this afternoon so decided to through caution to the wind and make him into a card. Whilst I'm still not convinced he looks like a dog, he definitely looks enough like a balloon animal to join this party:

I added some balloon designer series paper from the 'It's My Party' stack (just in case anyone needed some visual association for my stamped animal!!) and the fun sentiment that also features in the 'Balloon Builder' stamp set. In retrospect I think I should have used a patterned paper for my pink layer too as it's a little plain, but there we go - next time! It was fun to try out this little set though - I can't wait to see what other animals I can create.

Back tomorrow with another project; until then, happy stampin'!


Stampin' Up! Supplies Used:

Table built using Product Table Builder by The Crafty Owl - Independent Stampin' Up! Demonstrator.

Tags: , , , , , , ,

Cards | Shop Online | Stamping

Make A Wish Birthday Card

by Joanne James30. December 2015 21:31

Good evening lovely readers! I hope you've all had a pleasant day. I went for my second visit of the week to the pantomime, this time the turn of The Snow Queen, which was excellent. I love pantomime - for me it is one of those traditions that make my Christmas. As for crafting - I'm back today with another 'sneak peek' for you, this time using the current sketch over at Mojo Monday as the basis for my birthday card:

Today's card features not one, but FIVE new products from the forthcoming Stampin' Up! Spring-Summer catalogue. Here's my card - can you spot them all?


So how did you do? Check out the fun party-themed designer series paper from the 'It's My Party' Designer Series Paper Stack, along with the stamps, both from a new set called 'Party Wishes' (I coloured them with my Stampin' Write markers to get the detail). Then there's the fabby two-tone baker's twine that I also shared on yesterday's card and check out the trio of enamel dots on my birthday cake - these come in a pack with Mint Macaron coloured dots too! Finally, did you spot the fifth item? This is a slightly sneaky one - the candle on the cake was punched with one of a trio of punches in the 'Party Punch Pack' (it also includes a balloon and a mini cupcake!) If you are wondering where the striped paper across the bottom panel came from - this is actually a piece of black and white striped paper from the Neutrals paper stack where I coloured in the white stripes with my Melon Mambo Stampin' Write marker to create my custom paper to co-ordinate in with the rest of my colour scheme.

So much party fun in one card! I just love the bold colour combinations of the 'It's My Party' Suite - they offer so many different creative possibilities!

Back tomorrow with a new challenge over at Create With Connie and Mary where it's out with the old and in with the new! Until then, happy stampin'!


Stampin' Up! Supplies Used:

The following items will be available on 5th January:

140552 It's My Party Designer Series Paper Stack

140961 Party Wishes Stamp Set

140608 Party Punch Pack

140555 Baker's Twine Combo Pack

140554 It's My Party Enamel Dots

Table built using Product Table Builder by The Crafty Owl - Independent Stampin' Up! Demonstrator.


Scrapbooking

Stampin' Up! has introduced a new range of 12x12" scrapbooking product and kit - the full range is now available to purchase online. To download a copy of the new digital Scrapbooking Catalogue click here.

Mini Catalogue

BROWSE THE CATALOGUE

'Tis The Season - the new Stampin' Up! Mini Catalogue is here! For more details and to download your copy click here

Shop Online

Access my online shop 24 x 7, 365 days of the year:

Current September hostess code:

JQEHTZGK

Shop Online

2024-25 Annual Catalogue

BROWSE THE CATALOGUE

Click on the image to download your copy of the 2024-25 annual catalogue. For a full list of current SU! supplies, go to my online store. If you would like any help or advice, please drop me a line at joanne@thecraftyowl.co.uk or give me a call on 07773 421446 - I'd be happy to help.

Join My Team

It's always a great time to join Stampin’ Up! New team members can get £130 worth of products for only £99 + free business supplies + free shipping + all the fun being a part of Stampin’ Up! Stampin' Up! has something for everyone: join my growing team and benefit from my support to enjoy Stampin' Up! however you choose.

If you're interested, call me for a chat to understand how I can help you realise your goals. Alternatively, if you have already decided to sign up and you just can't wait, please click here for the link to the online form where you can sign up and order your starter kit right away! 

Latest Kits!

Stampin Cut and Emboss

The Christmas Ornaments Kit and Card Keeper Kit are the latest kits that will be arriving in the online store later this month - get yours here!

New Online Exclusives

There are new products available exclusively in the online store from 3 July - check them out here.

About Me

Hi I'm Joanne and live in Northampton and when I'm not looking after my husband and two beautiful children, am an avid crafter with a passion for all things Stampin' Up!

I must confess that I have never been a big rubber stamper - until I discovered Stampin' Up! that is. I love the fact that I can get such great results with co-ordinating stamps, inks, papers and punches - the possibilities are endless! Join me on my stamping journey as I share the things I love and be inspired to create amazing things yourself!

Follow Me

Monthly Newsletter

Box Builder

Click the button above to use Box Buster to create your custom box design using the Envelope Punch Board!

Kits Collection Now Available!

Stampin Cut and Emboss

The new Kits Collection from Stampin' Up! is now available!

Click here to see the current kits available and order yours online today.

I Design For


Stampin' Up Stuff

This is my personal blog and is not endorsed by Stampin’ Up! I hope you find it a plentiful source of ideas and personal inspiration but please don't copy my designs for contest submission or use for classes, publication or sale without express permission.