by Joanne James19. January 2016 07:00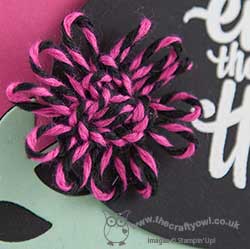
Good morning lovely readers! Today I am sharing a card for this week's challenge over at Pals Paper Arts:

I'm not usually one to gravitate towards colour challenges (I'm more of a sketch gal as you well know!) but I thought this was a great colour combo chosen by the equally great Brian King and so that, combined with the fact that he finds my English spelling of the word 'colour' in and of itself rather quirky, I just had to play along! Here's my card:
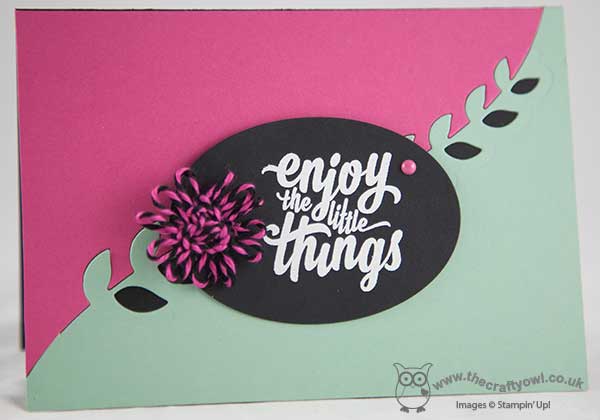
I decided to make a bold statement using blocks of colour, with Basic Black as my base and each of the other colours cut with both the positive and negative pieces of the intricate leaf framelit from the Botanical Builder Framelits Dies and pieced together for my base. I stamped my sentiment in Versamark and heat embossed it in white on an oval of Basic Black, which I then popped up on dimensionals in the centre of my card. What to use to tie the whole thing together though? I decide to have a go at making a loopy flower out of the new thick baker's twine that comes in the challenge colours; I made a few but decided one was enough to ground my sentiment and bring the whole thing together. If you've never made one of these before, they are really not that tricky when you know how. With that in mind, I made another short technique tutorial to show you how it's done - I haven't yet had time to edit it though, so will share with you later in the week.
That's all from me today; I have a private class this morning with a wonderful group of seniors at a local residential care home and then a few jobs this afternoon before taking the James Juniors for their music lessons. Another busy day!
Back tomorrow with another project; until then, happy stampin'!
Stampin' Up! Supplies Used:
eba1cfe0-07e7-451c-a5ad-b38fa96bb7e7|0|.0|96d5b379-7e1d-4dac-a6ba-1e50db561b04
Tags: Big Shot, Enjoy The Little Things, Botanical Builder Framelits Dies, Ovals Framelits, video tutorial, Stampin' Up, Stampin' Up Card, Stampin' Up Card ideas, Stampin' Up Supplies, Shop online, Shop Stampin' Up online
Cards | Shop Online | Stamping | Video Tutorials
by Joanne James18. January 2016 07:00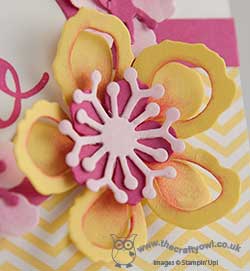
Hello to you from James Towers this morning! It's cold outside but we haven't had any more snow, much to the disappointment of my James juniors who were so hoping for a snow day today!
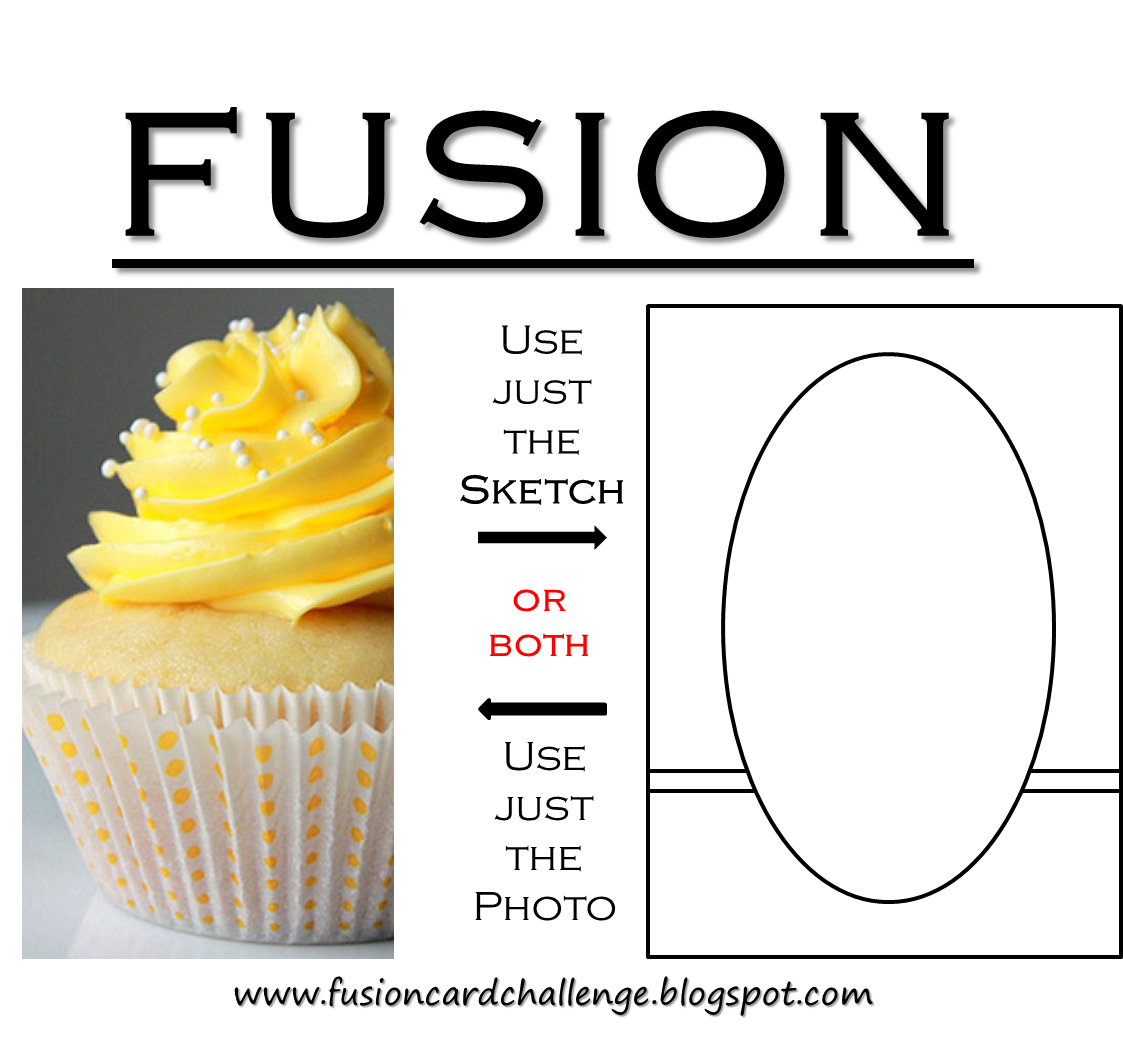
Today's card is for the current 2 year anniversary challenge over at Fusion where they have this wonderful summery photo inspiration and optional sketch to play along with:

I used the photo and the sketch for my card today, albeit I used the sketch in a landscape rather than portrait orientation as it suited my embellishments a little better. Here is my card:
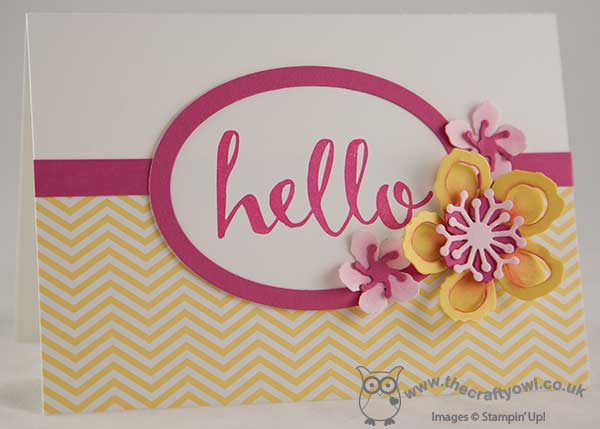
I used a base of extra thick Whisper White cardstock and covered the lower part with a piece of chevron designer series paper from last year's Brights dsp stack. I added a strip of Melon Mambo cardstock and also used it to frame my 'Hello' sentiment, from the Sale-A-Bration stamp set of the same name. I added a trio of layered flowers in pinks and yellow, for my embellishment. I cut each of them using the Botanical Builder Framelits Dies, adding some sponging for added depth. These framelits make gorgeous flowers with so much layering and interest and if you run them through your Big Shot with the Precision Base Plate and use the new Big Shot Die Brush to remove the cuts from the dies, they are incredibly easy to make.
I just love the breath of summer that the colours and flowers of today's card evoke - makes me forget the freezing temperatures outside, even if just for a little while! That's all from me today; I have a busy day with a piano lesson, some final preparation for a private class tomorrow and I'm off to watch Rebecca's first netball match of the season this afternoon - thankfully, indoors! Back tomorrow with another project; until then, happy stampin'!
Stampin' Up! Supplies Used:
by Joanne James2. November 2015 09:00 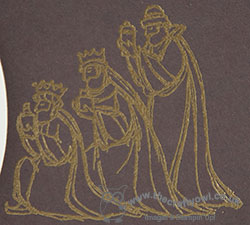
Good morning everyone - happy Monday to you! This morning I have a Christmas card using this week's sketch over at Freshly Made Sketches:
Now I looked at this sketch and loved the layout and almost went with it 'as is' using the square as my shape - such a classic layout - but decided since Cindy was ok with 'any shape' I would actually go with a much less literal interpretation. So without further ado, here's my card:
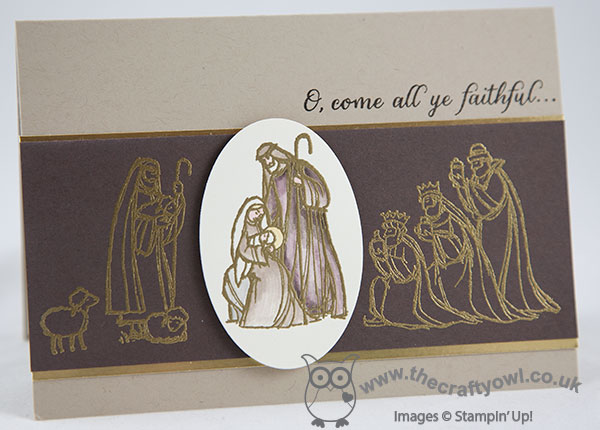
I used Crumb Cake for my base, then stamped the shepherds and wise men from the 'All Ye Faithful' stamp set onto a strip of Early Espresso cardstock and heat embossed them in gold and matted this panel with gold foil cardstock before adhering to my card base. I then did the same to my holy family onto a piece of Very Vanilla cardstock and coloured it with my inks and a blender pen before cutting out with the smallest of the Ovals Framelits and my Big Shot. I then popped this up on dimensionals between the stamped images on the Early Espresso piece. To finish, I stamped my sentiment in Early Espresso directly onto the Crumb Cake base layer.
So as you can see, a less than literal interpretation of the sketch but each of the key elements is present. I adore this stamp set and these images are beautiful whether used individually or as a set.
That's all from me today; I'll be back tomorrow with another project. Until then, happy stampin'!
Stampin' Up! Supplies Used:
by Joanne James17. September 2015 08:05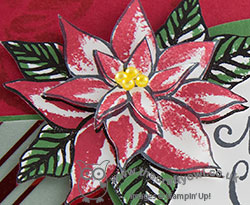
Today it's time for a new challenge over at Create With Connie and Mary and this week we have a great sketch challenge for you:
I decided to use the lovely 'Reason For The Season' stamp set on my card again today. Here's my card:
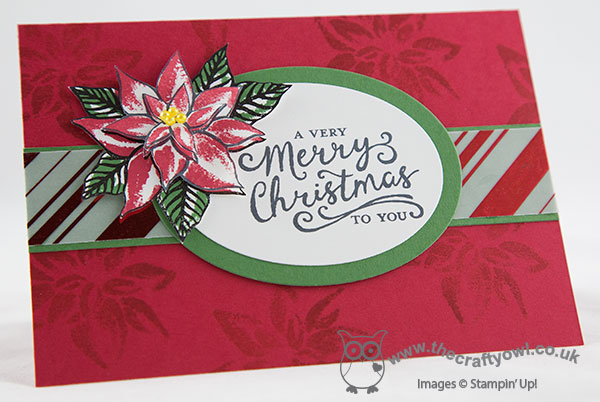
I decided to use the tone on tone stamping on my Real Red card base as it was so popular on my earlier card here. I used a band of Garden Green and a Garden Green mat for my Whisper White oval, cut with my Big Shot and Oval Framelits, and added a band of Real Red striped Holiday Fancy Foil Designer Vellum to the central band to add a little shine. I stamped my sentiment in black and then for my embellishment, I stamped the poinsettia three times on Whisper White and fussy cut each one, creating different layers of petals as I did so, so that when they were adhered on top of each other they have a real 3D effect. I also coloured some pearls with a yellow Sharpie and added those to the centre of my flower. Here's a closeup of the detail:
I love the effect you get with some good old fashioned fussy cutting and layering and for this card, no punch required. This set really is so versatile!
Do visit the other Design Team members to see how they used this week's challenge sketch; there's lots of inspiration over on their blogs too!
Enjoy your day and I'll be back tomorrow with another project; until then, happy stampin'!
Stampin' Up! Supplies Used:
- Reason For The Season Photopolymer Stamp Set
- Holidays Fancy Foil Designer Vellum
- Ovals Collection Framelits Dies
- Big Shot
- Whisper White A4 Cardstock
- Real Red Classic Stampin' Pad
- Real Red A4 Cardstock
- Garden Green Classic Stampin' Pad
- Garden Green A4 Cardstock
- Pearl Basic Jewels
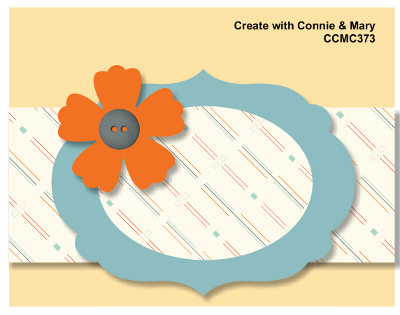
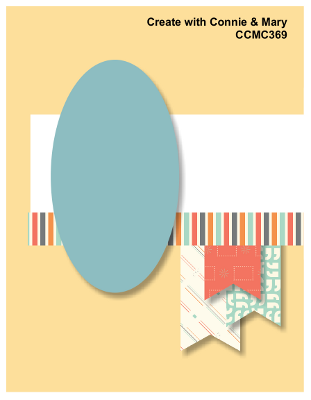
by Joanne James20. August 2015 08:05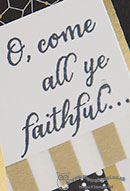 Today it's time for a new challenge over at Create With Connie and Mary and this week we have a great sketch challenge for you:
As I'm still excited to be working may way through my box of seasonal preorder goodies, I have another Christmas card to share with you today using the All Ye Faithful stamp set and Winter Wonderland Specialty Designer Sseries Paper and washi tape. Here's my card:
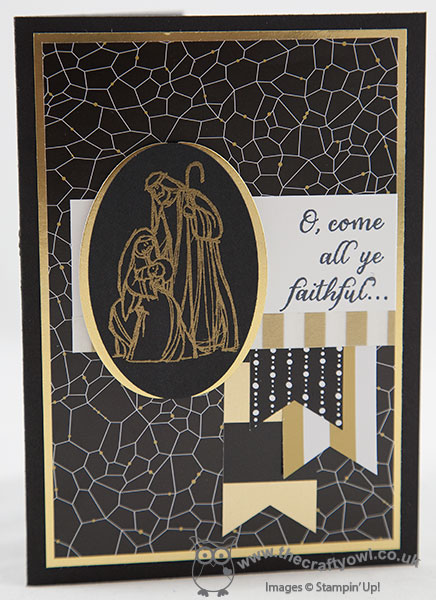
My colour scheme today was inspired by the Winter Wonderland product suite - a mix of black, white and gold, with foil accents and real sparkle. Using Basic Black for my base with a mat of gold foil, then used a piece of Winter Wonderland DSP with a crackle-glaze pattern for the front of my card. I edged a piece of Whisper White with gold striped washi tape, then stamped my sentiment in Memento Black on the right hand edge. This sentiment does actually come on one line, so in order to make it work for my card and the sketch I carefully masked off parts of it to enable me to stamp it in three separate sections. For the oval, I stamped Mary and Joseph in Versamark onto Basic Black card and heat embossed it in gold. I backed this with an oval that was cut to the same size using my Big Shot and Ovals Framelits, then cut in half vertically; this then creates a frame that enables the oval to stand out, but isn't too wide, as it would have been if I'd used the next size framelit up. To finish, I added a trio of flags punched using my Tripe Banner Punch, featuring more of the patterns in the Winter Wonderland DSP suite.
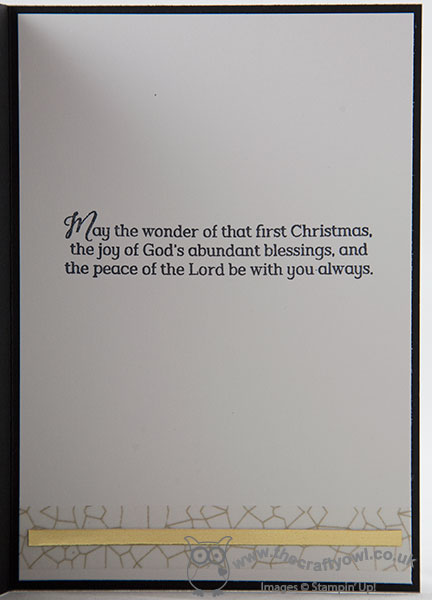
Whilst this isn't a colourway I would necessarily have been drawn to of my own accord, it is very on-trend and I do love the way the entire suite of products make co-ordination so easy - good old Stampin' Up! I love the All Ye Faithful stamp set too - one of my favourite religious sets in the new catalogue, it comes with two other feature stamps and a verse sentiment too that I used on the inside of my card:
I hope you like today's card. Do visit the other Design Team members to see how they used this week's challenge sketch; there's lots of inspiration over on their blogs too!
Enjoy your day and I'll be back tomorrow with another sneak-peek project, one for Halloween this time. Until then, happy stampin'!
Stampin' Up! Supplies Used:
* All Ye Faithful - available September 1st
* Winter Wonderland Specialty Designer Series Paper - available September 1st
*Winter Wonderland Washi Tape - available September 1st
- Big Shot
- Magnetic Platform
- Ovals Collection Framelits Dies
- Banner Triple Punch
- Gold Foil Sheets
- Whisper White A4 Cardstock
- Embossing Buddy
- Versamark Pad
- Gold Stampin' Emboss Powder
- Heat Tool (Uk)
- Basic Black A4 Cardstock
- Tuxedo Black Memento Ink Pad
ce7c5f2c-dfb8-4703-91c7-b6bb6f392bfe|0|.0|96d5b379-7e1d-4dac-a6ba-1e50db561b04
Tags: Create With Connie And Mary, Stampin' Up, Stampin' Up Card, Stampin' Up Card ideas, Stampin' Up Supplies, All ye Faithful, Winter Wonderland, Christmas, Ovals Framelits, Magnetic Platform, Big Shot, Triple Banner Punch
Cards | Shop Online | Stamping
by Joanne James23. July 2015 08:00Today it's time for a new challenge over at Create With Connie and Mary and this week we have a great sketch for you:
This is such a versatile sketch with so many possibilities, in the end though I settled for something that is a little unusual for me - take a look at today's card:
I was keen to use another of the papers on the Pretty Petals DSP stack as my background layer, so matted this on a base of Old Olive and Mint Macaron. I used Calypso Coral for my banner, effortlessly punched with my Triple Banner Punch (how did I ever manage without this in my life?!) and tucking a sliver of retired Old Olive ribbon beneath it (there is not a single ribbon in this colour in the current catalogue - let's hope that the Winter seasonal brings us something here in this staple colour!) I coloured my sentiment, from the 'A Whole Lot Of Lovely' hostess set (chat to me about booking a party or joining my next hostess club if you would like to own this set too!) in Pacific Point, Mint Macaron and Calypso Coral Stampin' Write markers and stamped onto Very Vanilla cardstock, that I cut out with my Big Shot and Oval Framelits.
Then for the bit that really isn't my usual style - I covered the back of the oval with Tear and Tape (how great is this product?! No more static red peel to stick to you!)and ruched some Mint Macaron lace trim all the way around the edge before adhering to my card front. I really love this pale green colour however was finding myself not really using is much in my card making, unlike it's counterparts Watermelon Wonder and Cucumber Crush (how did I ever live without these in my stamping cupboard?!) so this card is the first that seeks to rectify that. To finish, I added an Old Olive flower punched with the Petite Petals punch as leaves for the base of my Watermelon Wonder blossom accent - whilst not Calypso Coral, it is sufficiently close to compliment the coral elsewhere on my card.
So definitely more frilly than usual and this card would work just as well without the lace trim (and be more post-service friendly) but nice for a change I think! Do visit the other Design Team members to checkout their interpretations of this week's challenge sketch; and if you didn't read my Weekly Deals post yesterday, do check it out here - it contains a special offer exclusive to my customers!
Right, I'm off to top up my tan! Enjoy your day and I'll be back tomorrow with another project; until then, happy stampin'!
Stampin' Up! Supplies Used:
- A Whole Lot Of Lovely Clear-Mount Stamp Set
- Pretty Petals Designer Series Paper Stack
- Big Shot
- Ovals Collection Framelits Dies
- Mint Macaron A4 Cardstock
- Mint Macaron 1" Dotted Lace Trim
- 2015-2017 In Color Stampin' Write Markers
- 2015-2017 In Color Blossom Accents
- Old Olive A4 Cardstock
- Calypso Coral Stampin' Write Marker
- Calypso Coral A4 Cardstock
- Brights Stampin' Write Markers
- Very Vanilla A4 Cardstock
- Petite Petals Punch
- Banner Triple Punch
2869fbc5-7eb8-4234-85e8-0ba74f07d9a8|0|.0|96d5b379-7e1d-4dac-a6ba-1e50db561b04
Tags: A Whole Lot of Lovely, Big Shot, Create With Connie And Mary, Ovals Framelits, Triple Banner Punch, Pretty Petals, Shop Stampin' Up online, Shop online, Stampin' Up, Stampin' Up Card, Stampin' Up Card ideas, Stampin' Up Supplies, Host a Party
Cards | Host a Party | hosting | Stamping
by Joanne James26. April 2015 10:00Yay! It's Sunday and time for a new challenge over at The Paper Players. We loved your watercoloured creations last week; today the lovely Ann is hosting and she has a sketch challenge for us - and you know how I love a good sketch! This is the sketch layout:
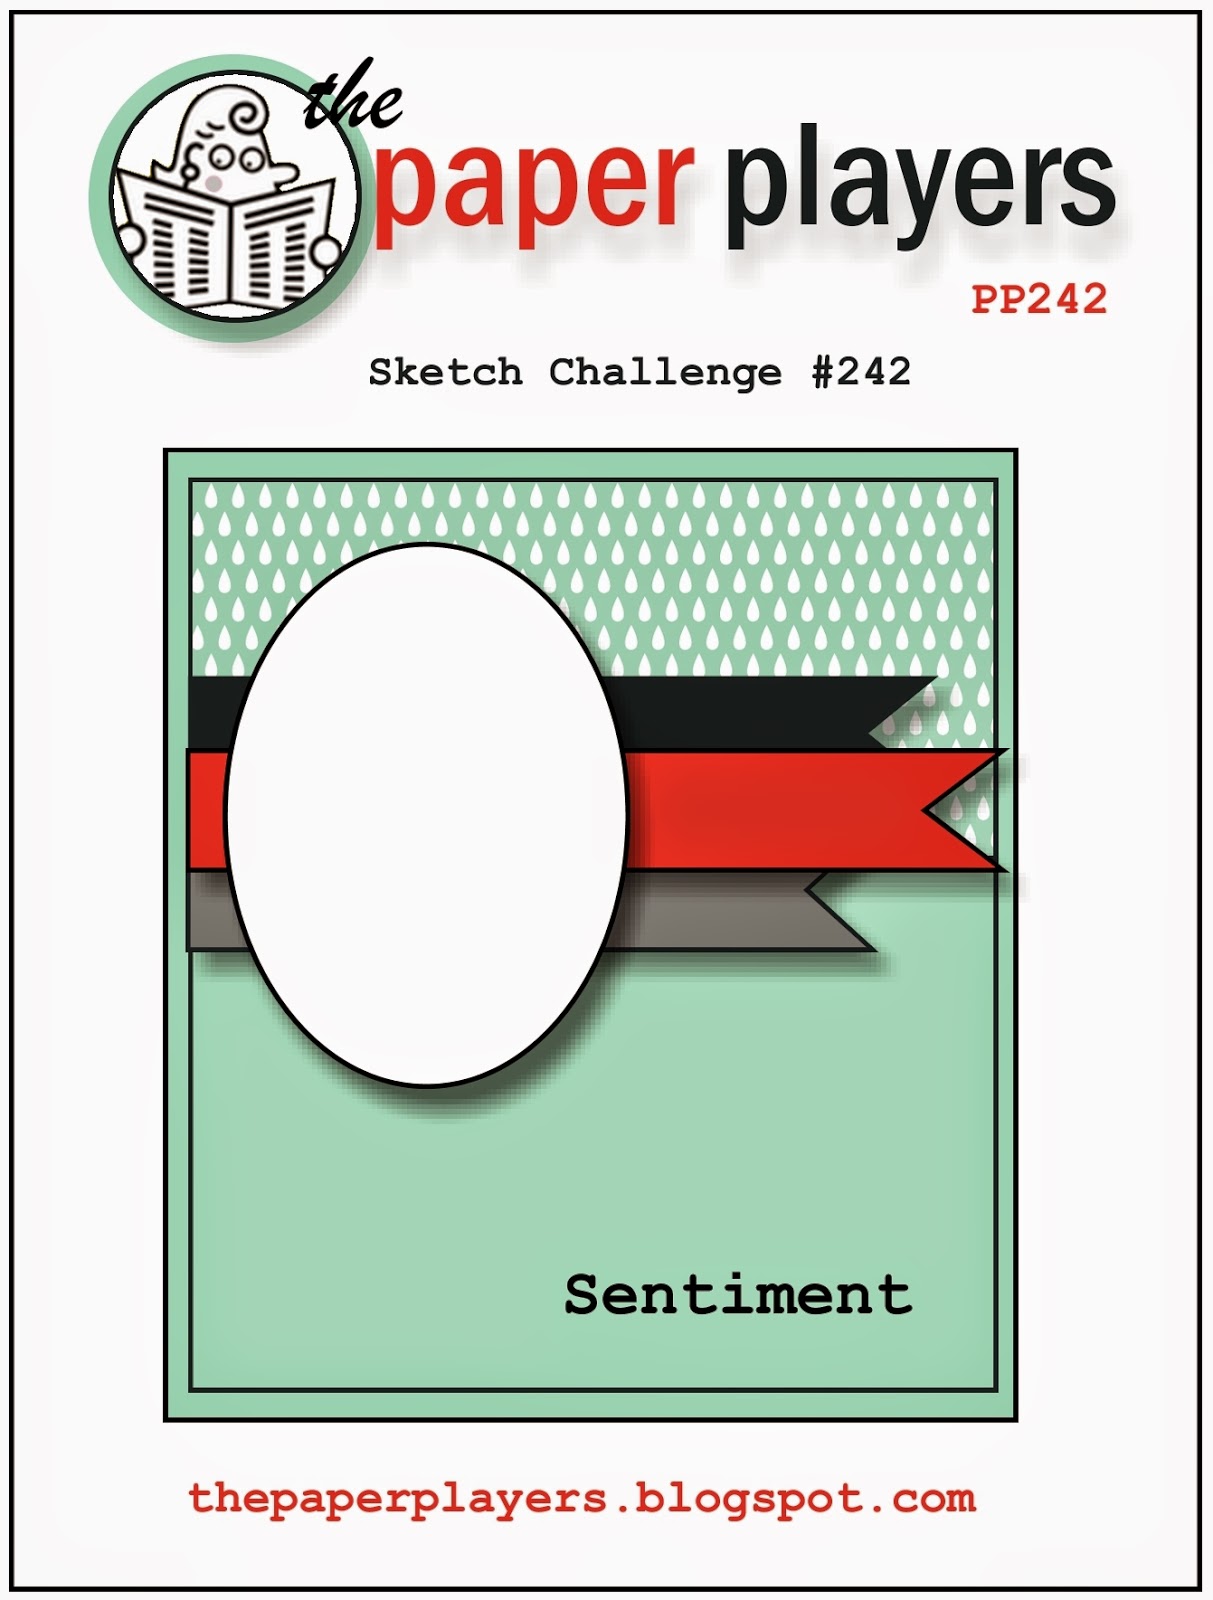
So many possibilities for this great sketch, but I decided that today I had to go with a birthday card for 2 reasons: I have lots of birthdays coming up in the next month, so I need to get into a birthday groove, but more importantly, today the lovely Ann is also celebrating her birthday, so it seemed entirely appropriate. I have sent a card (not this one!) in the post, but I'm not sure she will have received it in time for the big day so I'm playing safe with a virtual one too! I decided to use a piece of Birthday Bash paper as the inspiration for my colour scheme, and paired this with a retiring stamp set, Well Worded:
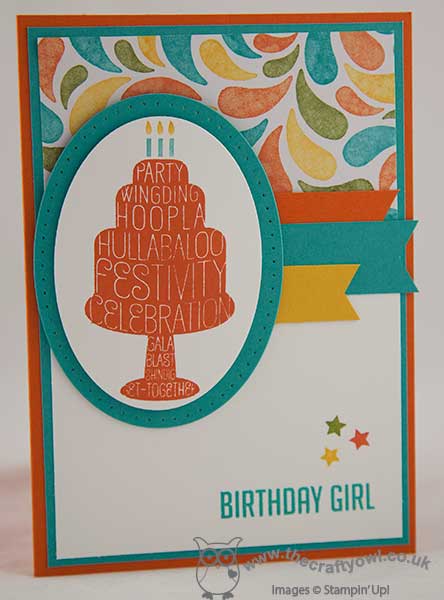
I used Tangelo Twist for my base and a mat of Bermuda Bay, then used a split layer with Birthday Bash DSP across the top and Whisper White along the bottom. I covered the join with pennants in co-ordinating colours, then stamped my birthday cake in Tangelo Twist with Bermuda Bay candles and cut this out with my Big Shot and Oval framelits, matting it onto a slightly larger oval that I paper pierced using my piercing template. To finish, I added a final sentiment to the bottom corner using the 'birthday girl' stamp from the 'Hooray It's Your Day' set - this set co-ordinates with the project kit of the same name, but is useful for lots of cards and can be used for some fun personalisation - this card could equally be tailored to a 'birthday boy' and you wouldn't even need to change the colours. I stamped a trio of stars from the same set in co-ordinating colours to finish my fun birthday card.
So before you reach for your paper and inks, check out what our amazing team has created to inspire you this week:
The Paper Players Design Team
Here's a quick recap of our challenge rules:
1. Create a new paper project
2. Upload your creation to your blog with a link back to us and provide a direct link to the post featuring your challenge submission.
3. Please link your card to no more than three challenges, TOTAL.
4. Have FUN!
I hope my birthday card puts you in a celebratory mood today - best wishes to Ann for a super day and I look forward to seeing what you make with our sketch this week.
Back tomorrow with another project; until then, happy stampin'!
Stampin' Up! Supplies Used:
bf4956a9-4319-4767-854f-17cb7d539b92|0|.0|96d5b379-7e1d-4dac-a6ba-1e50db561b04
Tags: Birthday Bash, Well Worded, Hooray It's Your Day, Ovals Framelits, Big Shot, Paper Piercing, Shop online, Stampin' Up, Stampin' Up Card, Stampin' Up Card ideas, Stampin' Up Supplies, The Paper Players
Cards | Stamping
by Joanne James23. April 2015 08:05It's Thursday and that means a new challenge over at Create With Connie and Mary. This week it's colours:
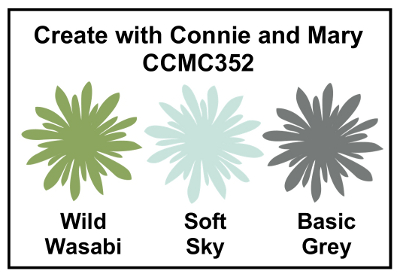
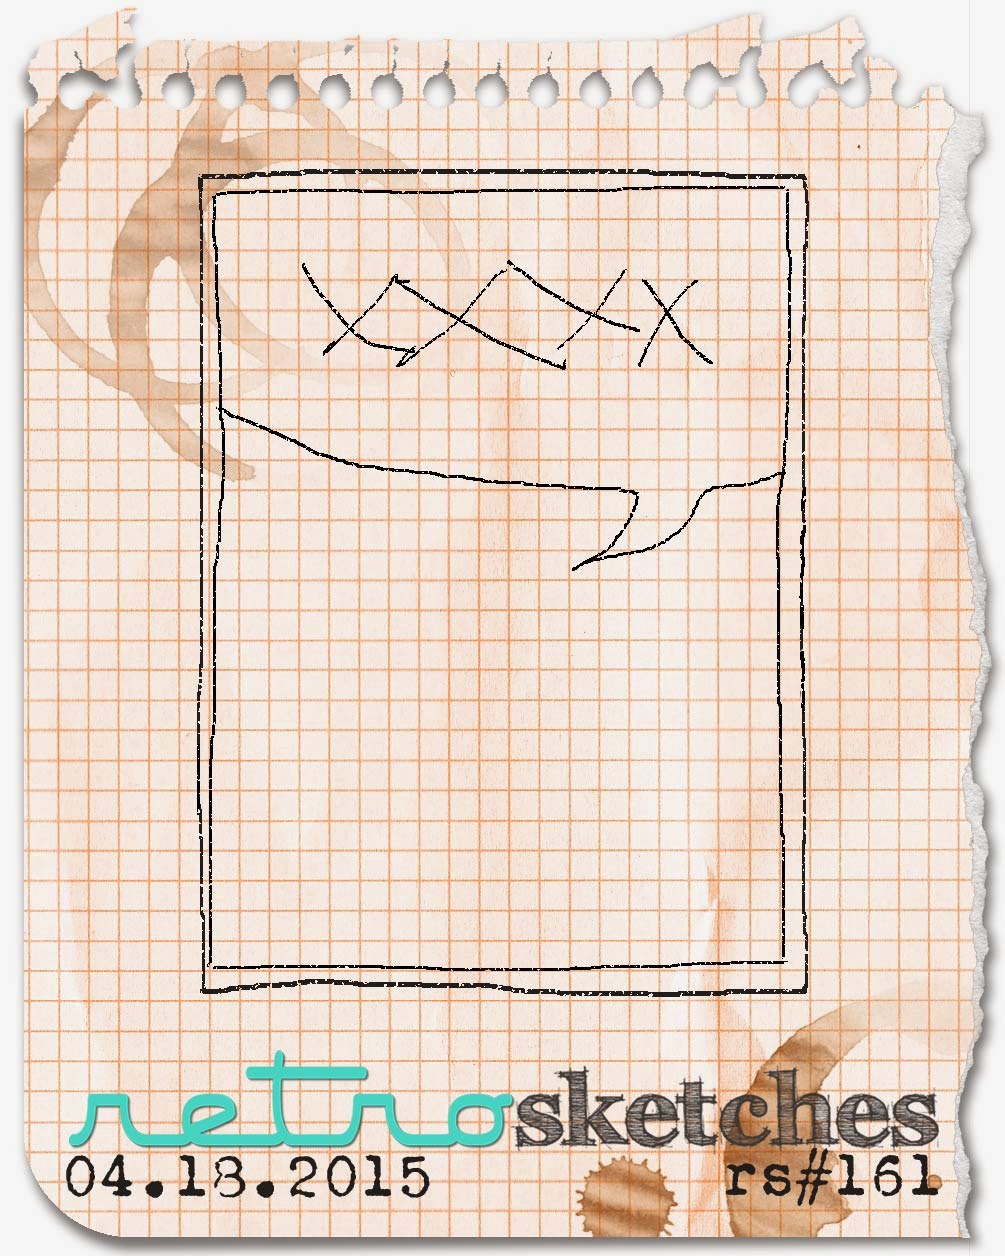
I'm also using this week's sketch over at Retrosketches for my layout. So I debated long and hard what to do with this colour combination; then I decided I would go with something fun! I used my Life in The Forest set - not inked up in a while and soon to be retired so it seemed like a good opportunity to use it:
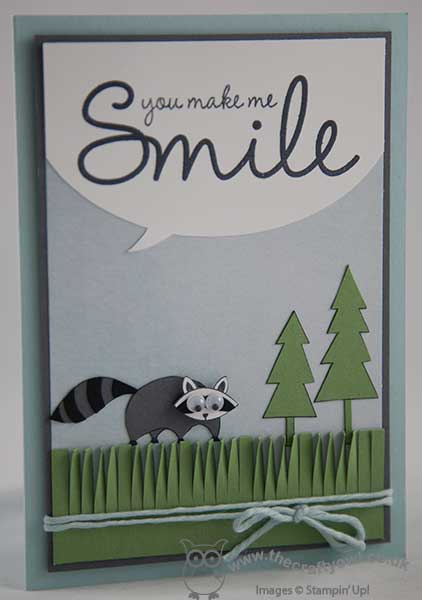
I used Soft Sky for my base, then created a little paper pieced scene for my racoon. I used the soft sky paper from the Painted Blooms DSP pack for my sky, then paper pieced my trees from Wild Wasabi cardstock and my racoon from a combination of Basic Grey, Basic Black and Whisper White cardstock. I cut my large word bubble out using my Big Shot and oval framelits, handcutting the speech piece and stamped the sentiment from the 'So You' stamp set. I love the addition of the wild wasabi grass, cut with my fringe scissors, and the Soft Sky Painted Blooms cotton twine, but my absolute favourite part of this card? The addition of the tiny googly eyes to my little racoon:

It brings out the child in me - so cute!!! Do hop on over to the other designers to see how they have interpreted this week's colours - I look forward to seeing your creations in the gallery.
I will be back tomorrow with another project; until then, happy stampin'!
Stampin' Up! Supplies Used:
- Life In The Forest
- So You Photopolymer Stamp Set
- Painted Blooms Designer Series Paper
- Big Shot Die-Cut Machine
- Ovals Collection Framelits Dies
- Fringe Scissors
- Painted Blooms Cotton Twine
- Tuxedo Black Memento Ink Pad
- Card Stock A4 Soft Sky
- Wild Wasabi A4 Card Stock
- Basic Gray A4 Card Stock
- Basic Black A4 Card Stock
- Whisper White A4 Card Stock
efff1472-c63c-4f2d-a157-b947133247ce|0|.0|96d5b379-7e1d-4dac-a6ba-1e50db561b04
Tags: Fringe Scissors, Life In The Forest, Shop online, So You, Stampin' Up Supplies, Stampin' Up Card ideas, Stampin' Up Card, Stampin' Up, Painted Blooms, Ovals Framelits, Big ShotCreate With Connie And Mary
Cards | Stamping
by Joanne James29. March 2015 20:52Good evening blog readers - I am sneaking in an extra post today - you can see my earlier Paper Players post here - to make up for my lack of one yesterday. I had my card ready and had fully intended to write up my post last night, when I got back from taking both James juniors to their swimming gala, however the swim meet was really busy and we didn't get home until much later than usual and I was beyond writing anything other than gibberish at that point!
So this card is for a couple of challenges: I used the sketch only over at Fusion and the colours from Colour Q this week:
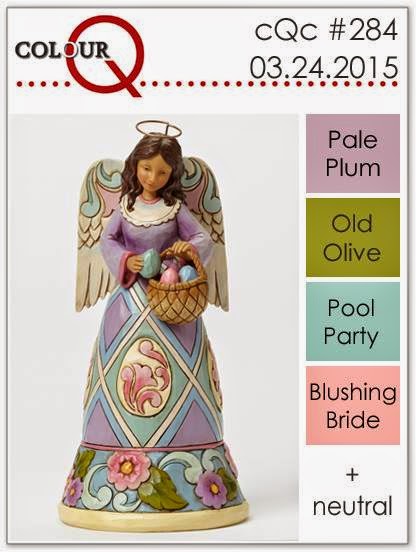
I love this week's Colour Q palette, so perfect for an Easter card, which I still need a few more of. This card is something I've been playing around with for a while. My daughter had a colouring book for Christmas that was full of animals, made from patterns, and I wondered if I could make an abstract bunny using floral images. I've had a few attempts, and this is my favourite so far:
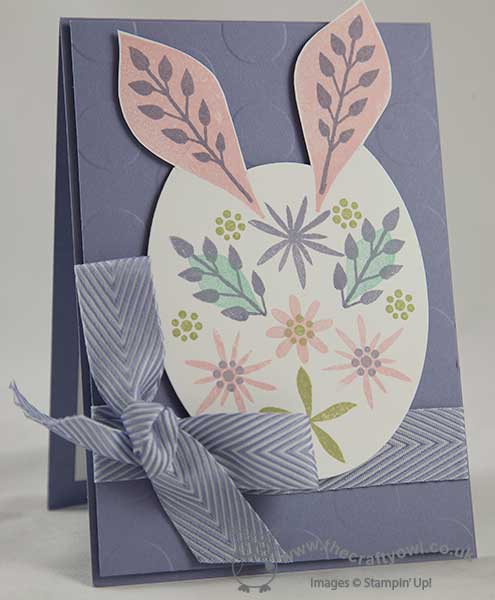
I used Wisteria Wonder for my base and mat layer, embossing this with the large polka dot embossing folder, then cut an oval using my Big Shot and Oval Framelits, having partially cut the ears with the leaf shapes from the Flower Fair framelits first and allowed them to overhang. I then stamped the various flower stamps from the Flower Patch set to make an abstract face, with ears, eyes and nose.
So, opinion in our house is divided over this card: both James juniors recognised it as a rabbit immediately; my abstract art is however lost on my husband, who thinks this is just a bunch of random flower patterns! Either way, with the addition of some Wisteria Wonder chevron ribbon and a bow, I like it! Do leave me a comment and let me know what you think to my unusual creation.
Back tomorrow with another project; until then, happy stampin'!
Stampin' Up! Supplies Used:
1ac1e2a3-7141-42d0-8d96-b9fa6db3b7b7|0|.0|96d5b379-7e1d-4dac-a6ba-1e50db561b04
Tags: Easter, Flower Patch, Flower Fair Framelits, Ovals Framelits, Big Shot, Shop online, Stampin' Up, Stampin' Up Card, Stampin' Up Card ideas, Stampin' Up Supplies, Large Polka Dot TIEF
Cards | Stamping
by Joanne James10. September 2014 09:35It's Wednesday so that means a new collection of Wednesday Weekly Deals! This week's deals are included below - they will be available for one week only, before a new collection of deals is announced.
As always, if you want to take advantage of any of the deals on offer, you can support my business by placing your order online by clicking here or using the link to my store on the right hand side of my blog page where it says 'Shop Online' or with me in person. Don't forget to add the Hostess Code for September (you can find this under the 'Shop Online' section on the right).
Here's a summary of this week's one-week only Wednesday deals - click on each item to go to the online store to purchase:
This weeks deals:
More great offers this week: the Modern Mosaic TIEF and Mosaic Punch are both great prices and just over £16 if you purchase both. At £8.63 the Banner Punch is a bargain; what's more if you combine it with one of the co-ordinating stamp sets from the annual catalogue, such as Banner Banter (134060 clear, £12.95) this would make a great gift for a crafty friend for just over £20 - a good opportunity to get started with some Christmas shopping perhaps! Plus framelits, ribbon, cardstock and MDS - so much to choose from!
Back shortly with today's creative project; until then, happy shopping!