Horse Punch Art SUO #90

by Joanne James17. February 2014 21:26

Today I've had the most fun day. I was privileged to be invited to run a Crafty Owl birthday party for a 10 year old and her classmates, which was great fun. We made some wall art and they had a fun time punching shapes and using the Big Shot to create their masterpieces. When I run a craft party, I always create a punch art kit for the party bags so that the children can continue the crafty fun at home. For today's party, the birthday girl loves horses so I knew that a pony needed to feature on my card. I had a quick surf on Pinterest for some general inspiration then set to work creating my card. This is what I came up with:

I used a variety of punches to create my card (see full list below) and some Core d'inations cardstock embossed with the woodgrain embossing folder to give texture to my stable door. I've always loved grey horses so made my card with a grey pony, but since my eight year-old informed me that this made it look like a donkey, the kits I made for the party girls all had brown horses to remove any doubt!

The girls loved their kits and I'm sure they will have had as much fun completing them as they did at the party itself. I'm linking today's card up with the challenge over at SUO Challenges where the theme this week is 'Punch Art', so this card fits perfectly.

I ended my day with a trip to the cinema to see the new Lego Movie; it was a great children's movie for half term and fulfilled one of Ben's main aims for the week, so all in all a good day was had by all.

Back tomorrow with another project; until then, happy stampin'!


Stampin' Up! Supplies Used:

Table built using Product Table Builder by The Crafty Owl - Independent Stampin' Up! Demonstrator.

Merry Christmas Monster Hugs!

by Joanne James25. December 2013 21:05

Well, it's here at last - Merry Christmas lovely blog readers! We've had a lovely day today that has involved much present unwrapping, eating and Lego building - don't you just love Christmas?!

I still have a few Christmas things that I haven't shared with you, so today thought I would share the Christmas cards I made for my little James juniors. I was inspired by Lizy Bartaby's card here - I loved the idea of the Santa Monster Hugs but took my cards a step further by making them into pop-ups using my Pop 'n' Cuts base; I'm always looking for new ways to use this. So I made a co-ordinating pair of his and hers santa monster hugs. Here's the little girl santa monster:

Cute, huh? Here's the little boy monster that is her partner-in-crime:

How cute are these? I made my hats using an oval punch with a section cut out using the word window punch to create the curve of the hat. I made the brim using a 'squashed' scallop circle as I don't own a scalloped oval punch, which would of course make this slightly easier. A pop up card and chocolate coins - I'm not sure which the children thought was best (who I am kidding - the chocolate, of course!)

I'm sure this won't be the last we'll be seeing of these little guys - but for now, I hope you have all had a wonderful Christmas and that Santa brought you everything that was on your wish list.

Back tomorrow with another project; until then, happy stampin'!


Stampin' Up! Supplies Used:

Table built using Stampin' Up! Product Table Builder from The Crafty Owl.


All Wrapped Up - Simple Christmas Gift Wrapping Ideas

by Joanne James22. December 2013 21:17

Well it's been another busy few days here in the James household with a trip to the movies on Friday, a fun trip iceskating yesterday and swimming, grocery shopping and a pre-Christmas festive family get-together this evening. The big day is almost upon us, but I finally managed to get some photographs taken today in between all my last minute Christmas preparations and today would like to share some of my quick but attractive festive packaging ideas for stocking-fillers and small gifts. Here's the first one - a simple pouch made using the envelope punch board:


I made lots of these in various colours to tie in with the Winter Frost DSP stack to package some little gifts for the lovely ladies who have attended my classes over the past year (I can't tell you what's inside though - it's not Christmas Day yet ;-)! )

The second of my projects is a little stocking filler I made for my daughter - a pair of hairclips decorated with Frosted Finishes Embellishments and packaged in a cute little triangular carton that I made using a sheet of the Winter Frost DSP stack:

I embossed the 'warm wishes' sentiment from the 'Snow Day' stamp set using silver embossing powder and it added a real feel of luxury to the finished packaging. For the clips, I simply adhered a Frosted Finishes Embellishments using Crystal Effects to a couple of standard hair clips.

My last packaging idea that I'm going to share today is one of the lovely little muslin bags, which I stamped with the 'Love and Joy' single stamp and decorated with another Frosted Finishes embellishment, a ribbon tie and a little Dazzling Diamonds for some extra sparkle:

These bags are a great size and perfect for a little sweet treat or a small gift such as nail polish or some candles, or maybe a miniature bottle of a favourite tipple, a pack of playing cards or a micro torch for a more masculine gift.

So some easy ideas to make those little gifts extra special.

I have a date with a very large ironing basket tomorrow evening (the exciting life I lead!), but all being well will be back with another post as I've a few more Christmas-themed things to share and am running out of time in which to do it.

Until then, happy stampin'!


Stampin' Up! Supplies Used:

Table built using Stampin' Up! Product Table Builder from The Crafty Owl.


Merry Mini Card and Custom Envelope using the NEW Envelope Punch Board

by Joanne James4. November 2013 21:26

Today's post features one of the cards that I'm making in my classes this week: it's a 3" x 4" notelet card, with co-ordinating DSP bespoke envelope made with the new Envelope Punch Board. This really is a great piece of kit and can be used for so much besides envelopes, but before we get ahead of ourselves I thought I would shoot a short video to show you just how easy it is to make a simple envelope to fit a card that isn't a 'standard' size.

So here is the card I made:

The card itself is very simple, with some festive washi tape and a small punched square, that has been embossed with the Stylish stripes TIEF and had a little Christmas tree punched out using one of the Merry Minis punch trio. Then a tiny button and twine bow to finish and a simple sentiment and done. The great thing is that with the new envelope punch board a co-ordinating envelope really can be created in minutes - just watch the video below to see how easy it is:


Isn't that great? The ladies at my class today couldn't believe just how easy it was to create a perfect envelope. It was a good job this was our last card of the class, otherwise I think they would have spent the whole afternoon making envelopes and not cards! The envelope board can be used for so much more though; watch out for more videos showing you how to get the most out of this great new tool.

I'm also linking today's card up with the colour challenge over at Create with Connie and Mary, where this week's challenge is to make a card using my featured colours: 

If you would like to be inspired, pop over to their blog and see how other designers have used this colour combination in a variety of different ways. Back tomorrow with another project; until then, happy stampin'!


Stampin' Up! Supplies Used:


Christmas Ornament and Decorated Box

by Joanne James9. August 2013 22:13

Today I'm sharing the last of the projects we made at last weekend's Christmas workshop: a stamped clay ornament and a decorated kraft gift box to put it in. Here's a photograph of the ornament:

These clay ornaments have a natural finish and can be stamped straight onto the surface, without any additional preparation. As we were going all out for Christmas, once we had stamped our design onto the ornament we stamped the pattern again with Versamark, sprinkled with Heat and Stick Powder and heated with the heat gun, then sprinkled with Iridescent Ice glitter and heated once more. This gives the finished item a more muted colour and a lovely sparkle that catches the light.

We also decorated one of the lovely ready-made kraft boxes from the catalogue to go with it - here's the top of mine:

Together they would make a lovely gift for someone, if you could bear to part with them of course! I will be using mine to decorate my tree during the festive season, but I'm sure I can make another one or something else to go in the box! I hope you liked my first Christmas projects of the season - there will be lots more where this came from. If you would like to join any of my classes, do get in touch for more details; my September card classes will be featuring the Mosaic Madness stamp set and then from October we will be doing Christmas cards all the way through until the end of the year.

Back tomorrow with the first of the weekend birthday cards: my brother-in-law is celebrating his 'big 40' with a party tomorrow and then my own 'Baby James' will be 6 on Sunday, so I've a few birthday cards to share. Until then, happy stampin'!

Stampin' Up Supplies:

Stamps: Sweet Essentials, Four Seasons (hostess - retired)

Cardstock: Cherry Cobbler, Be of Good Cheer Designer Series Paper (retired)

Ink/Stampin' Write Markers: Real Red

Tools: Simply Scored, Big Shot, 1 1/4" Circle Punch, 7/8" and 1 3/4" Scallop Circle Punches, Merry Minis (star)

Finishing Touches: Champagne Glimmer Paper, 3/4" Cherry Cobbler Chevron Ribbon,  Cherry Cobbler 1/2" Scallop Dots Ribbon (retired)


Christmas Rosette Door Wreath

by Joanne James4. August 2013 19:36

As I mentioned earlier this week, yesterday I held an all-day Christmas workshop with a lovely bunch of ladies and we made a good start with our preparations for the festive season with a number of 3D projects. I'm going to share the first of these with you today: a door wreath made out of paper rosettes and featuring the sadly recently retired Be Of Good Cheer Christmas DSP. After much scoring, gluing and decorating, this was the finished article:

This picture shows my version of the wreath suspended. In hindsight, I should have photographed it in situ on my front door, although then my neighbours would have thought me completely mad (they already think I'm part way there, as I grow potatoes and pumpkins in my front garden, but that's a story for another time!!) The rosettes made from the patterned paper were cut using the Designer Rosette Bigx XL die, which is great for fast and easy cutting and scoring; unlike the ones made from the plain cardstock, which we scored using the Simply Scored scoreboard so they took a little longer. We used a variety of circle and scallop punches to create the centres; here's a close up of a couple of mine:

The one below was our focal point rosette, complete with ribbon trim - did you spot the lovely new Cherry Cobbler chevron ribbon in there? - and we also included a banner sentiment in keeping with the season:

The nice thing about a project like this though is that whilst everyone starts out with the same materials, each person has their own 'take' on what theirs should look like, so you end up with lots of similar but slightly different outputs. To illustrate, here is one of the finished wreaths of one of the ladies who attended:

Isn't Maureen's wreath just lovely? I'll share the other projects we made with you later this week. I'm off now to recover from the party excesses of my day - my downline Barbara and I held a joint party for our 6 year old sons this afternoon: swimming party followed by birthday picnic in the park. I will share the invitations and thank you notes we made tomorrow; meanwhile, time for a nice quiet glass of wine and to put my feet up, I think!

Back tomorrow with another project; until then, happy stampin'!


Stampin' Up Supplies:

Stamps: Sweet Essentials, Tiny Tags (retired)

Cardstock: Very Vanilla, Gumball Green, Cherry Cobbler, Be of Good Cheer Designer Series Paper (retired)

Ink/Stampin' Write Markers: Cherry Cobbler

Tools: Simply Scored, Big Shot, Rosette Bigz XL Die, 1", 1 1/4", 1 3/8" Circle Punches, 7/8", 1 1/4" 1 3/4" Scallop Circle Punches, Itty Bitty Punches (circle), Merry Minis Punch Pack (star), Jewellery Tag Punch (retired)

Finishing Touches: Champagne Glimmer Paper, Vintage Faceted Designer Buttons, In Colour Dahlias, 3/4" Cherry Cobbler Chevron Ribbon,  Cherry Cobbler 1/2" Scallop Dots Ribbon


Angry Birds Spiral Pop-Up Birthday Card

by Joanne James27. July 2013 20:23

Today I have a very special card to share with you. As my regular blog followers are aware, my soon-to-be six year old son and his friends are Angry Bird mad; I swear if we didn't ration access to all touch devices in our house he would turn into one of those little feathered creatures!! Anyway, a friend of his celebrates his birthday today and in addition to the card I made from us, which I will share with you another time, his Mum also asked me if I would make him a special birthday card. I saw a very simple Angry Bird pop up card by Julie Davidson a while ago which I loved (you can see Julie's card that was the inspiration for mine here), but I must confess I had something much more 'explosive' in mind. So this was the front of my card:
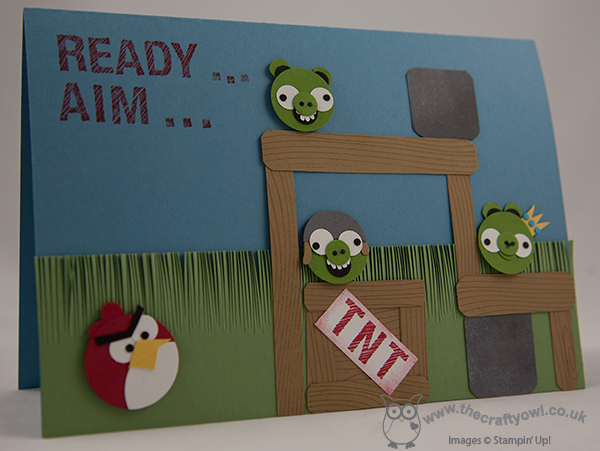
 

Lots of little pigs hiding amidst the wood and boulders, along with a box of TNT for good measure and a red Angry Bird ready for action. Open the card to reveal what happens once there's been a hit:
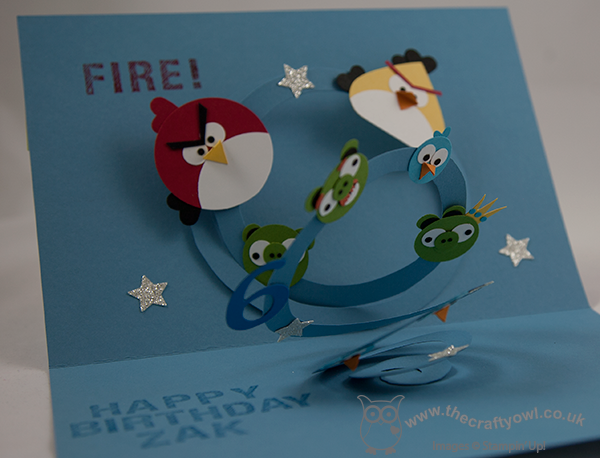
 

Birds, pigs and stars literally 'explode' out of the card. The decoration is all attached to a spiral pop-up, which is simply a large circle cut into a spiral with one end attached to each side of the card. Its really easy to do and if you made the spiral the same colour as the base card, it blends into the background and allows the birds to really 'fly'. Here's a close up of the pigs so that you can see what I mean:
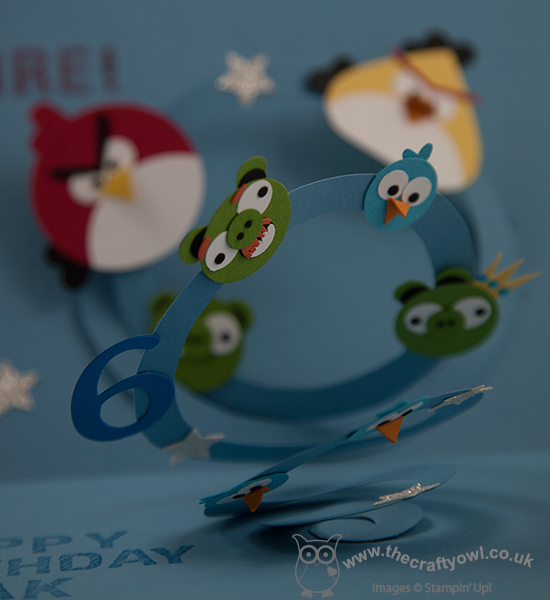
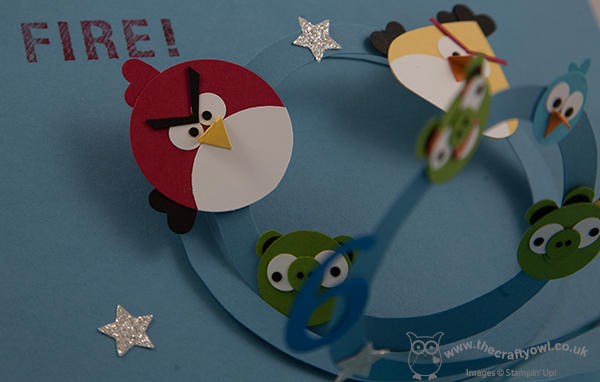
I added a number 6 and some glimmer stars and used the new Simply Sketched alphabet stamps to add the 'Ready, Aim ... Fire!' and a personalised message for the recipient. It has to be said, this card was something of a 'labour of love' - creating all the birds and pigs takes an absolute age, but it was so worth it for the impact of the resulting card, which I am reliably informed was well received!
It sounds like our very own TNT explosion in the garden at the moment; the thunder and lightening is flashing and crashing as I write and whilst lawns and gardens everywhere are I'm sure benefiting from the downpour, I'm personally hoping it is just a brief interlude in the glorious weather we've been having of late.

Back tomorrow with another project; until then, happy stampin'!


Stampin' Up Supplies:

Stamps: ABC-123 Sketch Alphabet & Numbers, Woodgrain

Cardstock: Real Red, Daffodil Delight, Basic Black, Whisper White, Crumb Cake, Gumball Green, Pumpkin Pie, Basic Grey, Marina Mist, Pacific Point, Tempting Turquoise

Inks: Real Red, Pacific Point, Chocolate Chip, Basic Grey, Whisper White

Tools: 1 3/4" Circle Punch, 1 1/4" Circle Punch, 3/4" Circle Punch, Handheld Circle Punch (retired), Small Heart Punch, Full Heart Punch, Owl Punch, Itty Bitty Shapes Punch (circle), Corner Punch, Merry Minis Punch (star), Sponge Dauber, Stamp-a-ma-jig

Finishing Touches: Silver Glimmer Paper


Dad - You Are The Best!

by Joanne James16. June 2013 20:09

Today is Father's Day and I can finally share the Father's Day card that I made for the James Juniors to give to Daddy on Father's Day. This has been something of a closely guarded secret in our house, but we managed to get to the official envelope-opening before he saw it, so that's pretty good going! I tried something new for this card and broke into my This and That Washi Tape for the first time - take a look:

It is so easy to tape and reposition this tape and it's great for card detail, as well as to hold photos and keepsakes into your journal. Wondering where I got the sentiment from? The 'To My Dad' is from the soon-to-be retired 'For My Family' set (can't believe this set is going - it is SO useful for card personalisation!) but the 'You are the best' is a combination of words taken from a couple of the 'Feel Goods' stamps - with careful use of my trusty stamp-a-ma-jig and some selective colouring with my Basic Grey marker pen, I created my very own sentiment that summed up exactly what I wanted to say. Some stars, linen thread and designer button, along with a co-ordinating envelope, finished off the card worthy of the best Dad - in our eyes, anyway! And as if to prove the point, it has to be said his day was very similar to most Sundays and with the exception of a card and gift, he wasn't treated any differently to any other day - but in his own words, every day is his day so he was fine with that. I can't promise the same will be said next time Mother's Day comes round, but there we go!

So Happy Father's Day - to my husband and Daddy to my children, to my own Dad and everyone else who shares this day.

Back tomorrow with another birthday project - until then, happy stampin'!


Stampin' Up Supplies:

Stamps: For My Family, Feel Goods

Cardstock: Crumb Cake, Very Vanilla, Calypso Coral, basic Grey, This and That Designer Series Paper

Ink/Stampin' Write Markers: Basic Grey

Tools: Stamp-a-ma-jig, Merry Minis Punch (star)

Finishing Touches: Basics Designer Buttons, Linen Thread, This and That Washi Tape, 1/8" Mini Brads

Comic Relief Red Nose Punch Art

by Joanne James15. March 2013 20:35

Something different for today: anyone who lives in the UK will know today is 'Red Nose Day' or Comic Relief Day, where we all don red noses, host bake sales and generally do something funny for money. You can find out more about Comic Relief and their work, including make an online donation, here but meanwhile having sent my two children to school dressed as heroes, made 35 red nose cake pops (with faces!) and chocolate mini muffins with red noses, of course, I thought I would create my very own red nose punch art card to celebrate the good work that Comic Relief does both at home and abroad. So here it is:

I made my own punch art versions of this year's red Noses with Toes: TSpex, Triceytops and Dinomite. The sentiment is from a retired set, but I thought it was perfect for this card - laughter and smiles is what Comic Relief is all about.

I hope you've all had plenty of red-nose fun today - I'm off to tune into the BBC1 coverage now for the rest of the evening. Just watching Peter Kay's exploits travelling by couch from Belfast to London - hilarious!!

Until next time, happy stampin'!


Stampin' Up Supplies:

Stamps: Sprinkled Expressions (retired)

Cardstock: Whisper White, Basic Black, Real Red

Stampin' Write Markers: Basic Black, Real Red

Tools: Itty Bitty Punches, Scallop Circle Punch, Mixed Bunch Punch, Circle Punch (various sizes), Merry Minis Ornament Punch, Stampin' Dimensionals, Trimmer

Tags: , , , , , , ,

Punch Art

Current Promotions

Stampin Cut and Emboss

Save up to 30% off on all your favourite kits from 1 to 31 October! 

Click here to see the current kits available and order yours online today.

Join My Team

It's always a great time to join Stampin’ Up! During October you can get even more in your starter kit! New team members can get £160 worth of products for only £99 + free business supplies + free shipping + all the fun being a part of Stampin’ Up! Stampin' Up! has something for everyone: join my growing team and benefit from my support to enjoy Stampin' Up! however you choose.

If you're interested, call me for a chat to understand how I can help you realise your goals. Alternatively, if you have already decided to sign up and you just can't wait, please click here for the link to the online form where you can sign up and order your starter kit right away! 

Shop Online

Access my online shop 24 x 7, 365 days of the year:

Current October hostess code:

4XPEYCB9

Shop Online

Scrapbooking

Stampin' Up! has introduced a new range of 12x12" scrapbooking product and kit - the full range is now available to purchase online. To download a copy of the new digital Scrapbooking Catalogue click here.

Mini Catalogue

BROWSE THE CATALOGUE

'Tis The Season - the new Stampin' Up! Mini Catalogue is here! For more details and to download your copy click here

2024-25 Annual Catalogue

BROWSE THE CATALOGUE

Click on the image to download your copy of the 2024-25 annual catalogue. For a full list of current SU! supplies, go to my online store. If you would like any help or advice, please drop me a line at joanne@thecraftyowl.co.uk or give me a call on 07773 421446 - I'd be happy to help.

Latest Kits!

Stampin Cut and Emboss

The Christmas Ornaments Kit and Card Keeper Kit are the latest kits in the online store - get yours here!

New Online Exclusives

There are new products available exclusively in the online store from 5 November - check them out here.

About Me

Hi I'm Joanne and live in Northampton and when I'm not looking after my husband and two beautiful children, am an avid crafter with a passion for all things Stampin' Up!

I must confess that I have never been a big rubber stamper - until I discovered Stampin' Up! that is. I love the fact that I can get such great results with co-ordinating stamps, inks, papers and punches - the possibilities are endless! Join me on my stamping journey as I share the things I love and be inspired to create amazing things yourself!

Follow Me

Monthly Newsletter

Box Builder

Click the button above to use Box Buster to create your custom box design using the Envelope Punch Board!

Kits Collection Now Available!

Stampin Cut and Emboss

The new Kits Collection from Stampin' Up! is now available!

Click here to see the current kits available and order yours online today.

I Design For


Stampin' Up Stuff

This is my personal blog and is not endorsed by Stampin’ Up! I hope you find it a plentiful source of ideas and personal inspiration but please don't copy my designs for contest submission or use for classes, publication or sale without express permission.