Santa's 'Stache of Cheer Card

by Joanne James12. October 2014 20:32

Good evening lovely blog readers! Now I know it's Sunday and for me that's normally an early post with my Design Team card for The Paper Players, right? Well, those lovely ladies have given me a week off as I'm heading to Brussels for Stampin' Up!'s European Convention later this week and so won't be around to comment on all the lovely cards in the challenge gallery or choose my favourite. This week Ann has a colour challenge for you so why not pop over to The Paper Players challenge blog for some great design team inspiration and to link up your card? If you need a little inspiration from me, check out my card for Sandy's sketch challenge a couple of weeks ago - you can find it here - as by complete coincidence I used this week's challenge colour palette on my card. I'll be back 'with the programme' next Sunday and my blog post will be scheduled to go live before I return home from Brussels, so normal service will resume then.

For those of you that don't already know, Stampin' Up!'s European Convention is an annual event that is exclusive to demonstrators and is a great opportunity to meet other demonstrators, craft, gain business insight and knowledge and be rewarded for achievements in sales and recruitment throughout the year. I will be bringing you more information about the event here on my blog later this week and will be sharing news and excitement via my Facebook Page whilst I'm away too, so if you haven't already 'liked' my page, hop on over and do it today so that you don't miss out on all the latest news, excitement and maybe even a few 'sneak peeks'.

Anyway, onto the crafty stuff! I managed to squeeze in some crafting today so made a card for this week's challenge over at Freshly Made Sketches, which had the following sketch for inspiration:

This is what I decided to do with it:

I decided to use my Santa Stache Santa stamp - gotta love that mustache! - which I coloured with my Blendabilities markers, and combined it with some of the bold striped paper from the Trim The Tree DSP paper stack for the patterned panel.

That's all from me for today; back tomorrow with another project; until then, happy stampin'!


Stampin' Up! Supplies Used:

Table built using Product Table Builder by The Crafty Owl - Independent Stampin' Up! Demonstrator.


My First Halloween Pumpkin!

by Joanne James5. October 2014 07:00

It's Sunday and time for this week's challenge over at The Paper Players, where Jaydee has a fun Halloween theme challenge for us this week:


I used the layout over at Freshly Made Sketches again this week for my card (although I'm not sure my card is as 'clean' as is required; the layout was too good to pass up) as I thought it would be perfect to highlight my first Halloween pumpkin - here's my card:

I used a piece of Motley Monsters DSP on a base of Tangerine Tango for the front of my card; I love this paper and the little eyes that peek through between the trees, although I must confess this looks so much better on a sheet of 12 x 12" and it was difficult to take my scissors to it! I used the Halloween sentiment from 'Mingle All The Way', colouring the letters with a Tangerine Tango Stampin' Write marker and mounted this on a circle of Basic Black. This circle was mounted on top of a piece of chevron-embossed Crushed Curry and black chevron ribbon and the card finished with a cute little pumpkin from the Fall Fest stamp set and cut out with the matching framelit. It's tricky to see from the photo, but the pumpkin was then covered in Crystal Effects and allowed to dry, so it has a lovely dimension and shine.

That's my simple Halloween card for today; why not pop over to The Paper Players challenge blog and check out this week's inspiration from the other designers? As always, there are some great cards on show.

Back tomorrow with another project; until then, happy stampin'!


Stampin' Up! Supplies Used:

Table built using Product Table Builder by The Crafty Owl - Independent Stampin' Up! Demonstrator.


Autumn Fall Wreath for The Paper Players

by Joanne James14. September 2014 08:00

Today I'm sharing my Design Team card for The Paper Players, where this week Anne Marie has chosen this beautiful Autumnal colour palette for us to work with:


I also used the sketch over at Freshly Made Sketches this week for my layout. As soon as I saw this week's colours, I knew it was time to make an Autumn wreath card using my 'Wondrous Wreath' stamp set, as I've been wanting to do one of these for ages. Here's my card:

I used Baked Brown Sugar and Cajun Craze for the leaves on my wreath and stamped the berries in Blackberry Bliss. I cut it out using my Big Shot and the co-ordinating framelits and looped some linen thread behind it before adhering it with dimensionals to my Hardwood background, stamped in Always Artichoke (this panel reminds my of a mossy whitewashed shed!). I finished my wreath with a bow in the gorgeous Blackberry Bliss satin ribbon and a sentiment panel stamped with a simple 'thanks' and decorated with a few leaves from my 'Gratitude For Days' stamp set and a couple of candy dots. I love the rustic feel of this card - so fitting for this time of year.

Do pop by the challenge blog and see how the other Paper Players designers have used this week's colour combination - there are some fabulous cards from this talented bunch of designers.

I'm still playing catch up so am looking forward to a reasonably restful day today before the onslaught of another new and action-packed week. Back tomorrow with another project; until then, happy stampin'!


Stampin' Up! Supplies Used:

Table built using Product Table Builder by The Crafty Owl - Independent Stampin' Up! Demonstrator.


Star Framelits 3D Wall Art

by Joanne James10. July 2014 22:01

Another busy day for me today - for those who follow me on Facebook, you will have seen photographs of a class I ran a few weeks ago with a super bunch of ladies making 3D wall art using folded hearts so that they would each have a unique gift for their little girls. Well it just so happens that the same group of ladies also each have one or more sons, so in order that they wouldn't feel left out they wanted to make a similar project with boys in mind. Never one to resist a challenge, I already had an idea in mind using the new Stars Framelits - here it is:

Using a combination of the two smallest star framelits and the mini star punch from the new Itty Bitty punches pack, I cut lots of stars and then having scored them down the middle, adhered them to each other on one half in groups of three and arranged them in a star shape. This close-up shot gives a better explanation of this:

I used a combination of Pacific Point, Pumpkin Pie and Real Red patterned papers from the Brights Designer Paper Stack for my wall art as these colours will look great in Ben's Lego-inspired bedroom, however the ladies in my class used different colour combinations and even created some stunning monochrome designs. The dimensional stars really make this wall art stand out, especially in bold, bright colours. The wall art made in the class will be on my Facebook page in the morning if you would like to pop over and take a look, when I will also be updating the product links for today's post. If you live local to me in Northampton or the surrounding area and you would like to attend a class to make one of these lovely frames, then do get in touch.

This really is a quick post from me as I have a few more jobs to do before I turn in for the night, having been running a class today, sorting my school and after-school club runs and then a pleasant (if brief!) couple of hours with some of my lovely team this evening for one of our regular catch up sessions.

Back tomorrow with another project; until then, happy stampin'!


Stampin' Up Supplies Used:


Tags: , , , , , , , , ,

3D Projects | Classes

Paper Players Guest Designer Announcement - And A Happy Day Card!

by Joanne James25. June 2014 13:00

Today I was all set to share the card I made for this week’s challenge over at The Paper Players, where Nance has this great sketch for us to work with:


But before I get to my card, there is an exciting news announcement over on the Paper Players blog today involving yours truly: I have been asked to feature as one of their guest designers, starting July 6th - how great is that?!

I am excited and truly honoured that this wonderful bunch of papercrafters have asked me to join them for a three month period through to September. You can check out the details and the other guest designers that will be featuring at the same time by clicking on the link here and you will of course be able to see my weekly submissions right here on my blog in weeks to come.

Anyway - back to today's card! I love a good sketch challenge and Nance's sketch can be used in so many ways. Given that we are transitioning between catalogues, my choices for my card today were driven by the (relatively!) fewer stamps that I currently have in my collection and also a desire to use another piece of Designer Series Paper that hasn’t yet made the cut – here’s my card:

I decided to use the ‘Oh Happy Day’ stamp from the Starburst Sayings stamp set and wanted to use the bold black and white zebra-like pattern from the Kaleidescope DSP set; this layout allows for the use of a bold patterned paper without it overwhelming the rest of the card. Black and white alone was a little stark for me though – but I had the perfect antidote with a burst of Melon Mambo, a great hot pink to liven things up a bit! I used the black and white DSP for my central panel, matting this on a piece of Basic Black and then a strip of Melon Mambo, before adhering to my Basic Black card base. I stamped my sentiment focal point in Versamark on Basic Black and then heat embossed in Melon Mambo, which adds great texture and sheen, and cut out using the co-ordinating framelit. I then popped the starburst onto a Melon Mambo circle cut with my Circle Framelits using dimensionals to give added depth. I also decided this card was worthy of some serious ‘bling’ and adhered small rhinestones to each of the circles on the word ‘happy’ – this made this card so sparkly! To finish, I added two small banners cut with framelits as per the sketch, finished with a Melon Mambo button and a few extra rhinestones for good measure.

I think this card has a real ‘rock chick’ feel to it and would be great for an uber-cool teenager; I have a very discerning teenage niece that this card will be perfect for and as her birthday isn’t until October, I guess that makes me look super organised too – win, win! Or I could just send it to myself since today is indeed a happy day, given the announcement that I am going to be a Paper Players Guest Designer - yay! Decisions, decisions....

Back tomorrow with another project; until then, happy stampin’!

Stampin' Up! Supplies Used:

Table built using Product Table Builder by The Crafty Owl - Independent Stampin' Up! Demonstrator.


White With a Hint of Gold - Gratefulness Card

by Joanne James24. June 2014 13:00

This week the peeps over at CAS(E) This Sketch and Fusion have joined forces on their challenge blogs with a great sketch and inspiration photo:

I took the inspiration for my card from both the photo and the sketch and came up with the following card:

For a largely white card, there's a lot going on here; all-white cards are also incredibly difficult to photograph well, so I hope you can see some of the more subtle elements of design. Firstly, I used a Whisper White card base and ran this through my Big Shot with the Wildflower Meadow Textured Impressions Embossing Folder to give a nice relief pattern that I thought worked well with the butterfly. I created a layered banner using my Banner Framelits, cutting one in Whisper White and another slightly longer one in gold foil to extend beyond the length of it. On the uppermost white banner, I stamped my sentiment in Versamark and heat embossed it with gold embossing powder - this sentiment is a 'sneak peek' from a new set called 'Something to Say', out next week (not long now!).

I then did something I've never done before: I glittered a butterfly! Now whilst my 9 year old daughter loves anything with glitter, I'm generally not a fan of the stuff. I love Stampin' Up!'s glimmer paper as this is a great no-shed alternative, and I've had 2 pots of glitter sitting in my drawer since before Christmas and until now unopened for fear of the ensuing mess that would be created! As my card came together, I knew that glitter was going to be the only way to go to get the look I was after and create the contrast in texture of all the gold elements. So, I was brave - out came the heat and stick powder and gold glitter, and this sparkly vellum butterfly is the result. And I love it - even though I think I will be brushing gold glitter out of my butterfly punch for some time to come. Lastly, I substituted the stitching in the sketch layout for two rows of sequins to add one last gold element to my card.

I made this card with my Mother-In-Law in mind; she is always there to help me out of a fix and last week was no exception: Rebecca came home from school the week before last with instruction to make a weasel costume for the forthcoming production of 'Wind In the Willows' - to be held this week! Not only did she need a weasel costume, this weasel required a brightly coloured waistcoat and cravat to look the part. Fortunately for me MIL came to the rescue and a few days later had managed to tailor the most amazing waistcoat and cravat I've ever seen just from bits and bobs in her sewing box. Rebecca is destined to be the best dressed weasel around at her production on Thursday (I'll post a picture of her in costume later in the week!); as for me - my Mother-In-Law's goodness does indeed make me very grateful, so Kathy this one is for you!

Back tomorrow with another project and this week's Wednesday Deals; until then, happy stampin'!


Stampin' Up! Supplies Used:

* Something To Say Stamp Set - available 1st July

Table built using Product Table Builder by The Crafty Owl - Independent Stampin' Up! Demonstrator.


Monochrome Baby Boy Card - Baby We've Grown

by Joanne James16. May 2014 17:55

I have had the busiest day today - last minute preparations for the Stampin' Up! UK Regional Training Event in Telford tomorrow coupled with lots of little jobs. Best part of my day though was getting to spend an hour in the sunshine watching Rebecca's team win their second rounders match of the week (go girls!) and I'm even managing to squeeze in a quick blog post, which I thought might be touch and go today!

I have had a few baby cards to make lately, all of them girls, but I know someone who is due a baby boy anytime soon so thought I would get ahead for once and make my card ready. I decided to make a monochrome boy card to pair with the monochrome girl card I designed a couple of weeks ago for the Pals Paper Arts 200th anniversary challenge (you can see my original baby girl card here). Here is today's card:

Using a Soft Sky base, I matted both of my cardstock layers on Whisper White and used a piece of Polka Dot DSP from the Subtles DSP stack for panel 2, whilst for panel 3 I stamped the 'sweet baby' stamp repeatedly in Whisper White onto Soft Sky cardstock - a stamp-a-ma-jig is essential for this - and coloured the word 'baby' with my chalk marker to give it a powdery look. Lastly, my focal point is the cute little boy shoes that I fussy cut and decorated with my chalk marker; to finish I layered this circle on a blue starburst mat and a further white circle.

Another pastel monochrome creation - not quite as fussy as the little girl one, but then in my experience boys never are!

Back tomorrow with another card and news of what's been happening at the regional event; until then, happy stampin'!

Stampin' Up! Supplies Used:

Table built using Product Table Builder by The Crafty Owl - Independent Stampin' Up! Demonstrator.


Stampin' Up! Coram Cards For Keeps Charity Auction

by Joanne James26. April 2014 21:06

I've been busy preparing for next week's classes today; I'll share those cards with you later next week, however today thought I would share something a little different. If any of you are followers of Stampin' Up! UK's Facebook page, you will probably already be aware of Stampin' Up!'s 'Cards For Keeps' charitable auction that is due to take place on Ebay in May. For those of you that aren't, Stampin' Up! have joined forces with Coram, the oldest UK children's charity, to celebrate its 275 year anniversary by inviting a wide range of stars from sport, stage, screen, music and art to create a unique card using Stampin' Up! supplies.

Stampin' Up! demonstrators have also been invited to submit a card for a pre-auction competition; the winning card will also be entered into the 'Cards for Keeps' auction, alongside those of the participating celebrities. In trying to decide on a design for my contest submission, I did a little research about Coram. Through services such as adoption and creative therapies, Coram helps some of the UK’s most vulnerable children to feel safe and loved and have access to the education and opportunities in life all children need. I read several inspirational stories about the work they do and the difference they make to the lives of so many young people, they really are a charity worthy of our support.

So without further ado, let me share the card I designed;for me, this card sums up everything that Coram stands for:

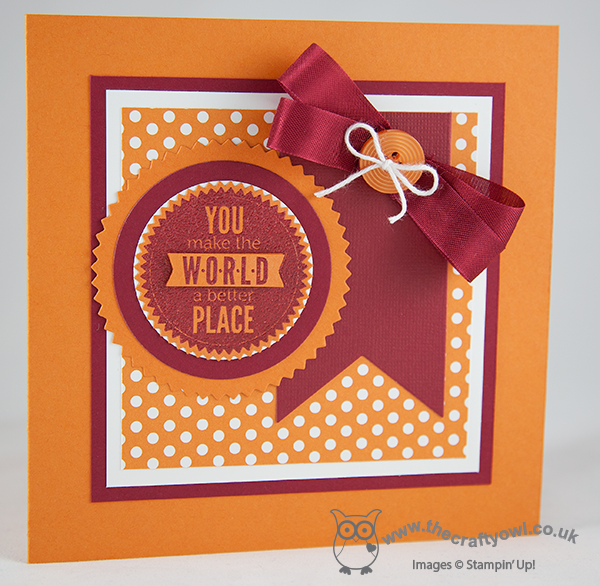
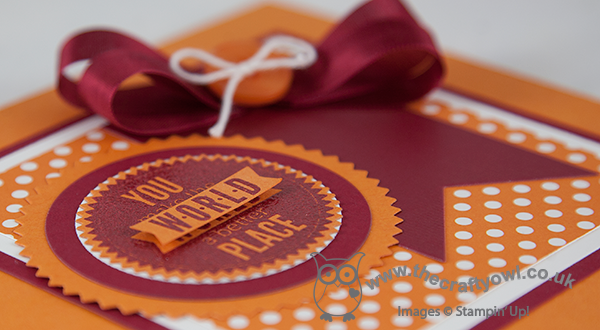
My colour scheme of Pumpkin Pie, Cherry Cobbler and Whisper White was inspired by Coram's logo and corporate colours. I decided to make a square card with a strong focal point - the 'you make the world a better place' stamp from the Starburst Sayings set. For me, this stamp sums up the work of Coram so well - they make the world a better place for thousands of children each and every year. l brought in lots of detail to my card with layers and textures: I stamped the image in Versamark and heat embossed in Cherry Cobbler embossing powder, cutting out the 'World' banner and popping it up on a couple of dimensionals for extra emphasis. I then matted my starburst on white and Cherry Cobbler circles, followed by a final starburst of Pumpkin Pie. I cut my banner using the Banner Framelits and a piece of Cherry Cobbler Cored'inations cardstock. The base of the card is Pumpkin Pie, with Cherry Cobbler and Whisper White mats and a central panel of Polka Dots DSP in Pumpkin Pie. A Cherry Cobbler seam binding double bow tied with white baker's twine and a Pumpkin pie button finish my card.

The inside had a little treatment too, before I added my personalised message:

If you would like to see some of the celebrity cards that have been created for the 'Cards For Keeps' online auction, check them out here on the Cards For Keeps Pinterest board. There are sure to be some sought-after auction lots, with celebrities from Benedict Cumberbatch to Liza Tarbuck, and Axel Scheffler to Twiggy.

I'll let you know if my autographed version is lucky enough to join them, but for now I'm off to work out which ones I'm going to bid on - so far my favourite is Jo Brand and the Jelly Babies (yes, for real!)

Back tomorrow with another project; until then, happy stampin'!


Stampin' Up! Supplies Used:

Table built using Product Table Builder by The Crafty Owl - Independent Stampin' Up! Demonstrator.


Monochrome Baby Girl Card for The Pals Paper Arts 200th Anniversary

by Joanne James22. April 2014 08:00

This week the Pals Paper Arts Card Challenge is celebrating its 200th anniversary - a whole 200 challenges! To celebrate this milestone, they have a sketch along with a twist - to complete your card in a monochromatic colour scheme. Here is the sketch:


Both design teams have designed cards to inspire this week; initially I was really tempted to use the Starburst Sayings stamps and framelits which lend themselves totally to this sketch and worl with my favourite Brights colour palette, but as lots of the designers had the same idea and I couldn't see how I was going to create something suitably unique, I decided to go with something completely different - a baby card using the 'Baby We've Grown' stamp set in Blushing Bride pastel pink:

Using a pink base, I matted both of my cardstock layers on Whisper White and used a piece of Polka Dot DSP from the Subtles DSP stack for panel 2, whilst for panel 3 I stamped the 'sweet baby' stamp repeatedly in Whisper White onto Blushing Bride cardstock - a stamp-a-ma-jig is essential for this - and coloured the word 'baby' with my chalk marker to give it a powdery look. Lastly, my focal point panel 4 is a triumph of layers and fussy cutting: I stamped the shoe stamp 3 times, twice on Whisper White and once on Blushing Bride, then I fussy cut the shoes from the pink and glued them to the white base; with the other image stamped on white, I fussy cut the bows from the shoes and adhered them on top. I finished the shoes with two tiny seed pearls for fastenings, and layered this circle on a pink starburst mat and a further white circle. My card has 10 separate layers in total - this must be something of a record!

This card took a little while to create, but I love it - and only Blushing Bride and Whisper White used throughout. Do check out the other monochromatic cards at the Pals paper Arts this week - there is a mass of inspiration.

Back tomorrow with another card; until then, happy stampin'!

Stampin' Up! Supplies Used:

Table built using Product Table Builder by The Crafty Owl - Independent Stampin' Up! Demonstrator.


Blossom Party Originals Melon Mambo Flower

by Joanne James21. April 2014 08:00

Today I'm sharing a card I made with Jen Brum's great sketch over at Freshly Made Sketches - I combined it with the colours over at The Colour Throwdown, where one of my favourite colour combinations - Basic Grey and Melon Mambo - is trio'd with Garden Green:

A great combination - here is my card:

I used Basic Grey for my base and matted this with a piece of Melon Mambo to create a narrow border between my base and my central panel of High Tide DSP. I decided to use a flower as my focal point, but instead of stamping I decided to die cut two flowers with my Blossoms Originals die and layer them together, finishing with a small grey circle and pink candy dot centre. I tucked a Gumball Green leaf behind (cut with the Secret Garden framelits) and stamped my sentiment in Versamark onto Basic Grey and heat embossed with Melon Mambo embossing powder. The green leaf provides a lovely 'pop' of colour behind the flower and lifts the whole card, I think. Gumball Green has to be my favourite of the soon-to-be retiring In-Colours - I will so miss it when it's gone!

As I stepped back to admire my card, I realised that I had adhered my mat panels upside down in relation to Jen's sketch - and by this point, my Tombo was well and truly stuck fast - oops! I am hoping the team at FMS will forgive me this oversight ;-)

Back tomorrow with another card; until then, happy stampin'!


Stampin' Up! Supplies Used:

Table built using Product Table Builder by The Crafty Owl - Independent Stampin' Up! Demonstrator.

Mini Catalogue

BROWSE THE CATALOGUE

The mini catalogue is now live! Read and download your copy here.

Shop Online

Access my online shop 24 x 7, 365 days of the year:

Current March hostess code:

S9F2XJJW

Shop Online

Join My Team

It's always a great time to join Stampin’ Up! New team members can get £130 worth of products for only £99 + free business supplies + free shipping + all the fun being a part of Stampin’ Up! Stampin' Up! has something for everyone: join my growing team and benefit from my support to enjoy Stampin' Up! however you choose.

If you're interested, call me for a chat to understand how I can help you realise your goals. Alternatively, if you have already decided to sign up and you just can't wait, please click here for the link to the online form where you can sign up and order your starter kit right away! 

Latest Kit!

Stampin Cut and Emboss

The Rock Legend Kit has all you need to make 8 cards with coordinating envelopes. Along with the new Panda Friends Kit, both are available from January 4th for just £14 each - get yours here!

2023-24 Annual Catalogue

BROWSE THE CATALOGUE

Click on the catalogue for a full list of current SU! supplies - if you would like to order any of the items featured, please drop me a line at [email protected] or give me a call on 07773 421446 - I'd be happy to help.

New Online Exclusives

There will be new products available exclusively in the online store from 5 March - check them out here.

About Me

Hi I'm Joanne and live in Northampton and when I'm not looking after my husband and two beautiful children, am an avid crafter with a passion for all things Stampin' Up!

I must confess that I have never been a big rubber stamper - until I discovered Stampin' Up! that is. I love the fact that I can get such great results with co-ordinating stamps, inks, papers and punches - the possibilities are endless! Join me on my stamping journey as I share the things I love and be inspired to create amazing things yourself!

Follow Me

Monthly Newsletter

Box Builder

Click the button above to use Box Buster to create your custom box design using the Envelope Punch Board!

Kits Collection Now Available!

Stampin Cut and Emboss

The new Kits Collection from Stampin' Up! is now available!

Click here to see the current kits available and order yours online today.

I Design For


Stampin' Up Stuff

This is my personal blog and is not endorsed by Stampin’ Up! I hope you find it a plentiful source of ideas and personal inspiration but please don't copy my designs for contest submission or use for classes, publication or sale without express permission.