Beside The Seaside Beach Day Sandcastles AYSI328

by Joanne James19. July 2024 12:00

Today I'm sharing my design team card for our new challenge over at As you See It where it's time for a seasonal 'fill in the blank' challenge from Heather:


My favourite beach activity - well, I'm not one for lying on a sun lounger at the beach (I prefer to do that poolside!) so when I'm at the beach I like to be 'doing' and my favourite things to do include building sandcastles and paddling in the sea. So I knew I had to feature a sandcastle on today's card. I was inspired by this card that was my pick over at The Paper Players last week to try a similar technique and I ended up with not one, but two cards to share with you today. Here's the first one that I started with:


I used my retired Little Letters Thinlits Dies to cut my sentiment out a sheet of retired Serene Scenes paper with a beach scape, and infilled with the same letters cut from Basic White, and stamped a sandcastle using my Beach Day stamp set to which I added a little extra colour using my Stampin' Blends:


Having made this card, I decided that I would use the letters I'd cut out of my designer paper and make a second card:


This time I inset my letters into a white panel, that I popped up on a white card base which I had embossed with a retired waves embossing folder. Finally I added another sandcastle:


You still get a sense of the seaside from the letters, against all the white space. I decided I liked this card more than my first one, so that's the one that I used as my As You See it card, but I've shared both to explain the process. Here's a photo of both cards together - which one do you prefer?


No visual summary of the key products today, as the key products are retired, but there are store links to the current products used below. I'm also linking today's first card up over at the Alphabet Challenge Blog where they are on 'H is for Holidays' and my second card for another play at Addicted to CAS where the current codeword is SUMMER.

So what's your favourite beach activity? Why not play along and share it with us over at As You See It.

Here's a summary of our challenge rules:

  • Create any card, scrapbooking page, 3D or packaging project that fits the challenge.
  • For a Fill In The Blank Challenge you must tell us how you would finish the sentence.
  • Please include the challenge graphic and link back to the challenge in your post.
  • Make sure you link the specific post and not the whole blog to the Linky. Use AYSI#(insert challenge number) when uploading to a public gallery
  • Please turn off word verification so that we can send you lots of feedback.
  • You can combine our challenge with up to 3 other compatible challenges. 
  • We do reserve the right to delete, or not consider for Top Pick and Featured Artist, entries that do not comply with these guidelines.
We look forward to seeing your creations in the AYSI gallery.

Enjoy your day and I'll be back tomorrow with another project. Until then, happy stampin'!


Stampin' Up! Supplies Used:

Table built using Product Table Builder by The Crafty Owl - Independent Stampin' Up! Demonstrator.

Movie-Inspired In-Color Hello Card for AYSI 227

by Joanne James5. June 2020 12:00

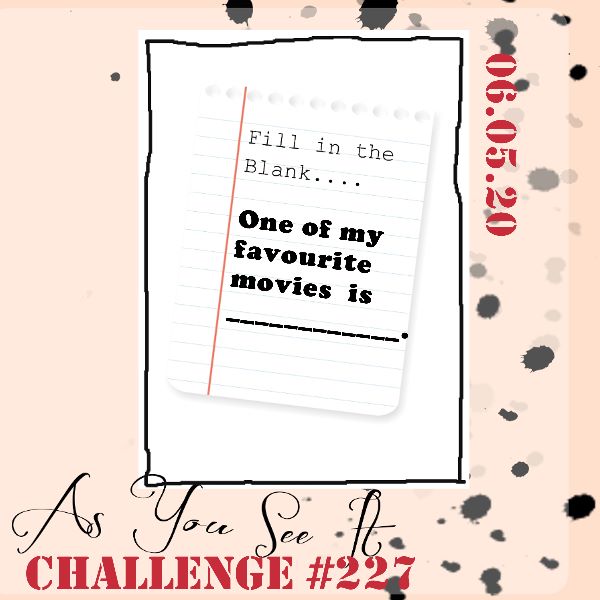
No blog yesterday as I was still super busy with new catalogue launch day activities and making sure that all the bundles were ordered for my online  'Blossoms in Bloom' class on June 15th - there's still time to sign up if you'd like to join me! Today I'm sharing my design team card for our new challenge over at As you See It where it's time for a fun 'fill in the blank' challenge:
 

Like many of the team this week I procrastinated for ages over this card! I love movies and I could think of so many different cards, I struggled to narrow down my ideas. In the end I went with an iconic movie quote from my most favourite movie of all time - take a look:
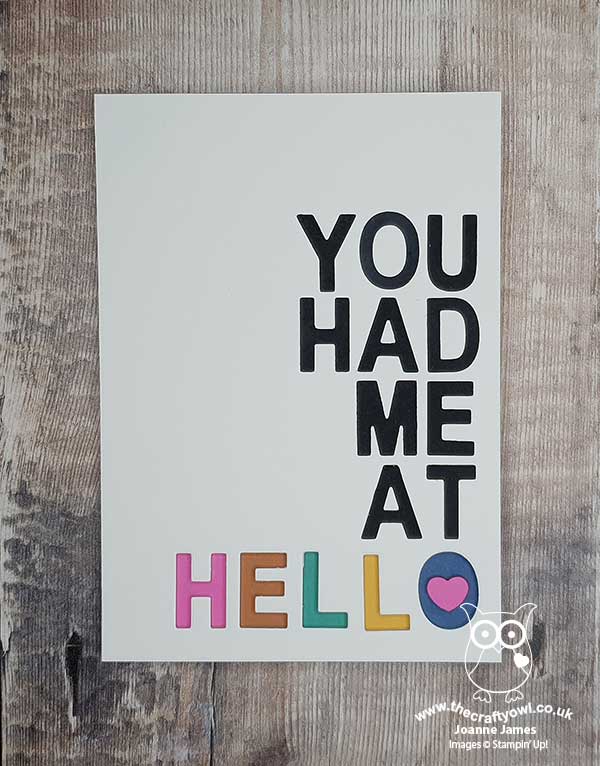
 

Do you recognise it? Yes, it's Renee Zellweger's classic line when her husband, the handsome Tom Cruise, returns from his road trip in the movie 'Jerry Maguire'. This is a movie packed with famous quotes: "Show me the money!" and "Did you know bees and dogs can smell fear?" to name just two. 

I decided to make a bold statement using diecut letters in black for the first part of the quote adhered directly to my card mat, then switched for 'hello' by diecutting this out of the mat itself and then adding snippets of each of the new Stampin' Up! 2020-22 in-colours directly to the cardbase below, and popping the mat up on dimensionals: 
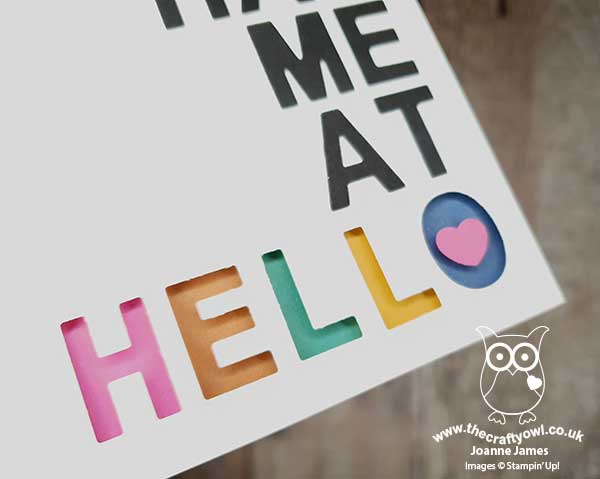
 

I added a little Magenta Madness pink heart to the centre of the 'o', courtesy of the dog builder punch (such a useful little heart!) to complete my card.

I used the retired Little Letters Thinlits Dies to create my card today, but it's a good opportunity to point out that the new Stampin' Up! catalogue has at last a new set of alphabet dies to purchase - something that many of you have missed from the last one, judging by the number of enquiries I get! The new set is called 'Playful Alphabet' (page 178) and is very similar in size and style to the thinlits I used on my card although there are a couple of great additions: duplicate letters for commonly used characters, such as vowels, as well as numbers and a set of characters, including a question mark, accents and a hashtag - and all for a very reasonable price of £32. As such, this is the set I've linked to below should you wish to purchase from my online store and re-create my card.

I don't have a photo of the inside of my card, as I wrote a personal message in it as soon as my card was made. I know my husband will totally 'get' this card as he knows how much I love this card, but I will confirm I did begin my message with another memorable quote from the movie: "You complete me" - it just had to be done! If you haven't seen this movie and have no idea what I'm talking about today, I can highly recommend it; grab your tissues and watch this little  clip, courtesy of movies.com, to whet your appetite: 

 And on that beautiful note - here is the visual summary of the key products used on today's project for you to pin for easy reference:
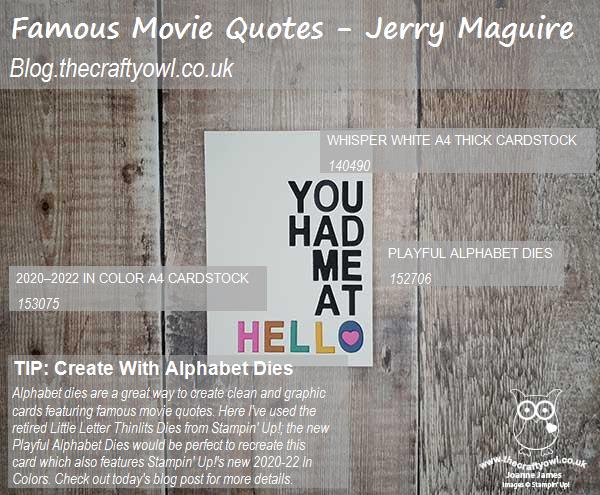
 

You can see all of my 'How To' summaries on my 'How To - Tips and Techniques' Pinterest board in case you've missed any. What is your favourite movie? Do leave me a comment below or better still, make a card to illustrate it and play along with us this week!

Here's a summary of our challenge rules:

  • Create any card, scrapbooking page, 3D project or packaging   project that fits the challenge.
  • Fill in the blanks with the words that are right for you and then create your project with those words in mind. Tell us, in your blog or on your site, what words you used.
  • Please include the challenge graphic and link back to the challenge in your blog post. Turn off word verification so we can leave you lots of lovely comments. Make sure you link the post not the whole blog to the Linky. Use #AYSIXXX when uploading to a public gallery.
  • If you’re unsure about ‘the rules’, check the details under the Challenge Guidelines tab on the As You See It Challenge homepage.

We look forward to seeing your creations in the AYSI gallery.

I am spending this morning in my office, whilst young Master James basks in the glory of CE exam completion and enjoys a 'day of rest', otherwise known as chatting and playing online with his friends, along with virtual pizza night this evening to celebrate. He is back on it next week as he begins what is usually a month of post CE exam fun, not with a week of outward bound activities in the Lake District with his class mates as planned, but instead video production to enable the Year 8 fashion show that they've been busy creating outfits for to happen online. I am off to school this afternoon to collect the 8 foot-high tree that I declined to bring home on the final day of school before lockdown because I couldn't fit it in my car along with all of the school books, files and sports kit and I couldn't believe it would be essential. Clearly I was wrong!!

Enjoy your day and I'll be back tomorrow with another project. Until then, happy stampin'!


Stampin' Up! Supplies Used:

Table built using Product Table Builder by The Crafty Owl - Independent Stampin' Up! Demonstrator.

Watercolour Words Father's Day Card

by Joanne James7. June 2016 07:00

I had a great day yesterday with the first of this month's technique classes, an outside BBQ dinner and an evening bike ride along the canal - not a bad start to the week! Today I have my third-in-a-row masculine card for you, using this week's sketch over at CAS(E) This Sketch:

I decided to have some fun with the idea of the vertical lines and sentiment so combined the two to come up with today's card:

Here's the low-down on today's card:

It's All About Perspective - I was definitely inspired by the sketch, but chose to reverse the perspective of the vertical lines and the sentiment. I stamped the 'you're the best' sentiment from the Watercolour Words stamp set in Versamark and heat embossed it in gold, then diecut my letters using the now retired Little Letters Thinlits. Before adhering the letters to the background, I cut 4 extra sets and glued these each on top of each other to give my 'DADDY' dimension.

A Touch Of Gold - I wanted to preserve the clean-and-simple look and feel of my card so kept to a monochromatic colour scheme with Pacific Point for my 'white space' and added a touch of gold for my lettering and framing mat.

You're The Best - I love the handwritten styling of the sentiments in the 'Watercolour Words' stamp set. This is a great sentiment set with lots of possibilities and it works perfectly to sum up my Father's Day message on this card.

 Here is the visual summary of the key products used on today's project for you to pin for easy reference:


You can see all of my 'How To' summaries on my 'How To - Tips and Techniques' Pinterest board in case you've missed any. 

Enjoy your day; I have another day of classes and music lessons after school, so mine will be full! I will also be at Bell's in Northampton tomorrow for my fortnightly drop-in Coffee & Card Session if you're local and fancy some crafty respite!

I'll be back tomorrow with another project; until then, happy stampin'!


Stampin' Up! Supplies Used:

Table built using Product Table Builder by The Crafty Owl - Independent Stampin' Up! Demonstrator.

Patriotic Union Jack Card

by Joanne James8. July 2015 21:53

This is my second post of the day - you can find my earlier post detailing this week's weekly deals here. This is a quick creative post from me today with a card I made this morning for a couple of challenges: another one for Less Is More's red, white and blue challenge and also for Addicted to CAS where the theme is 'patriotic:

My talented colleague over at The Paper Players, the lovely Jaydee, also designs for ATCAS and she chose the codeword for the current challenge. Whilst Jaydee lives in the USA, she is actually British so I thought that I would make a card with her in mind (oh, and the other current Brit of the moment, Andy Murray, who today got through to the Wimbledon semi-finals - woohoo!): 

I used the extra thick Whisper White cardstock as my base and then paper-pieced a union jack flag in Real Red, Whisper White and Pacific Point. My intention originally was to use the letters that I cut using my Bigshot and the Little Letters thinlits, but when I lined up the letters the flag wasn't as obvious as I'd hoped and the negative space worked much better, so I used this instead. Fortunately I managed to do a reasonable job of aligning the letters, although it was quite tricky as the magnets in the magnetic platform have a tendency to make the letters jump about! A no stamp card too!

I hope you like my take on patriotism for today's card; I did contemplate making something more in keeping with my own heritage (I'm Welsh!) although my stamp collection has a complete absence of dragon stamps and punch art would definitely not have fitted with the 'clean and simple' approach!

I'll be back tomorrow with our new challenge over at Create With Connie and Mary; until then, happy stampin'!


Stampin' Up! Supplies Used:

Table built using Product Table Builder by The Crafty Owl - Independent Stampin' Up! Demonstrator.


Roses are Pink...Two-for-One Valentine's Cards

by Joanne James10. February 2015 08:00

Today I have not one but two cards for you! Both cards fit this week's colour challenge over at Pals Paper Arts, where there is a gorgeous colour palette to work with this week:

I absolutely love this colour combination and couldn't wait to create something pink and pretty with it. Here is my first card:

I layered the colours in two sections and in the central section used one of the lovely rose die cut panels from the Artisan Embellishment kit as a stencil and stencilled the roses in the two shades of pink, adding in touches of Basic Grey for the flower leaves. These die cuts are so beautiful - it's a shame there are only two in the kit! Here's a close up of the sponged area:


The form of the roses is just so pretty I think and looks really beautiful. I added a bow in luxurious silver satin ribbon and stamped my sentiment on the wide mat layer of Pink Pirouette, stamped in Versamark and heat embossed in pewter. This card is full of romance, but I think it would work equally well as a birthday card.

My second card today uses exactly the same colour palette, but is altogether a more clean and simple affair. This week the team over at Less is More is celebrating its 4th birthday and have a colour challenge of 'pink and grey'. Here is my card for this week's challenge:

My card started out as a two-tone pink and grey affair, with an inlaid split sentiment - I die cut the word 'love' using my Little Letters thinlits, then did the same with the cardstock the other way around top and bottom in order that I could paper-piece the reverse colours into the negative space. The more I looked at it though, the more it needed a little something else - I toyed with a scrap of Rose Red that sat on my desk leftover from the first card and the addition of the tiny heart with a tiny sparkle was just what it needed. You can see the detail of the die cut and inlaid letters below:

Congratulations to Chrissie and the team on their 4th birthday - you are an awesome bunch who run a most successful weekly challenge and are truly an inspiration. 

I'll be back tomorrow with another card; until then, happy stampin'!


Stampin' Up! Supplies Used:

Card 1: 

Table built using Product Table Builder by The Crafty Owl - Independent Stampin' Up! Demonstrator.
 
Card 2:
 
Table built using Product Table Builder by The Crafty Owl - Independent Stampin' Up! Demonstrator.

Jingle Bells, Jingle Bells, Jingle All The Way!

by Joanne James22. November 2014 07:00

It's the weekend - yay! Today I'm sharing my card for this week's challenge over at the Merry Monday Card Challenge, where Sue has the following challenge for us this week:

Hmmm - bells! These designers are really keeping me on my toes this week, as this is another one of those where investigation of my extensive supplies led me to conclude not a single bell image, die cut or embellishment of any kind! Not to be beaten, I decided it was time to think laterally; the obvious choice was to run to my e-cutter, but instead I thought I would try and create some jingle bells using punches. Here is my finished card:

I had the urge to create something really glitzy today, so chose a plain background of Garden Green and decided on gold glimmer paper for my bells. They were surprisingly easy to make: I punched a 1" circle, then punched a star out of the top half. I punched two small circles with my crop-a-dile on the bottom half and used my paper snips to create the openings. Lastly, I punched a round edge using my 1 3/4" circle punch, adhered it to the centre of my bell and trimmed the ends. I also created a couple of gold bell hooks, but you can't really see these beneath the ribbon. I layered these onto my card base, popping one on a dimensional for a little lift, then finished with a rather extravagant bow. This red satin ribbon curls so beautifully I couldn't resist - even though this card is SOOO impractical for mailing!

My sentiment is a combination of the die cut using my Little Letters thinlits to spell 'jingle' and backed with Real Red cardstock, and the 'all the way' from the Mingle All The Way stamp set, which I selectively coloured with my Garden Green marker. 

I'm also entering this card for the challenge over at Less is More where the theme this week is aptly 'Jingle All The Way', although I have another card planned with a slightly different slant for later in the week and it didn't occur to me that this one probably fits the theme slightly better!

I'm really pleased with my shiny jingle bells - what do you think? I'm off for my usual Saturday of sport today; back tomorrow with my Design Team card for this week's new challenge over at The Paper Players. Until then, happy stampin'!


Stampin' Up! Supplies Used:

Table built using Product Table Builder by The Crafty Owl - Independent Stampin' Up! Demonstrator.


Happy Hauntings - Boo! Halloween Card

by Joanne James13. October 2014 10:19

Monday already - where does the time go?! This week promises to be full of fun and excitement, but for today there is lots to be done! I have a Stampin' Up! party to prepare for this evening and I need to put the finishing touches to tomorrow's project class, so a nice early blog post is most definitely the order of the day! As Halloween approaches, lots of the current colour challenges have colour palettes to match - today's card uses this week's colours over at Pals Paper Arts and this week's CAS(E) This Sketch:


There are some great examples on the challenge page where these colours have been used in a non-traditional way, but I decided to stick with the spooky theme and create another Halloween card - take a look:

I used a base of Basic Black cardstock, then used a panel of Tangelo Twist that is narrower than the base and popped up on dimensionals. I used my little letter thinlits to cut the word 'BOO' out of the length of the orange cardstock, then I used my Fun Fall framelits to cut two ghosts out of Very Vanilla and adhered these to the edge of the Tangelo Twist piece, aligning the 'O's to look like the ghost's mouth - they really look like they're floating off the edge of the card. I finished with a stamped sentiment and tied some black and white baker's twine around the Tangelo Twist layer and tied in a bow.

Whilst I used the negative space of the die cut letters for my card, the letters themselves didn't go to waste - I stamped some bats from 'Freaky Friends' onto a Very Vanilla envelope then adhered my 'Boo!' on top to add interest. Waste not, want not, as the saying goes!

I hope you like today's fun spooky card; back tomorrow with something altogether more Christmassy! Until then, happy stampin'!


Stampin' Up! Supplies Used:

Table built using Product Table Builder by The Crafty Owl - Independent Stampin' Up! Demonstrator.


Happy World Card Making Day!

by Joanne James4. October 2014 22:09

I've had such a busy day today however I did manage to squeeze in a couple of hours this afternoon for some cardmaking. I'm only just back from a swimming gala this evening and I almost didn't get time to blog, but as it's World Card Making Day this really is one day that I couldn't pass up on the opportunity to share with you the cards that I made.

The first card I made was a case of a fun card by Miranda Mols-Heidenrath that appeared on the Stampin' Up! UK Facebook page earlier this week, which I thought was such a fun card to celebrate WCMD: 

I love the use of the negative space of the die cut and the partial stamp to make this card, so I decided to use the same layout to make another card in an alternative colourway for someone special whose birthday it is today - take a look:

Yes, today it's my dear hubby's birthday, although you'd almost never know it given that he's hardly had a look in, although we did manage to squeeze in a special birthday lunch and a birthday cake. This was the card from the James juniors, which of course more than met with their seal of approval due to the presence of the gold glimmer star (isn't everything better with glimmer?!)

I also made my card for tomorrow's new challenge over at The Paper Players, but you're going to have to wait until the morning to see that one!

I hope you all had fun days too and managed to squeeze in a little crafting; don't forget if you need to stock up on inks, cardstock or adhesives there are some great offers on this weekend, including 20% off selected stamp sets. Get the full details in my earlier post here and hop on over to my online store to purchase (don't forget to use this month's hostess code which can be found on the right hand side of this page).

Back tomorrow with my Paper Players Design Team card - until then, happy stampin'!


Stampin' Up! Supplies Used:

Table built using Product Table Builder by The Crafty Owl - Independent Stampin' Up! Demonstrator.

Current Promotions

Stampin Cut and Emboss

Save up to 30% off on all your favourite kits from 1 to 31 October! 

Click here to see the current kits available and order yours online today.

Join My Team

It's always a great time to join Stampin’ Up! During October you can get even more in your starter kit! New team members can get £160 worth of products for only £99 + free business supplies + free shipping + all the fun being a part of Stampin’ Up! Stampin' Up! has something for everyone: join my growing team and benefit from my support to enjoy Stampin' Up! however you choose.

If you're interested, call me for a chat to understand how I can help you realise your goals. Alternatively, if you have already decided to sign up and you just can't wait, please click here for the link to the online form where you can sign up and order your starter kit right away! 

Shop Online

Access my online shop 24 x 7, 365 days of the year:

Current October hostess code:

4XPEYCB9

Shop Online

Scrapbooking

Stampin' Up! has introduced a new range of 12x12" scrapbooking product and kit - the full range is now available to purchase online. To download a copy of the new digital Scrapbooking Catalogue click here.

Mini Catalogue

BROWSE THE CATALOGUE

'Tis The Season - the new Stampin' Up! Mini Catalogue is here! For more details and to download your copy click here

2024-25 Annual Catalogue

BROWSE THE CATALOGUE

Click on the image to download your copy of the 2024-25 annual catalogue. For a full list of current SU! supplies, go to my online store. If you would like any help or advice, please drop me a line at joanne@thecraftyowl.co.uk or give me a call on 07773 421446 - I'd be happy to help.

Latest Kits!

Stampin Cut and Emboss

The Christmas Ornaments Kit and Card Keeper Kit are the latest kits in the online store - get yours here!

New Online Exclusives

There are new products available exclusively in the online store from 5 November - check them out here.

About Me

Hi I'm Joanne and live in Northampton and when I'm not looking after my husband and two beautiful children, am an avid crafter with a passion for all things Stampin' Up!

I must confess that I have never been a big rubber stamper - until I discovered Stampin' Up! that is. I love the fact that I can get such great results with co-ordinating stamps, inks, papers and punches - the possibilities are endless! Join me on my stamping journey as I share the things I love and be inspired to create amazing things yourself!

Follow Me

Monthly Newsletter

Box Builder

Click the button above to use Box Buster to create your custom box design using the Envelope Punch Board!

Kits Collection Now Available!

Stampin Cut and Emboss

The new Kits Collection from Stampin' Up! is now available!

Click here to see the current kits available and order yours online today.

I Design For


Stampin' Up Stuff

This is my personal blog and is not endorsed by Stampin’ Up! I hope you find it a plentiful source of ideas and personal inspiration but please don't copy my designs for contest submission or use for classes, publication or sale without express permission.