I'm So Grateful There's You in The World

by Joanne James14. September 2013 21:09

Last week it was my mother-in-law's birthday and today I'm sharing the birthday card I made for her, using my Chalk Talk set for the first time:

I had some of the lovely pink wide ribbon left over from the Spring-Summer Seasonal Catalogue earlier in the year and I wanted this to be a real feature of this card, so the actual stamping is understated. I really love the sentiment on this Chalk Talk stamp and for someone who is such an integral part of our family, it was especially appropriate for this card. Also, did you notice the background paper - wondering where I got this from? Well, I made it myself using the 'Mum' stamp from the retired 'For My Family' stamp set. I'm really pleased with how it turned out - and I didn't even use a stamp-a-ma-jig to line it up! I love the colour combo too - I'm really into Bermuda Bay at the moment and I think it works really well with the pinks in this card.

Back tomorrow with another card; until then, happy stampin'!


Stampin' Up Supplies:

Stamps: Chalk Talk, For My Family (retired)

Cardstock: Whisper White, Rose Red, Bermuda Bay

Ink/Stampin' Write Markers:  Pink Pirouette, Rose Red, Bermuda Bay

Tools: Chalk Talk Framelits, Extra Large Oval Punch, Big Shot, Magnetic Platform

Finishing Touches: 1 1/4" Two Tone Ribbon (retired), Basics Rhinestones

Tags: , , , , , , , , ,

Cards | Stamping

The Big Shot Magnetic Platform is Now Available to Order!

by Joanne James13. September 2013 20:30

No post yesterday, but two today to make up for it! Here's the first one. Great news - the Big Shot Magnetic Platform is back and now available to order again!

This is one of the 'unsung heroes' of this year's annual catalogue, although clearly I am not the only one to think so - some 13 weeks worth of stock sold out in about 3 weeks! I'm happy to report that supplies have now been restored, so if you've been eagerly awaiting yours, now's the time to order!

The magnetic platform makes light work of cutting cardstock with framelits; no longer do you need to rely on post-it notes and hope that they hold everything in place. If you would like to see the magnetic platform in action, here's a great video from Stampin' Up that shows you how it works:

If you would like to order a magnetic platform, either contact me or pop over to my online store now to purchase.

Back shortly with another post; until then, happy stampin'!

Tags: , , , , , ,

Catalogues | Shop Online | Video Tutorials

Happy 70th Birthday Ann!

by Joanne James3. September 2013 21:51

Today I'm sharing a birthday card commission that I made for my sister-in-law's very special Mum, who celebrates her 70th birthday today. I decided to use a combination of some of my favourite of this year's in-colours and the lovely Secret Garden framelits. Here's the finished card:

I love the pretty ruffle trim ribbon and added a tiny sliver of silver glimmer paper to add a little sparkle. I must confess to having had a few failed attempts before producing a card that I was really happy with - I needed this card to be 'just right' and am pleased to say I was happy with the finished result. Here's a quick picture of the card I made for Ann to wish her a special 70th birthday: 

Not the best of photographs, I'm afraid - when flat you can see the sentiment through the aperture cut with an oval framelit - but hopefully good enough to give you an idea. This one uses a similar colour scheme and the Flower Shop stamp set - check out the vellum flowers on the front, which I stamped then heat embossed with Iridescent Ice for a lovely sparkle.

One last thing on my original card: did you notice the little butterfly stamped on vellum that highlighted my label? Here's a close-up:


This is one of the butterflies in the Papillion Potpourri stamp set, punched out with the Bitty Butterfly punch - these are the items on offer at 15% off when you buy them together before 30th September - you can read more about this offer here.

Both James Juniors are back at school tomorrow; whilst I'll miss them not being at home, I can't deny that I'm looking forward to getting back into my craft room for a bit more creating - lots to do!

Do come back in the next day or so to see what I've been creating; I'm looking forward to sharing some of my Christmas ideas and September is a month of birthdays for me, so I'll have lots on this front too. Until next time, happy, stampin'!


Stampin' Up Supplies:

Stamps: Secret Garden, Delightful Dozen, Memorable Moments, Papillion Potpourri

Cardstock: Whisper White, Strawberry Slush, vellum

Ink/Stampin' Write Markers:  Strawberry Slush, Crisp Cantaloupe, Pistachio Pudding

Tools: Secret Garden Framelits, Oval Framelits, Bitty Butterfly Punch, Stamp-a-ma-jig

Finishing Touches: Strawberry Slush Stretch Ribbon Trim, Silver Glimmer Paper, Basics Pearls

Christmas Tea Lights

by Joanne James8. August 2013 09:44

Another week, another late post - I'm loving the summer holidays but when school's out it sure is tricky to keep everything else on track! So today I'm posting nice and early, so that I don't run out of time again!

Today I'm sharing another of the makes from my Christmas workshop that I held last weekend: a lovely set of four tea lights in a handmade box. This workshop was less about the stamping and much more about the scoring - if my ladies weren't proficient with their Simply Scored scoreboard beforehand, they sure are now! So here is our finished box:
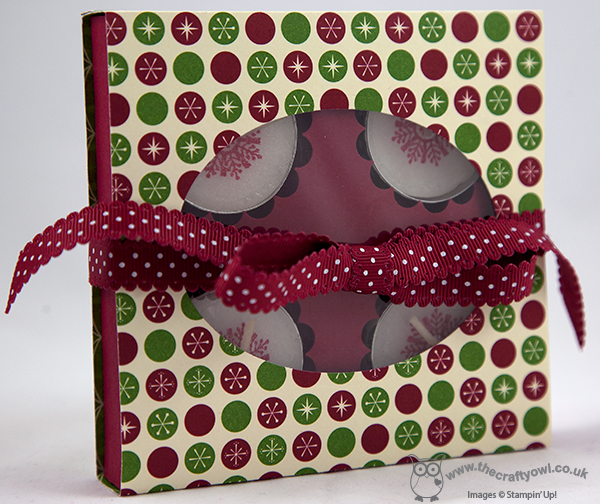
 

We made a box with a sliding sleeve cover, from which we cut out an oval aperture with the Oval Framelits and backed with a window sheet, to allow a glimpse of our lovely hand-stamped candles inside. Here's a picture of the open box, with a peek at our 'dressed up' tea lights:
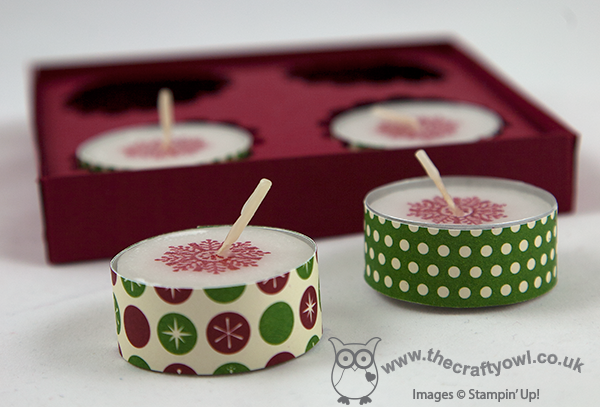
We edged each of them with a strip of DSP; I'll be making more of these when my festive washi tape arrives, as this is perfect for this kind of project. The candle stamping was really easy to achieve and as none of the ladies present had done this before, was a real 'wow' moment for them. I suspect lots of their friends and neighbours will be receiving stamped tea light gift sets for Christmas now that they've learned this clever technique!

I love this spotted star/snowflake paper from the retired 'Be of Good Cheer' paper set; with so many designs to choose from, we all made different ones though - here's one of the other finished sets made by Kathy during the workshop:
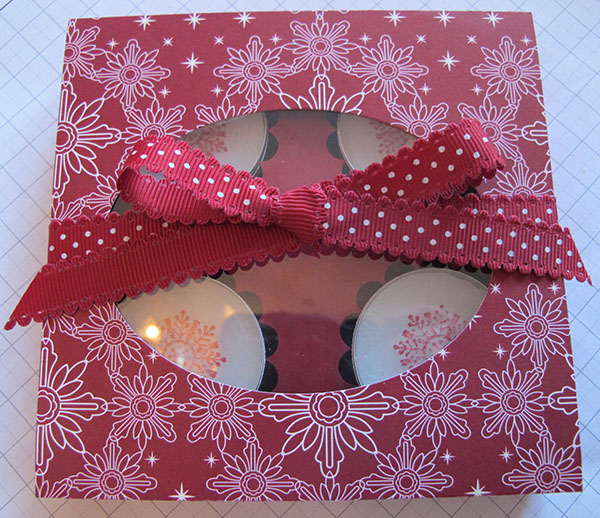
These papers are just so lovely, but don't be too sad that they are now retired; I have had a 'sneak peek' of the new Autumn-Winter seasonal catalogue and can honestly say, you will not be disappointed with this year's offerings!

All being well, I will be back tomorrow with the last of my Christmas workshop projects. I'm off to have a quick spot of making before meeting friends in the park for a picnic - lovely! Until then, happy stampin'!


Stampin' Up Supplies:

Stamps: Four Seasons (hostess - retired)

Cardstock: Cherry Cobbler, Be of Good Cheer Designer Series Paper (retired)

Ink/Stampin' Write Markers: Cherry Cobbler

Tools: Simply Scored, Big Shot, 1 1/4" Circle Punch, 1 3/4" Scallop Circle Punches, Oval Framelits

Finishing Touches: Creped Filter Paper, Window Sheet,  Cherry Cobbler 1/2" Scallop Dots Ribbon (retired)

Tag-A-Bag Gift Bag Hostess Gift

by Joanne James28. July 2013 19:50

After all the excitement of yesterday's pop-up card, today I'm sharing another of the projects I made at my recent quarterly training. The new annual catalogue has some great new packaging options; today's project is a great way to dress up one of the bags from the 'Tag a Bag Gift Bag' kits for a quick gift:

A simple outer open fronted box adds some structure and the addition of a bright Chalk Talk gift tag, with a flower punched from one of the tags in the gift bag kit, finished with a Strawberry Slush embellishment and a showy bow of Crushed Curry Chevron Ribbon; a simple bag is turned into something truly gift-worthy with little effort. Great for a small thank you or hostess gift.

Back tomorrow with another project featuring the Tag-a-Bags; until then, happy stampin'!


Stampin' Up Supplies:

Stamps: Chalk Talk

Cardstock: Bermuda Bay, Whisper White

Ink/Stampin' Write Markers: Strawberry Slush

Tools: Chalk Talk, Pansy Punch

Finishing Touches: Tag A Bag Gift Bag, Tag A Bag Accessory Kit, Crushed Curry 3/4" Chevron Ribbon, Strawberry Slush, In Colour Boutique Details

Tags: , , , , , , , , ,

3D Projects | Boxes | Host a Party | Stamping

Remember When...?

by Joanne James13. June 2013 22:37

Last night's card class was fun as always but too late for a blog post and today has been another busy day making birthday cards for the young lady of the house and some Father's Day cards, ahead of the big birthday weekend. I'll share these in the next few days, but meanwhile tonight I thought I'd share the last of the Golden Anniversary cards I made recently. This one is quite different to the previous two; instead of leading with a 50th Anniversary sentiment, I used one of the stamps from the retiring Word Play set as the focus:

I've never used this stamp before, as it never seemed right for anything I was designing. I have toyed with using it as a feature stamp on a scrapbook page (a project for another time though!) then as I was thinking about what it would be like to celebrate 50 years of marriage myself (believe me, that is a LONG way off!) and it struck me how appropriate this stamp would be for a milestone anniversary card - 50 years is a lot of memories!

I decided to use white and brushed gold cardstock again and leave the layout quite simple, with Oval and Label Framelits making light work of the layered front. You can see the lovely gold embossing in this photo too - it adds a real shine. I finished the front with a fussy organza double bow then stamped the inside with my congratulatory anniversary message:

So that's all my Golden Anniversary cards for the time being - which one do you prefer? The other big news of the day is that registration for this year's Stampin' Up! European Convention opened today. Better still, this year convention is being held in Manchester in the UK. I've signed up already; if you would like to enjoy two days of stampin' fun from 22nd-23rd November, contact me for a chat about this and the other benefits being a Stampin' Up! demonstrator can offer.

Back tomorrow with another project - until then, happy stampin'!


Stampin' Up Supplies:

Stamps: Word Play, Memorable Moments

Cardstock: Whisper White, Brushed Gold

Ink/Stampin' Write Markers: Versamark

Tools: Ovals Framelits, Labels Framelits, Stamp-a-ma-jig

Finishing Touches:  Gold Embossing Powder, Whisper White 5/8" Organza Ribbon

Feel Goods - The Best of Friends

by Joanne James20. April 2013 21:10

The sun is shining here in the UK - oh, happy days at last! Back to cards today and I thought I'd share a card I made a little while ago using one of the stamps in the 'Feel Goods' stamp set. I loved this stamp set the first time I set eyes on it - 5 great sayings that can be suitable for so many occasions. This is the first card I made with this set, although I will have many more to share in days to come I'm sure:

My favourite bright colours again for this card, with a ribbon of Summer Smooches designer series paper along with a couple of butterflies for interest. Centre stage absolutely goes to the 'feel good' though. I made this card for a good friend of mine for whom the sentiment absolutely fits. In the words of a Fergal Sharkey pop song from the 80s (I know, it shows my age when I start reminiscing like this!) 'A good heart these days is hard to find'. I think the same can be said of good friends - but the recipient of this card is one of the best!

Back tomorrow with another project - until then, enjoy the sunshine and happy stampin'!

Stampin' Up Supplies:

Stamps: Feel Goods

Cardstock: Real Red, Daffodil Delight, Rich Razzleberry, Whisper White, Brights DSP, Summer Smooches DSP

Ink/Stampin' Write Markers: Rich Razzleberry

Tools: Elegant Butterfly punch, Bitty Butterfly punch, Labels Framelits

Finishing Touches: Basics Rhinestones


Easter Bunny Punch Art Card and Gift Box

by Joanne James31. March 2013 21:43

I hope everyone has been enjoying a lovely Easter day, with plenty of chocolate eggs thrown in! This is my last Easter offering to share with you all and was inspired by one of my other hobbies - biscuit making. I recently enjoyed a fun day out with a friend at the Biscuiteers Icing Cafe in Notting Hill, where we spent a pleasant morning icing Easter bunnies in various poses, spring lambs and Easter eggs. My favourite was a lovely pale brown bunny with floppy ears, that shows him from behind with an iced bunny tail - he inspired this punch art bunny card, which shows him with a couple of friends:


I love the simple design with the polka dot paper and oval framelits, with just a touch of colour to each bunny tail to make them 'pop'. I didn't add a sentiment because although this card was for Easter, I wanted it to be able to use it for any occasion. My biscuits from that day are all long gone but I have the same cutter to make more at home and so designed a co-ordinating gift box, which is just the right size for a similar biscuit to fit in and would make a lovely gift for someone special:

I just made a simple shallow box with a Whisper White base and Marina Mist lid using my Simply Scored, then attached the punched bunny oval to a belly band made from the reverse side to the spots on the card, which just holds the box securely together. Next time I make one of these I'll try and include a photo of the biscuit too, although they don't hang around for long in our house, it has to be said!

Back tomorrow with thoughts of spring - until then, eat lots of chocolate and happy stampin'!


Stampin' Up Supplies:

Cardstock: Marina Mist, Whisper White, Certainly Celery, Pretty in Pink, So Saffron, Crumb Cake, Polka Dots Parade DSP

Tools: Owl Punch, 3/4" Circle Punch, 1" Circle Punch, 1 1/4" Circle Punch, Ornament Punch, Itty Bitty Shapes punch (flower), Oval Framelits, Simply Scored

Finishing Touches: 1/8" Taffeta Ribbon Marina Mist, Basics Pearls

Which came first: the chick or the egg?

by Joanne James26. March 2013 21:51

Today I'm sharing one of my favourite Easter projects with you. I think the new oval framelits in the Spring-Summer seasonal catalogue were crying out to be made into an Easter gate-fold card, so here's my version: 

I used oval framelits 1-4 and 6 to create an Easter egg on the outside; I deliberately chose to keep the front quite simple with some paper piercing for interest and a large paper bow to tie the whole thing together. The outer oval lifts up to release the fold and reveal the surprise on the inside:

A cute punch art chick with a happy Easter message! So for this card at least, the egg came first. One last photo of a close up of the bow - a dramatic focal point for this card and I love it:


Hope you like it. Back tomorrow with more Spring loveliness; until then, happy stampin'!


Stampin' Up Supplies:

Stamps: Wacky Wishes

Cardstock: Daffodil Delight, Melon Mambo, Tangerine Tango, Old Olive

Ink: Tangerine Tango

Tools: Oval Framelits, Oval Paper Piercing Template, 1 3/4" Circle Punch, Two Step Bird Punch (for wings), Heart Punch (for feet - retired)


Tags: , , , , , , , ,

3D Projects | Cards | Punch Art

Easter Egg Treat Holder

by Joanne James25. March 2013 22:07

Today I have a lovely treat holder for you, the perfect size for a Creme Egg or something similar as a great way to 'dress up' your egg into something a little bit special. I made something similar when experimenting with wedding favour boxes a few weeks ago (I will photograph these and share another time!) and modified my original design slightly to accommodate a small Easter egg:


They were so easy: an open box base, sandwiched between two of the bookmark-style tags from the Two Tags Die set. A small hole punched for a handle, tied with some co-ordinating ribbon and a little tag made with one of the Hearts A Flutter framelits and decorated with the basket of Easter eggs stamp from the Spring Sampler set. The photo below just shows the eggs inside so you can see in more detail:

I'd like to say the eggs were still around, but ... well it is nearly Easter, right??! Might need to buy a couple more before I gift these to anyone!

Back tomorrow with another Easter project; until then, happy stampin'!


Stampin' Up Supplies:

Stamps: Spring Sampler, Bitty Banners

Cardstock: Calypso Coral, Pool Party

Ink/Stampin' Write Markers: Island Indigo, Calypso Coral, Lucky Limeade, Wisteria Wonder, Pool Party

Tools: Hearts A Flutter Framelits, Bitty Banners

Finishing Touches: Pool Party and Calypso Coral Ruffled Ribbon, Bakers Twine


Tags: , , , , , ,

3D Projects | Boxes | Stamping

Scrapbooking

Stampin' Up! has introduced a new range of 12x12" scrapbooking product and kit - the full range is now available to purchase online. To download a copy of the new digital Scrapbooking Catalogue click here.

Mini Catalogue

BROWSE THE CATALOGUE

'Tis The Season - the new Stampin' Up! Mini Catalogue is here! For more details and to download your copy click here

Shop Online

Access my online shop 24 x 7, 365 days of the year:

Current September hostess code:

JQEHTZGK

Shop Online

2024-25 Annual Catalogue

BROWSE THE CATALOGUE

Click on the image to download your copy of the 2024-25 annual catalogue. For a full list of current SU! supplies, go to my online store. If you would like any help or advice, please drop me a line at joanne@thecraftyowl.co.uk or give me a call on 07773 421446 - I'd be happy to help.

Join My Team

It's always a great time to join Stampin’ Up! New team members can get £130 worth of products for only £99 + free business supplies + free shipping + all the fun being a part of Stampin’ Up! Stampin' Up! has something for everyone: join my growing team and benefit from my support to enjoy Stampin' Up! however you choose.

If you're interested, call me for a chat to understand how I can help you realise your goals. Alternatively, if you have already decided to sign up and you just can't wait, please click here for the link to the online form where you can sign up and order your starter kit right away! 

Latest Kits!

Stampin Cut and Emboss

The Christmas Ornaments Kit and Card Keeper Kit are the latest kits that will be arriving in the online store later this month - get yours here!

New Online Exclusives

There are new products available exclusively in the online store from 3 July - check them out here.

About Me

Hi I'm Joanne and live in Northampton and when I'm not looking after my husband and two beautiful children, am an avid crafter with a passion for all things Stampin' Up!

I must confess that I have never been a big rubber stamper - until I discovered Stampin' Up! that is. I love the fact that I can get such great results with co-ordinating stamps, inks, papers and punches - the possibilities are endless! Join me on my stamping journey as I share the things I love and be inspired to create amazing things yourself!

Follow Me

Monthly Newsletter

Box Builder

Click the button above to use Box Buster to create your custom box design using the Envelope Punch Board!

Kits Collection Now Available!

Stampin Cut and Emboss

The new Kits Collection from Stampin' Up! is now available!

Click here to see the current kits available and order yours online today.

I Design For


Stampin' Up Stuff

This is my personal blog and is not endorsed by Stampin’ Up! I hope you find it a plentiful source of ideas and personal inspiration but please don't copy my designs for contest submission or use for classes, publication or sale without express permission.