Autumn Leaves And A New Technique for Colour Me..!

by Joanne James8. October 2014 09:00

Here's today's creative post - my Design Team card for this week's challenge over at Colour Me...! where we have the striking colour combination of Cherry Cobbler and Hello Honey to work with this week:


These are great autumnal colours and I like Claire was inspired by this week's photo and those lovely leaves surrounding the bowl. I also used this week's Deconstructed Sketch layout as the basis for my design. So you want to see my card? Here it is:

Another 6" square card - my second this week - and lots of layers, so pay attention!

I decided today's card would be a perfect opportunity to try out a technique that I've seen a lot in blogland recently - the alcohol marker marbling technique, where you colour a piece of plastic with your Stampin' Up! Blendabilities, spritz with alcohol and then lay your glossy cardstock on top. I watched this tutorial on Splitcoast Stampers to get an idea of how to get the effect, although I decided to use gold foil in place of glossy white cardstock as I wanted to really emphasise the richness of the autumnal colours. I cut out my leaf using my Silhouette Cameo, but you could use the Autumn Accents Bigz Die if you have it. In keeping with the challenge, I used the darkest of the Cherry Cobbler Blendabilities and the darkest of my Daffodil Delight Blendabilities (much more like Hello Honey) to create my marbled leaf. Depending on how much alcohol you add, depends on the effect you achieve. I used very little for the leaf that I used on my card as I wanted to colours to remain quite vibrant, but I also made some that were much more subtle. When you are using this technique on gold foil cardstock, you need to be careful that you don't rub the card too much or otherwise some silver from the layer beneath will show through. You can see this in places on my leaf, but I like it that way - I think it just adds more to the finish of the leaf. Here's a 'work in progress' picture that shows the difference in the subtle effect you can achieve:

I tied my leaf with some linen thread then mounted it on a piece of Cherry Cobbler cut out with a Window Frame framelit, and backed this with a square of kraft cardstock. I crossed some Hello Honey cardstock and some textured Cherry Cobbler cardsock (retired) beneath this, along with a little label of Hello Honey that is stamped with my 'give thanks' sentiment in Cherry Cobbler, on top of a mat of kraft cardstock, stamped with the En Francais (retired) background stamp in Baked Brown Sugar ink. Another mat of textured Cherry Cobbler cardstock to finish before the kraft cardstock base.

So what do you think? Feel free to leave a comment on today's card, before hopping over to check out the amazing cards by the rest of the Colour Me...! team:

And our talented guest designer for October - Jen Mitchell
 
We look forward to seeing your striking creations. 
 
Back tomorrow with another project that actually uses the negative space from the leaf I cut out today - pop back if you'd like to see what I did with it! Until then, happy stampin'!
 
Stampin' Up! Supplies Used:
 
Table built using Product Table Builder by The Crafty Owl - Independent Stampin' Up! Demonstrator.


Tags: , , , , , , , , ,

Cards | Stamping

Vintage Flowerful Heart

by Joanne James27. January 2014 19:47

A quick post from me this evening! With just one more day to go, I had intended to share another card using a Sale-A-Bration 'sneak peek' to whet your appetite for tomorrow, however I've had an idea that I've wanted to try for a couple of weeks with my Flowerfull Heart stamp and since today is the last day you can purchase this stamp, I thought I'd have one last share with you. I decided to use this week's layout at Freshly Made Sketches as my starting point:


As my regular readers will know, I struggle with the concept of 'vintage' (I much prefer clean lines!) but instinctively I thought this was one of the few stamps in my set that might work for the vintage look, so here's my attempt:

I say 'attempt' because whilst I quite like the finished card, I'm not sure it meets the criteria for a truly vintage look. I like the Crumb Cake, the more muted effect by colouring the stamp with markers and the ribbon works. however, not a pearl or doily in sight - think I might have to go off and do a little more research on this one! If anyone would like to leave some suggestions as to how I could improve the vintage feel of this card, do let me know - all comments welcome. Click on the links below if you would like to purchase any of the items used above, including the stamp - last chance today!

Back tomorrow with the start of Sale-A-Bration - hope you're all as excited as I am!! Until then, happy stampin'!


Stampin' Up! Supplies Used:

Table built using Stampin' Up! Product Table Builder from The Crafty Owl.
 

Tags: , , , , , , ,

Cards | Stamping

The Colours of the Rainbow - Filter Paper Technique

by Joanne James20. May 2013 20:36

I thought today I would share a card I made at my last training session which showcases a very cool technique using ink, alcohol and filter paper. Here is the finished card: 

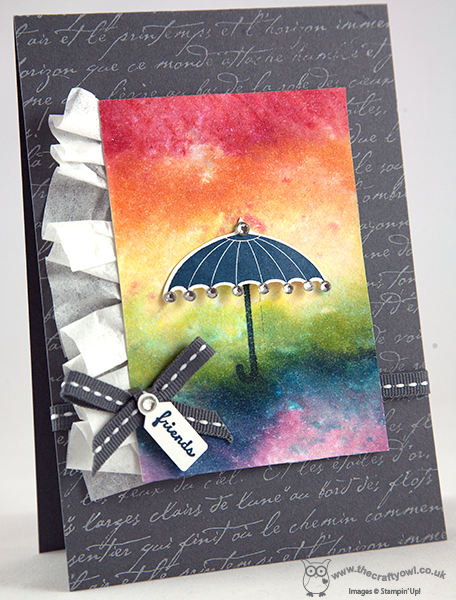
The real focal point of this card, designed by the lovely Monica Gale, is the central rainbow panel, which is so easy to achieve. All you need to do is colour an acetate window sheet using Stampin' Write markers in sections - for this card we used Real Red, Pumpkin Pie, Daffodil Delight, Gumball Green, Midnight Muse and Rich Razzleberry - then spray this liberally with water, or isopropyl alcohol if you want it to dry more quickly, until the ink blends. Once this happens, you simply lay your filter paper (rough side down) onto the ink until it's absorbed, then peel away from the acetate and leave to dry. Once dry, the filter paper can be glued to a piece of white card and cut to size to fit your project.

The result varies depending on the colours used and the shapes drawn onto the acetate, but that's the great thing with a technique like this - a unique output every time. I will be using this on other cards for sure and may even record a short video to demostrate just how easy it is to achieve - watch this space!

Back tomorrow with another project. Until then, happy stampin'!


Stampin' Up Supplies:

Stamps: Rain or Shine, En Francais, Tiny Tags

Cardstock: Basic Grey, Whisper White

Ink/Stampin' Write Markers: Real Red, Pumpkin Pie, Daffodil Delight, Gumball Green, Midnight Muse and Rich Razzleberry

Tools: Jewellery Tag Punch, Creped Filter Paper

Finishing Touches: Basics Rhinestones, 1/4" Stitched Grosgrain Ribbon Basic Grey, Alcohol Shimmer Mist

Tags: , , , , , , , ,

Cards | Stamping

Butterflies - for Mums everywhere

by Joanne James12. May 2013 21:58

Well, it's been a busy weekend: Stampin' Up! regional training in Telford yesterday, preparing for this week's classes today, so am rather behind with my posts. Yesterday was a great day, with lots to share in the coming weeks, however I returned home with the most dreadful headache, so couldn't focus long enough to finish yesterday's post. I will share my swaps tomorrow instead, as today's post is a timely one as it's International Mother's Day; we in the UK had our Mother's Day a while ago now, but for my American and Canadian friends celebrating today, I thought I would share the Mother's Day card I made for my Mother-In-Law, which I couldn't share at the time as she reads my blog and so I couldn't spoil the surprise! This was her card:


Very pink just about sums it up! Can you see the lovely shimmer on the butterflies? This is courtesy of the liberal spray of Vanilla Smooch Spritz - they really sparkle when they catch the light. This card would of course also make a lovely birthday card for a Mum.

One of my favourite books is 'Good Mother, Bad Mother' by Gina Ford (a modern day heroine in my view) and there is a line at the beginning that says "the hand that rocks the cradle is the hand that rules the world" - I so love that line, so to Mothers everywhere, this one's for you - hope you've had a lovely day.

Back tomorrow with my Telford swaps; until them, happy stampin'!


Stampin' Up Supplies:

Stamps: En Francais

Cardstock: Whisper White, Melon Mambo, Pretty in Pink

Ink/Stampin' Write Markers: Pretty in Pink

Tools: Elegant Butterfly Punch, Bitty Butterfly Punch, Typeset Alphabet

Finishing Touches: Vanilla Smooch Spritz, Basics Rhinestones


Mini Catalogue

BROWSE THE CATALOGUE

The mini catalogue is now live! Read and download your copy here.

Shop Online

Access my online shop 24 x 7, 365 days of the year:

Current April hostess code:

VDKNV7BH

Shop Online

Join My Team

It's always a great time to join Stampin’ Up! New team members can get £130 worth of products for only £99 + free business supplies + free shipping + all the fun being a part of Stampin’ Up! Stampin' Up! has something for everyone: join my growing team and benefit from my support to enjoy Stampin' Up! however you choose.

If you're interested, call me for a chat to understand how I can help you realise your goals. Alternatively, if you have already decided to sign up and you just can't wait, please click here for the link to the online form where you can sign up and order your starter kit right away! 

Latest Kit!

Stampin Cut and Emboss

The Rock Legend Kit has all you need to make 8 cards with coordinating envelopes. Along with the new Panda Friends Kit, both are available from January 4th for just £14 each - get yours here!

2023-24 Annual Catalogue

BROWSE THE CATALOGUE

Click on the catalogue for a full list of current SU! supplies - if you would like to order any of the items featured, please drop me a line at [email protected] or give me a call on 07773 421446 - I'd be happy to help.

New Online Exclusives

There are new products available exclusively in the online store from 5 March - check them out here.

About Me

Hi I'm Joanne and live in Northampton and when I'm not looking after my husband and two beautiful children, am an avid crafter with a passion for all things Stampin' Up!

I must confess that I have never been a big rubber stamper - until I discovered Stampin' Up! that is. I love the fact that I can get such great results with co-ordinating stamps, inks, papers and punches - the possibilities are endless! Join me on my stamping journey as I share the things I love and be inspired to create amazing things yourself!

Follow Me

Monthly Newsletter

Box Builder

Click the button above to use Box Buster to create your custom box design using the Envelope Punch Board!

Kits Collection Now Available!

Stampin Cut and Emboss

The new Kits Collection from Stampin' Up! is now available!

Click here to see the current kits available and order yours online today.

I Design For


Stampin' Up Stuff

This is my personal blog and is not endorsed by Stampin’ Up! I hope you find it a plentiful source of ideas and personal inspiration but please don't copy my designs for contest submission or use for classes, publication or sale without express permission.