Crafternoon Tea at Bell of Northampton - Spaces Available!

by Joanne James11. April 2016 19:00

I have had a busy start to my week: the James Juniors are back at school after an enjoyable Easter break so today has been spent catching up on correspondence, spending more time making my swaps for Onstage later this week and planning for my week ahead, which includes the fist of this month's Technique Classes tomorrow - more on that later this week.

Today I want to share a home decor project that I will be making at my 'Crafternoon Tea' event that I am holding at Bell of Northampton in Kingsthorpe on Saturday 7th May, featuring the Botanical Builder Framelits Dies and the 'Hello Life' stamp set:

All instruction and materials will be provided for the session and each person will leave with a decorated 9” x 9” frame to keep. Check out this close-up of the gorgeous flowers: 

Once you’ve completed your project, you can tuck into a scrumptious afternoon tea for two with scones and cakes alongside a large selection of sandwiches stuffed to bursting with egg mayonnaise, chicken and horseradish, cheddar cheese with chilli jam and many more scrumptious fillings freshly prepared by Tea and Cake @ Bell.

The session will run from 10am-2pm on Saturday 7th May and cost £56 for two people. Buy it for yourself or as a gift! Why not treat yourself and your mum, friend or daughter to a voucher for an indulgent afternoon tea and crafting session! There are still spaces left for this event - I would love you to join me! If this is something that appeals to you, click here to make your booking online.

I'll be back tomorrow with a 'sneak peek' of the card that I will be making in my drop-in Coffee and Card Session at Bell's on Wednesday this week between 10-12 noon. Until then, happy stampin!

Tags: , , , ,

3D Projects | Classes

Coffee and Card Drop-in Sessions at Bell of Northampton

by Joanne James8. March 2016 09:30

I have an extra post today to share some of the detail around a new type of event that I've added to my calendar recently - Coffee and Card Drop-in Sessions. You can see the key details on my graphic below:


I am excited to share this new venture with you. It's the perfect opportunity for non-crafters and crafters alike who live in or around the Northampton area to 'dip their toe' into the world of papercrafting and experience Stampin' Up! products first hand with me, without having to commit to a class. And what better place to do it than in the luxurious surroundings of Bell of Northampton, whilst enjoying a drink and a delicious cookie prepared by the in-house baker Alex of Tea and Cake @ Bell. No booking, skills or expertise required - just pop in for a little 'time out' and leave with a beautiful handcrafted card to send to someone special. You can find directions to Bell's here - there is ample free customer parking with disabled access at both the front and rear of the store.

The full schedule for these sessions along with the rest of my classes and events can be found on my website here. The next of my sessions will be tomorrow, Wednesday 9th March - I'd love to see you there!

Back shortly with today's creative project; until then, happy stampin'!

Awesomely Artistic Collage Card

by Joanne James5. January 2016 07:05

A two-post day today! This year's Sale-A-Bration promotion and the launch of the Stampin' Up! 2016 Spring-Summer catalogue is today and you can get the full scoop here; for today's creative post I am sharing a card that we are making in my technique class this month. Our class is using the 'Awesomely Artistic' stamp set and looking at collage techniques. This is one of the cards we made and it features one of my favourite new products from the new catalogue for adding a touch of sparkle to your projects - take a look:


The glimmer on the dragonfly's wings is tricky to capture on a photograph, but I can assure you in real life they have a beautiful golden shimmer! The Wink of Stella Glitter brushes are the perfect tool to add sparkle and shine to your projects. There are two different pens on page 24 of the new Spring-Summer catalogue and we used the gold one on this card. We used the clear brush on our other two cards; I'll share these another day. 

My February technique classes will feature the beautiful Bloomin' Hearts Thinlits Die and the co-ordinating Bloomin' Love stamp set. If you live in or around Northampton and you would like to join me for crafting enjoyment with like-minded individuals, please do get in touch for more details. We had a new lady join us today for the first time so if you're reading this, a big hello to you Fran - I hope you enjoyed yourself as much as we enjoyed your company and look forward to seeing you again soon.

I have another full day of classes today; I'l be back tomorrow with another project. Until then, happy stampin'!


Stampin' Up! Supplies Used:

Table built using Product Table Builder by The Crafty Owl - Independent Stampin' Up! Demonstrator.


Sleigh Ride Edgelits Christmas Ornament with Salt Technique Background

by Joanne James20. December 2015 21:29

It's Sunday and whilst there is no Paper Players post from me today - we are taking a couple of weeks off from our design commitments to enjoy the festive season with our families - however fear not - as promised I still have a project to share with you today! 

My December technique classes featured creating backgrounds with the salt technique. I had created the following pair of cards cased from the lovely Jen Timko just for fun:

I just loved the white, layering and beautiful and unique sky created using this fun technique:


You can see Jen's card and a great video on the technique here. In my class we made a similar card using the 'Jingle All the Way' stamp set but the real focus of our class was a 3 dimensional Christmas bauble ornament and a co-ordinating box to gift it in, all featuring backgrounds made using this technique. Here is my finished bauble:

This bauble is quite stunning in real life; the layering, silver foil and embossing and dazzling diamonds glimmer paper, along with that amazing sky, really show the Sleigh Ride Edgelits off to full advantage. I'm so sorry that these will not be carried over on 4th January; if you haven't already purchased them, place your order now before it's too late!

Back soon with another project; until then, happy stampin'!


Stampin' Up! Supplies Used:

Table built using Product Table Builder by The Crafty Owl - Independent Stampin' Up! Demonstrator.


Crazy About You One Sheet Wonder Cards

by Joanne James17. November 2015 21:55

I am having a busy week with another two classes today, so today's post is light on words but with lots of pictures to make up for it. I wanted to share the cards we made at my Stamp-A-Stack class last week. My ladies decided they wanted a change from Christmas cards, so instead we did a One Sheet Wonder adapted from a template by LeeAnn Greff. I wanted to go totally bright so we used Calypso Coral, Crushed Curry, Wild Wasabi and Pool Party and flowers from the 'Crazy About You' stamp set along with a little one from 'Flower Patch' and a mix of sentiments from other sets. We made 10 cards in total - here they are:

I didn't add sentiments on many of them - sometimes it's nice to be able to add a sentiment as you use the card: 


There you go - 10 cards for any occasion. We had so much fun at this class we are going to do it all again next month, only this time using the Vintage Leaves stamp set to make a set of masculine cards. This class will be on Friday 11th December and the cost for the class is £15 or free with a £45 order. There are still a couple of places available, so if you would like to join us do get in touch to reserve your place. 

Back tomorrow with another project; until then, happy stampin'!


Stampin' Up! Supplies Used:

Table built using Product Table Builder by The Crafty Owl - Independent Stampin' Up! Demonstrator.


To You And Yours Christmas Shaker Cards

by Joanne James6. October 2015 21:23

Today I have another kit based project to share with you: the 'To You And Yours Shaker Cards' project kit featured on page 4 of the current seasonal catalogue. Whilst I love creating my own cards from scratch, I am also a huge fan of Stampin' Up!'s card kits. Like the rest of the Stampin' Up! product range they are always of a very high quality and represent great value for money and for me are a great way to relax as I craft, as all I have to do is follow the instructions and put them together!

I don't always blog my kit projects because often they are completed then straight out the door (they make great last minute cards for busy crafters too!) however I often get the feedback when people see them made up at classes, parties or open house events that they look so much better in real life than the catalogue images. So, with that in mind I have been making a concerted effort, along with one of my downlines and fellow 'kit fan' Barbara, to get my kits put together ahead of time and share them with you. So here goes! 

The 'To You And Yours Shaker Cards' Project Kit contains everything you need to make 18 cards, 6 each of three designs. You can make them with or without the additional stamping - for this you will need the 'To You And Yours Too' co-ordinating stamp set and a few ink pads (see product table below). The first card features a star shaker, complete with star-shaped sequins:


The second card features a Christmas tree, with sequin baubles and glitter glass shaker:


The last card features a bauble, in gorgeous green and red (in case you're wondering, I swapped the sentiments on the front of each of the star and bauble cards because I preferred them this way) - I think this one is actually my favourite: 

Aren't they just gorgeous?! And not tricky to put together at all! So much so that I am running a couple of children's classes to make these cards during the forthcoming half-term holiday; you can check out the details by clicking on the 'events' tab on my Facebook page here or alternatively send me an email or give me a call - spaces are limited and they are filling up fast! Likewise, if you would like to get together with a group of grown up friends to make this kit then let me know - I'll bring along the inks and stamp sets, you just need to purchase the kits!

If you are purchasing this kit to craft at home, (or need more convincing!) the lovely people at Stampin' Up! have even made a video showing you step by step how to put the kit together:

I hope you enjoyed the review of this fantastic little kit; I'll be back with details of the other kits we offer in due course. That's all from me today - back tomorrow with details of this week's new Wednesday Weekly Deals and a creative punch art project. until then, happy stampin'!


Stampin' Up! Supplies Used:

Table built using Product Table Builder by The Crafty Owl - Independent Stampin' Up! Demonstrator.


Witching Decor Project Kit - Halloween Witches Hat

by Joanne James5. October 2015 21:39

So today I thought we would have a change from cards and I would share with you the 3D project that I made on World Card Making Day. I know, topsy turvy, but since crafting with friends is in itself something to be celebrated, it seemed a great way to spend the day. So the project in question is the Witching Decor Project Kit in the seasonal catalogue. Normally this isn't the kind of project I would make, however the female James junior of the house, Rebecca, absolutely loved it and wore me down until I promised to buy it for her to create! 

So she invited her friend and fellow crafting enthusiast Nicholas over for the afternoon and we spent a pleasant few hours putting our respective hats together. Here is Rebecca's finished hat in all its glory:
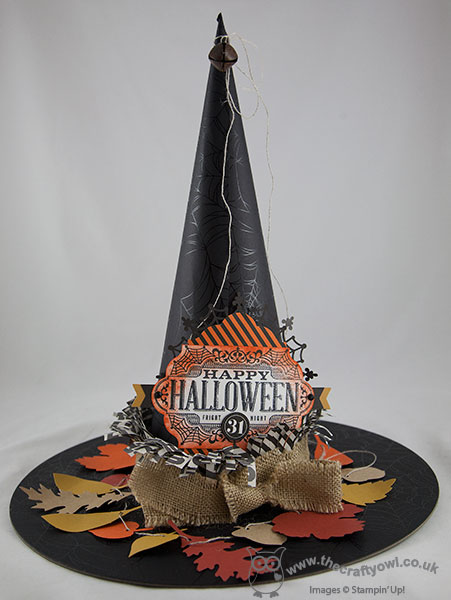
Now if you've seen the photo in the catalogue, you will see a few differences between this one and that one. the first is the shape: the one in the catalogue looks crumpled and 'worn in' (a little like the sorting hat in the Harry Potter stories!). The trouble was, once put together Rebecca decided she wanted hers to have a perfect point, so since she still managed to tie on her bell and have it tinkle, she couldn't bring herself to crumple the end! It must be a girl thing - Nicholas had no such issues and his had a wonderfully worn in appearance! 

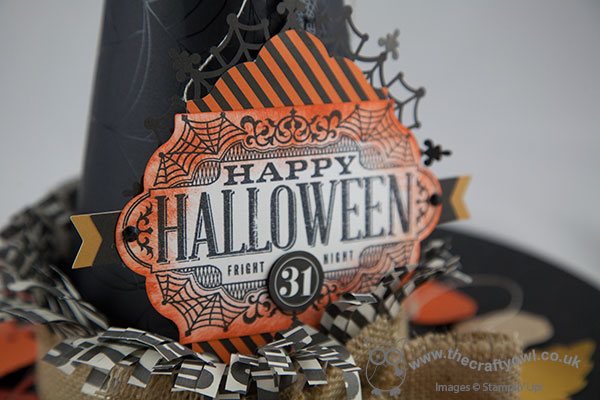
You might also notice the rather enthusiastically sponged edging to the 'Happy Halloween' label; the kit recommends using Soft Suede for a 'worn' look, yet having made one like this the children universally agreed that this didn't work for them at all and orange was most definitely needed! So we made another label - there are enough labels for 3 each of the stamp designs, in fact the whole kit is very generous in its contents; we made interchangeable labels and still had labels, flags, rhinestones and lots of leaves left over. All for just £20 and the co-ordinating 'Witches' Night' stamp set. I have a class scheduled to make this kit on 13th October - it would also make a great project for a girls' night in. I have a few calendar slots left in October so if this is something that interests you, please get in touch.
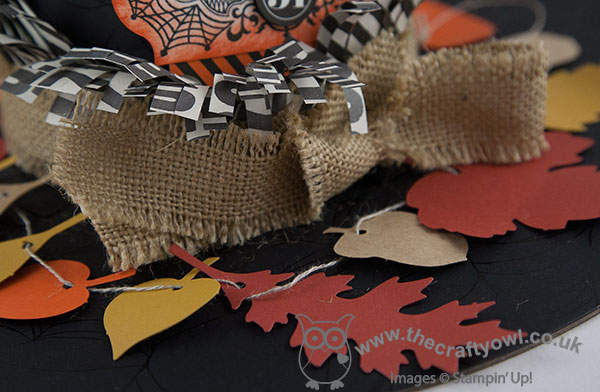
The leaves that are threaded around the edge of the hat are all pre-punched and can be used just as they are, as the children did on their hats (they just wanted to get them threaded and had no time for extra sponging!). They could also be sponged and distressed to add more texture and colour, or even stamped with the Vintage Leaves set to add more detail. 
We were so absorbed in our task, I didn't even take a photograph of us at work to share with you. Suffice to say, the children had a great time and I am loving the addition of the hat to our Halloween home decor. 

This is a great kit and very easy to construct - you might say child's play! It would be a great kit to make with children as part of the build up to your 'trick or treat' festivities. 

That's all from me today - back tomorrow with another project and some exciting children's news too! Until then, happy stampin'!


Stampin' Up! Supplies used:

Table built using Product Table Builder by The Crafty Owl - Independent Stampin' Up! Demonstrator.


Home For Christmas Jolly Reindeer Card

by Joanne James28. September 2015 22:14

Happy Monday everyone! Today I have another of the cards that I designed for my recent Christmas stamp-a-stack featuring an adorable reindeer from the Home For Christmas designer paper. This clean and layered card is just perfect for the challenge over at The Card Concept this week, which is to feature a forest friend on your card:

Isn't that inspiration photo just the cutest? Here's the reindeer forest friend that features on my card:

I used a Soft Suede base and a couple of patterned pieces of Home for Christmas DSP, then punched a 2" circle of Very Vanilla and adhered my fussy cut reindeer on the top. I stamped the 'Have a' and 'Christmas' parts of my sentiment from the Holly Jolly Greetings set in Memento Black onto Very Vanilla, then cut a 'jolly' out of red glimmer paper using my Big Shot and Christmas Greetings Thinlits Dies and adhered all of my sentiments with dimensionals for a little extra height. I just love the Home For Christmas Designer Series Paper - the retro designs are fantastic and the reindeers and santas are all decorated differently and in slightly different poses that are great for fussy cutting, although I'm not sure my ladies agreed after cutting out six of these little fellas!

That's all from me today; back tomorrow with another project. Until then, happy stampin'!


Stampin' Up! Supplies Used:

Table built using Product Table Builder by The Crafty Owl - Independent Stampin' Up! Demonstrator.


Poinsettia Festive Flower Punch Christmas Card

by Joanne James21. September 2015 21:40

I've been busy today with the final preparations for the first of my all day Christmas Stamp-a-Stacks later this week but today's card that I'm going to share is the final one from last month's technique class using the 'Reason For The Season' stamp set:

For this card we used a base of Real Red and decorated the front with a piece of Merry Moments DSP, then cut away a section using a 2" circle punch, so that it would fit around a 3D poinsettia flower made from Real Red card stock and adhered to the inside to the card. We used two layers of petals and a trio of leaves for our flower and wrapped a few loops of fine gold metallic thread behind it. This was a great card to get everyone used to building the 3D flower using the punch, having stamped the patterns onto the petals and leaves beforehand. These flowers also look great on festive packaging and really make the most of this versatile stamp set. This is one of the many great value bundles in the seasonal catalogue - with 15% off when you purchase the bundle, it represents a great saving. If you would like to see this stamp and punch combo in action (and a refresher for the ladies that attended my class!), here's a great video from Stampin' Up! that gives you the lowdown:

I hope you enjoyed that video. Don't forget, if you live in or around Northampton and would like more information on attending any of my classes, you can find full details here or just get in touch to confirm availability. Back tomorrow with another project; until then, happy stampin'!


Stampin' Up! Supplies Used:

Table built using Product Table Builder by The Crafty Owl - Independent Stampin' Up! Demonstrator.


White and Gold Christmas Poinsettia Card

by Joanne James15. September 2015 21:02

Good evening blog readers! I had a lovely time with the ladies - and gent! - that attend my card class at a local residential care home this morning. As always, the lovely Sheila and Brenda were wonderful hostesses and today we were joined a new resident, Peggy, for the first time. We enjoyed a pleasant few hours making Christmas cards and this afternoon I caught up with one of my team over a quick coffee and got some jobs done before collecting the children and embarking on the usual Tuesday round of homework, piano lessons and dinner. Anyway, enough about my day! No time to make a card today, so I thought I'd share with you another of the cards we made at my Technique class this month. Another using the 'Reason For The Season' stamp set, but this time in white and gold:

I used extra thick Whisper White cardstock for my base, then created a layered central panel using a piece of gold foil cardstock and a piece of Whisper White covered with a piece of the gorgeous gold foil Winter Wonderland Designer Vellum Stack. I stamped the sentiment and flower onto a piece of Whisper White in Versamark and heat embossed in gold, then fussy cut the flower and punched the sentiment out using a 2" circle punch. To put together, I created a few loops of gold corded trim and adhered these to my card, followed by the sentiment then lastly the flower, overlapping each slightly. A sprinkling of gold sequins from the Metallics Sequin Assortment completes my card.

This is my favourite of all the cards we made in this month's technique class - I love the modern, crisp gold and white finish. That's all from me today; back tomorrow with a new collection of weekly deals. until then, happy stampin'!


Stampin' Up! Supplies Used:

Table built using Product Table Builder by The Crafty Owl - Independent Stampin' Up! Demonstrator.


Tags: , , , , , ,

Cards | Classes | Shop Online | Stamping

Current Promotions

Stampin Cut and Emboss

Save up to 30% off on all your favourite kits from 1 to 31 October! 

Click here to see the current kits available and order yours online today.

Join My Team

It's always a great time to join Stampin’ Up! During October you can get even more in your starter kit! New team members can get £160 worth of products for only £99 + free business supplies + free shipping + all the fun being a part of Stampin’ Up! Stampin' Up! has something for everyone: join my growing team and benefit from my support to enjoy Stampin' Up! however you choose.

If you're interested, call me for a chat to understand how I can help you realise your goals. Alternatively, if you have already decided to sign up and you just can't wait, please click here for the link to the online form where you can sign up and order your starter kit right away! 

Shop Online

Access my online shop 24 x 7, 365 days of the year:

Current October hostess code:

4XPEYCB9

Shop Online

Scrapbooking

Stampin' Up! has introduced a new range of 12x12" scrapbooking product and kit - the full range is now available to purchase online. To download a copy of the new digital Scrapbooking Catalogue click here.

Mini Catalogue

BROWSE THE CATALOGUE

'Tis The Season - the new Stampin' Up! Mini Catalogue is here! For more details and to download your copy click here

2024-25 Annual Catalogue

BROWSE THE CATALOGUE

Click on the image to download your copy of the 2024-25 annual catalogue. For a full list of current SU! supplies, go to my online store. If you would like any help or advice, please drop me a line at joanne@thecraftyowl.co.uk or give me a call on 07773 421446 - I'd be happy to help.

Latest Kits!

Stampin Cut and Emboss

The Christmas Ornaments Kit and Card Keeper Kit are the latest kits in the online store - get yours here!

New Online Exclusives

There are new products available exclusively in the online store from 5 November - check them out here.

About Me

Hi I'm Joanne and live in Northampton and when I'm not looking after my husband and two beautiful children, am an avid crafter with a passion for all things Stampin' Up!

I must confess that I have never been a big rubber stamper - until I discovered Stampin' Up! that is. I love the fact that I can get such great results with co-ordinating stamps, inks, papers and punches - the possibilities are endless! Join me on my stamping journey as I share the things I love and be inspired to create amazing things yourself!

Follow Me

Monthly Newsletter

Box Builder

Click the button above to use Box Buster to create your custom box design using the Envelope Punch Board!

Kits Collection Now Available!

Stampin Cut and Emboss

The new Kits Collection from Stampin' Up! is now available!

Click here to see the current kits available and order yours online today.

I Design For


Stampin' Up Stuff

This is my personal blog and is not endorsed by Stampin’ Up! I hope you find it a plentiful source of ideas and personal inspiration but please don't copy my designs for contest submission or use for classes, publication or sale without express permission.