Window Box Thinlit Gift Box And The Benefits Of Crafting Together

by Joanne James8. May 2017 20:00

As promised on Friday (Saturday was consumed with homework, swimming and the first cricket match of the season - goodness, doesn't that game go on FOREVER?!! - so I didn't get to post this the as planned), today I'm sharing with you another of the makes from one of last month's technique classes, featuring the Window Box Thinlits dies. In addition to using them to make the birthday card I shared on Friday and an Easter basket, we also made a box with the thinlits and one of the decorative pieces. Here is our finished box:


Here's the low-down on today's project:

Window Box Thinlits - The Window Box Thinlits make the most adorable hexagonal box that is incredibly versatile. It can be used as packaging for a small gift or would be the perfect size for a wedding favour; it also makes a beautiful table decoration if you place a battery-operated tealight inside and looks lovely if a number of them are clustered together in this way. You can build it plain, decorate with designer series paper or use the selection of cutout dies to give extra pattern to the side and top panels. The box above has the side panels cut out and backed with vellum, along with a layered vellum backed top, so that the ribbon tie sits below the vellum panel and allows the sentiment banner to sit neatly across the top of the box.

So Much More Than A Box - The Window Box Thinlits are so much more than a standard box though. This versatile thinlit die set can also be used to make other items, such as sail boats and baskets, and can be used to create alternative boxes in different shapes and sizes too. The benefit of featuring this set in a class is that you can demonstrate and show the class participants how to do the slightly more unusual things in a hands-on way and be there to answer their questions and queries as you go. It's also a good opportunity to ensure everyone understands what each thinlit piece is for, any hints and tricks and sometimes how to avoid common pitfalls when using the item in question.

Love What We Do, Share What We Love - Stampin' Up!'s Statement of the Heart is "To love what we do and share what we love, as we help others enjoy creativity and worthwhile accomplishments ... in this we make a difference". There are many ways as a demonstrator that this can be achieved and I'm someone who loves to share my projects in a variety of ways. I love the 'art' of blogging (I find it relaxing and in many ways a kind of free therapy!) and sharing my projects with you, but in the online world not everyone who reads my blog or sees my projects on Pinterest or other social media channels leaves feedback or a comment to say what they think. That's one of the things I love about face-to-face classes - the feedback is immediate and it is instantly gratifying to share my love of Stampin' Up! with those that attend my classes and see them leave at the end of a session having learned lots, made some beautiful things and be brimming with ideas of how they can use their Stampin' Up! purchases to bring them continued and lasting crafting pleasure. There's nothing quite like it! 

I would love to see you at one of my classes and share my knowledge and experience of how to get the best from your Stampin' Up! products 'up close and personal'. You can see the current list here but do check back regularly for updates as new classes are added from time to time and will be updating shortly with a new set of classes featuring new items from the new 2017-18 Annual Stampin' Up! Catalogue. 

Here is the visual summary of the key products used on today's project for you to pin for easy reference:


You can see all of my 'How To' summaries on my 'How To - Tips and Techniques' Pinterest board in case you've missed any. 

I'll be back tomorrow with another project. Until then, happy stampin'!


Stampin' Up! Supplies Used:

Table built using Product Table Builder by The Crafty Owl - Independent Stampin' Up! Demonstrator.

Window Box Thinlits Happy Birthday Candle Card

by Joanne James5. May 2017 20:00

Did you miss me? I've been away from my blog this week simply because, well, life got in the way! I've been busy preparing for a big team training event that I'm hosting the weekend after next and I've had preparation for next week's classes to take care of, so whilst I've content prepared for both that I will share in due course, I seem to have struggled to find the time to write any posts.

Anyways, I'm here a little earlier this evening and thought I would share with you one of the makes from one of last month's technique classes, featuring the Window Box Thinlits dies. In addition to using them to make an Easter basket and a pretty box, we also made a simple card that featured the co-ordinating Window Shopping stamp set and one of the decorative pieces. Here it is:


The card features the bright colours that are a feature of the candle-printed designer series paper from the Party Animal Suite: Tangerine Tango, Pacific Point, Emerald Envy, Crushed Curry. A bold happy birthday sentiment, along with a Stitched Framelit square that w as run through the Big Shot for a second time with the candle die from the Window Box thinlit set form the basis of the central panel. Wondering how I coloured my candles? I used Party Animal Washi Tape, just running a few strips across the base before adding the diecut popped up on dimensionals. You can see the detail more closely here:


This is one of those 'go to' cards - quick and easy to put together and in this colour combination pretty much suitable for anyone. A great standby card or one to make if you're short on time and need a card in a hurry!

I'm so glad that the Window Shopping stamp set and Window Box Thinlits are carrying over into the new annual catalogue - they are so useful. The current discounted bundle price won't carry over though, so if you would like get the 10% bundle discount for purchasing before products, be sure to purchase before the end of May.

Here is the visual summary of the key products used on today's project for you to pin for easy reference:


You can see all of my 'How To' summaries on my 'How To - Tips and Techniques' Pinterest board in case you've missed any. 

I'll be back tomorrow with one of the other projects from last month's technique class featuring the Window Box Thinlits. If you live in or around Northampton, I would love to see you at one of my classes. You can see the current list here but do check back regularly for updates as new classes are added from time to time. Until tomorrow, happy stampin'!


Stampin' Up! Supplies Used:

Table built using Product Table Builder by The Crafty Owl - Independent Stampin' Up! Demonstrator.

Petals And Paisleys 3D Home Decor Wall Art - FREE PDF Tutorlal

by Joanne James26. April 2017 20:13

Today I'm sharing a project that I made in an all-day class last November, but didn't share at the time on my blog. Do you remember the 3D home decor piece featuring the Paisleys and Posies stamp set and co-ordinating Paisleys Framelits that featured on page 46 of the Autumn-Winter seasonal catalogue? Here's a reminder:


I thought this was a lovely and unusual piece of wall art, so decided to use it as the basis for an all-day class where the ladies attending would each make their own version of this project and also stamp a stack of cards using the remaining papers in the Petals & Paisleys Specialty Designer Series Paper pack, which they each received in their kits.

Here's my finished framed piece - I originally framed it in white, but have since had it professionally framed in a beautiful copper-coloured wood frame similar to the one in the catalogue, which has much greater impact:


I like this piece so much it is now hanging on the wall in my dining room. The photo above really doesn't do it justice - just look at the lovely shine on the foil and embossed copper against the navy: 


So very pretty! The finished piece measures 12" x 12" unmounted and unframed. The Petals and Posies stamp set and co-ordinating Paisleys Framelits were carried over and are still available, however the paper was discontinued. Good news though: I decided to share this project today because those lovely Petals and Paisleys Specialty Designer Series Papers are now available again on the Clearance Rack for only £4.70 per pack - bargain!

I ALSO HAVE A SPECIAL OFFER FOR YOU - A FREE PDF TUTORIAL!

For everyone who purchases the Petals and Paisleys Specialty Designer Series Papers on the Clearance Rack along with the Petals and Posies stamp set and co-ordinating Paisleys Framelits from me through my online store before the end of this month (Sunday 30th April) using the current hostess code Y2MKPTP6, I will send you a copy of my PDF tutorial for the above home decor wall art project, containing full written and photo step-by-step instructions FOR FREE, so that you can recreate it too! Instructions will be emailed separately following purchase - please ensure you include your email address and check the box that allows you to be contacted by me as your demonstrator following your purchase to send them on to you.


The links below will take you to my online store to enable you to purchase all of the supplies you need. I'll be back tomorrow with another project and more Stampin' Up! news. Until then, happy stampin'!


Stampin' Up! Supplies Used:

Table built using Product Table Builder by The Crafty Owl - Independent Stampin' Up! Demonstrator.

Forever Evergreen Project Kit Christmas Trees

by Joanne James2. November 2016 09:40

Wednesday already? Happy 'hump day' everyone! Today I have a 3D project for a change - I want to share the trio of Christmas trees I made using the Forever Evergreen Project Kit in the seasonal catalogue. My regular readers will know what a fan I am of Stampin' Up!'s kits: they are great for everyone from the complete novice to the seasoned crafter and are the perfect option for a fun afternoon or evening activity with friends.

The Forever Evergreen kit comprises three Christmas trees, one 33cm tall and two 27.9cm tall - complete with decorations. You then need some additional basic items to complete the project: the Forever Evergreen stamp set, ink pads and adhesives. Here are my trees in all their glory - first the largest one in Garden Green:


The second, smaller one also in Garden Green:


And lastly, the final smaller one, this time in Wild Wasabi:


I have to say the catalogue really doesn't do these trees justice; they are way more impressive in real life and having had them on display at the craft show I exhibited at recently they were the subject of many 'oohs' and 'aahs'. Many of my customers have passed comment on them as they've been in and out for classes too. If you would like to purchase these kits to make at home, Stampin' Up! has produced a very helpful video that is worth watching before you start putting the kit together:

If you would like to get together with me in person to make this kit, you have a couple of options: you can gather with friends and purchase a kit each and have me bring the extra supplies needed for a crafty afternoon or evening in with friends. Alternatively you could join me for my next Crafternoon Tea at Bell's in Kingsthorpe, Northampton, on Saturday 19th November from 10am-2pm, when we will be making this kit and finishing with an afternoon tea prepared by the Cafe @ Bells in store - contact me to book your place. 

I hope you've enjoyed your day today; I enjoyed a crisp autumn day kicking leaves in the country park and a hockey match (unfortunately no win today, but another match on Saturday so hopefully their luck will change!). I'll be back tomorrow with a Christmas card for this week's new challenge over at Create With Connie and Mary. Until then, happy stampin'!


Stampin' Up! Supplies Used:

Table built using Product Table Builder by The Crafty Owl - Independent Stampin' Up! Demonstrator.

Pop Of Pink Jar of Love Shaker Card

by Joanne James18. July 2016 07:00

Today I'm sharing the first of the cards from my second of this month's technique class featuring the very on-trend Jar of Love stamp set and co-ordinating Everyday Jars Framelits Dies. Each of the ladies received the bundle and as always I was on a mission to use as wide a variety as possible of the stamps in this set to showcase its versatility.

This was the easiest cards of the three - a fun 'pop of pink' shaker card:


Here's the low-down on today's card:

Pop of Pink - The colour scheme for my fun shaker is inspired by the Pop of Pink Suite of Products; I used some of the Pop of Pink washi tape to embellish with a little gold ribbon - here's the colours if you'd like to save them for inspiration too:


A Sweet Sentiment - This card uses one of the many sweet sentiments from the 'Jar of Love' stamp set and is perfect for the loveheart theme of my card. I added a Brights enamel heart too for added shine.

Confetti Fun - My confetti is a mix of Melon Mambo hearts, cut out with the little framelit in the Everyday Jars set, and the hearts in the metallic sequins assortment; I usually pick these out when I do other projects, so I had quite the collection for my shaker! 

Here is the visual summary of the key products used on today's project for you to pin for easy reference:


You can see all of my 'How To' summaries on my 'How To - Tips and Techniques' Pinterest board in case you've missed any. 

The Jar of Love and Everyday Jars Framelits bundle is another of those that has just has so many creative possibilities! If you haven't bought yours yet, this month would be the perfect time to do so; if you purchase the bundle at £48.50 you will earn yourself a £4.50 money-off coupon any purchases next month too - bargain! Just click on the links below to hop on over to my online store to order yours today - and don't forget to add this month's hostess code 63RNATE3 to get a little thank you in the post from me too.

I'll be back tomorrow with the second of the cards from my Jar of Love class; come back then, you won't want to miss it! Until then, happy stampin'!


Stampin' Up! Supplies Used:

Table built using Product Table Builder by The Crafty Owl - Independent Stampin' Up! Demonstrator.

Hearth & Home Thinlits Roman Blind Card

by Joanne James27. May 2016 08:00

Happy Friday everyone! Today I'm sharing a card that I made in my shaker card technique class that featured the Hearth & Home Thinlits at the back end of last year:


So long ago I know, and whilst some of the products on this card are retiring (namely the flower and bird punches, the Alphabet Rotary Stamp and the ribbon), the Hearth & Home Thinlits are staying so it's still worth a share! Not only that, but the new Foam Adhesive Strips that are coming in the new catalogue will make this kind of card a breeze. 

This one isn't a shaker card; I made a little video tutorial to show how I created my colourful roman blind window treatment and have finally got around to editing it, so here it is:


I'm so glad the Hearth & Home Thinlits are staying, they really are so useful. I'm looking forward to seeing what new ribbons are coming our way to see how I can give my next window a makeover!

Here is the visual summary of the key products used on today's project for you to pin for easy reference:


You can see all of my 'How To' summaries on my 'How To - Tips and Techniques' Pinterest board in case you've missed any. 

That's all from me today; back tomorrow with another project. Until then, happy stampin'!


Stampin' Up! Supplies Used: 

Table built using Product Table Builder by The Crafty Owl - Independent Stampin' Up! Demonstrator.

Hot Pink Picture Perfect Hummingbird Card

by Joanne James10. May 2016 22:00

Good evening everyone! I hope your week has started well. I've had my first technique class of the month yesterday along with both a rounders and cricket match (observing not participating, and both wins!), and a second technique class and this month's Project Life Memory Keeping class today so it's been a busy couple of days. Just time to pop in this evening and share the first of the cards from this month's technique class, featuring the Hummingbird in the 'Picture Perfect' stamp set. I used this week's sketch over at As You See It for my layout:

AYSIChallenge134   SIP One Element Wonder 47 800

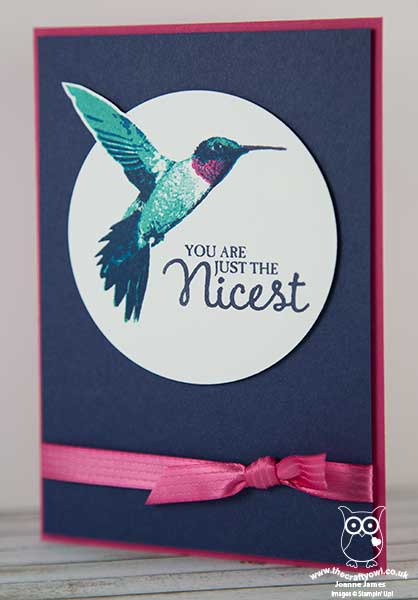
I'm also linking up with Stamp Ink Paper again this week, as their challenge is to feature one main element on your project and make it really stand out. The hummingbird is the most tricky stamp in the set to align, but when you get it right is so worth it in terms of the result. Here is my finished card:

Here's the low-down on today's card:

Picture Perfect Hummingbird - 'Picture Perfect' is a multi-step image stamp set, with each of the stamps having two, three or four layers. The hummingbird comes in four pieces; for my bird I stamped my first layer in Bermuda Bay, I stamped the second stamp in Melon Mambo, the third layer in Pacific Point and the fourth and final one in Night of Navy. Whilst it sounds complicated, this set is made from photopolymer which makes lining up the images really straightforward. I find it helpful to use the eye to align the images and use a piercing mat or similar foam pad as a base for your stamping for an even image. I do prefer to stamp my bird in the order that the stamps are numbered and if all else fails, a stamp-a-ma-jig will help you to align the images perfectly.  It is definitely a stamp where positioning improves with practice and I must say my ladies today stamped with amazing results, each producing four perfectly stamped hummingbirds on the first attempt!

Partial Die Cutting using Circle Framelits - I stamped my bird onto a piece of Whisper White and having fussy cut his wing tip by hand, I then cut a partial circle up to the diagonal before adhering behind so that it aligned with my cut away circle on my card base. Circle Framelits are invaluable for this kind of partial diecutting, as you simply roll through the Big Shot to the desired point without cutting the whole way through. I've used this technique with this stamp before here; it adds an interesting detail to an otherwise clean and simple card.

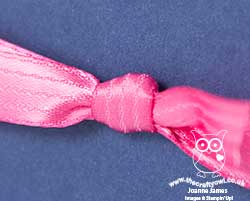
Pop of Pink - Melon Mambo is one of my favourite pinks in the Stampin' Up! colour collections and whilst there is only the smallest amount featured on the throat of my bird, I picked up this colour in both my card base and satin knotted ribbon to give a real pop of colour to my otherwise blue card.

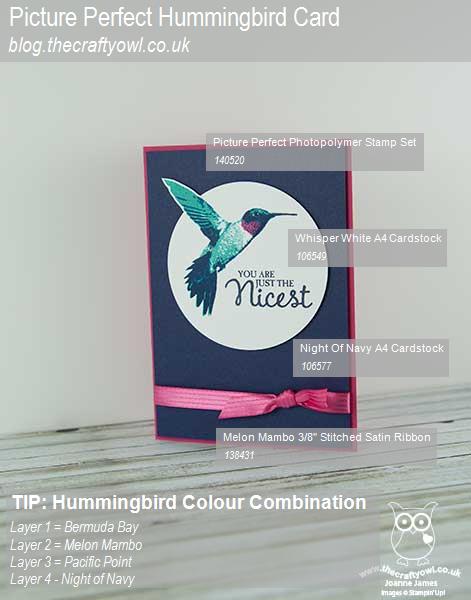
Here's today's visual summary of the key things needed to make today's card for easy reference:


You can see all of my 'How To' summaries on my 'How To - Tips and Techniques' Pinterest board in case you've missed any. 

That's all from me today; I have another busy day tomorrow, with my Coffee and Card Drop In Session at Bell of Northampton in Kingsthorpe and I'll also be at the in-store Spring Open Evening at Bells too. you can find full details on the latter here

Hopefully I'll squeeze in time for a quick blog post with another of my Picture Perfect class cards. Until then, happy stampin'!


Stampin' Up! Supplies Used:

Table built using Product Table Builder by The Crafty Owl - Independent Stampin' Up! Demonstrator.

Picture Perfect Hummmingbird Meets Flowering Flourishes

by Joanne James4. May 2016 19:00


I have had a busy day today with early climbing wall club (for the James Juniors, not me!), a trip to Ikea for a few frames (am I the only one who goes in for 4 things and comes out with 14?!) as well as some preparation for some upcoming classes. One of those classes is using the Picture Perfect stamp set, that also features on my card today for the current Fusion challenge:

I've been busy trying lots of hummingbird colour combinations and when I saw the inspiration photo for the challenge I couldn't resist having a go at this one. Here's my card: 


An eclectic mix of elements today - here's the low-down on my card:

Picture Perfect Hummingbird - I stamped the four parts of my hummingbird in Wild Wasabi, Bermuda Bay, Crushed Curry and Basic Grey to get the realistic markings. There is so much fun to be had in trying different colour combinations with this bird and the photopolymer does make it easy to line up with a little practice.

A Flowering Flourish - I decided to add a flowering flourish to mimic the orange blossom of the inspiration photo and having seen this card here on Pinterest I thought the Flowering Flourishes stamp set offered the perfect solution. I inked mine with my Watermelon Wonder, Crushed Curry and Cucumber Crush Stampin' Write markers for added vibrancy.

Borders of Blue - I finished my card with a piece of Bermuda Bay patterned paper from the Cherry On Top DSP stack to frame my scene. 

Here is the visual summary of the key products used on today's project for you to pin for easy reference:


You can see all of my 'How To' summaries on my 'How To - Tips and Techniques' Pinterest board in case you've missed any. 

This isn't one of my class cards next week but hopefully it will get the ladies that are booked to attend in the mood for some multi-step stamping.

That's all from me today. Back tomorrow with my card for this week's new challenge over at Create With Connie and Mary; until then, happy stampin'!


Stampin' Up! Supplies Used:

Table built using Product Table Builder by The Crafty Owl - Independent Stampin' Up! Demonstrator.

Coffee and Card - Party Pop-Up Card

by Joanne James12. April 2016 10:00

I've had a busy day today with both my first Technique Class of the month and my monthly Project Life Memory Keeping Class. Today's card though is all about tomorrow; it's the card that we will be making at my Drop-in Coffee and Card morning at Bell of Northampton. This week we will be making a pop up card using the Party Pop-Up Thinlits - take a look:

I've featured a card front similar to this one on my blog previously (you can read the detail here) - for this one though the fun happens on the inside:

I used one of the fun Party Pop-Up Thinlits for a surprise inside greeting, cut out of Whisper White and coloured with my Stampin' Write markers to co-ordinate with the front of my card. Added gold Wink of Stella for the candle flames, of course!

Here is the visual summary of the key products used on today's project for you to pin for easy reference:


You can see all of my 'How To' summaries on my 'How To - Tips and Techniques' Pinterest board in case you've missed any.  

I would love you to join me at Bell's tomorrow between 10-12 (you can find a reminder of the full details here) - hope to see you there!

I will be back tomorrow with one of the cards from today's technique class featuring the Rose Wonder bundle and the new, final set of Weekly Deals; until then, happy stampin'!


Stampin' Up! Supplies Used:

Table built using Product Table Builder by The Crafty Owl - Independent Stampin' Up! Demonstrator.

Crafternoon Tea at Bell of Northampton - Spaces Available!

by Joanne James11. April 2016 19:00

I have had a busy start to my week: the James Juniors are back at school after an enjoyable Easter break so today has been spent catching up on correspondence, spending more time making my swaps for Onstage later this week and planning for my week ahead, which includes the fist of this month's Technique Classes tomorrow - more on that later this week.

Today I want to share a home decor project that I will be making at my 'Crafternoon Tea' event that I am holding at Bell of Northampton in Kingsthorpe on Saturday 7th May, featuring the Botanical Builder Framelits Dies and the 'Hello Life' stamp set:

All instruction and materials will be provided for the session and each person will leave with a decorated 9” x 9” frame to keep. Check out this close-up of the gorgeous flowers: 

Once you’ve completed your project, you can tuck into a scrumptious afternoon tea for two with scones and cakes alongside a large selection of sandwiches stuffed to bursting with egg mayonnaise, chicken and horseradish, cheddar cheese with chilli jam and many more scrumptious fillings freshly prepared by Tea and Cake @ Bell.

The session will run from 10am-2pm on Saturday 7th May and cost £56 for two people. Buy it for yourself or as a gift! Why not treat yourself and your mum, friend or daughter to a voucher for an indulgent afternoon tea and crafting session! There are still spaces left for this event - I would love you to join me! If this is something that appeals to you, click here to make your booking online.

I'll be back tomorrow with a 'sneak peek' of the card that I will be making in my drop-in Coffee and Card Session at Bell's on Wednesday this week between 10-12 noon. Until then, happy stampin!

Tags: , , , ,

3D Projects | Classes

Mini Catalogue

BROWSE THE CATALOGUE

The mini catalogue is now live! Read and download your copy here.

Shop Online

Access my online shop 24 x 7, 365 days of the year:

Current April hostess code:

VDKNV7BH

Shop Online

Join My Team

It's always a great time to join Stampin’ Up! New team members can get £130 worth of products for only £99 + free business supplies + free shipping + all the fun being a part of Stampin’ Up! Stampin' Up! has something for everyone: join my growing team and benefit from my support to enjoy Stampin' Up! however you choose.

If you're interested, call me for a chat to understand how I can help you realise your goals. Alternatively, if you have already decided to sign up and you just can't wait, please click here for the link to the online form where you can sign up and order your starter kit right away! 

Latest Kit!

Stampin Cut and Emboss

The Rock Legend Kit has all you need to make 8 cards with coordinating envelopes. Along with the new Panda Friends Kit, both are available from January 4th for just £14 each - get yours here!

2023-24 Annual Catalogue

BROWSE THE CATALOGUE

Click on the catalogue for a full list of current SU! supplies - if you would like to order any of the items featured, please drop me a line at [email protected] or give me a call on 07773 421446 - I'd be happy to help.

New Online Exclusives

There are new products available exclusively in the online store from 5 March - check them out here.

About Me

Hi I'm Joanne and live in Northampton and when I'm not looking after my husband and two beautiful children, am an avid crafter with a passion for all things Stampin' Up!

I must confess that I have never been a big rubber stamper - until I discovered Stampin' Up! that is. I love the fact that I can get such great results with co-ordinating stamps, inks, papers and punches - the possibilities are endless! Join me on my stamping journey as I share the things I love and be inspired to create amazing things yourself!

Follow Me

Monthly Newsletter

Box Builder

Click the button above to use Box Buster to create your custom box design using the Envelope Punch Board!

Kits Collection Now Available!

Stampin Cut and Emboss

The new Kits Collection from Stampin' Up! is now available!

Click here to see the current kits available and order yours online today.

I Design For


Stampin' Up Stuff

This is my personal blog and is not endorsed by Stampin’ Up! I hope you find it a plentiful source of ideas and personal inspiration but please don't copy my designs for contest submission or use for classes, publication or sale without express permission.