Bike Ride Apple Basket Thank You Cards PP415

by Joanne James21. October 2018 09:00

Today it's Sunday and time for this week's new challenge over at The Paper Players - yay! It's my turn to host this week and I have a clean and simple challenge for you to work with:


Remember in addition to including an apple on your card, this week is a Clean-and-Simple (CAS) challenge!  What do we mean by CAS?

  • Minimal layers and embellishments
  • Plenty of open space, aka "white" space
  • Simple and uncluttered

I decided that for my card this week I was going to pair a little of something old with something new and create a bunch of thank you cards - take a look:


Here's the low-down on today's card:

A Basket Of Apples - My little basket of apples comes from the Bike Ride set and is cut out with the Build A Bike framelits. This little image works in its own right - not a bike in sight on today's card! It is super quick and easy to stamp as the leaves and apples and basket all have solid images to be stamped to fill in the colour quickly and easily - great for clean and simple cards.

Thanks A Bunch - I layered my basket on a set of layered ovals, with a sentiment from the Beautiful Bouquet stamp set. Ok, so this stamp was designed to work with flowers, but I think it works for apples too!

Buffalo Check Background Made Easy - I know I'm using it again this week, but can you tell I'm loving the new Buffalo Check background stamp? I went with a straightforward single colour stamped image in Granny Apple Green to contrast with the apples - it reminds me of a picnic table cloth!

Here is the visual summary of the key products used on today's project for you to pin for easy reference:


Having completed my full-size card for today, I decided to run off a whole bunch of these using the same design, in both a red and green colourway, to use as my customer thank you cards this month - here are two of my finished cards:


I actually think I prefer the balance of the size/shape of the oval on the lightly smaller card - what do you think? Either way, I like this design so much I think I'll run off a set of co-ordinating bag tags too! 

Here is the visual summary of the key products used on today's project for you to pin for easy reference:


You can see all of my Product and 'How To' summaries on my 'How To - Tips and Techniques' Pinterest board in case you've missed any. 

Before you reach for your ink and papers, check out what our amazing team has created to inspire you this week:

Here's a quick recap of our challenge rules:
 
1.  Create a new paper project
2.  Upload your creation to your blog with a link back to us and provide a direct link to the post featuring your challenge submission.
3.  Please link your card to no more than four challenges, TOTAL.
4.  Have FUN!

You can see all of my 'How To' summaries on my 'How To - Tips and Techniques' Pinterest board in case you've missed any. 

Enjoy your day; I will be spending mine with a lovely group of ladies on the second day of our weekend residential craft retreat - more about that in tomorrow's post! Until then, happy stampin'!


Stampin' Up! Supplies Used: 

Table built using Product Table Builder by The Crafty Owl - Independent Stampin' Up! Demonstrator.

A Bermuda Bay Bike Ride For The Paper Players

by Joanne James13. August 2017 10:00

It's Sunday and time for this week's new challenge over at The Paper Players! Firstly, thanks to everyone who left such lovely comments on my High Tide square pop out swing card last week; I have a few more cards made using the same design and will be sharing a more detailed 'how to' for this fun fold, so stay tuned for more information on this one. Back to today: it's the turn of the awesomely-inspiring Sandy to host this week and she has a colour challenge for us to work with:


I must say I did find this colour palette rather challenging; the green got me thinking of flowers, but I was struggling to make the three colours work together. Instead I chose to focus on the blue and I took the opportunity to get out my Bike Ride stamp set and create a fun birthday card - take a look:


Here's the low-down on today's card:

Build A Bike Made Simple - This is the first time I've use my Bike Ride stamp set with the co-ordinating Build A Bike Framelits, as the cards I made with it previously were having returned from Onstage in Amsterdam where we received the stamp set only as an all-attendee giveaway but not the framelits. What a difference they make - I pieced together the pieces of my bicycle with ease and got to use the little wire basket too - love it!

Flip The Sketch And Chop The Bike - I used the sketch over at CAS Colours & Sketches for my layout today (I figured a bike is about as non-rectangular a shape as you can get!), rotating it through 180 degrees as I wanted my bike to be riding onto my card rather than off it. Patricia's sketch shows the shape appearing to hang off the edge of the card so there was nothing else for it - I chopped off the end of my bicycle! I think it works though - if anything, it adds to the sense of movement I think. 

Coffee Break Border - My card is predominantly blue, with the Pear Pizzazz and Calypso Coral featuring only in small quantities: the flowers in the basket, a heart enamel dot. I almost left it there, but I felt like I wanted to ground my bicycle and include a little more of one of the colours so added a strip of Coffee Break designer series paper with a subtle green and white stripe.


Here is the visual summary of the key products used on today's project for you to pin for easy reference:


You can see all of my Product and 'How To' summaries on my 'How To - Tips and Techniques' Pinterest board in case you've missed any. 

Before you reach for your ink and papers, check out what our amazing team has created to inspire you this week:

The Paper Players Design Team
 
 
Here's a quick recap of our challenge rules:
 
1.  Create a new paper project
2.  Upload your creation to your blog with a link back to us and provide a direct link to the post featuring your challenge submission.
3.  Please link your card to no more than four challenges, TOTAL.
4.  Have FUN! 

I look forward to seeing what you create with this week's colour palette. Enjoy the rest of your weekend - we are continuing with Ben's weekend of birthday celebrations, so lots of fun to be had here! I'll be back tomorrow with another project; until then, happy stampin'!


Stampin' Up! Supplies Used: 

Table built using Product Table Builder by The Crafty Owl - Independent Stampin' Up! Demonstrator.

A Bike Ride With Two New In-Colours

by Joanne James25. April 2017 12:00

Today I'm sharing a card for this week's new challenge over at CAS Colours and Sketches where this is the last of my guest designer posts this month. This week it's a sketch challenge: 
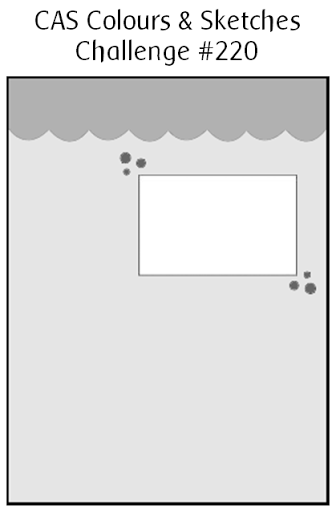
    

I also decided to use the inspiration photo over at Fusion as a starting point for my card today, which features another sneak peek of the forthcoming 'Bike Ride' stamp set and a few other new products besides - take a look:
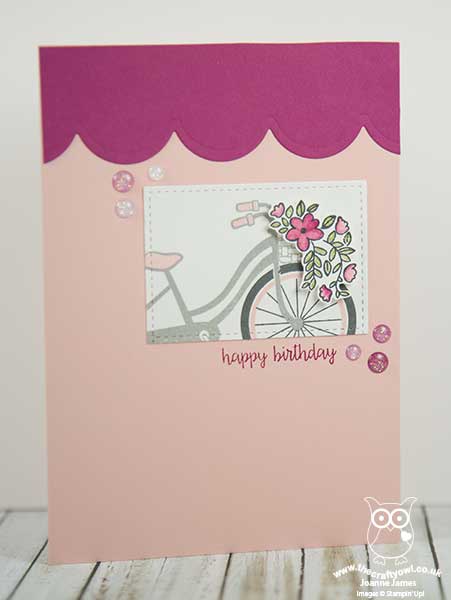
 

 Here's the low-down on today's card:

New Stamps - Not one, but two new stamps from the forthcoming new Stampin' Up! annual catalogue on my card today! The lovely Bike Ride bicycle, this time in Smoky Slate (not quite a truck, but still transport, right?) with a cascade of flowers in the front basket. I stamped and fussy cut these so that I could pop them onto a dimensional; not tricky, but I'm still looking forward to ordering my co-ordinating framelits! The sentiment is from a new set too called 'Happy Birthday Gorgeous' that has some wonderful sentiments in pretty scripts and fonts - more on this another day.

New In-Colours - Two new in-colours on my card today too: my cardbase and bicycle highlights are the new Powder Pink, a delicate soft pink that is almost a neutral, and Berry Burst - a rich, berry red with warm undertones, the colour that I used for my scalloped top border and enamel dots. Did you spot those lovely new accessories too? Glitter enamel dots, in various sizes and shades of Berry, with a wonderful glittery sparkle. I am going to need a TON of these!

New Tools - Wondering how I made that scalloped border? Yes, another something 'new' from the Seasonal Layers Thinlits is a scalloped border edge thinlit; I know this will be useful for all kinds of projects.

Isn't that a whole lot of new loveliness for a clean and simple card?!

Here is the visual summary of the key products used on today's project for you to pin for easy reference:
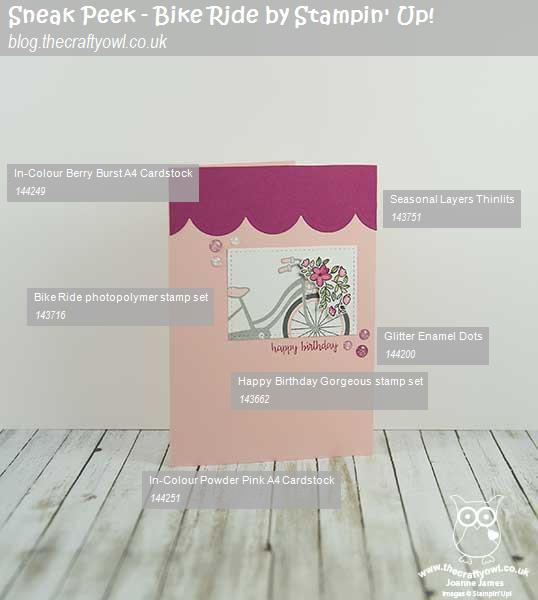
 

You can see all of my 'How To' summaries on my 'How To - Tips and Techniques' Pinterest board in case you've missed any. 

Be sure to check out the other DT cards over at CAS Colours and Sketches and look out for me in the gallery from next week onwards!

Enjoy the rest of your day; the James Juniors are (finally) back to school so today I am loooking to move mountains and get into the thick of my significant 'to do' list. I'll be back tomorrow with another project. Until then, happy stampin'!


Stampin' Up! Supplies Used: No product table today, as most of the items on today's card will not be available to purchase until the new catalogue launches. Item numbers are included on the visual above though, so why not add this to your Pinterest board and contact me when the catalogue is live to place your order?

Stampin' Up! Sneak Peek - Bike Ride For The Paper Players

by Joanne James16. April 2017 10:00

It's Sunday and time for this week's new challenge over at The Paper Players! It's the turn of the amazing LeAnne to host this week and she has a clean and simple challenge for us to work with:


So I couldn't resist sharing a sneak peek of a brand new stamp set with you today - a fabulous two-step stamping set called 'Bike Ride', that I received as part of an all-attendee giveaway at Onstage in Amsterdam last week - take a look:


Isn't that fun?! Read on for the low-down on today's card:

Demonstrator Perks And A Sneak Peek - One of the best perks about being a Stampin' Up! demonstrator is being able to get your hands on new products before anyone else does! I came home from Onstage last week with some new stamp sets including this fun bicycle stamp set. I was also able to participate in an event-only pre-order which means I am expecting another box of new goodies on Tuesday morning - can't wait! If you are excited by getting your hands on new products early, do get in touch with me about joining my team now so that you can take advantage of these pre-order demonstrator perks too.

A Bike Ride For Teacher - Today's sneak peek is a set called 'Bike Ride'. Such a fun two-step stamp set with lots of little accessories - everything from flowers to apples and books to an adorable puppy dog! You can build endless combinations to make your two-wheeled creations totally unique. The best bit? This set also has some co-ordinating Build A Bike framelits that will make putting your creations together as easy as can be! My CAS card today uses just the stamp set - I created a few masks to enable me to stamp my bicycle as a single layer and adapted the basket to fit the front of my bike. For my first card I stamped my bicycle slightly off the page and added a basket of apples with an overlaid thanks diecut from the retiring 'Hello You' thinlit set (I cut this out 3 times, stacked them and heat embossed with clear embossing powder for added dimension and shine) and the word teacher stamped with my Layered Alphabet set -so useful for custom greetings. 

Teacher Thank You Take Two - I was having so much fun with my set, I created a second card to share with you too! This time I stamped the whole of my bicycle on the card front so that in addition to my basket of apples (accented with my fine tip glue pen) I could add a stack of books to the rear. I also grounded my bicycle with a little sponging and some stamped grass (from the retiring 'Basket Bunch' stamp set) and stamped the word teacher in bold block lettering and cut it out and popped it up on dimensionals for added impact:


I had so much fun playing with this set and making an early start on my teacher thank you cards for the end of next term. I've lots more ideas for this set and I can't wait to get my hands of the framelits when the new catalogue goes live on June 1st! 

Here is the visual summary of the key products used on today's project for you to pin for easy reference:


You can see all of my Product and 'How To' summaries on my 'How To - Tips and Techniques' Pinterest board in case you've missed any. 

Before you reach for your ink and papers, check out what our amazing team has created to inspire you this week:

The Paper Players Design Team
 
 
Here's a quick recap of our challenge rules:
 
1.  Create a new paper project
2.  Upload your creation to your blog with a link back to us and provide a direct link to the post featuring your challenge submission.
3.  Please link your card to no more than four challenges, TOTAL.
4.  Have FUN! 

I look forward to seeing your clean and simple creations in the gallery this week. Enjoy the rest of your weekend - we will be either hunting for or eating chocolate as our primary activities today - I think we might need a bike ride later to work some of our calories off! I'll be back tomorrow with another project, also with a travel theme so be sure to tune on for that, Until then, happy stampin'!


Stampin' Up! Supplies Used: 

Table built using Product Table Builder by The Crafty Owl - Independent Stampin' Up! Demonstrator.

Current Promotions

Stampin Cut and Emboss

Save up to 30% off on all your favourite kits from 1 to 31 October! 

Click here to see the current kits available and order yours online today.

Join My Team

It's always a great time to join Stampin’ Up! During October you can get even more in your starter kit! New team members can get £160 worth of products for only £99 + free business supplies + free shipping + all the fun being a part of Stampin’ Up! Stampin' Up! has something for everyone: join my growing team and benefit from my support to enjoy Stampin' Up! however you choose.

If you're interested, call me for a chat to understand how I can help you realise your goals. Alternatively, if you have already decided to sign up and you just can't wait, please click here for the link to the online form where you can sign up and order your starter kit right away! 

Shop Online

Access my online shop 24 x 7, 365 days of the year:

Current October hostess code:

4XPEYCB9

Shop Online

Scrapbooking

Stampin' Up! has introduced a new range of 12x12" scrapbooking product and kit - the full range is now available to purchase online. To download a copy of the new digital Scrapbooking Catalogue click here.

Mini Catalogue

BROWSE THE CATALOGUE

'Tis The Season - the new Stampin' Up! Mini Catalogue is here! For more details and to download your copy click here

2024-25 Annual Catalogue

BROWSE THE CATALOGUE

Click on the image to download your copy of the 2024-25 annual catalogue. For a full list of current SU! supplies, go to my online store. If you would like any help or advice, please drop me a line at joanne@thecraftyowl.co.uk or give me a call on 07773 421446 - I'd be happy to help.

Latest Kits!

Stampin Cut and Emboss

The Christmas Ornaments Kit and Card Keeper Kit are the latest kits in the online store - get yours here!

New Online Exclusives

There are new products available exclusively in the online store from 5 November - check them out here.

About Me

Hi I'm Joanne and live in Northampton and when I'm not looking after my husband and two beautiful children, am an avid crafter with a passion for all things Stampin' Up!

I must confess that I have never been a big rubber stamper - until I discovered Stampin' Up! that is. I love the fact that I can get such great results with co-ordinating stamps, inks, papers and punches - the possibilities are endless! Join me on my stamping journey as I share the things I love and be inspired to create amazing things yourself!

Follow Me

Monthly Newsletter

Box Builder

Click the button above to use Box Buster to create your custom box design using the Envelope Punch Board!

Kits Collection Now Available!

Stampin Cut and Emboss

The new Kits Collection from Stampin' Up! is now available!

Click here to see the current kits available and order yours online today.

I Design For


Stampin' Up Stuff

This is my personal blog and is not endorsed by Stampin’ Up! I hope you find it a plentiful source of ideas and personal inspiration but please don't copy my designs for contest submission or use for classes, publication or sale without express permission.