Sleigh Ride Edgelits Christmas Ornament with Salt Technique Background

by Joanne James20. December 2015 21:29

It's Sunday and whilst there is no Paper Players post from me today - we are taking a couple of weeks off from our design commitments to enjoy the festive season with our families - however fear not - as promised I still have a project to share with you today! 

My December technique classes featured creating backgrounds with the salt technique. I had created the following pair of cards cased from the lovely Jen Timko just for fun:

I just loved the white, layering and beautiful and unique sky created using this fun technique:


You can see Jen's card and a great video on the technique here. In my class we made a similar card using the 'Jingle All the Way' stamp set but the real focus of our class was a 3 dimensional Christmas bauble ornament and a co-ordinating box to gift it in, all featuring backgrounds made using this technique. Here is my finished bauble:

This bauble is quite stunning in real life; the layering, silver foil and embossing and dazzling diamonds glimmer paper, along with that amazing sky, really show the Sleigh Ride Edgelits off to full advantage. I'm so sorry that these will not be carried over on 4th January; if you haven't already purchased them, place your order now before it's too late!

Back soon with another project; until then, happy stampin'!


Stampin' Up! Supplies Used:

Table built using Product Table Builder by The Crafty Owl - Independent Stampin' Up! Demonstrator.


Christmas Cheer With Project Life Seasonal Snapshot 2015

by Joanne James2. December 2015 11:46

It's Wednesday already? The week is zipping by! I'm sure that time moves quicker the nearer to Christmas we get! I have a great festive monochromatic Christmas card for you today: big on layers, easy to recreate - just what we like at this time of year! I made today's card with a couple of challenges in mind:

    CYCI#97

The sketch over at CAS(E) This Sketch this week is a classic and I just love the inspiration photo at CanYouCaseIt - so much shine! I took my inspiration from the red and white elements and the shiny foil which I incorporated into the border frame for my card:

Isn't that striped Holiday vellum just gorgeous? I matted it on a piece of Whisper White cardstock before adhering to my Real Red base so that the red foil stripes would really stand out. For the focal point of my card, I used the sentiment from the 'Cheer All Year' stamp set - so versatile - and my little hot cocoa mugs are from the 'Project Life Hello December 2015' stamp set - another one of those sets that is useful for so much more than its designed purpose.

Are any of you out there joining in with the #decemberdaily project? I love to create a Project Life mini-album each December documenting the goings on in the James household during the festive season, so the above stamp set was a must for me to decorate this year's journalling, along with the Hello December 2015 Project Life Card Collection and Accessory Kit:

I'm mindful that I don't often share my Project Life documenting here on my blog - I just tend to get on with it! - but I'm trying to consciously change that, so throughout December I will be sharing some of the inspiration for my daily journalling and occasionally some of my completed pages in the hope that they will inspire you to get involved in active memory keeping too. Yesterday's page will feature the arrival of our Christmas Elf Charlie, who often gets up to mischief in the run up to Christmas and yesterday appeared with a fun piece of home decor I made to remind the James Juniors that good behaviour is important more now than ever since the elf will be reporting back to Santa on everything he sees and hears:

Isn't that fun? Surprisingly easy to create with the help of my e-cutter and some Stampin' Up! cardstock. Here's a picture of Charlie as he made his first appearance of the year:

This morning Ben was out of bed, up and dressed in record time and off on the hunt for Charlie to see what mischief he had got up to overnight; he eventually found him hiding in the basil pot amongst the herbs on the kitchen windowsill. Here's to more mayhem as the month progresses!

If you would like to join me in documenting your December, it's not too late to order the supplies to create your own album; just click on the links below to go to the online store or give me a call and I would be happy to place an order for you. More tips and Project Life #decemberdaily inspiration to come! Equally, if you would like to share your own #decemberdaily memories, feel free to upload them to my Facebook page here - I would love to feature them.

That's all from me today; I'll be back tomorrow with a festive card for this week's new challenge over at Create With Connie and Mary. until then, happy stampin'!


Stampin' Up! Supplies Used:

Table built using Product Table Builder by The Crafty Owl - Independent Stampin' Up! Demonstrator.


Project Life #dailydecember Stampin' Up! Supplies Used:

Table built using Product Table Builder by The Crafty Owl - Independent Stampin' Up! Demonstrator.


Reason For The Season Pillar Candle Christmas Table Decoration

by Joanne James27. November 2015 21:48

Yay - it's Friday - always a good day! I've had a busy one with a few errands, appointments and a pleasant afternoon watching Ben play rugby. Not much time for crafting today (I did help a friend make good progress on some Christmas bunting, but we still have a few finishing touches to make so I'll share that another time!) so I'm sharing a home decor project I made in a class with a lovely group of ladies last week. We decided to decorate a pillar candle and make a table centre, using the Festive Flower Punch and the Spiral Flower Originals Die to make a wreath of flowers around the base.

Here's my finished project, in Real Red with Very Vanilla roses:

I stamped the flower from 'Reason to the Season' on filter paper and melted it into the candle to set it, then covered a small polystyrene wreath with Very Vanilla satin ribbon before adhering my flower to it. A few gold glimmer and pearl flower centres and some loops of gold glitter ribbon interspersed in between completes the project.

The ladies in my class made their arrangements in a variety of colours; you can see their creations on my Facebook page here (feel free to give me a 'like' whilst your there!) for more colour inspiration. This was such a fun project to make and another way to show the versatility of the 'Reason for The Season' stamp set and co-ordinating Festive Flower Punch - this is one bundle that just keeps on giving, so many creative possibilities! The new Spring-Summer catalogue also offers another stamp set that co-ordinates with this useful punch - watch this space!

I'm linking up with the lovely ladies over at SUO Challenges too who are working with your favourite holiday colours - my traditional colour scheme remains a favourite, even though it's sometimes nice to step out of the creative comfort zone (see next Sunday's post for an example of that!) That's all from me today; back tomorrow with another project. Until then, happy stampin'!


Stampin' Up! Supplies Used:

Table built using Product Table Builder by The Crafty Owl - Independent Stampin' Up! Demonstrator.


Vintage Leaves Autumn Home Decor Wreath

by Joanne James20. October 2015 22:27

I've had a busy day today with my 'Shake It Up!' Children's Craft Class making the shaker cards featured in the 'To You And Yours Shaker Cards Project Kit'. We all had tremendous fun and made lots of great cards. I'll share a picture from our class at the end of today's post, however in the meantime my blog project to share with you today is the one that my Facebook followers had a sneak peek of last week that I made with a lovely group of ladies - our Autumn leaf wreaths. We based our design on this one created by Stampin' Up! Artisan Designer Alison Okamitsu; I made a large wreath like Alison's to hang on my front door and the ladies liked it so much they wanted to create a similar, smaller version - here is ours:


We used a selection of muted colours and the wonderful Vintage Leaves stamp set and cut out the leaves using our Big Shot and co-ordinating Leaflets Framelits (one of the catalogue 15% off bundles if you are a bargain-hunter!), some pinecones, a few leaves punched with the bird builder punch and a burlap bow to finish. Isn't that pretty? The ladies were all so very pleased with their wreaths and their stamping as this is something of a first for them! 

This was a private class that I held for a group of like-minded friends who often invite me to run a class just for them. If you have a group of friends that you would like to arrange a crafty get-together with, or would simply like to join in with one of my existing scheduled classes, then do get in touch - I would love to hear from you! Don't forget the offer of additional Stampin' rewards is also still valid until the 9th November - party sales of £200 or more will earn an extra 3% of Stampin' Rewards (formerly known as Hostess Credits) so if you have a long wish list, I've still a few slots left so contact me to book your party today!

Before I go, let me share a photo of the James Juniors proudly displaying their handiwork from this morning's class:

Like mother, like daughter (and son!) as the saying goes - what else can I possibly add?!

Back tomorrow with another project; until then, happy stampin'!


Stampin' Up! Supplies Used:

Table built using Product Table Builder by The Crafty Owl - Independent Stampin' Up! Demonstrator.


Witching Decor Project Kit - Halloween Witches Hat

by Joanne James5. October 2015 21:39

So today I thought we would have a change from cards and I would share with you the 3D project that I made on World Card Making Day. I know, topsy turvy, but since crafting with friends is in itself something to be celebrated, it seemed a great way to spend the day. So the project in question is the Witching Decor Project Kit in the seasonal catalogue. Normally this isn't the kind of project I would make, however the female James junior of the house, Rebecca, absolutely loved it and wore me down until I promised to buy it for her to create! 

So she invited her friend and fellow crafting enthusiast Nicholas over for the afternoon and we spent a pleasant few hours putting our respective hats together. Here is Rebecca's finished hat in all its glory:

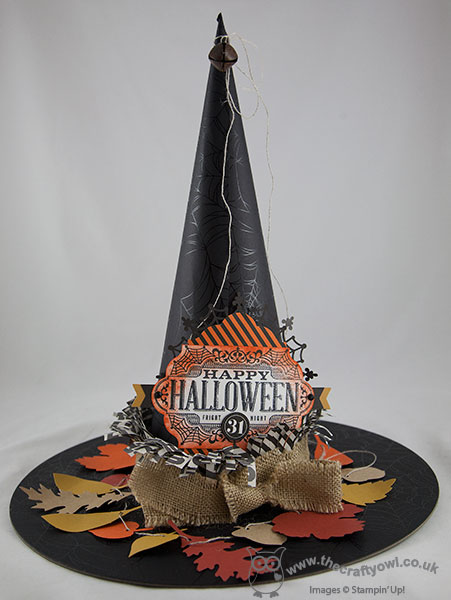
Now if you've seen the photo in the catalogue, you will see a few differences between this one and that one. the first is the shape: the one in the catalogue looks crumpled and 'worn in' (a little like the sorting hat in the Harry Potter stories!). The trouble was, once put together Rebecca decided she wanted hers to have a perfect point, so since she still managed to tie on her bell and have it tinkle, she couldn't bring herself to crumple the end! It must be a girl thing - Nicholas had no such issues and his had a wonderfully worn in appearance! 

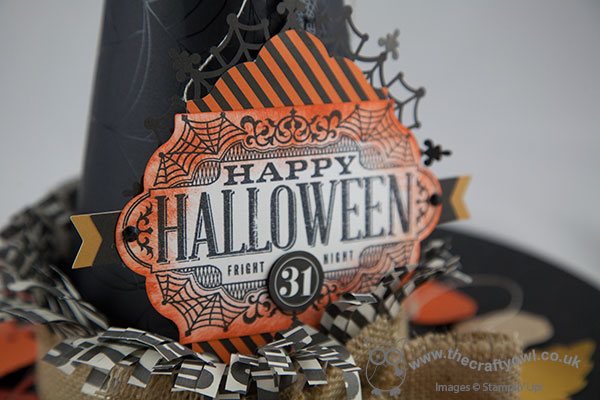
You might also notice the rather enthusiastically sponged edging to the 'Happy Halloween' label; the kit recommends using Soft Suede for a 'worn' look, yet having made one like this the children universally agreed that this didn't work for them at all and orange was most definitely needed! So we made another label - there are enough labels for 3 each of the stamp designs, in fact the whole kit is very generous in its contents; we made interchangeable labels and still had labels, flags, rhinestones and lots of leaves left over. All for just £20 and the co-ordinating 'Witches' Night' stamp set. I have a class scheduled to make this kit on 13th October - it would also make a great project for a girls' night in. I have a few calendar slots left in October so if this is something that interests you, please get in touch.

The leaves that are threaded around the edge of the hat are all pre-punched and can be used just as they are, as the children did on their hats (they just wanted to get them threaded and had no time for extra sponging!). They could also be sponged and distressed to add more texture and colour, or even stamped with the Vintage Leaves set to add more detail. 

We were so absorbed in our task, I didn't even take a photograph of us at work to share with you. Suffice to say, the children had a great time and I am loving the addition of the hat to our Halloween home decor. 

This is a great kit and very easy to construct - you might say child's play! It would be a great kit to make with children as part of the build up to your 'trick or treat' festivities. 

That's all from me today - back tomorrow with another project and some exciting children's news too! Until then, happy stampin'!


Stampin' Up! Supplies used:

Table built using Product Table Builder by The Crafty Owl - Independent Stampin' Up! Demonstrator.


Howl-o-Ween Treat Matchbox Style Halloween Pop Up Card

by Joanne James4. October 2015 10:00

Did you have fun celebrating World Card Day yesterday? I sent the afternoon crafting, but making home decor rather than cards as Rebecca had a friend round and we spent a couple of hours putting together our Witching Decor Project kits. It did rather put me in the mood for today's new challenge over at The Paper Players! This week it's my turn to host again and since it's the first Sunday in October I have a fun theme challenge for you:


Yes that's right - it's Halloween! I took the opportunity to have some fun with my Howl-o-ween Treat Stamp set and the co-ordinating Boo To You framelits and created something that's been on my general 'to do' list for ages - a matchbox style pop up card. Lots of photos today - here's my card from the outside:


My outer box sleeve is made from Tangelo Twist cardstock decorated with the fun ghost patterned paper from the Happy haunting DSP set - I've been wanting to use this pattern for ages! - and a tag punched with the Ornate Tag Topper punch attached with some Tangelo Twist satin ribbon available on the Clearance Rack currently while stocks last!) My tag is decorated with some bats courtesy of the Project Life Seasonal Snapshot 2015 set and the Trick or Treat sentiment from the Howl-o-Ween treat set. The question is though, which will it be - trick or treat? Let's take a look inside the box:


 I made the drawer tray using Basic Black cardstock and my trusty Envelope Punch Board, and lined it with more Happy Haunting DSP. I used my framelits to cut a 'Boo!' out of black glimmer paper - so perfect for Halloween projects - and stamped a bright green owl, complete with pumpkin basket and spider hanging down from a piece of black baker's twine. Here's another view - oh and I backed my owl with a partial spider web doily too: 


I made my box quite large so that I could accommodate both my pop up owl and greeting and a little something behind. If you look closely in the photo above you can just catch a glimpse of what it is - it also determined the colour of my owl. Can you see what it is? How about a brightly coloured spider to scare your nearest and dearest:

This time more trick than treat (although I've a feeling there are plenty of little ones out there who may think otherwise, given the potential for the odd practical joke or two!), however you could always include a bar of chocolate instead. I hope you like my fun Halloween card - I think the bright orange spider is my favourite!

Before you reach for your ink and papers, check out what our amazing team has created to inspire you this week:

The Paper Players Design Team
Anne Marie Hile - on leave
 
 
Here's a quick recap of our challenge rules:
 
1.  Create a new paper project
2.  Upload your creation to your blog with a link back to us and provide a direct link to the post featuring your challenge submission.
3.  Please link your card to no more than three challenges, TOTAL.
4.  Have FUN! 


I look forward to seeing your Halloween-themed cards this week. I'm off for a morning of basketball and then home for birthday lunch - today it's my husband who's celebrating; I'll share his birthday cards with you later this week.

Back tomorrow with another project; until then, happy stampin'!


Stampin' Up! Supplies Used:

Table built using Product Table Builder by The Crafty Owl - Independent Stampin' Up! Demonstrator.


5 Reasons To Buy The Perpetual Calendar Kit - You Know You Want To!

by Joanne James1. August 2015 15:00

Today I want to share one of the fabulous kits that was first introduced with the Spring Summer seasonal catalogue earlier this year and has since been carried over into the main catalogue: the Perpetual Birthday Calendar kit. Now I'm a big fan of kits for a number of reasons:

  1. I think they make great gifts, for crafters and non-crafters alike
  2. Combine with a stamp set, glue and an ink pad or two, they contain everything you need to complete your project - including step-by-step instructions
  3. They are great for travelling and 'crafting on the go'
  4. They are great for the time-strapped crafter - you can complete a whole project or significant number of cards in a short space of time
  5. For someone like me, who uses a lot of creative energy designing my own cards and classes for others, they can be truly relaxing - little thought required!

I spent a pleasurable afternoon with my good friend and downline Barbara recently and we made up our kits together. Here's a quick photograph of the front of my finished calendar:

And here are some great photos courtesy of Stampin' Up! that show firstly everything that you get in the box:

Perpetual Birthday Calendar Project Kit by Stampin' Up!

And secondly what some of the other months look like completed:

There are more than enough bits and pieces to make the kit (SU! kits are very generous and usually have plenty of spares leftover!) and the nice thing about this kit is that the box can be used as a giftbox, with ribbon to finish, so if you didnt want to gift the actual kit to someone to make, you could have all the fun of making it and then gift the finished article to someone - win, win! And who doesn't need a birthday calendar?? (Or are you all so much better at remembering birthdays than I am?!) The co-ordinating stamp set is also great for creating quick and easy cards and notelets too, either on its own of combined with other sets. 

If you needed further convincing, watch this great little video from Stampin' Up! that demonstrates just what a great kit this is:

I really recommend you watch the video before commencing this project as the written instructions are quite small and it also gives lots of hints and tips about putting the project together. Alternatively, you can contact me to express an interest in attending my next project class for this calendar kit or arrange for to hold a private class for you in your home with a group of friends - I'll bring the ink, stamps, adhesives and kits and we can spend a fun few hours putting them together!

That's all from me today - back tomorrow with a new challenge over at The Paper Players. Until then, happy stampin'!


Stampin' Up! Supplies Used:

Table built using Product Table Builder by The Crafty Owl - Independent Stampin' Up! Demonstrator.


Bohemian Petite Cafe Gift Bag

by Joanne James6. June 2015 21:51

Just time to squeeze in a quick post from me today to share a really quick and easy packaging idea using the Stampin' Up! Petite Cafe gift bags and some lovely new product from the 2015-16 Stampin' Up! Annual Catalogue:

Isn't the little shopping trolley so cute?! This was a gift to me from my wonderful upline Monica recently and I wanted to share the lovely bag with you. It is decorated with the new Bohemian DSP and a stamped scallop circle with one of the stamps from the new 'Friendly Wishes' stamp set. The banners were punched in seconds using the new Triple Banner Punch and the bag was finished off with some Venetian Crochet Trim and Metallic Gold Baker's Twine. What was inside? Well, that would be telling...but it was yummy!

With packaging so quick and easy to recreate there really is no excuse not to add the handmade touch to your sweet treats!

Back tomorrow with a special project for the new challenge over at The Paper Players where I am the hostess this week. Come back then - I guarantee you won't want to miss it! Until then, happy stampin'! 


Stampin' Up! Supplies Used:

Table built using Product Table Builder by The Crafty Owl - Independent Stampin' Up! Demonstrator.


Home Decor Spring Flower Wreath using Stampin' Up! Flower Frenzy Bigz L Die

by Joanne James6. May 2015 09:37

Good morning everyone - today I have something a little different for you! I ran a very successful class a little while ago to make a beautiful home decor Spring flower wreath. I am demonstrating how to make this wreath at a Spring Open Evening at Bell Of Northampton this evening so thought this was a good opportunity to share it with you too:

We started with a polystyrene wreath base and covered it with a roll of burlap, then decorated it with a selection of flowers made with a variety of dies and punches. The largest flower, leaves and the bases for the medium flowers were made using the Big Shot and Flower Frenzy Bigz L Die; the remaining flowers were made using a combination of the retiring Blossom punch, the Pansy punch and the Petite Petals punch. The Blossom punch and Flower Frenzy Bigz die are now out of stock, as is the patterend paper that I used, but you could make something similar with other punches and dies. We used a variety of buttons, brads and embellishments to decorate our flowers: I used Vintage Faceted Buttons, Something Borrowed Embellishments and some retired brads from my stash to decorate mine. I chose Elegant Eggplant, Smoky Slate and Pear Pizzazz as my colourway but each of the ladies tailored their colour choices and embellishments to their personal preferences. Here's a closeup of my flowers - I think they are gorgeous:


I created an album with pictures of their finished wreaths on my Facebook page here - you really should go and check them out as there are some amazing pieces and they all look so very different in the various colourways. If you haven't already, perhaps you could give me a 'like' whilst you're there - I'm only 10 away from my next milestone!

If you live in or around Northampton and would like to see me demonstrate how to make these flowers, do pop along to Bell's between 6-9pm this evening:

I hope you like today's project - it's one of my favourites! Back tomorrow with a card for this week's new challenge over at Create With Connie and Mary. Until then, happy stampin'!Full details via the link above and on my Facebook Page. There are lots of other demonstrations taking place - there will be someone fabulous chefs in residence cooking up delicious treats, a little pampering as well as other in-store delights that will all make for a pleasant browsing experience.


Stampin' Up! Supplies Used:

Table built using Product Table Builder by The Crafty Owl - Independent Stampin' Up! Demonstrator.


A Sweet Tweet For You!

by Joanne James13. February 2015 22:00

Yay it's Friday! It's been a long week and I'm glad the weekend is finally here. As it's Valentine's Day tomorrow, both James Juniors were keen to take some sweet treats into school to share with their class mates. I found these lovely heart-shaped jelly beans, that fitted perfectly into the thin cello bags:

This is just the first few - production became quite intense at one point and included boy- and girl themed packaging. You can see pictures of the total effort over on my Facebook page. These pretty pink ones were of course headed in the direction of the young ladies; we were stamping the tab top from the 'Hey, Valentine' set in a variety of pinks and colouring in with Blendabilities. Here's a close-up:

I definitely like the Melon Mambo one best (I'm such a 'brights' girl at heart) but they all look cute, especially with the addition of a heart-shaped Hodgepodge clip too. This little bag topper is a perfect fit for these cello bags and will work just as well at any other time of year too, not just Valentines. I also made a batch for a children's birthday party that I am hosting tomorrow afternoon, in pinks and purples. Our cello bags are great value at 50 for £2.25 and make such a nice way to create beautifully decorated party favours.

I'm told that the treats were well received by everyone which is nice to know and provided the perfect start to our forthcoming week-long half-term break.

Back tomorrow with another project; until then happy stampin'!


Stampin' Up! Supplies Used:

Table built using Product Table Builder by The Crafty Owl - Independent Stampin' Up! Demonstrator.


Mini Catalogue

BROWSE THE CATALOGUE

The mini catalogue is now live! Read and download your copy here.

Shop Online

Access my online shop 24 x 7, 365 days of the year:

Current April hostess code:

VDKNV7BH

Shop Online

Join My Team

It's always a great time to join Stampin’ Up! New team members can get £130 worth of products for only £99 + free business supplies + free shipping + all the fun being a part of Stampin’ Up! Stampin' Up! has something for everyone: join my growing team and benefit from my support to enjoy Stampin' Up! however you choose.

If you're interested, call me for a chat to understand how I can help you realise your goals. Alternatively, if you have already decided to sign up and you just can't wait, please click here for the link to the online form where you can sign up and order your starter kit right away! 

Latest Kit!

Stampin Cut and Emboss

The Rock Legend Kit has all you need to make 8 cards with coordinating envelopes. Along with the new Panda Friends Kit, both are available from January 4th for just £14 each - get yours here!

2023-24 Annual Catalogue

BROWSE THE CATALOGUE

Click on the catalogue for a full list of current SU! supplies - if you would like to order any of the items featured, please drop me a line at [email protected] or give me a call on 07773 421446 - I'd be happy to help.

New Online Exclusives

There are new products available exclusively in the online store from 5 March - check them out here.

About Me

Hi I'm Joanne and live in Northampton and when I'm not looking after my husband and two beautiful children, am an avid crafter with a passion for all things Stampin' Up!

I must confess that I have never been a big rubber stamper - until I discovered Stampin' Up! that is. I love the fact that I can get such great results with co-ordinating stamps, inks, papers and punches - the possibilities are endless! Join me on my stamping journey as I share the things I love and be inspired to create amazing things yourself!

Follow Me

Monthly Newsletter

Box Builder

Click the button above to use Box Buster to create your custom box design using the Envelope Punch Board!

Kits Collection Now Available!

Stampin Cut and Emboss

The new Kits Collection from Stampin' Up! is now available!

Click here to see the current kits available and order yours online today.

I Design For


Stampin' Up Stuff

This is my personal blog and is not endorsed by Stampin’ Up! I hope you find it a plentiful source of ideas and personal inspiration but please don't copy my designs for contest submission or use for classes, publication or sale without express permission.