Designer Tee When In Doubt STAMP Card

by Joanne James8. March 2017 21:48

I've had a busy week so far but it's about time I squeezed in a quick blog post! I realise I haven't shared the card that I sent out to my lovely customers with my Spring-Summer catalogues and Sale-A-Bration catalogues at the beginning of January and since it's super clean and simple (well, I had a lot of them to make!) this is a great time to share it - take a look:


Here's the low-down on today's card:

Design Your Tee FOR FREE - Each of my cards features a cute t-shirt featuring one of the stamps from the Sale-A-Bration Designer Tee set, stamped onto Whisper White cardstock and cut out using one of the T-Shirt Builder Framelit Dies in the Spring-Summer catalogue. A number of this year's SAB products co-ordinate with bundles in the Spring-Summer catalogue, which is such a plus; this Designer Tee stamp set extends the creative possibilities of the Customer Tee Bundle even further and I thought the stamp on my t-shirt was just perfect to send to a bunch of people who share my love of all things Stampin' Up! Better still, if you buy the Custom Tee bundle you are well on your way to receiving the Designer Tee stamp set - or any other SAB promotional item - for FREE! We are in the third and final month of this year's Sale-A-Bration promotion - if you haven't yet reaped the benefits, there's still time!

Itty Bitty Flower - I added a punched flower to my t-shirts, finished with a rhinestone for a little girly bling. So many of you lament the retiring of the Itty Bitty Punch Pack, but did you know that the Tree Builder Punch has this tiny flower that is very similar and just as useful? What's more it's a current product and is still available to purchase.

Perpetual Birthday Flowers - I wanted to add a little background to my cards, so I went to one of my 'go to' stamp sets for a little background pattern - Perpetual Birthday. I love the little motifs in this set, so useful for backgrounds, creating your own designer paper and seasonal projects. I guess you could say this set is my personal 'Gorgeous Grunge', a set that I know is a stamp room staple for many of my customers - a little more gorgeous and a little less grunge!

When I'm mass-producing cards in this volume, I also like to make the same card in a rainbow of colours (it stops me from getting bored!) and I often reach for my favourite brights - here's a little shot showing the colours I used:


If you received one of these, which colour did you get? Feel free to leave a comment below or better still upload a picture of you and your card on my Facebook page - I would love to see! If you didn't receive one, it will be because you're not on my customer list; if you don't already have a demonstrator and would like to receive a catalogue, just get in touch and I can pop one in the post to you.

Lastly, check out this video from the Stampin' Up! Home Office Team that shows you lots of other cool things you can do with this stamp set:

I'll be back tomorrow with another project. Until then, happy stampin'!


Stampin' Up! Supplies Used:

Table built using Product Table Builder by The Crafty Owl - Independent Stampin' Up! Demonstrator.

Spooky Fun Halloween Notelets

by Joanne James27. October 2016 08:05

Today it's time for a new challenge over at Create With Connie and Mary and this week we have a colour combination for you:


It would be fair to say I struggled big time with these colours this week! I couldn't get away from the idea of Halloween, yet making them work was definitely a challenge! I ended up making two cards and I must confess I'm not completely happy with either of them! That said, I'm sharing my notelets with you anyway - here's the first one:


And here's the second one:


Both use a combination of the challenge colours and the Spooky Fun stamp set and co-ordinating Halloween Scenes Edgelits Dies. The second one also includes a sentiment from the 'Suite Seasons' stamp set and a background created with the spots stamp in the 'Perpetual Calendar' set, along with a sentiment banner on each. Each would be quick and easy to create, although first time around they took me longer than I would have liked!

Here is the visual summary of the key products used on today's project for you to pin for easy reference:

You can see all of my 'How To' summaries on my 'How To - Tips and Techniques' Pinterest board in case you've missed any. 

Do visit the other Design Team members to see what they did with this week's colours; there's lots of inspiration over on their blogs too!

Enjoy your day - we are off to Brick Live to play Lego all day, a James family passion! Hope you enjoy your day too and I'll be back tomorrow with another project. Until then, happy stampin'!


Stampin' Up! Supplies Used:

Table built using Product Table Builder by The Crafty Owl - Independent Stampin' Up! Demonstrator.

Halloween Scenes in Orange and Green

by Joanne James9. October 2016 10:00

It's Sunday and time for a new challenge over at The Paper Players! It's the turn of the super-talented Sandy to host this week and she has a great fall/Halloween-inspired colour palette for you to work with:

    TWO WEEK - Paper Craft Crew Sketch 214!    You are invited to play along with this weeks sketch.  Open to ANY products.  www.papercraftcrew.com

Having missed Claire's Halloween themed challenge last week, I decided to take Sandy's colours and use them for a fun Halloween card this week; take a look:


I also used this week's sketch over at The Paper Craft Crew's Challenge for my layout. Here's the low-down on today's card:

A Halloween Scene - I used my Spooky Fun stamp set and co-ordinating Halloween Scenes Edgelits Dies to create the spooky scene on my card. I used my Layered Circle Framelits to cut a Whisper White circle for my oversize moon, then used the spooky tree and witch framelits to give my scene structure. I just love that tree - it reminds me of the whomping willow in the Harry Potter books!

A Wicked Witch - I decided to use the green on my card for the sentiment banner and the witch - after all, aren't all wicked witches green?! I stamped it in black on to Wild Wasabi cardstock and then coloured in some of the detail with my black Stampin' Write marker.

Background Detail - I used the wash stamp in the Perpetual Calendar stamp set for the orange detail on my card base beneath my strip of Halloween Nights designer series paper and added in a couple of spooky fun bats, some sequins and silver metallic thread to complete my card.

Here is the visual summary of the key products used on today's project for you to pin for easy reference:


You can see all of my 'How To' summaries on my 'How To - Tips and Techniques' Pinterest board in case you've missed any. 

Before you reach for your ink and papers, check out what our amazing team has created to inspire you this week:

The Paper Players Design Team
 
 
Here's a quick recap of our challenge rules:
 
1.  Create a new paper project
2.  Upload your creation to your blog with a link back to us and provide a direct link to the post featuring your challenge submission.
3.  Please link your card to no more than four challenges, TOTAL.
4.  Have FUN! 


I look forward to seeing what you create with this week's colours. 

Back tomorrow with another project; until then, happy stampin'!


Stampin' Up! Supplies Used:

Table built using Product Table Builder by The Crafty Owl - Independent Stampin' Up! Demonstrator.

Mondrian-Inspired Colourblock Congratulations Card

by Joanne James14. August 2016 10:00

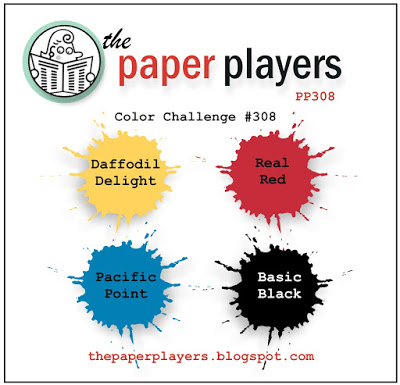
It's Sunday and time for a new challenge over at The Paper Players! It's my dear friend Claire's turn to host this week and she has a great palette of primary colours for you to work with:
    AYSIChallenge140

These colours are perfect for a back to school project. I actually used these colours for a quick card that I made for this week's sketch challenge over at the As You See It Challenge earlier this week but couldn't link it up as their site is down, so I thought I would instead share it today (edited to add: subsequently back on line now so I've linked):
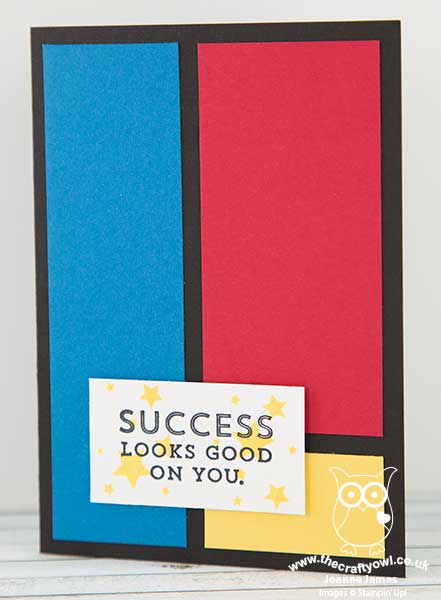
 

There is so much you could do with the AYSI sketch, but I found myself constantly returning to the idea that it had all the makings of a Mondrian painting - so I decided to create a clean and simple card in that style. Here's the low-down on today's card:

Mondrian Blocks of Colour - Piet Mondrian is a Dutch painter famous for his modern art using bold blocks of primary colours and white, delineated with black lines. My card is a super-simple card in this style; my fellow PP designer, Hannelie Bester, has also made a card with a Mondrian influence this week that is much more intricate and detailed and if you're a fan of this style of art you should definitely check it out.

Suite Words of Success - This message of success comes from the 'Suite Sayings' sentiment set. I've not used this set in a while, but I've used it many times earlier this year and it's one I was so pleased to see carried over from the Spring-Summer seasonal catalogue into the annual. This modern font was the perfect fit for my card today.

Perpetual Stars - Rather than leave my sentiment just black on white, I did break with my colour blocking slightly to add a burst of bright yellow stars to add to the celebratory feel. I used the star stamp from the Perpetual Calendar stamp set for this - such a useful set with lots of small stamps that are perfect for small details. 

I know lots of students expecting GCSE exam results this year, so I thought this would make a great exam success card. Maybe one that would work for a boy too - not too 'pretty'!

Here is the visual summary of the key products used on today's project for you to pin for easy reference:
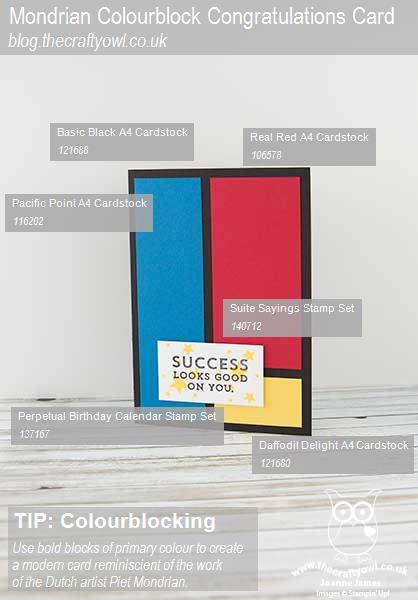
 

You can see all of my 'How To' summaries on my 'How To - Tips and Techniques' Pinterest board in case you've missed any. 

Before you reach for your ink and papers, check out what our amazing team has created to inspire you this week:

The Paper Players Design Team
 
 
Here's a quick recap of our challenge rules:
 
1.  Create a new paper project
2.  Upload your creation to your blog with a link back to us and provide a direct link to the post featuring your challenge submission.
3.  Please link your card to no more than four challenges, TOTAL.
4.  Have FUN! 


I look forward to seeing what you create with our colours this week.

Back tomorrow with another project; until then, happy stampin'!


Stampin' Up! Supplies Used:

Table built using Product Table Builder by The Crafty Owl - Independent Stampin' Up! Demonstrator.

5 Reasons To Buy The Perpetual Calendar Kit - You Know You Want To!

by Joanne James1. August 2015 15:00

Today I want to share one of the fabulous kits that was first introduced with the Spring Summer seasonal catalogue earlier this year and has since been carried over into the main catalogue: the Perpetual Birthday Calendar kit. Now I'm a big fan of kits for a number of reasons:

  1. I think they make great gifts, for crafters and non-crafters alike
  2. Combine with a stamp set, glue and an ink pad or two, they contain everything you need to complete your project - including step-by-step instructions
  3. They are great for travelling and 'crafting on the go'
  4. They are great for the time-strapped crafter - you can complete a whole project or significant number of cards in a short space of time
  5. For someone like me, who uses a lot of creative energy designing my own cards and classes for others, they can be truly relaxing - little thought required!

I spent a pleasurable afternoon with my good friend and downline Barbara recently and we made up our kits together. Here's a quick photograph of the front of my finished calendar:

And here are some great photos courtesy of Stampin' Up! that show firstly everything that you get in the box:

Perpetual Birthday Calendar Project Kit by Stampin' Up!

And secondly what some of the other months look like completed:

There are more than enough bits and pieces to make the kit (SU! kits are very generous and usually have plenty of spares leftover!) and the nice thing about this kit is that the box can be used as a giftbox, with ribbon to finish, so if you didnt want to gift the actual kit to someone to make, you could have all the fun of making it and then gift the finished article to someone - win, win! And who doesn't need a birthday calendar?? (Or are you all so much better at remembering birthdays than I am?!) The co-ordinating stamp set is also great for creating quick and easy cards and notelets too, either on its own of combined with other sets. 

If you needed further convincing, watch this great little video from Stampin' Up! that demonstrates just what a great kit this is:

I really recommend you watch the video before commencing this project as the written instructions are quite small and it also gives lots of hints and tips about putting the project together. Alternatively, you can contact me to express an interest in attending my next project class for this calendar kit or arrange for to hold a private class for you in your home with a group of friends - I'll bring the ink, stamps, adhesives and kits and we can spend a fun few hours putting them together!

That's all from me today - back tomorrow with a new challenge over at The Paper Players. Until then, happy stampin'!


Stampin' Up! Supplies Used:

Table built using Product Table Builder by The Crafty Owl - Independent Stampin' Up! Demonstrator.


Mini Catalogue

BROWSE THE CATALOGUE

The mini catalogue is now live! Read and download your copy here.

Shop Online

Access my online shop 24 x 7, 365 days of the year:

Current March hostess code:

S9F2XJJW

Shop Online

Join My Team

It's always a great time to join Stampin’ Up! New team members can get £130 worth of products for only £99 + free business supplies + free shipping + all the fun being a part of Stampin’ Up! Stampin' Up! has something for everyone: join my growing team and benefit from my support to enjoy Stampin' Up! however you choose.

If you're interested, call me for a chat to understand how I can help you realise your goals. Alternatively, if you have already decided to sign up and you just can't wait, please click here for the link to the online form where you can sign up and order your starter kit right away! 

Latest Kit!

Stampin Cut and Emboss

The Rock Legend Kit has all you need to make 8 cards with coordinating envelopes. Along with the new Panda Friends Kit, both are available from January 4th for just £14 each - get yours here!

2023-24 Annual Catalogue

BROWSE THE CATALOGUE

Click on the catalogue for a full list of current SU! supplies - if you would like to order any of the items featured, please drop me a line at [email protected] or give me a call on 07773 421446 - I'd be happy to help.

New Online Exclusives

There will be new products available exclusively in the online store from 5 March - check them out here.

About Me

Hi I'm Joanne and live in Northampton and when I'm not looking after my husband and two beautiful children, am an avid crafter with a passion for all things Stampin' Up!

I must confess that I have never been a big rubber stamper - until I discovered Stampin' Up! that is. I love the fact that I can get such great results with co-ordinating stamps, inks, papers and punches - the possibilities are endless! Join me on my stamping journey as I share the things I love and be inspired to create amazing things yourself!

Follow Me

Monthly Newsletter

Box Builder

Click the button above to use Box Buster to create your custom box design using the Envelope Punch Board!

Kits Collection Now Available!

Stampin Cut and Emboss

The new Kits Collection from Stampin' Up! is now available!

Click here to see the current kits available and order yours online today.

I Design For


Stampin' Up Stuff

This is my personal blog and is not endorsed by Stampin’ Up! I hope you find it a plentiful source of ideas and personal inspiration but please don't copy my designs for contest submission or use for classes, publication or sale without express permission.