Bird Builder Spring Wreath Card

by Joanne James4. March 2015 20:05

Finally time for today's creative post! I was fortunate enough to be selected as the 'Top Pick' over at the As You See It Challenge last week - thank you ladies! - for this card here. Today I'm entering a card for this week's challenge which is another sketch-based one - you know how I love a good sketch:

I was keen to interpret the ring in the sketch as a wreath in some way and since I had some leftover burlap on my desk from another project that I am currently working on, I knew which direction I wanted to go. My thoughts are definitely on Spring this week - here is my interpretation of the sketch: 

I started with a base of Lost Lagoon then added a piece of All Abloom DSP down the side. I overlapped this with a piece of So Saffron and added a Pistachio Pudding panel across the horizontal, that I pierced around the edge to add interest. To create my spring wreath, I used a few strands of burlap that I stripped from a length and tied it together at three points around the edge to hold everything together. To decorate, I added a few springs of leaves in Mossy Meadow punched from my bird punch, then punched my bird itself in Lost Lagoon. I added an eye with a Basic Grey marker and I punched his wing out of a snippet of All Abloom paper in a different stack design. I added a sentiment banner that I stamped using the Crazy About You' stamp set and to finish a trio of flowers, one in So Saffron with a pearl centre, and two that I stamped in So Saffron on Whisper White with the flower stamp from the 'Something to Say' stamp set and punched out with the co-ordinating Itty Bitty Accents punch.

I love the look and feel of this card - it's so fresh and says that Spring is on the way. I haven't used my bird punch in ages but this little fella looks quite at home sat on his burlap wreath. This would also make a nice Easter or Birthday card, with a change of sentiment.

Back tomorrow with another double-post day and some exciting news too! Until then, happy stampin'!


Stampin' Up! Supplies Used:

Table built using Product Table Builder by The Crafty Owl - Independent Stampin' Up! Demonstrator.


A New Home Card!

by Joanne James22. May 2014 15:30

I had a hugely productive creative day yesterday (I love days like that!) and decided to have another go at a card with the sketch layout from CAS(E) This Sketch (although I'm too late to link up to this challenge with this sketch). I am linking up with Addicted to CAS though as I have another 'over the edge' birdie and today's card features the zingy colour palette over at Color Throwdown:


So using the color throwdown photo for inspiration, I decided to create a 'new home' card. There is only one set is the annual catalogue that features a new home welcome - the hostess set 'Sweetly Framed' - so I decided to create something using some punch art with an idea that I've had swimming around in my head for a while. Here's my card:

I used Pear Pizzazz for my base, and popped my Soft Sky panel up on dimensionals and created a little bird house by punching a 1" square out and topping with a Tangerine Tango triangle cut from half a square for the roof. I punched a Tangerine Tango bird using the bird punch and highlighted the bird's wing by using a scrap of Retro Fresh DSP, adhering with rolled glue dots to give some height. I added some punched co-ordinating coloured hearts punched with my owl punch. Lastly, what to use as a sentiment? I eventually decided on 'Yippee-Skippee!' from the stamp set of the same name, stamped in Versamark and heat embossed in clear powder - not quite 'Welcome to your new home', but it's exactly how I felt when I bought a new house, both times, so it seemed more than appropriate! Another very clean and simple card, created with just a few punches and a sentiment.

Back tomorrow with another project; until then, happy stampin'!


Stampin' Up! Supplies Used:

Table built using Product Table Builder by The Crafty Owl - Independent Stampin' Up! Demonstrator.


Tags: , , , , , , , ,

Cards | Punch Art | Stamping

Make a Wish and New MDS Downloads

by Joanne James15. October 2013 20:23

A quick post from me today as I'm keen to finish watching the rest of tonight's Great British Bake Off semi-final. Here's a birthday card I made last week, very similar to this one by Mary Fish, which is so easy yet so effective:

I thought this would be the perfect card for my teenage niece - girly, but not too childish with clean geometric lines. The in-colour designer paper does most of the work here without the need for lots of stamping. It was also a good excuse to get my bird punch out of the drawer, as he hasn't been used in a while. If you're quite new to stamping and reading this and thinking I've finally lost the plot as there isn't a bird to be seen on this card, you'd be right - but the wing shape from the punch in question makes the perfect flame for the birthday candles (so I'm not completely mad, just a little!)

Just before I go, it's Tuesday which means MDS Digital Download Day. Here's a quick look at some of today's new downloads:

Just click on the date button to go straight to my online store to download them.

October 15, 2013 - Digital Downloads

Back tomorrow with another project - right now I'm off to watch the end of the Bake Off! Until tomorrow, happy stampin!


Stampin' Up Supplies Used:

Bird Punch - by Stampin' Up!2013-2015 In Color Designer Series Paper StackSweet EssentialsSilver Mini Brads

Tags: , , , , , ,

Cards | Punch Art | Stamping

Sunshine and Sprinkles Scrapbook Page

by Joanne James19. April 2013 21:09

Today I thought I would share something a little different: as many of my followers will know, I love to design and make cards. I'm not a scrapbooker - it's just not my 'thing'. In many ways this may surprise those close to me, as we are a household of keen photographers and have a collection of literally thousands of memories captured on slide, film and digitally. I love to have photographs on display - for me though, I struggle to design a page without a specific photograph in mind.

All that being said, I made a scrapbook page at training last Sunday and I thought I would share it with you, as even though I haven't yet chosen the photos to put on it, the layout could be used and adapted in so many ways I'm sure it will inspire some of you reading this, who I know are keen scrapbookers. Here is my finished page: 
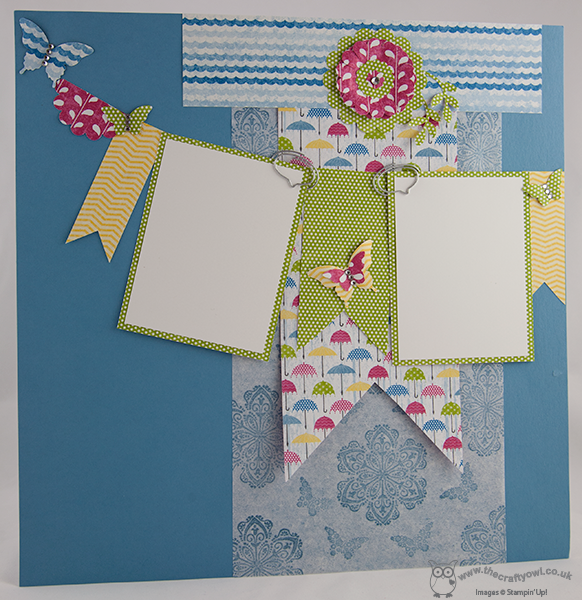
This page was designed by the lovely Bekka Prideaux and features one of my favourite current designer papers in the Spring Summer catalogue, Sunshine and Sprinkles. I also like the background stamped sheet - this is Marina Mist ink stamped straight on to filter paper.

Here's a close-up of the top section - there's so much going on here: 
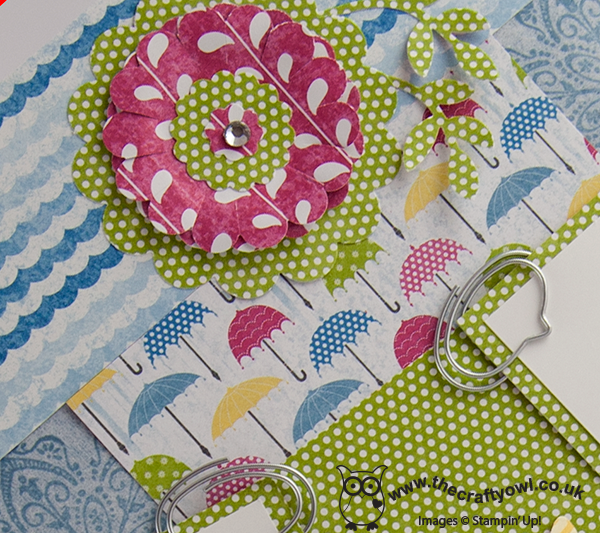
Did you notice the lovely speech bubble paper clips too - aren't they cute? You may have overlooked them in the catalogue (p.28, Spring Summer Cat.): there are 2 different packs - each with 8 of 3 different designs (there is an arrow and a coat hanger in this set too) and at £4.50 per pack they represent great value. One or two on a scrapbook page or card is enough to add just the right amount of detail. One more photo - a close-up of one of the butterflies:
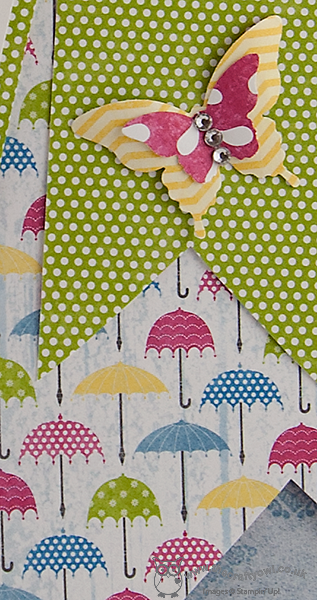
As Bekka herself would say, you can never have too many butterflies! I love the way the Bitty Butterfly punch is layered with the Elegant Butterfly punch to create a double one and the rhinestones add just enough 'bling' without overpowering the page. I really like this layout and there's even some space on the base page if you wanted to add some journalling or commentary. For those of you that enjoy journalling, I will have more great Stampin' Up! news coming soon - all 'top secret' currently, but watch this space - that's all I'm saying for now!

I hope you enjoyed the change in direction today; back with another card tomorrow. Unti then, happy stampin'!


Stampin' Up Supplies:

Stamps: Mixed Bunch, Papillon Potpourri

Cardstock: Marina Mist, Whisper White, Sunshine and Sprinkles DSP

Ink/Stampin' Write Markers: Marina Mist

Tools: Elegant Butterfly punch, Bitty Butterfly punch, 2-Step Bird punch, 1 3/4" Scallop Circle punch, 2 3/8" Scallop Circle punch, 7/8" Scallop Circle punch, Itty Bitty Shapes punch

Finishing Touches: Cute Clips, Basics Rhinestones

Which came first: the chick or the egg?

by Joanne James26. March 2013 21:51

Today I'm sharing one of my favourite Easter projects with you. I think the new oval framelits in the Spring-Summer seasonal catalogue were crying out to be made into an Easter gate-fold card, so here's my version: 

I used oval framelits 1-4 and 6 to create an Easter egg on the outside; I deliberately chose to keep the front quite simple with some paper piercing for interest and a large paper bow to tie the whole thing together. The outer oval lifts up to release the fold and reveal the surprise on the inside:

A cute punch art chick with a happy Easter message! So for this card at least, the egg came first. One last photo of a close up of the bow - a dramatic focal point for this card and I love it:


Hope you like it. Back tomorrow with more Spring loveliness; until then, happy stampin'!


Stampin' Up Supplies:

Stamps: Wacky Wishes

Cardstock: Daffodil Delight, Melon Mambo, Tangerine Tango, Old Olive

Ink: Tangerine Tango

Tools: Oval Framelits, Oval Paper Piercing Template, 1 3/4" Circle Punch, Two Step Bird Punch (for wings), Heart Punch (for feet - retired)


Tags: , , , , , , , ,

3D Projects | Cards | Punch Art

Tea Shoppe Centre Step Card

by Joanne James22. March 2013 21:37

I'm behind with my Easter photography, so a break from Easter cards today and another of the Tea Shoppe cards that I've been making to share with you. This is a case of a card by Michelle Last (you can see her version here), albeit in a completely different colourway: 

This card involves a lot of cutting out by hand of the cups, but it's worth it I think for the overall effect. I used some of my 'Tea for Two' DSP to provide the background paper and I love the flower trim - it really makes this card, don't you think? I coloured the edges of my flowers by dipping in some Pretty in Pink reinker; I think it ties them into the overall colour scheme really well. You can do this with any ink colour to co-ordinate with your project, so it makes them really versatile. Here's a close up of the flowers so that you can see the effect in detail: 

So pretty! I love the vintage feel of this card, even though I'm generally a clean lines, modern design kind of girl. This would be a lovely birthday card or even special invitation to an afternoon tea party - I can almost hear the china tea cups and saucers chinking together ...

Back tomorrow with more Easter fun; until then, happy stampin'!


Stampin' Up Supplies:

Stamps: Tea Shoppe

Cardstock: Very Vanilla, Rose Red, Tea for Two DSP

Ink: Pretty in Pink, Rose Red

Tools: Scallop Oval Punch, Large Oval Punch, Two-Step Bird Punch (for the leaves), Stampin' Dimensionals, Trimmer

Finishing Touches: 5/8" Flower Trim

Tags: , , , , , , , ,

Cards | Stamping

Easter Chicks Simply Scored

by Joanne James17. March 2013 21:50

So I thought it was about time I started with some Easter cards, otherwise it will be here before we know it and I won't have shared any ideas with you. I took the opportunity to play with my Simply Scored Borders scoring plate today and used it to decorate some Easter eggs for my newly hatched chicks:


It's taken me a while to get used to the new scoring plate, but now that I have I'm finding it useful for all kinds of things. Stampin' Up! have made a great video tutorial showing how to use the new plate, which does work differently to the other plates as it has an overlay guide too - click on the video link here if you'd like to know more.

In case you're wondering where the chicks came from - they are the bird from the two-step bird punch, sponged around the edges to add definition. I love punches like this that have multiple uses!

The children had a Spring Fayre at school yesterday and won a runner-up prize in the Easter Egg Hunt of a chocolate egg and a chocolate rabbit - they were delighted and as they devoured the egg this afternoon, decided Easter has officially begun! I'll be back tomorrow with another Easter card; until then, happy stampin'!


Stampin' Up Supplies:

Stamps: Wacky Wishes

Cardstock: Crumb Cake, Wisteria Wonder, Island Indigo, Calypso Coral, Lucky Limeade, Daffodil Delight

Ink: Daffodil Delight, Island Indigo

Tools: Simply Scored Borders Scoring Plate, Ovals Framelits, Two-Step Bird Punch

Finishing Touches: Linen Thread

Tags: , , , , , , , , ,

Cards | Punch Art

Xin Nian Kuai Le - or Happy New Year, in Mandarin!

by Joanne James10. February 2013 20:38

I have been very busy exhibiting at my first wedding fair today, so today's work is that of a guest crafter - my daughter! Today is Chinese New Year and as my daughter is very fortunate to learn Mandarin at school, we decided to make a new year card for her Mandarin teacher, Wan Lau Shu (or Mrs Nelson to the uninitiated - apologies for  the poor phonetics!!) and a small gift.

So first up, the card:

This year is the Year of the Snake, so we decided to decorate the card with a golden snake (yellow/gold is considered the most important colour and the colour of Imperial China) made using a paper-folding technique learned at a lunchtime 'Maths through Art and Design' club (aren't schools great these days?!). We stuck the snake to a bright red card, as red is an important colour in Chinese culture symbolising good fortune and joy and is very popular during new year celebrations. To finish, my daughter carefully wrote 'Happy New Year' in her best character writing alongside it.

She then also made a small gift of a punch art panda bookmark to go with the card. Isn't he cute?


Just a few simple punched shapes, diamantes to give his eyes some sparkle and a red bow for luck. So to everyone out there who is celebrating today, a Happy New Year! Until next time, happy stampin'!

Stampin' Up Supplies (Panda Bookmark only):

Paper: Whisper White, Basic Black

Tools: Large oval punch, 2-step bird punch (the wing), owl punch (circles for eyes and heart for nose), diamantes


Tags: , , , , , , , ,

3D Projects | Cards | Punch Art

Current Promotions

Stampin Cut and Emboss

Save up to 30% off on all your favourite kits from 1 to 31 October! 

Click here to see the current kits available and order yours online today.

Join My Team

It's always a great time to join Stampin’ Up! During October you can get even more in your starter kit! New team members can get £160 worth of products for only £99 + free business supplies + free shipping + all the fun being a part of Stampin’ Up! Stampin' Up! has something for everyone: join my growing team and benefit from my support to enjoy Stampin' Up! however you choose.

If you're interested, call me for a chat to understand how I can help you realise your goals. Alternatively, if you have already decided to sign up and you just can't wait, please click here for the link to the online form where you can sign up and order your starter kit right away! 

Shop Online

Access my online shop 24 x 7, 365 days of the year:

Current October hostess code:

4XPEYCB9

Shop Online

Scrapbooking

Stampin' Up! has introduced a new range of 12x12" scrapbooking product and kit - the full range is now available to purchase online. To download a copy of the new digital Scrapbooking Catalogue click here.

Mini Catalogue

BROWSE THE CATALOGUE

'Tis The Season - the new Stampin' Up! Mini Catalogue is here! For more details and to download your copy click here

2024-25 Annual Catalogue

BROWSE THE CATALOGUE

Click on the image to download your copy of the 2024-25 annual catalogue. For a full list of current SU! supplies, go to my online store. If you would like any help or advice, please drop me a line at joanne@thecraftyowl.co.uk or give me a call on 07773 421446 - I'd be happy to help.

Latest Kits!

Stampin Cut and Emboss

The Christmas Ornaments Kit and Card Keeper Kit are the latest kits in the online store - get yours here!

New Online Exclusives

There are new products available exclusively in the online store from 5 November - check them out here.

About Me

Hi I'm Joanne and live in Northampton and when I'm not looking after my husband and two beautiful children, am an avid crafter with a passion for all things Stampin' Up!

I must confess that I have never been a big rubber stamper - until I discovered Stampin' Up! that is. I love the fact that I can get such great results with co-ordinating stamps, inks, papers and punches - the possibilities are endless! Join me on my stamping journey as I share the things I love and be inspired to create amazing things yourself!

Follow Me

Monthly Newsletter

Box Builder

Click the button above to use Box Buster to create your custom box design using the Envelope Punch Board!

Kits Collection Now Available!

Stampin Cut and Emboss

The new Kits Collection from Stampin' Up! is now available!

Click here to see the current kits available and order yours online today.

I Design For


Stampin' Up Stuff

This is my personal blog and is not endorsed by Stampin’ Up! I hope you find it a plentiful source of ideas and personal inspiration but please don't copy my designs for contest submission or use for classes, publication or sale without express permission.