by Joanne James14. May 2014 21:40I've had a busy couple of days preparing swaps and finishing my preparations for the Stampin' Up! event at Telford on Saturday and I've still got more to do! Today I'm sharing my card for this week's challenge over at Less is More, where Chrissie and the team are looking for one layer thank you cards. I decided to try something something a little different, using my retired but never-to-be parted with Expressions Thinlits. Here is my card:
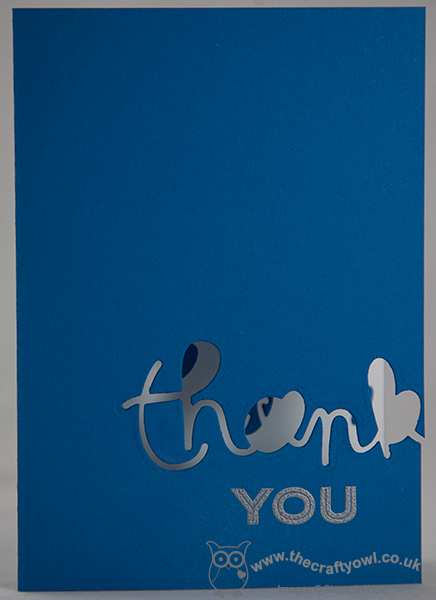
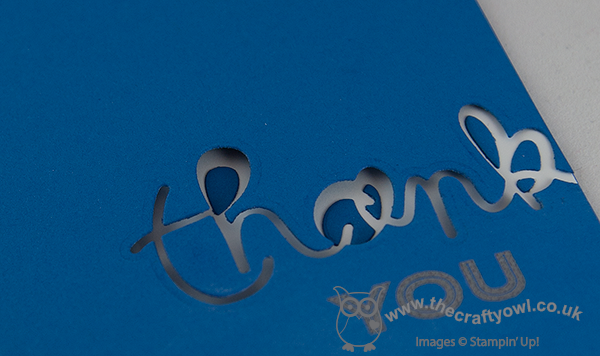
I decided to make a thank you card that would be suitable for a male, or at the very least gender neutral - so I went for a nice bright blue. Now I know the eagle-eyed amongst you are thinking - but the framelit says 'thankful', right? Well that's true - as I only wanted the 'thank' part, I positioned it over the edge of the card and cut it to the edge so that it looks as if the writing is going off the edge of the card. I adhered the cut-out pieces from the middle of the word to the inside of the card, to maintain the definition of the lettering - you can see it more clearly on the photo below:
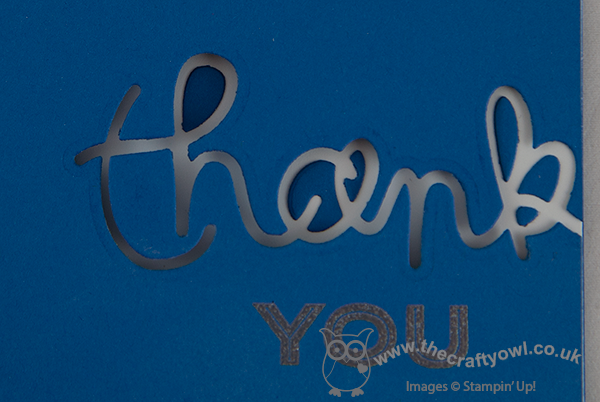
To finish my sentiment, I inked up the 'you' from the 'thank you' sentiment in the 'Simply Celebrate' set and heat embossed it with silver embossing powder. A clean and simple thank you card that's just a little bit different! I'm also linking my card up to 'Addicted to CAS', where the current challenge is appropriately 'off the edge'. Right, I'm off to get my nails done!
Back tomorrow with another project; until then, happy stampin'!
Stampin' Up! Supplies Used:
by Joanne James14. May 2014 11:00I'm having a love affair with my heat gun this week as this is my second card that features heat embossing and I've another cued up for tomorrow too! Today's card is my entry for this week's challenge over at The Paper Players where Sandy has chosen some lovely subtle spring colours to work with; I've also used this week's layout over at Retrosketches as the basis for my card:
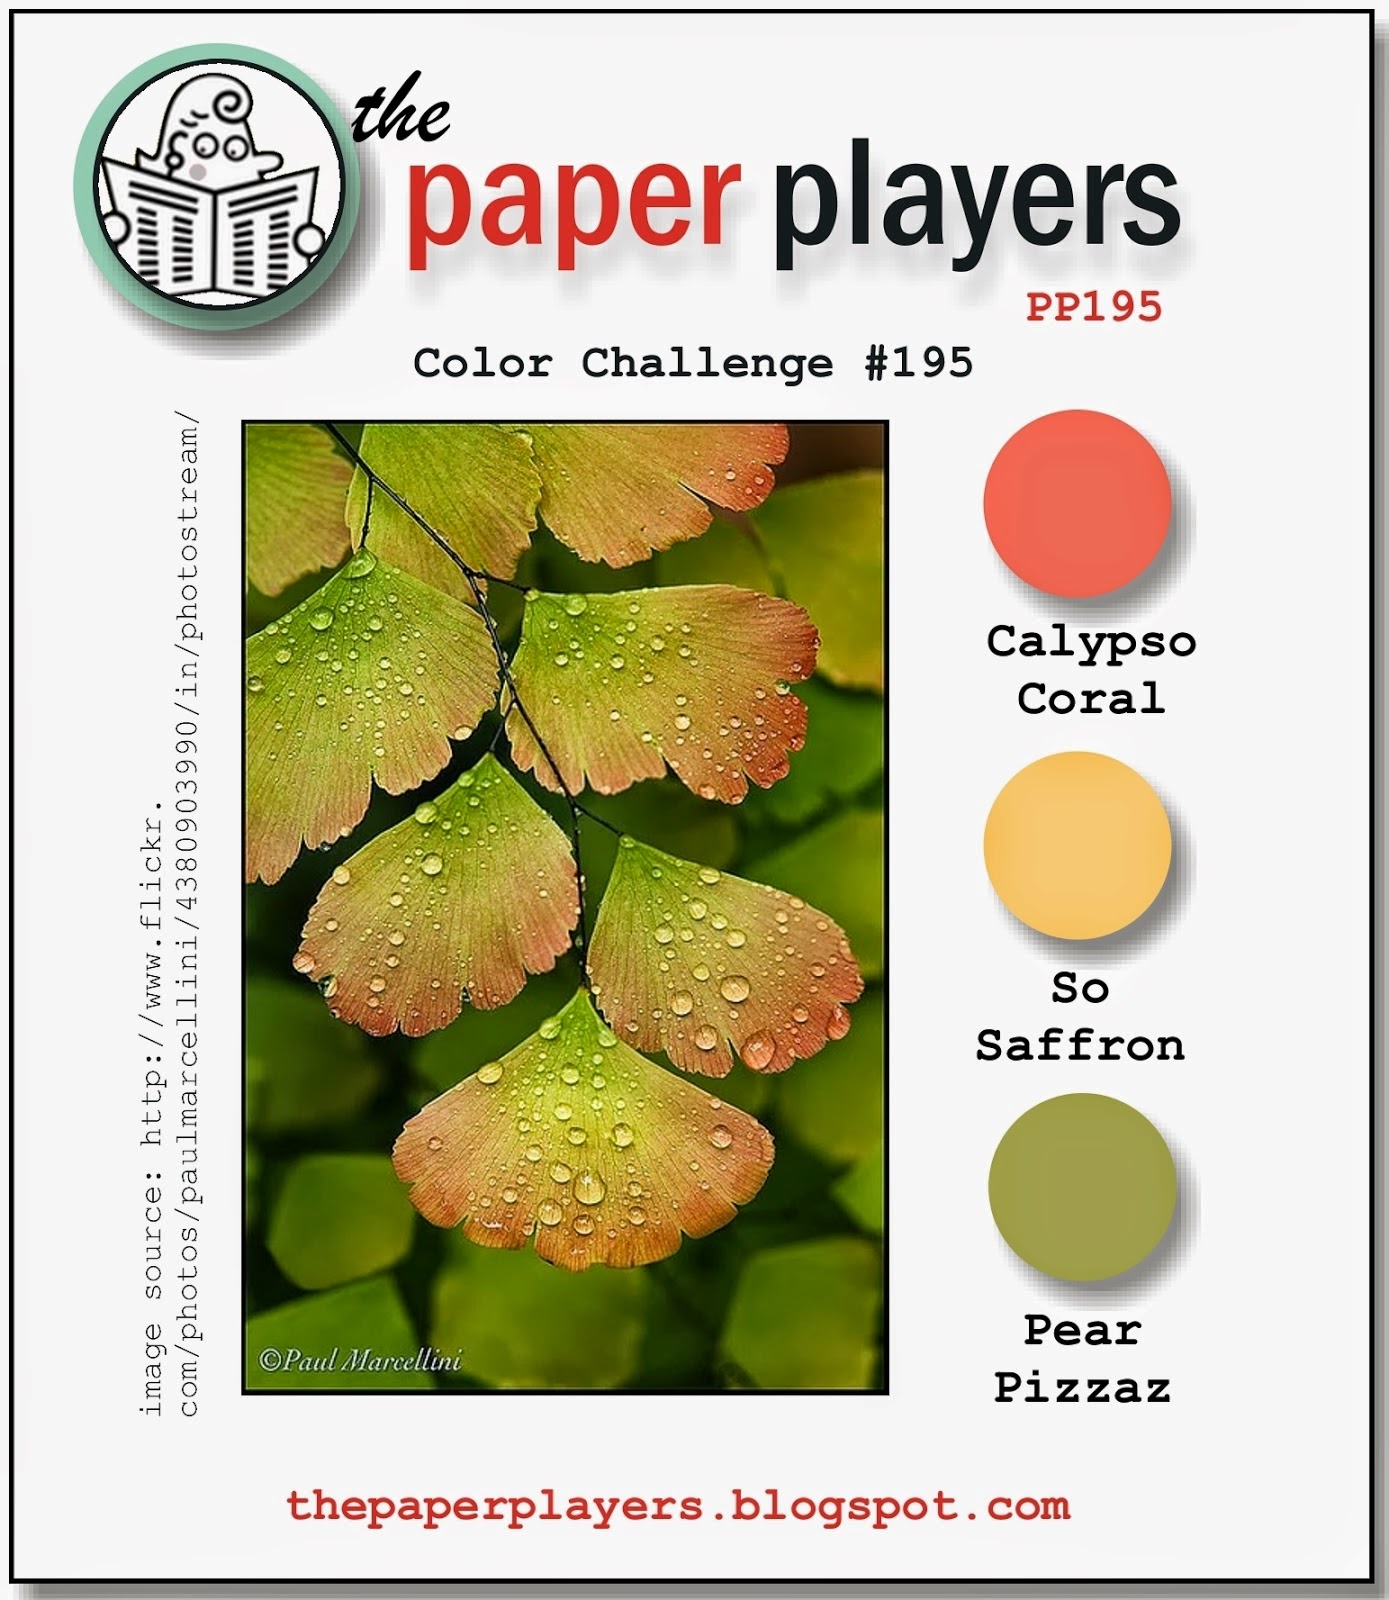
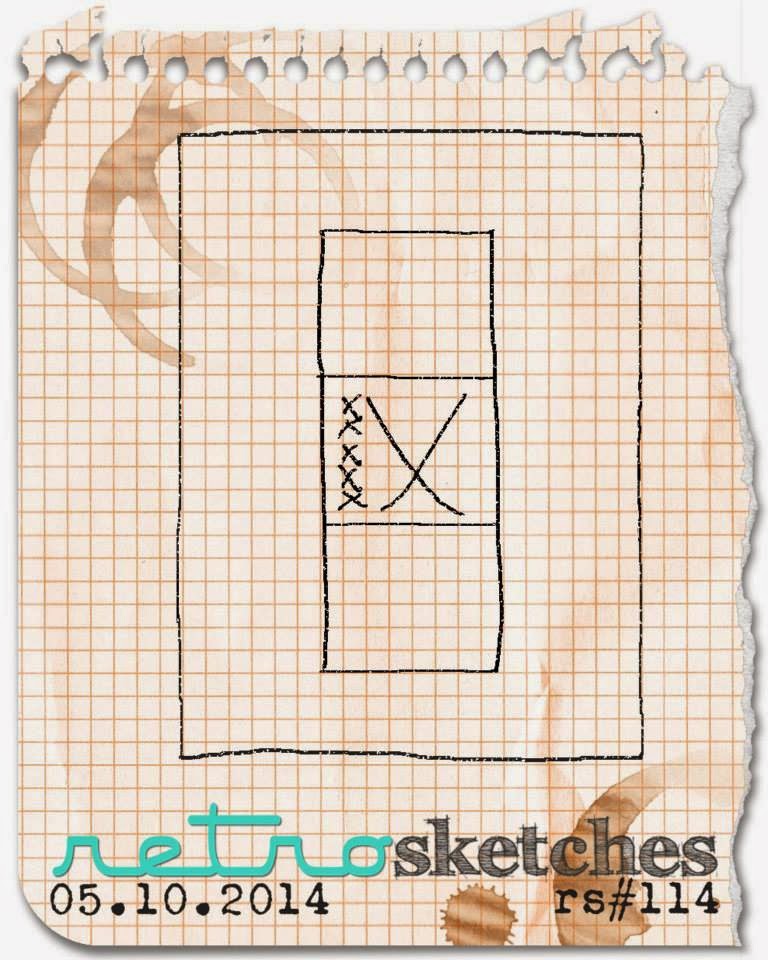
I thought that The Paper Players colours were just asking to be used on a floral card - this is what I came up with:
I stamped the corner flower image twice in Versamark onto my vellum panel then heat embossed in white and coloured the reverse of the images with my So Saffron, Calypso Coral and Pear Pizzazz markers. I then adhered this to a panel of Calypso Coral and heat embossed my 'thank you' sentiment in white onto a panel of So Saffron and placed this across the middle on dimensionals.
This card came together quite quickly and I love the subtle effect of the colouring behind the vellum.
That's all from me today - I have to go and get on with my swaps in readiness for Stampin' Up!'s UK regional training event in Telford on Saturday, in order to be finished in time to go and watch Rebecca's first rounders match of the season later on this afternoon!
Back tomorrow with another card; until then, happy stampin'!
Stampin' Up! Supplies Used:
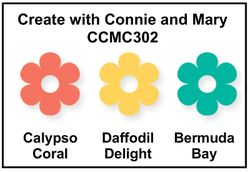
by Joanne James13. May 2014 21:06Today I'm sharing a card I made for this week's challenge over at Create with Connie and Mary, where they have a lovely vibrant colour palette to play with; I also used the layout over at CAS(E) This Sketch:
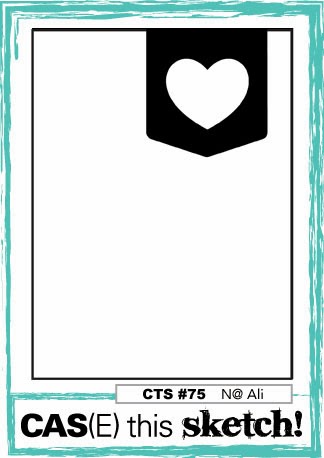
This card gave me the perfect opportunity to make a feature of a lovely piece of Watercolour Wonder paper that I've had in my box for a while and also to try something different with the tab panel. Here is my card:
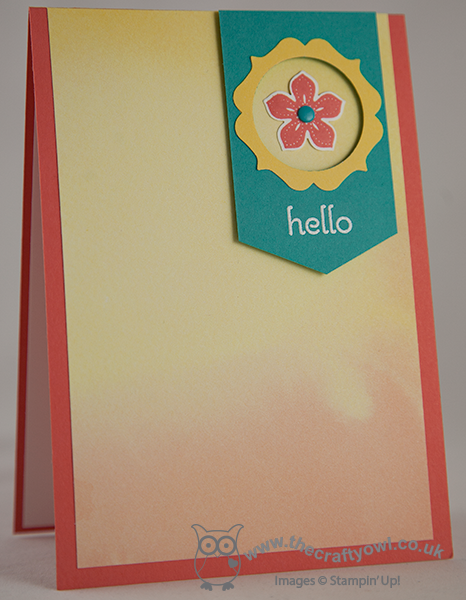
I used Calypso Coral for the base of my card, topped with a piece of Watercolour Wonder DSP. Now I know that, strictly speaking, the paper pack says that Daffodil Delight and Tangerine Tango are the feature colours in the Watercolour Wonder papers, however the watercolour effects mean that on some of the sheets the blending means that there are also opportunities to match with other colours, such as Calypso Coral for example - I just chose an area of paper that avoided the darkest orange tones so it fits perfectly with the rest of my card. I cut my inverted banner from a piece of Bermuda Bay cardstock and used a 1 1/4" circle and the Label Bracket punch to create the Daffodil Delight aperture to showcase my Petite Petals flower - I've been wanting to use this framing idea ever since I saw it on one of Connie Babbert's cards a while ago (you can see Connie's original card here). I also stamped my 'hello' sentiment in Versamark and heat embossed in Whisper White. Lastly, I stamped my flower in Calypso Coral on some Whisper White cardstock and finished it with a Bermuda Bay candy dot.
I really like how this card turned out; I almost stamped a sentiment onto the DSP instead of the banner, but in hindsight I'm really glad I didn't - I love that the watercoloured panel is on show and uninterrupted by any other stamping or design.
Back tomorrow with another project and this week's new Wednesday weekly deals; until then, happy stampin'!
Stampin' Up! Supplies Used:
by Joanne James12. May 2014 21:29Good evening everyone! Firstly, can I say a big than you to Helen, Dotty and Granny for your lovely comments on Rebecca's blog post yesterday - it's always nice to get comments and she was very touched by your kind words and asked me to say thank you to you all today.
On to today's post! I wanted to play with my new photopolymer stamps that arrived last week (free with each order of £60 or more - read all about the May offer here) and am just managing to squeeze in my entry to this week's Pals Paper Arts challenge, where this week there is a colour challenge. I also loosely based my card on the sketch over at Fab Friday:
Whilst the PPA design team came up with a great variety of cards suitable for both men and women this week, this colour scheme led me to make a masculine card. As I mentioned, I wanted to use my photopolymer stamps to try out an idea inspired by a printed card I saw recently on Pinterest (you can see that card here) - here is my card:
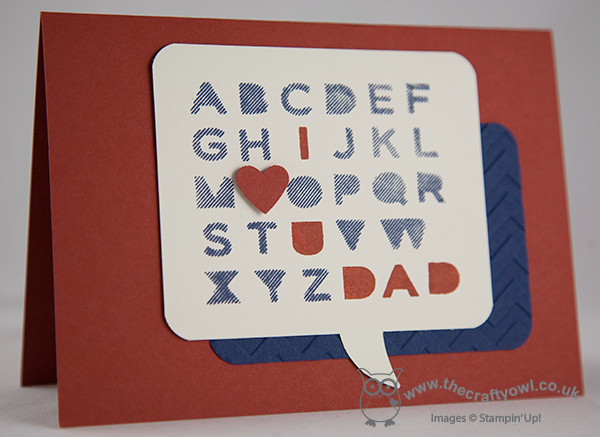
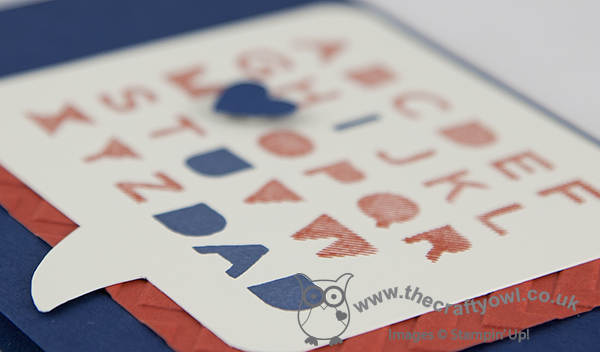
Clearly without the absolute pinpoint accuracy of the printed medium, yet this alphabet was relatively easy to stamp and align using the Sans and Stripes photopolymer stamps without the need for a stamp-a-ma-jig. I cut the word bubble by hand (another reason to add to my list of 'Why I need an e-cutter'!) and backed this with a contrasting coloured panel that I embossed with the Chevron embossing folder, rounding the corners to echo the shape of the word bubble. Lastly, I punched a contrasting heart and popped it on a dimensional. I liked this card so much, I also made one in the reverse colourway:
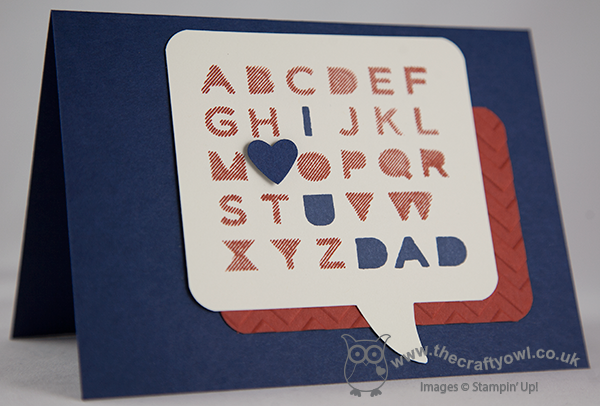
I think I like my Cajun Craze base the most, but this alternative version comes a close second. What about you - which one appeals to you most? I made this card with Father's Day in mind - still a good month away, but it pays to be organised! It would equally make a good birthday card for a special Dad.
That's all from me today; back tomorrow with another project. until then, happy stampin'!
Stampin' Up! Supplies Used:
by Joanne James11. May 2014 20:42Today I have a special blog post for you - a guest blogger, none other than my 8 year old daughter! As I was eating my breakfast and minding my own business one day, she was reading over my shoulder and fell in love with the card featured - this fabulous card featuring the fox from the Life in The Forest set, by the talented Erica Cerwin. She promptly announced she just HAD to copy the card and as Rebecca has always fancied the idea of writing her own blog, I asked if she would like to write the blog post for it and she jumped at the chance! So here is her CASE of Erica's card and a few words about how and why she made it:
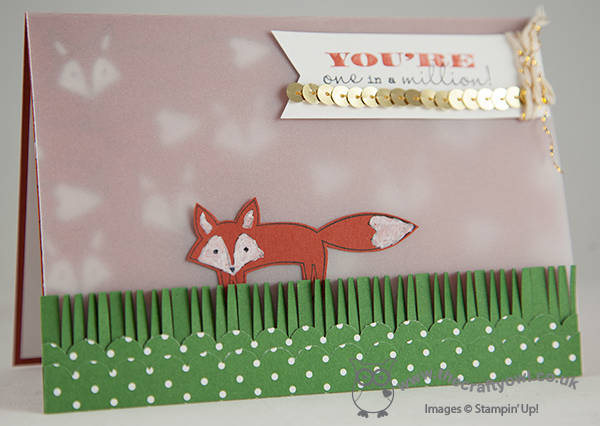
"I really liked this card when I saw it and decided it would make a perfect card for my singing teacher, to say thank you for her help in enabling me to get a distinction in my recent grade one singing exam. I stamped lots of foxes on the card base, and coloured in the white bits with a chalk marker. I love how you can see them through the vellum. I then stamped another fox and cut him out and stuck him on the front behind the grass, which I cut with fringe scissors. I made the banner with 'You're one in a million' but added a row of gold sequins to mine too, for extra sparkle. I also stamped a fox on the card envelope and coloured him in with a Cajun Craze marker pen. my singing teacher loved her card!"
I hope you like Rebecca's card - normal blog service resumes tomorrow! until then, happy stampin'!
Stampin' Up! Supplies Used:
by Joanne James10. May 2014 20:55A quick post from me this evening as I sit with my feet up relaxing following today's all day workshop. We had a lovely time and everyone left with lots of completed projects and plenty of leftover bits and pieces to make lots more things at home. The following card, designed by Monica Gale, was one of my favourite projects:
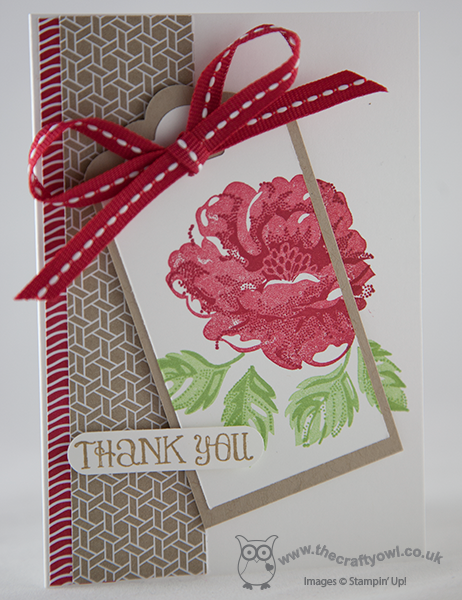
The feature of the card is a Stippled Blossoms rose that is stamped partially off the tag; this is backed with a couple of strips of Fresh Prints DSP and then finished with a red grosgrain ribbon bow and a sentiment cut with the word window punch. A simple enough card but a great way to use the Stippled Blossoms stamps and great practice for getting to grips with your stamp-a-ma-jig. I'm on a mission to make sure all my ladies can use theirs and truly reap the benefits (much to their dismay at times, I'm sure!) of this amazing little plastic sheet and its accompanying t-piece. Thanks ladies for your patience!
My next monthly card class is on Monday 2nd June and will be featuring the 'Springtime Hello' stamp set. If you live in or around Northampton and would like to come along, please do get in touch for more details - experienced and non-experienced crafters welcome.
Back tomorrow hopefully with a special blog post for you; until then, happy stampin'!
Stampin' Up! Supplies Used:
5b70a00c-4938-4cf1-86fd-79b4b2a7a072|0|.0|96d5b379-7e1d-4dac-a6ba-1e50db561b04
Tags: Classes, Lots of Thanks, Shop online, Stippled Blossoms, Scalloped Tag Topper Punch, Fresh Prints DSP Stack, Stamp-a-ma-jig, Stampin' Up, Stampin' Up Card, Stampin' Up Card ideas, Stampin' Up Supplies
Cards | Classes | Stamping
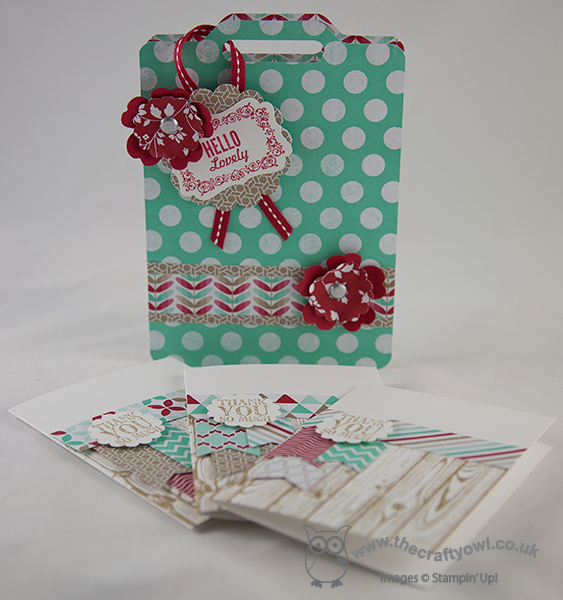
by Joanne James9. May 2014 20:39Good evening lovely blog readers! I've had a busy day today with lots of household chores and last minute preparations for an all day class that I'm running tomorrow with some of my favourite crafting ladies. Today I thought I would share with you one of the projects that we are making at our class tomorrow - a cute little tote made using the Envelope Punch Board:
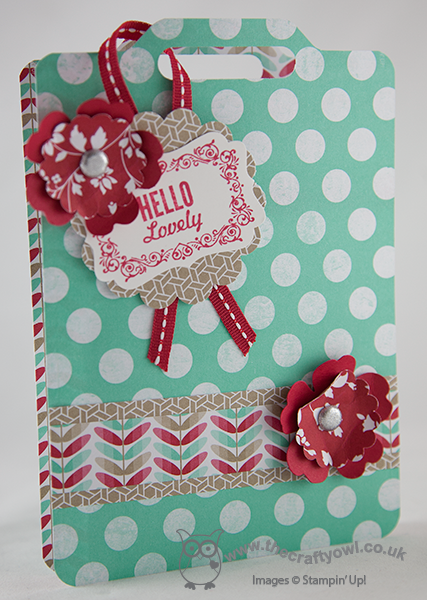
This project was designed by Monica Gale and is one that I made at our last team quarterly training day. It's made using the papers from the Fresh Prints DSP stack and decorated with a tag stamped from the 'Hello Lovely' stamp set. I just love the colours and patterns in this paper stack and as a card maker these papers offer such great value for money at just £6.25 for 48 sheets. We are also making a set of thank you notelets to go inside - this would make such a nice little gift for someone. I'm looking forward to making this and lots of other projects with my ladies tomorrow; if you live in or around Northampton and would be interested in attending any of my cardmaking or project classes, you can find my current class schedule here or just contact me for more information.
That's all from me; back tomorrow with another project. until then, happy stampin'!
Stampin' Up! Supplies Used:
a6422178-75d4-44d0-af72-a6fe6fdec35d|0|.0|96d5b379-7e1d-4dac-a6ba-1e50db561b04
Tags: 3D Projects, Classes, Decorative Label Punch, Envelope Punch Board, Fresh Prints DSP Stack, Hello Lovely, Lots of Thanks, scallop circle punch, Shop online, Stampin' Up, Stampin' Up Card, Stampin' Up Card ideas, Stampin' Up Supplies, Pansy punch, Word Window Punch, Hardwood
3D Projects | Cards | Classes | Envelope Punch Board | Stamping
by Joanne James8. May 2014 14:54Hello everyone - my second video in a week! I'm cheating slightly, as I actually shot this video weeks ago but haven't got around to editing it until now. I made a lovely concertina fold Mother's Day card a while ago using the Scalloped Tag Topper Punch - you can see my original card here - which was based on a similar card made by Julie Kettlewell (you can see Julie's original card here). Having just gone to update my original post with the link to today's video, I realise I didn't mention her in my original post, which was very remiss of me and a complete oversight on my part, as I even mentioned her in today's video. Needless to say, I have now updated the original post!
I love this concertina fold card style - it's great if you need a card that's just a little different. I made another card based on my original one, this time adapting it to a birthday card for a friend of mine who always puts so much thought into cards for others, I thought she deserved something special for her birthday too; here's my latest scalloped tag topper punch concertina fold card:
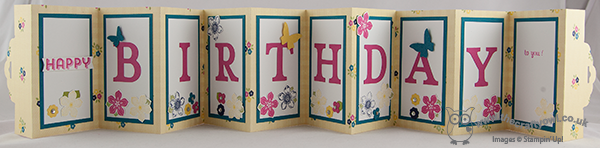
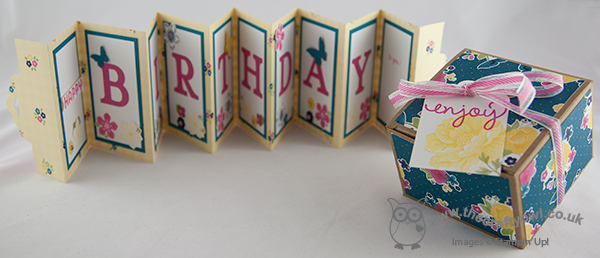
The dimensions are exactly the same as my original card - there is still enough space to stamp 'happy' on one panel, with 'birthday' spelled out on the subsequent panels leaving the last panel blank for your message (I also stamped a little 'to you!' on this panel, just to complete my message). I also decorated one of the Stampin' Up! Kraft gift boxes with some co-ordinating Gingham Garden DSP to make some pretty packaging for my accompanying gift - finished with a tag made with the Scalloped Tag Topper Punch - well, what else?! Here's a picture of both pieces together:
So, if you would like to make a Scalloped Tag Topper Concertina Fold Card - either for the forthcoming international Mother's Day or a birthday card, here's my video tutorial showing you everything you need to know:
If you would like to purchase any of the Stampin' Up! supplies featured in today's project, just contact me or click on the links in the table below to go straight to my online store.
Back tomorrow with another project; until then, happy stampin'!
Stampin' Up! Supplies Used:
83ecd8a3-a7da-4843-9788-9cf4d23e90f5|0|.0|96d5b379-7e1d-4dac-a6ba-1e50db561b04
Tags: 3D Projects, boxes, Kraft Gift Boxes, Gingham Garden, Typeset Alphabet, video tutorial, Stampin' Up, Stampin' Up Card, Stampin' Up Card ideas, Stampin' Up Supplies, Shop online, Scalloped Tag Topper Punch, Simply Celebrate, Stippled Blossoms, Petite Petals, Petite Petals Punch, Itty Bitty Punches, Fabulous Phrases, See Ya Later
3D Projects | Boxes | Cards | Stamping | Video Tutorials
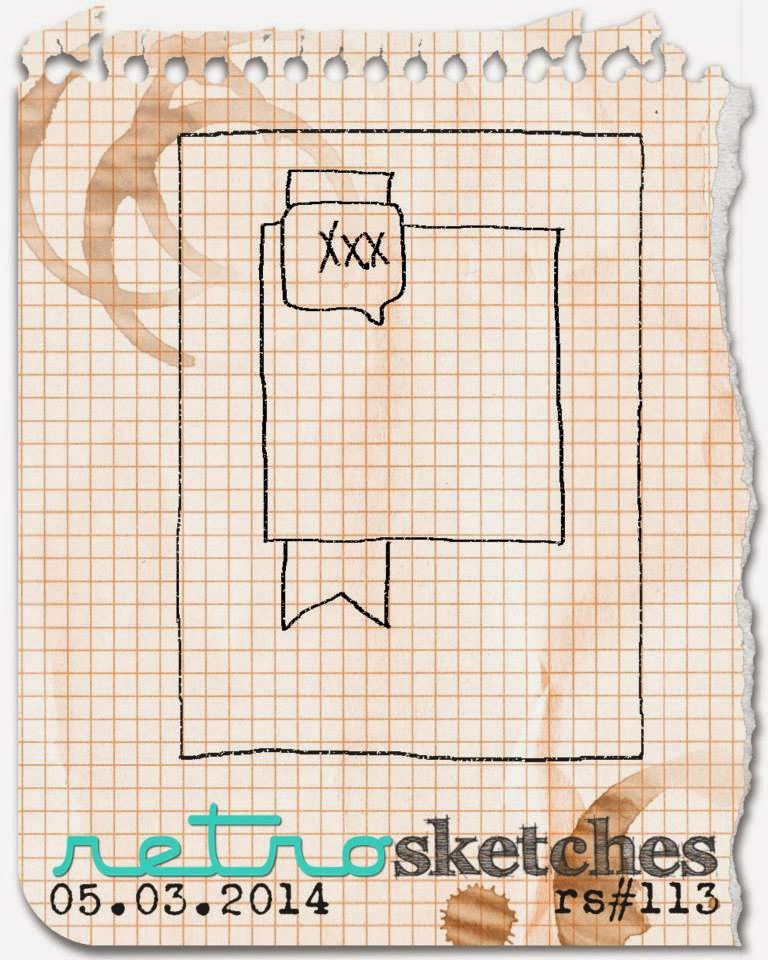
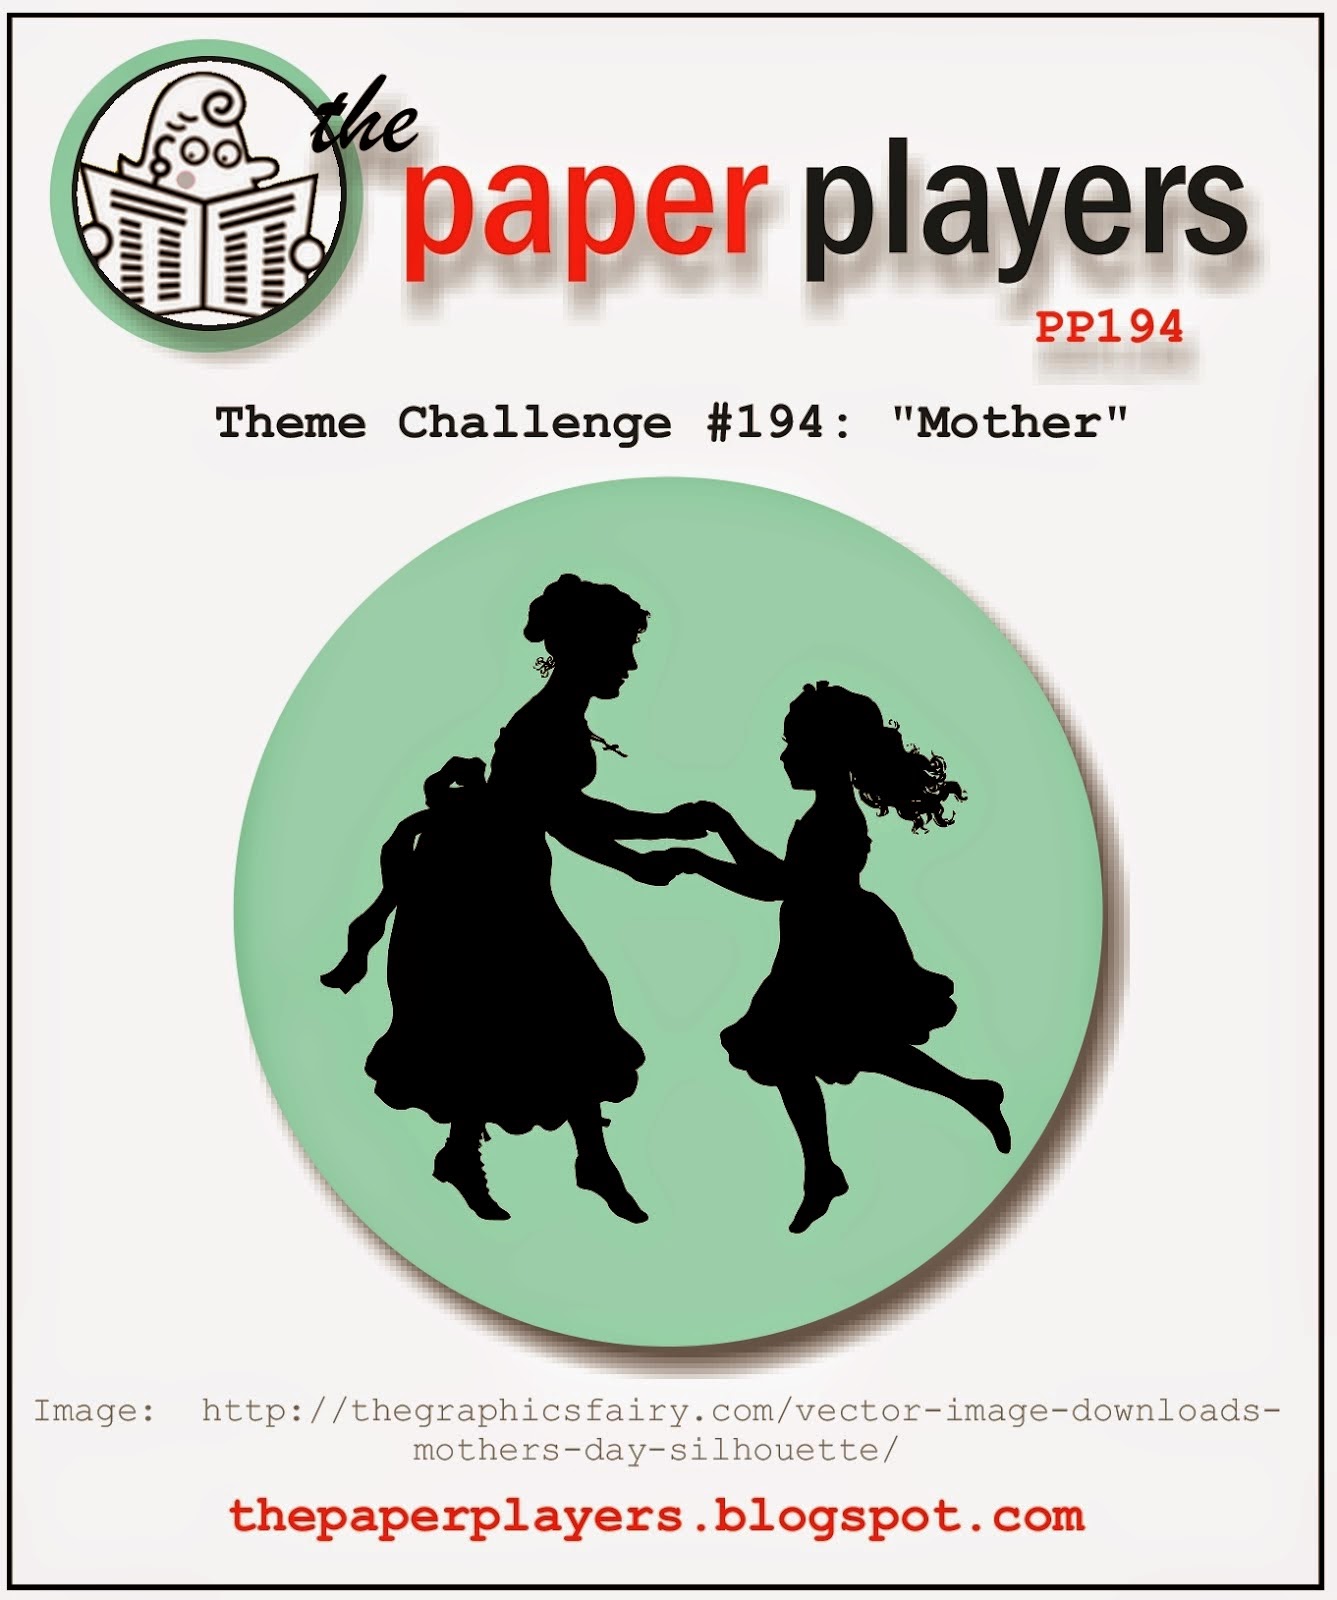
by Joanne James7. May 2014 22:08Good evening all! I had an unexpected uninterrupted day at home today and with the exception of a large basket of ironing, I've spent pretty much the whole day crafting - bliss! I had lots of partially finished projects on my desk and am glad to have been able to complete a fair few of these and cleared some space. I also had some new goodies arrive today and when I saw this week's Colour Me ...! challenge colours and photo inspiration, I just knew I was going to have to ink one of them up to complete a card for this challenge! I also used this week's sketch over at Retrosketches for my layout and tied it in with Jaydee's theme of 'Mother' over at The Paper Players this week:
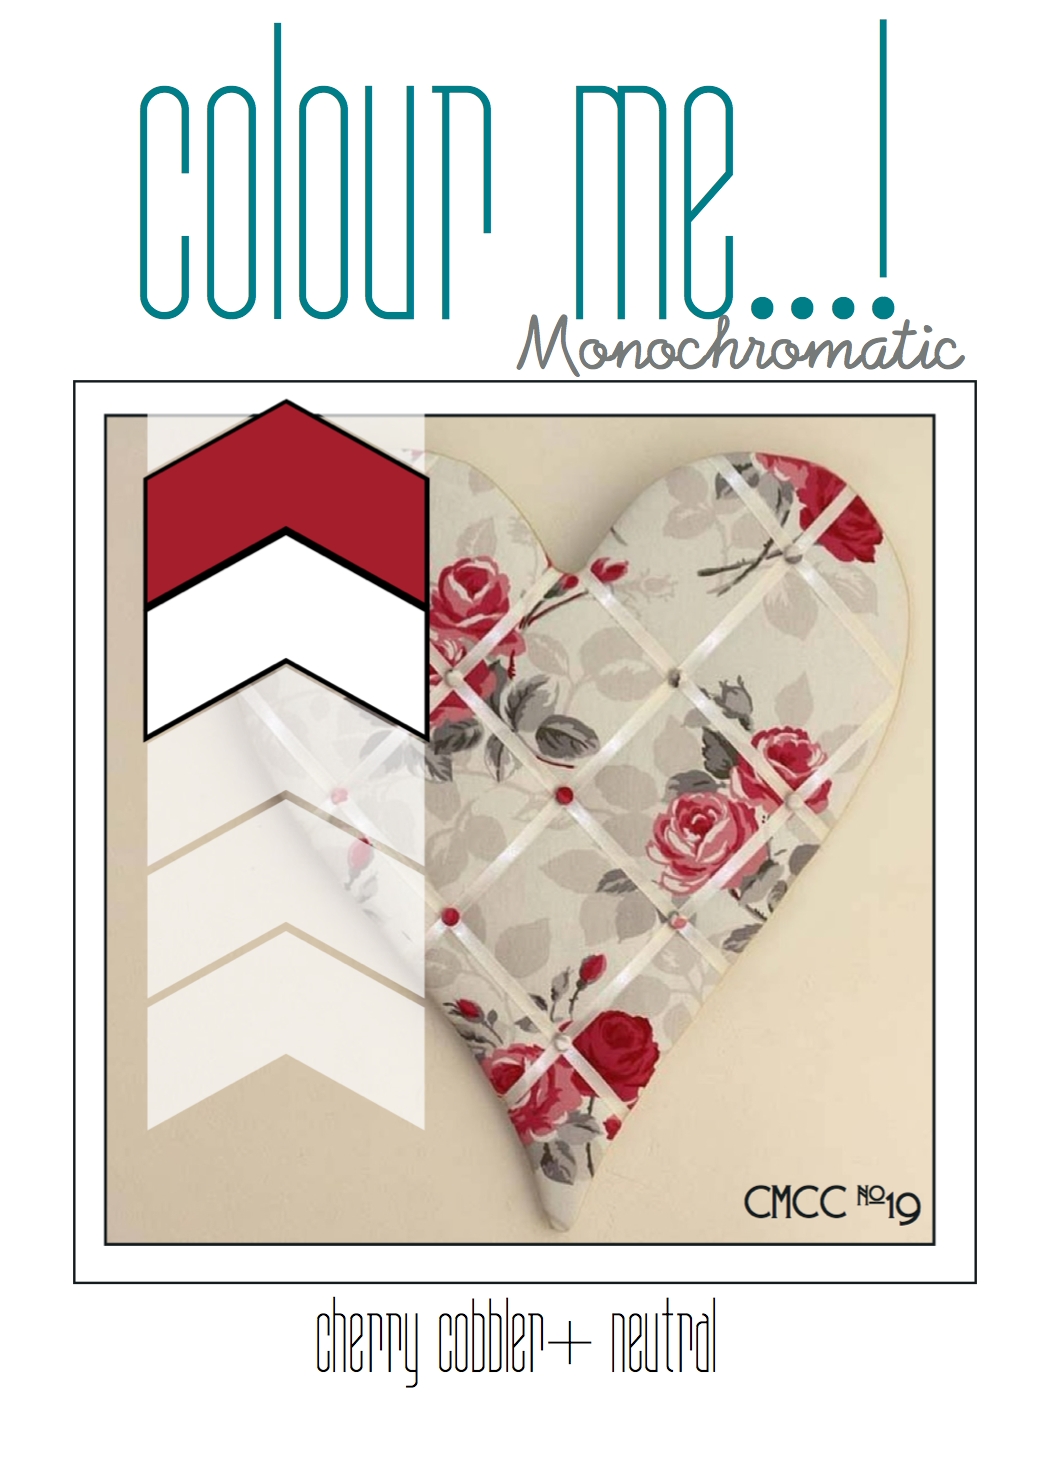
I always think of Cherry Cobbler as a Christmas colour, so it's nice to use it for something that isn't seasonal. Here is my card:

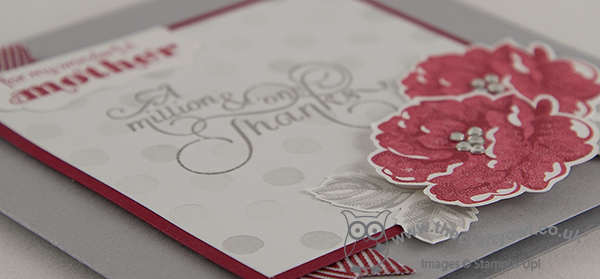
This card was the perfect excuse to ink up my new Stippled Blossoms stamp set. I've much admired this set for some time as I love the effect of the two-step stamping on the flowers, which look so typical of old English roses, but only recently purchased it. It's essential to use a stamp-a-ma-jig to get the images perfectly aligned - and there is no matching framelit, so the blossoms all need to be fussy cut by hand - but it is so worth it. I used my flowers to frame my central panel, a sheet of Watercolour Wonder DSP in White/Smoky Slate, onto which I heat-embossed the sentiment 'A Million and One Thanks' in Pewter. I matted this onto a square of Cherry Cobbler and used a Smoky Slate base. We've already celebrated Mothering Sunday here in the UK, but I decided to stay with this theme for my card. I thought this sentiment was quite appropriate; I know I don't thank my own Mother or Mother-in-law enough for everything they do for me and my family. I added a label (punched with the edge of the Decorative Label Punch) to incorporate 'to my delightful Mother' too and I finished off my card with a simple chevron ribbon trim and some rhinestones to add some sparkle.
Do check out the links to the challenges above for more design inspiration, especially Colour Me ...! where my long-distance Stampin' Up! buddy LeAnne Pugliese is the guest designer this month; you can check out her card on her Wee Inklings blog here.
Back tomorrow with another project (maybe even another video!); until then, happy stampin'!
Stampin' Up! Supplies Used:
862dbbcc-ef43-4e17-b01b-909f77482fcd|0|.0|96d5b379-7e1d-4dac-a6ba-1e50db561b04
Tags: Stippled Blossoms, Stampin' Up, Stampin' Up Card, Stampin' Up Card ideas, Stampin' Up Supplies, Stamp-a-ma-jig, Shop online, Delightful Dozen, Watercolour Wonder, Million & One, Decorative Label Punch
Cards | Stamping
by Joanne James7. May 2014 21:56It's still Wednesday (just!) and they're here: today's Wednesday Weekly Deals! This week's deals are included below - they will be available for one week only, before a new collection of deals is announced.
As always, if you want to take advantage of any of the deals on offer, you can support my business by placing your order online by clicking here or using the link to my store on the right hand side of my blog page where it says 'Shop Online' or with me in person. Don't forget to add the Hostess Code for May (you can find this under the 'Shop Online' section on the right.
Here's a summary of this week's one-week only Wednesday deals - click on each item to go to the online store to purchase:
Embossing is the name of the game this week, with some great offers on dry embossing folders and powders and a heat gun for heat embossing. Back shortly with today's creative post; until then, happy shopping!