Sale-A-Bration Hey Chick Peek A Boo Card

by Joanne James19. February 2017 22:00

I know technically it's still Sunday, but this is Monday's post as I want to link up to the Stamp Ink Paper challenge which closes late this evening - so I'm early! Here's their colour palette this week:


I'm also linking up with CAS Colours and Sketches as I used their sketch for my card, SUO Challenges who are looking for projects featuring Sale-A-Bration sets and the ladies over at TGIF Challenges where they have a 'birds of a feather' theme that my chickens are perfect for! I thought it was about time I broke out the most popular of all this year's Sale-A-Bration free gifts this year  - take a look:


This is the outside of my card - read on for more details and a fun reveal inside! Here's the low-down on today's card:

Hey, Chick - What's better than a new stamp set? Well, it has to be a new FREE stamp set, right? The comical chicks in the 'Hey, Chick' stamp set are proving the runaway success of this year's Sale-A-Bration promotion and could be yours free too with a purchase of £45 or more. I cropped the two large, feathered birds top and bottom using my Stitched Shape Framelits looking up and down respectively on the little 'egg on legs' and coloured with my Stampin' Write markers.

Peek A Boo - There is another chicken that features in this set, perhaps my most favourite of all - the crazy-haired Polish Frizzle Bantam White. Where's mine? Well, take a look inside my card where all will be revealed:


 As the card is opened, the shutters pull back to reveal the funky chicken that I like to think hatched out of that egg - isn't that just the most fun? I like this card so much it's made the cut for my next Sale-A-Bration class - you can see details of my class listings here and I would love you to join me!

Playful Palette - Some Playful Palette designer series paper and some Bermuda Bay stitched satin ribbon complete my card.

Here is the visual summary of the key products used on today's project for you to pin for easy reference:


You can see all of my 'How To' summaries on my 'How To - Tips and Techniques' Pinterest board in case you've missed any. 

I'll be back on Tuesday with another project. Until then, enjoy the start to your week and happy stampin'!


Stampin' Up! Supplies Used:

Table built using Product Table Builder by The Crafty Owl - Independent Stampin' Up! Demonstrator.

Perfectly Wrapped In-Colour Thank You Notelets

by Joanne James25. August 2016 08:05

Today it's time for a new challenge over at Create With Connie and Mary and this week we have a sketch for you:


With a birthday in the house recently and a batch of customer orders due I had a whole bunch of thank you cards to make, so I grabbed a pack of Stampin' Up!'s Whisper White Notelets and Envelopes and decided to use today's sketch as the starting point. I am also linking up with Fab Friday where the challenge is to use one or more of the in-colours. Here's my card:


Here's the low-down on today's card:

Perfectly Wrapped - I used the 'Perfectly Wrapped' stamp set on my card today - the flowers were perfect for the sketch and to tie in with the floral in-colour designer series paper that I used for my other punched circle. The larger flower works as the background to my sentiment and a trio of smaller flowers became the 'splatters'. By mounting all three smaller flowers together I could stamp them at the same time, and alternate the angle to stamp twice on the front of the card, but also stamp the inside and the envelopes, without needing to clean my stamp or re-mount. A great tip and time-saver when mass producing!

Touches of Silver - I decided to heat emboss both my sentiment and a border in silver to add some shine and texture to my card, along with a strip of silver glimmer paper, which I placed behind my front circle rather than in front as per the sketch so that it didn't interfere with my sentiment. Creative license :-) I finished my card with a sprinkling of rhinestones.

In Colour Collection - I made my set of thank you cards, featuring each of the 2016-18 In Colours. The card above features Emerald Envy; the selection below shows the remaining colours (from left to right) Flirty Flamingo, Emerald Envy, Dapper Denim, Peekaboo Peach, Sweet Sugarplum. I love them all; which one is your favourite?


Here is the visual summary of the key products used on today's project for you to pin for easy reference:


You can see all of my 'How To' summaries on my 'How To - Tips and Techniques' Pinterest board in case you've missed any. 

This card was all about mass production for me - I made 30 in one go! Stampin' Up!'s Whisper White notelets are perfect for the job too, with no cutting and scoring required. Which colour is your favourite? Do leave me a comment below, I'd love to know.

Do visit the other Design Team members to see what they did with this week's sketch; there's lots of inspiration over on their blogs too!

Enjoy your day and I'll be back tomorrow with another project; until then, happy stampin'!


Stampin' Up! Supplies Used:

Table built using Product Table Builder by The Crafty Owl - Independent Stampin' Up! Demonstrator.

You're Sublime In Subtles!

by Joanne James8. May 2016 09:00

Apologies for a lack of blog posts these last couple of days. I've plenty of projects made, I've just been away for a couple of days and then had my Crafternoon Tea Home Decor class yesterday at Bell of Northampton in Kingsthorpe. Along with everything else that makes up day-to-day life I've just not managed to find the time to write!

Anyway, today it's Sunday and time for a new challenge over at The Paper Players so I'm back to it! It's the turn of the lovely Jaydee to host our challenge this week and she has a four colour combination for you to play along with:


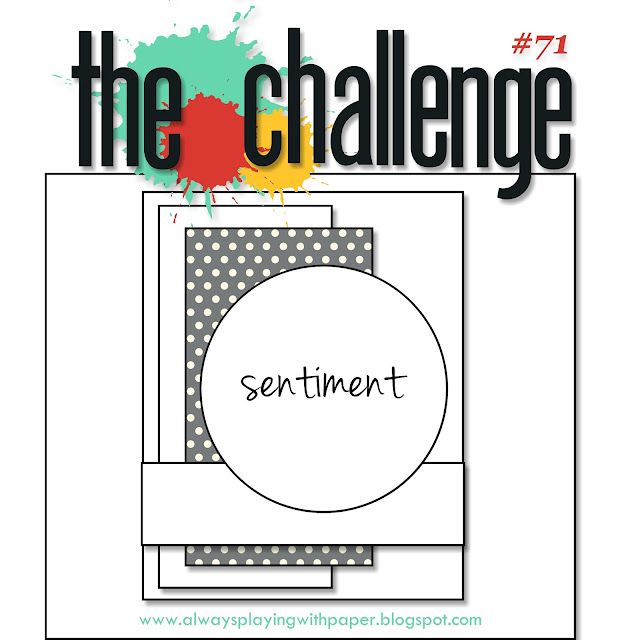
For my card this week I was inspired to use the flower-filled wheelbarrow from the 'You're Sublime' stamp set as the focal point (hence my rather compliment-filled blog post title today!), incorporating lots of layers as per the current sketch over at The Challenge:

Here's the low-down on today's card:

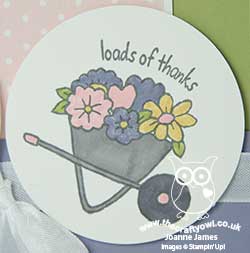
A Barrow of Flowers - This sweet little wheelbarrow stamp is one of the images in the 'You're Sublime' set that I haven't yet used and I these Spring pastels were perfect to fill my grey barrow. I coloured them using my Stampin' Write markers and added a liberal dose of clear Wink of Stella to my blooms, which adds a lovely sparkle in real life although is, alas, difficult to see in the photo. I then punched out my circle with my 2 1/2" circle punch - I'll miss this one when it retires!

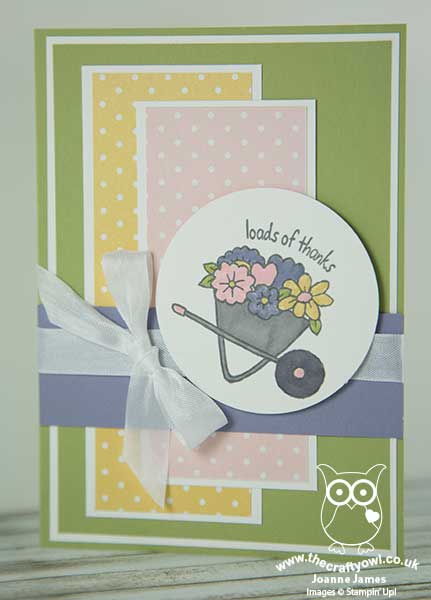
A Subtle Collection of Pastels - I don't use Subtles that often, less so exclusively on a card, unless it's a baby card. These lovely ice-cream colours (there's an idea in itself!) work really well together and this card proves when mixed with a liberal dose of Whisper White they work for flowers too.

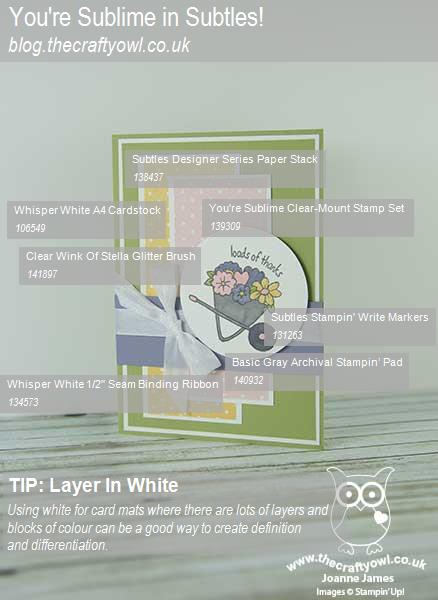
Uniformity In Layers - I focused on one each of the challenge colours per layer and kept the pattern the same on each of the DSP layers to create a uniformity to my design. Using a borderless circle for my focal image, white matting and a white seam binding ribbon and bow trim, each element ties together without overwhelming the others.

Here is the visual summary of the key products used on today's project for you to pin for easy reference:


You can see all of my 'How To' summaries on my 'How To - Tips and Techniques' Pinterest board in case you've missed any. 

Before you reach for your ink and papers, check out what our amazing team has created to inspire you this week:

The Paper Players Design Team
 
 
Here's a quick recap of our challenge rules:
 
1.  Create a new paper project
2.  Upload your creation to your blog with a link back to us and provide a direct link to the post featuring your challenge submission.
3.  Please link your card to no more than four challenges, TOTAL.
4.  Have FUN! 


I look forward to seeing what you create with this week's colours. We are off to basketball today and then hoping for a little more of the lovely sunshine we've been having here in the UK these past few days and an afternoon in the garden.

Back tomorrow with another project; until then, happy stampin'!


Stampin' Up! Supplies Used:

Table built using Product Table Builder by The Crafty Owl - Independent Stampin' Up! Demonstrator.

Sparkle and Shine Punch Art Umbrella

by Joanne James28. March 2016 12:15

I've been having fun playing along with the CASology challenges for the last couple of weeks, so today I have a couple of clean and simple cards for this week's challenge where the theme is weather:

   JAI #304...Inspiration

My first card was a fair weather sunshine card which you can see here. My second card is altogether at the other end of the weather spectrum and was born out my attempts to make a punch art umbrella for this week's challenge over at Just Add Ink where they have the most gorgeous inspiration photo:

Whilst I abandoned the card I had planned in my head for something infinitely more 'clean and simple', I am really pleased with my little punch art umbrella. Read on to find out how I did it:

Punch Art Umbrella - I actually used a combination of two circle punches, the 1 3'4" circle punch which I used to create a semi circle, then I took my 3/4" circle punch and punched it three times along the straight edge to create my umbrella shape. As if that wasn't neat enough, I then found the perfect umbrella handle - the candy cane framelit from the Snow Friends Framelits Dies! The dimensions are just right to complete my punch art creation. These framelits are still available as a carry-over item from the Winter seasonal catalogue if you would like to purchase them, along with the co-ordinating 'Snow Place' stamp set.

Pitter-Patter Raindrops - My raindrop background is from the 'Sparkle and Shine' stamp set. This set has some lovely patterns that work for small backgrounds or repeated patterns and the raindrops were just perfect for today's card. My sentiment is also from this set.

Neutrals That Pop - I deliberately keep my colour palette neutral with just one colour, Real Red, to maintain the CAS feel of my design. I also popped my umbrella canopy up on a couple of dimensionals to help it stand out. You can save my colour palette here:


Here's the visual summary of the key supplies used to make this card and my punch art umbrella tip for you to save for future reference:


This is the weather forecast here in the UK for the rest of this week, but I will be making the most of any fine weather and getting out and about. We also have a stash of craft kits to keep us busy when we aren't so lucky - and all of those chocolate eggs from yesterday to eat too! I have a date with my ironing basket this afternoon and then we are having an extended James family get-together this evening, which is always fun.

I will be back with another card tomorrow for the challenge over at Just Add Ink that this time focuses on the colours of those lovely umbrellas; until then, happy stampin'!


Stampin' Up! Supplies Used:

Table built using Product Table Builder by The Crafty Owl - Independent Stampin' Up! Demonstrator.

Going Global Meets Going Places Compass Masculine Card

by Joanne James22. March 2016 11:59

It's Tuesday and today I have a change of style with a masculine card for you! I'm too late to link up over at Pals Paper Arts Challenge but I just couldn't resist this great sketch from Beth Beard:

PPA-292-Mar17

So many lovely layers! The minute I saw this sketch I knew that I wanted to use the compass from the 'Going Global' stamp set and the co-ordinating papers in the Going Places DSP stack. Here's my card:


Today's card is all about co-ordination, colour and layout:

Co-Ordination - One of the things that make Stampin' Up! special is the extent to which suites of product fit seamlessly together and co-ordinate with our standard inks and cardstock and the Going Places product suite is no exception. Trendy, masculine patterns and textures with travel-inspired designs make this set perfect for cards for the man in your life. Whilst I don't often mix more than one designer paper on a card at any one time, the contrasting colours of the papers I used today work really well and the repitition of the compass image is what really makes this card.

Colour - Basic Black and Very Vanilla are in both of my chosen designer papers so I knew these colours would feature heavily on today's card. I needed a third colour though; what to choose? I decided upon one of our soon-to-be retired 2014-16 in-colours, Lost Lagoon. I wanted something muted, yet natural and Lost Lagoon fitted the bill.

Layout - I love a sketch with lots of layers and Beth's doesn't disappoint! My card actually has 12 separate layers, yet the definition of each plays an important part in the finished look and feel. Having chosen my sentiment and where I was going to position it on my card, I did take one liberty with Beth's sketch; my papers and compass were all centred on my card and whilst Beth's sketch shows the banner coming from one side and flagged on one end only, I knew I needed to centralise my Lost Lagoon banner too to maintain the balance of my card. This gave me the balanced look I was aiming for.

Here is a visual summary of the key products used to make today's card for easy reference:


I hope you like today's card. I have a short work day today as the James Juniors are on an early collection from school as it's the last day of term, so I need to get cracking! Before I go - for those of you interested in yesterday's netball scores, both A and B teams won their matches so Rebecca was thrilled to end the season on a high. 

I'll be back tomorrow with another project. until then, happy stampin'!


Stampin' Up! Supplies Used:

Table built using Product Table Builder by The Crafty Owl - Independent Stampin' Up! Demonstrator.


Botanical Gardens Suite - On Your Special Day

by Joanne James14. March 2016 21:21

Good evening lovely readers! I have had a busy day with the second of this month's technique classes this morning and a Spring concert for one of the James Juniors this afternoon. Today I'm sharing a card I made for this week's challenge over at TGIF Challenges that was also one of the cards I made with the ladies in my card class this morning. I haven't played along with the TGIF team for a while and I couldn't resist this week's sketch:

My card features all of the products in the Botanical Gardens bundle offer (buy all 3 and save 15%) - Botanical Gardens Designer Series Paper, Botanical Blooms stamp set and Botanical Builder Framelits Dies - and features a fun technique. Here is my card:

Today's card is a celebration of the Botanical Gardens product suite, but there are three things that really make it special:

Customised Designer Series Paper - The paper I used for the background on my card is one of a number of patterns in the Botanical Gardens Designer Series paper pack that can be customised using the Botanical Blooms stamp set. Many of the leaves and flowers can be stamped with veins and stamens in the colours of your choice to create a variety of different looks. I had great fun adding detail to my background and this best thing is, this can be different every time. 

Fuss-free Flowers - I just love the Botanical Builder Framelits Dies for limitless floral creative possibilities, yet the two things that really make these fuss-free can't even be seen on this card: the Big Shot Die Brush and the Big Shot Precision Base Plate. Both perfect for working with intricate dies, they really do enable these flowers to pop out easily, no wax paper required. You may think you don't need these items, however whilst you could use a standard or magnetic platform, you will definitely get better results using these tools. My customers keep telling me this too, so impressed are they with the results.

A Free Sentiment - The sentiment on my card is from the Sale-A-Bration set 'Botanicals For You'. This stamp set co-ordinates with the other Botanicals products and is available free with a £45 spend before the end of the month. The Botanical Gardens bundle costs £46.75, so if you buy the bundle, you can get this set for free too - bargain!

Here is today's visual summary of the key products used and top tip for easy reference:


I hope you like today's card; I have two more to share this week using this product suite that were also makes in my technique class today, so stay tuned for those. Back tomorrow with another project; until then, happy stampin'!


Stampin' Up! Supplies Used: 

Table built using Product Table Builder by The Crafty Owl - Independent Stampin' Up! Demonstrator.

Happiest of Birthdays Birthday Bouquet Card

by Joanne James8. March 2016 11:47

It's Tuesday and today I have a card using this week's sketch over at As You See It Challenge:

AYSIChallenge126

I saw this sketch and decided to use the Birthday Bouquet product suite for my rather pink card today - take a look:

There are three key elements to today's card - taking each in turn:

Birthday Bouquet Designer Series Paper - I chose this piece of ribbon-festooned paper that mirrors the horizontal lines of the sketch for the background for my card today. It's quite a busy pattern with some strong colour added with the Mossy Meadow, my chosen accent colour for this otherwise pink card, and is the perfect backdrop for my feature sentiment.

Birthday Blooms Stamp Set - I decided to use Blushing Bride cardstock for the focal circle that houses my sentiment. Using a coloured circle instead of white can be an interesting way to ring the changes on a card. Here I stamped my circle with the flower bouquet from 'Birthday Blooms' in Blushing Bride too for a subtle tone-on-tone effect with my sentiment in Mossy Meadow to stand out. I bordered this circle with a circle of Whisper White to frame it and lift it from the busy background.

Embellishments - I used a selection of embellishments to finish my card today: some simple 1/4" Blushing Bride cotton ribbon, pepped up with some twists of silver metallic thread, a few rhinestones and a sprinkle of sequins from the Love Blossoms embellishment kit to add just the right amount of sparkle.

Here's today's visual summary of the key products used to make today's card for reference:


I hope you like today's card - I even remembered to decorate the inside and my envelope too! I'm off to start preparing for the next of my Coffee and Card Classes at Bell of Northampton tomorrow - you can read all about them here and if you are local I'd love you to join me. No booking required - just drop in!

I'll be back tomorrow with another project; until then, happy stampin'!


Stampin' Up! Supplies Used:

Table built using Product Table Builder by The Crafty Owl - Independent Stampin' Up! Demonstrator.

Pearl Baby Lamb It's A Girl Card

by Joanne James23. February 2016 09:00

Hello everyone! Today I have a card for this week's challenge over at Pals Paper Arts where they have a sketch to work with:

PPA-288-Feb18

I love a good sketch and this one allowed me to get my Easter Lamb stamp out for the first time and try something that I've been wanting to do since I bought it - take a look:

The sketch is perfect for using the circle to create a stunning focal point - and this is where my cute lamb comes in! I decided to stamp it without the 'Happy Easter' sentiment as I wanted to make a card to celebrate the arrival of a baby girl. I stamped the image in Smoky Slate, adding a few touches of Blushing Bride and Mossy Meadow ink with my blender pen, then proceeded to add a pearl to each of the circles of the image to create my pearlescent woolly coat. Two packs of Pearl Basic Jewels and some time later, this was the result! I chose to use Blushing Bride and Mossy Meadow as my feature colours from the delicate spotty Birthday Bouquet designer series paper for my base and mat layers - whilst the green is quite dark for a pastel baby card, I was careful to use it sparingly to frame the paper and image only and to stamp my sentiment from the set 'A Dozen Thoughts'. I love this font but since I wanted a narrow banner, decided to make a feature of the loops and cut around them, which fits quite neatly to my circle too - bonus! Lastly, I decided that a strip of Blushing Bride Glimmer Paper was necessary for the vertical banner - just in case anyone was in any doubt that this is most definitely a card for a little lady! I may well be responsible for a run on packs of pearl jewels from the Stampin' Up! store with this card and I know that this is not the sort of card you would make every day, but for a special one-off to commemorate the addition of one more to the female race, I think it's totally worth it!

Here is today's visual summary for easy reference:


That's all from me today. I have lots to be getting on with, including last minute preparations for my new 'Coffee and Card' drop in class at Bells in Northampton tomorrow. Back tomorrow with another project and this week's new Weekly Deals; until then, happy stampin'!


Stampin' Up! Supplies Used: 

Table built using Product Table Builder by The Crafty Owl - Independent Stampin' Up! Demonstrator.

You Brighten My Day Layered Sunburst Card

by Joanne James14. February 2016 09:00

Happy Valentine's Day everyone! It's Sunday and time for a new challenge over at The Paper PlayersThis week it is the turn of the queen of die-cuts, the lovely Laurie, to host and she has a colour challenge for you to play along with:


This week's colours are about as far from Valentines as you could possibly get, but this colour palette offers some great opportunities for bright cards on a cold Winter's day. For my card this week I was inspired to use my new Sunburst Thinlits to create a layered sunburst, paired with some patterned cloud paper:

To create my sunburst I cut two sunbursts, one in Daffodil Delight to fit my card panel and the other full size in Tangelo Twist. To get a perfect 'shadow' I cut the orange one into three pieces to give equal shadow lines on each ray, then trimmed the ends to fit flush with the yellow one. I mounted my sunburst onto a piece of Pool Party cloud paper, taken from the Sweet L'il Things designer series paper stack. I stamped my sentiment in Tangelo Twist onto Very Vanilla and layered the circles to create the centrepiece for my sun. Finally, I added a trio of orange Brights sequins to finish. Quite a simple card to look at, but consisting of nine layers in total, each of which adds to the finished look and feel of the card. I love the bright colours of this week's colour palette  -so cheery and sure to brighten everyone's day! 

Before you reach for your ink and papers, check out what our amazing team has created to inspire you this week:

The Paper Players Design Team
 
 
Here's a quick recap of our challenge rules:
 
1.  Create a new paper project
2.  Upload your creation to your blog with a link back to us and provide a direct link to the post featuring your challenge submission.
3.  Please link your card to no more than four challenges, TOTAL.
4.  Have FUN! 

I look forward to seeing what you create with this week's colours. We have a restful day planned today, with a sport-free day as it's the start of the half-term holiday for the James Juniors. Pretty much a whole week of lie-ins - bliss!

Back tomorrow with another project; until then, happy stampin'!


Stampin' Up! Supplies Used:

Table built using Product Table Builder by The Crafty Owl - Independent Stampin' Up! Demonstrator.

Going Global Masculine Valentines Card

by Joanne James13. February 2016 20:00

Good evening lovely readers! It's the big day tomorrow so in anticipation I have one last Valentine card for you, and unlike many of my others, this one has a distinctly masculine feel. Today's card uses this week's sketch over at the Global Design Project and I am also linking up with The Friday Mashup (I chose Valentine, but not with candy!) and Just Add Ink where the challenge is something beginning with 'v':


I decided that this sketch was perfect for the globe in the 'Going Global' stamp set, paired with some of the map patterns in the 'Going Places' designer series paper stack. Take a look:

I layered my background and mats with Basic Black and Lost Lagoon, and used a piece of atlas patterned paper for the base layer and a piece of the street map paper for the top layer. Did you know that the papers in the Going Places stack are actual maps of real places? The street map here is of Brooklyn in New York, USA. I added a strip of Lost Lagoon embossed with the World Traveller embossing folder across the centre then for the focal point circle, I stamped the globe in Lost Lagoon onto Very Vanilla, having stamped off once so that it wouldn't overpower my over-stamped sentiment. I stamped the 'love' banner element again separately and fussy cut this and popped it up on dimensionals. I also punched a red heart from of Confetti Hearts Border punch and added over the stamped one and decided to create a mat for my circle element in red, to add a contrasting pop of colour and really draw you in - I know it's a masculine card, but it is Valentines, right? There are lots of layers on this card and I'm really pleased with how it came together.

That's all from me today; I'm looking forward to an early Valentines dinner this evening and will be back tomorrow with this week's new challenge over at The Paper Players. Until then, happy stampin'!


Stampin' Up! Supplies Used:

Table built using Product Table Builder by The Crafty Owl - Independent Stampin' Up! Demonstrator.


Mini Catalogue

BROWSE THE CATALOGUE

The mini catalogue is now live! Read and download your copy here.

Shop Online

Access my online shop 24 x 7, 365 days of the year:

Current April hostess code:

VDKNV7BH

Shop Online

Join My Team

It's always a great time to join Stampin’ Up! New team members can get £130 worth of products for only £99 + free business supplies + free shipping + all the fun being a part of Stampin’ Up! Stampin' Up! has something for everyone: join my growing team and benefit from my support to enjoy Stampin' Up! however you choose.

If you're interested, call me for a chat to understand how I can help you realise your goals. Alternatively, if you have already decided to sign up and you just can't wait, please click here for the link to the online form where you can sign up and order your starter kit right away! 

Latest Kit!

Stampin Cut and Emboss

The Rock Legend Kit has all you need to make 8 cards with coordinating envelopes. Along with the new Panda Friends Kit, both are available from January 4th for just £14 each - get yours here!

2023-24 Annual Catalogue

BROWSE THE CATALOGUE

Click on the catalogue for a full list of current SU! supplies - if you would like to order any of the items featured, please drop me a line at [email protected] or give me a call on 07773 421446 - I'd be happy to help.

New Online Exclusives

There are new products available exclusively in the online store from 5 March - check them out here.

About Me

Hi I'm Joanne and live in Northampton and when I'm not looking after my husband and two beautiful children, am an avid crafter with a passion for all things Stampin' Up!

I must confess that I have never been a big rubber stamper - until I discovered Stampin' Up! that is. I love the fact that I can get such great results with co-ordinating stamps, inks, papers and punches - the possibilities are endless! Join me on my stamping journey as I share the things I love and be inspired to create amazing things yourself!

Follow Me

Monthly Newsletter

Box Builder

Click the button above to use Box Buster to create your custom box design using the Envelope Punch Board!

Kits Collection Now Available!

Stampin Cut and Emboss

The new Kits Collection from Stampin' Up! is now available!

Click here to see the current kits available and order yours online today.

I Design For


Stampin' Up Stuff

This is my personal blog and is not endorsed by Stampin’ Up! I hope you find it a plentiful source of ideas and personal inspiration but please don't copy my designs for contest submission or use for classes, publication or sale without express permission.