Honeycomb Happiness Meets Birthday Bouquet Ice Creams!

by Joanne James23. March 2016 20:20

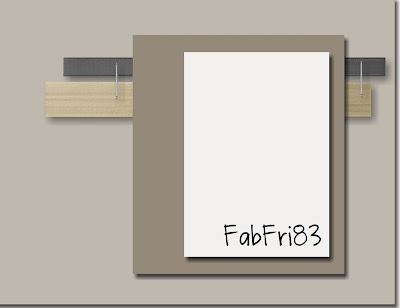
The middle of the week has arrived - and a short week at that! Today I have a card to share with you for this week's challenge over at TGIF Challenge that also uses the sketch layout at Fab Friday:


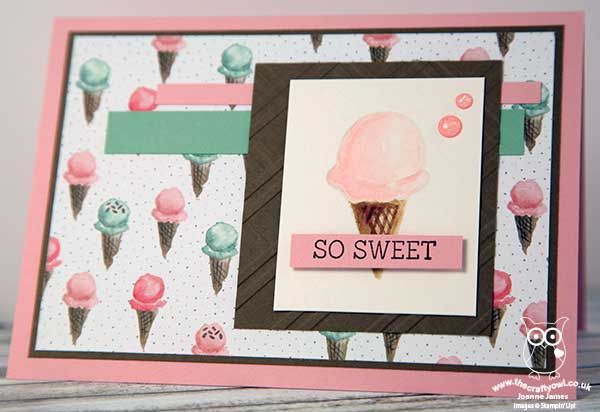
I got such lovely comments on my card for last week's TGIF Challenge, that when I saw the badge for this week I just knew it was the perfect opportunity to get out the ice cream patterned paper in the Birthday Blossoms DSP and play along. Here is my card:

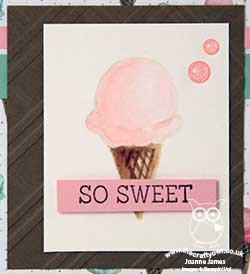
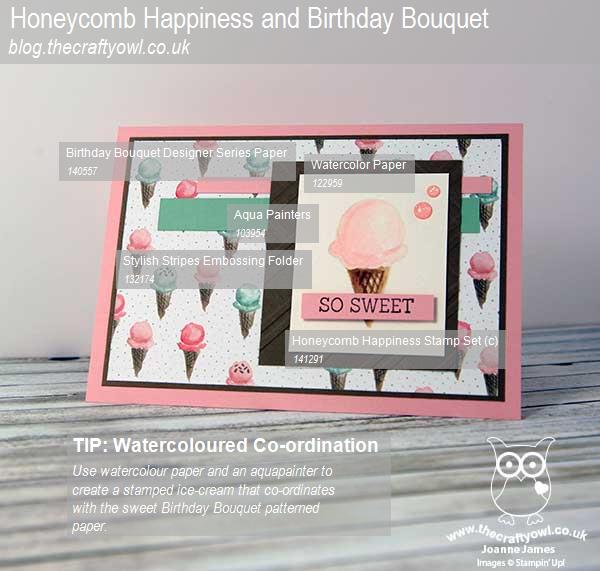
My card is a mix of mouth-watering ice-cream in pastel colours, with a little texture and another go at no-line watercolouring. Today's highlights include:

A sweet treat stamp and paper combination - The Birthday Bouquet Designer Series Paper has some gorgeous florals, but also includes a number of great alternative patterns that are perfect for a sweet celebration. I love these soft, watercoloured ice creams and decided to stamp one using the ice-cream stamp in the 'Honeycomb Happiness' Sale-A-Bration stamp set onto watercolour paper and coloured it using inks and my aquapainter to mirror those on the paper. I needed a small sentiment that wouldn't overwhelm my cone, so I trimmed the top part away for a better fit.

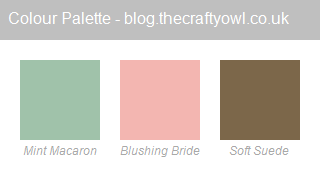
A colour combination that's good enough to eat - I love the combination of pale pink and pale green, with the warm brown of soft suede - the ice-creams combine these colours perfectly and the pink and brown make the perfect base for my card. Here's this colour combination if you would like to save it to use on your projects:


Waffle-y Versatile Stylish Stripes - I used the pastels for the horizontal stripes on my card and decided to use Soft Suede to mat my watercoloured image. I don't often use texture and embossing on my cards but decided to create a little more interest with a textured layer that emulated the cone of my ice cream. The Tiny Triangles or Zig Zag Textured Embossing Folders would have been good choices, but since I don't own either of those I embossed my cardstock twice with my trusty Stylish Stripes Textured Impressions Embossing Folder, embossing once then rotating my cardstock through 90 degrees and embossing again to give a criss-cross look. It works for me!

Here is today's visual summary of the key products used for you to save for easy reference:

I hope you like today's card. As I mentioned yesterday, today is the first day of the school holidays and when I returned from my drop-in Coffee and Card session at Bell of Northampton this morning (I'll be back to share the card we made today later in the week), Rebecca decided that having played outside all morning, she wanted to do something creative this afternoon. So what do you do when two of your greatest passions in life are Lego and craft? Well, you use your Lego Mindstorms to build a robot that you can programme to decorate your Easter eggs! We made a short video to show the results and I thought I'd share here as I thought the results were rather impressive:

Who said school holidays were boring? Not when you're 10 years old and a member of the James family, for sure!

Back tomorrow with this week's card for the new challenge over at Create With Connie and Mary; until then, happy stampin'!


Stampin' Up! Supplies Used:

Table built using Product Table Builder by The Crafty Owl - Independent Stampin' Up! Demonstrator.


Happiest of Birthdays Birthday Bouquet Card

by Joanne James8. March 2016 11:47

It's Tuesday and today I have a card using this week's sketch over at As You See It Challenge:

AYSIChallenge126

I saw this sketch and decided to use the Birthday Bouquet product suite for my rather pink card today - take a look:

There are three key elements to today's card - taking each in turn:

Birthday Bouquet Designer Series Paper - I chose this piece of ribbon-festooned paper that mirrors the horizontal lines of the sketch for the background for my card today. It's quite a busy pattern with some strong colour added with the Mossy Meadow, my chosen accent colour for this otherwise pink card, and is the perfect backdrop for my feature sentiment.

Birthday Blooms Stamp Set - I decided to use Blushing Bride cardstock for the focal circle that houses my sentiment. Using a coloured circle instead of white can be an interesting way to ring the changes on a card. Here I stamped my circle with the flower bouquet from 'Birthday Blooms' in Blushing Bride too for a subtle tone-on-tone effect with my sentiment in Mossy Meadow to stand out. I bordered this circle with a circle of Whisper White to frame it and lift it from the busy background.

Embellishments - I used a selection of embellishments to finish my card today: some simple 1/4" Blushing Bride cotton ribbon, pepped up with some twists of silver metallic thread, a few rhinestones and a sprinkle of sequins from the Love Blossoms embellishment kit to add just the right amount of sparkle.

Here's today's visual summary of the key products used to make today's card for reference:


I hope you like today's card - I even remembered to decorate the inside and my envelope too! I'm off to start preparing for the next of my Coffee and Card Classes at Bell of Northampton tomorrow - you can read all about them here and if you are local I'd love you to join me. No booking required - just drop in!

I'll be back tomorrow with another project; until then, happy stampin'!


Stampin' Up! Supplies Used:

Table built using Product Table Builder by The Crafty Owl - Independent Stampin' Up! Demonstrator.

Gift From The Garden

by Joanne James28. February 2016 09:00

It's Sunday and time for a new challenge over at The Paper Players! It's the turn of my sweet friend Claire to host our challenge this week and she has a great sketch for you to play along with:


For my card this week I was inspired to use the 'Gift From The Garden' stamp set and the colours and watering can and polka dots over at Color Throwdown provided just the additional inspiration I needed:


Claire's sketch has lots of layers so this gave plenty of opportunity to incorporate lots of elements. I used kraft cardstock for my base and stamped the flowerpot trio in Versamark all over the front to create a subtle tone on tone background design that was in keeping with the theme of my card. I then added a piece of Mint Macaron Birthday Bouquet designer series paper and strip of white seam binding ribbon and layered a piece of polka dot Pink Pirouette designer series paper from the Subtles stack before adding my stamped circles. I punched two circles of Whisper White and stamped a pair of Mint Macaron wellies on one and a Pink pirouette watering can on the other. I also stamped the watering can a second time on a piece of scrap so that I could fussy cut it out and overlap the spout when I layered the circles together. I stamped my sentiment in Soft Suede and then stamped the heart flower in a pot onto a piece of Whisper White, fussy cut it out then added a flowerpot cut from kraft coloured corrugated paper and a pink punched heart with added pearl. Lastly, I added a twine bow to my ribbon to finish my card.

I'm not sure that I would have chosen these pastel colours for a card using this set had I not seen the Color Throwdown photo, yet I think they make for a pretty card. The thing I love most about this card though is my custom patterned paper for my cardbase; it is subtle enough to not overpower and you don't even see that much of it, yet ties in so well with the theme of my card.I love the earthy tone of the kraft cardstock too - I really must use this more often I think! This card is headed to a wonderful green-fingered friend of mine; I'm not sure she owns a pink watering can or green wellies but I just know she will love this card.

Here's today's visual summary for easy reference:

Before you reach for your ink and papers, check out what our amazing team has created to inspire you this week:

The Paper Players Design Team
 
 
Here's a quick recap of our challenge rules:
 
1.  Create a new paper project
2.  Upload your creation to your blog with a link back to us and provide a direct link to the post featuring your challenge submission.
3.  Please link your card to no more than four challenges, TOTAL.
4.  Have FUN! 

I look forward to seeing what you create with our sketch this week. We are off to basketball today and Rebecca is playing in a hockey tournament too, so another day of sport in store.

Back tomorrow with another project; until then, happy stampin'!


Stampin' Up! Supplies Used:

Table built using Product Table Builder by The Crafty Owl - Independent Stampin' Up! Demonstrator.

Birthday Bouquet Balloons Card

by Joanne James21. February 2016 09:00

It's Sunday and time for a new challenge over at The Paper Players! It's my turn to host our challenge this week and I have a fun clean and simple challenge for you to play along with:


Up, up and away! Balloons are very on-trend currently, but you can use any airborne object on your card today - just keep it clean and simple. For my card this week I was inspired to use balloons and in contrast to yesterday's bright balloon card decided to feature a piece of the delicately patterned balloon paper from the Birthday Bouquet designer series paper set:


I used a base of Mint Macaron to which I adhered a strip of Pool Party 3/8" Glitter Ribbon before adding a piece of the balloon patterned paper. I added a simple sentiment from the 'Suite Sayings' stamp set, which I cut out with my Project Life Cards & Labels Framelits, and added a couple of balloons stamped with the 'Balloon Builders' stamp set to give the same muted effect as the paper. Finally, I created some tassels with some frayed Pool Party Glitter Ribbon and a few clear sequins to finish my card. On reflection, whilst my card has minimal layers it doesn't have much of the 'white space' that is traditionally typical of 'clean and simple' cards, but I love the soft feel if it and the glimmer from the ribbon and the balloon tassles so I had to share it with you! I'm also linking up again with the team over at The Global Design Project where their theme this week has been balloons - what can I say, we were obviously thinking along similar lines!

For those of you who like a visual summary, here's something new that I will be featuring in my blog posts - a labelled photograph of the key products required to make today's card: 

These images are perfect for pinning to give you a visual reference of the supplies needed to re-create this card which can be useful if you want to come back to it at a later date. I will be pinning these to my new 'How To - Tips and Techniques' Board on Pinterest too, which you can find here.

Before you reach for your ink and papers, check out what our amazing team has created to inspire you this week, all of whom have created some fantastic examples of clean and simple cards:

The Paper Players Design Team
 
 
Here's a quick recap of our challenge rules:
 
1.  Create a new paper project
2.  Upload your creation to your blog with a link back to us and provide a direct link to the post featuring your challenge submission.
3.  Please link your card to no more than four challenges, TOTAL.
4.  Have FUN! 

I look forward to seeing your clean and simple creations in the gallery. We are off to basketball and back to hockey today and are planning a fun afternoon of board games and maybe a walk out along the canal if the weather stays dry for long enough. 

Back tomorrow with another project; until then, happy stampin'!


Stampin' Up! Supplies Used: 

Table built using Product Table Builder by The Crafty Owl - Independent Stampin' Up! Demonstrator.


Birthday Bouquet For You

by Joanne James4. January 2016 08:00

Happy Monday everyone! I've had the first of my classes this year this morning (I'll share one of those cards with you tomorrow) but for today I have my last sneak peek for you, this time featuring some of the gorgeous new Birthday Bouquet designer series paper from the forthcoming Spring-Summer Stampin' Up! catalogue. This set has some beautiful patterns, featuring everything from confetti to ice creams, balloons to spots and stripes; my card today highlights one of the two flower patterns in the set:

I used some simple layers in Old Olive and Soft Sky to co-ordinate with the designer paper and stamped a sentiment from the co-ordinating 'Birthday Blooms' stamp set on a wide cross panel of Blushing Bride. I finished with a small Itty Bitty Accents punched flower and that's my card - done! I did add a little stamping on the inside but this card really was so quick I made two at the same time as it really didn't take twice as long. I love it when the paper does all the hard work for you!

So only one more sleep to go then it's here - the new 2016 Stampin' Up! Spring-Summer catalogue and the start of this year's Sale-A-Bration promotion! The catalogues have all been mailed to my online customers and my local customers will receive theirs either at their classes this week or at my open house next week on Thursday 14th January 10am-2pm. If you live in or around Northampton and would like to attend, please get in touch for details.

That's all from me today; back tomorrow with another project. Until then, happy stampin'!


Stampin' Up! Supplies Used:

Available 5th January:

140557 Birthday Bouquet Designer Series Paper

140658 Birthday Blooms Stamp Set (clear mount)

Table built using Product Table Builder by The Crafty Owl - Independent Stampin' Up! Demonstrator.


Mini Catalogue

BROWSE THE CATALOGUE

The mini catalogue is now live! Read and download your copy here.

Shop Online

Access my online shop 24 x 7, 365 days of the year:

Current March hostess code:

S9F2XJJW

Shop Online

Join My Team

It's always a great time to join Stampin’ Up! New team members can get £130 worth of products for only £99 + free business supplies + free shipping + all the fun being a part of Stampin’ Up! Stampin' Up! has something for everyone: join my growing team and benefit from my support to enjoy Stampin' Up! however you choose.

If you're interested, call me for a chat to understand how I can help you realise your goals. Alternatively, if you have already decided to sign up and you just can't wait, please click here for the link to the online form where you can sign up and order your starter kit right away! 

Latest Kit!

Stampin Cut and Emboss

The Rock Legend Kit has all you need to make 8 cards with coordinating envelopes. Along with the new Panda Friends Kit, both are available from January 4th for just £14 each - get yours here!

2023-24 Annual Catalogue

BROWSE THE CATALOGUE

Click on the catalogue for a full list of current SU! supplies - if you would like to order any of the items featured, please drop me a line at [email protected] or give me a call on 07773 421446 - I'd be happy to help.

New Online Exclusives

There will be new products available exclusively in the online store from 5 March - check them out here.

About Me

Hi I'm Joanne and live in Northampton and when I'm not looking after my husband and two beautiful children, am an avid crafter with a passion for all things Stampin' Up!

I must confess that I have never been a big rubber stamper - until I discovered Stampin' Up! that is. I love the fact that I can get such great results with co-ordinating stamps, inks, papers and punches - the possibilities are endless! Join me on my stamping journey as I share the things I love and be inspired to create amazing things yourself!

Follow Me

Monthly Newsletter

Box Builder

Click the button above to use Box Buster to create your custom box design using the Envelope Punch Board!

Kits Collection Now Available!

Stampin Cut and Emboss

The new Kits Collection from Stampin' Up! is now available!

Click here to see the current kits available and order yours online today.

I Design For


Stampin' Up Stuff

This is my personal blog and is not endorsed by Stampin’ Up! I hope you find it a plentiful source of ideas and personal inspiration but please don't copy my designs for contest submission or use for classes, publication or sale without express permission.