A Petal Garden Note For You #GDP139

by Joanne James23. May 2018 07:30

Today I'm sharing a card that uses the sketch over at As You See It that I also created with the Global Design Project theme this week in mind:


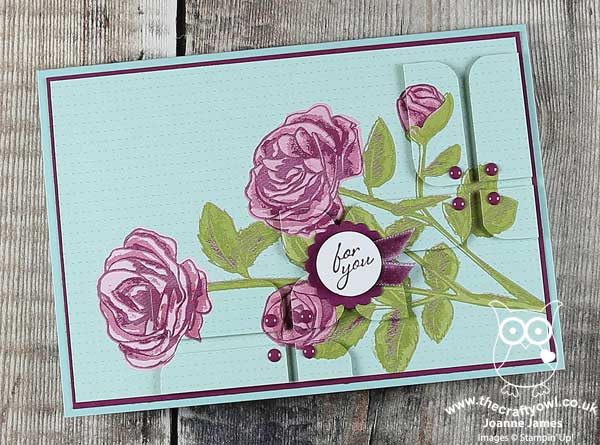
I was intrigued by the sketch at AYSI and thought I'd go one step further than the lovely LeAnne's card and not only use up some of my retiring DSP, but use it to create a kind of relief pattern that added interest to my main image - take a look:


Here's the low-down on today's card:

Petal Garden - I had some sheets of Petal Garden DSP left over and most of them had a single stem image like the one on my card. I thought this sketch would be an alternative way to add interest to the basic paper pattern by adding dimensional panels in the same design. I really like the finished effect - although it did challenge my mathematical skills to ensure that all of the pieces were the correct size and correctly spaced, whilst the image remained aligned. For a card with very little stamping, the mosaic element was rather time-consuming - a good thing that I like jigsaws!

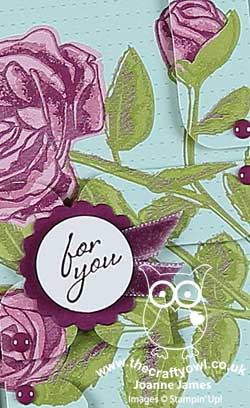
A Note For You - This card is all about the paper, so a small sentiment was the order of the day. I chose the simple 'For You' from the Graceful Garden stamp set, masking each word so that they would sit one on top of the other and fit into my 3/4" punched circle. I added a little of the new velvet ribbon beneath it.

When Is A Scalloped Circle Not A Scalloped Circle? - My sentiment needed a border so that it didn't get lost on my card, but I didn't have anything small enough to fit. Then I remembered a trick I have used on a previous card - I used the outer framelit of the wreath in the Santa's Sleigh Thinlits, circled below:


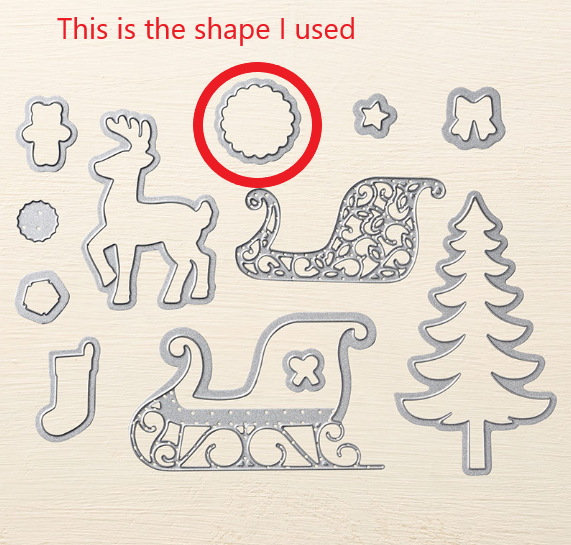
A clever trick! It's always worth checking your framelits to see if they can be used for purposes other than those intended :-)

I needed a 'just because' card and this one fits the bill nicely; it's always good to have a few of this type of card on hand. 

Here is the visual summary of the key products used on today's project for you to pin for easy reference:


You can see all of my 'How To' summaries on my 'How To - Tips and Techniques' Pinterest board in case you've missed any. 

Enjoy your day; I'm off to watch the cricket this afternoon so hoping that the sun continues to shine and it's a little less windy than last week! I'll be back tomorrow with another project. Until then, happy stampin'!


Stampin' Up! Supplies Used:

Table built using Product Table Builder by The Crafty Owl - Independent Stampin' Up! Demonstrator.

Christmas Tree Warmth and Cheer Washi Tape Card

by Joanne James5. December 2016 19:27

Happy Monday everyone! I've had a busy start to my week with deliveries and appointments but did manage to catch up with a couple of friends for a festive afternoon tea, which was lovely. I have a quick card to share with you today  - this one is from one of last month's classes where we were using the Santa's Sleigh bundle. This was our warm up card and features the traditional colours that the Paper Craft Crew are challenging us to use this week:

Visit the Paper Craft Crew and play along with Color Challenge 221. www.papercraftcrew.com

I got out the washi tape and set to work - here's my card:


Here's the low-down on today's card:

O Christmas Tree -  The tree framelit in the Santa's Sleigh Thinlits set makes for an elegant Christmas tree, and does double duty when the negative space is used creatively too. On this card the focal point is the absence of the actual tree, as opposed to the tree itself. 

Warmth and Cheer Washi - Here the tree is decorated with Warmth and Cheer washi tape, simple strips of colour onto the Crumb Cake card base. Perfect within the Garden Green top layer, to add to the feeling of foliage.

And A Star - I finished my card with a stamped sentiment, tied twine bow and a metallic gold star.

A great simple card, easy for mass production - and don't we all need those at this time of year!

Here is the visual summary of the key products used on today's project for you to pin for easy reference:


You can see all of my 'How To' summaries on my 'How To - Tips and Techniques' Pinterest board in case you've missed any. 

That's all from me; I'll be back soon with another project; until then, happy stampin'!


Stampin' Up! Supplies Used:

Table built using Product Table Builder by The Crafty Owl - Independent Stampin' Up! Demonstrator.

Silver Glimmer Christmas Reindeer

by Joanne James13. October 2016 08:05

I've been poorly this week hence my lack of blog posts but today it's time for a new challenge over at Create With Connie and Maryand this week we have a colour combination for you so I'm back with a short post for you:


I decided to go with an unusually coloured Christmas card today and equally uncharacteristically I had a design in mind as soon as I say this week's colour combination - that almost never happens! Here's my card:


Here's the low-down on today's card:

Santa's Sparkly Reindeer - The only stamping on today's card is the greeting (from the Star of Light stamp set) - this card is all about the dies, Santa's Sleigh Thinlits Dies to be exact. A silver glimmer reindeer, wearing a festive wreath and bow.

Die Impression Background - Inspired by the gorgeous cards that Jennifer McGuire made using die impression backgrounds recently (you can see her cards and a useful video tutorial here), I got out my Layered Circle Thinlits and created my own circle impressions to add texture and interest to my background. Unfortunately I did not manage to get a good photograph that showed this detail - this close up does show some of the circles, but I'm afraid that my photography skills on white are not as good as Jennifer's!

A Sprinkling of Fancy Frost - I finished my card with a sprinkling of Fancy Frost sequins - they feature two out of this week's colours, so it had to be done and they carried through the circle theme of the die impressions. 

Do visit the other Design Team members to see what they did with this week's colours; there's lots of inspiration over on their blogs too!

Enjoy your day and I'll be back tomorrow with another project. Until then, happy stampin'!


Stampin' Up! Supplies Used:

Table built using Product Table Builder by The Crafty Owl - Independent Stampin' Up! Demonstrator.

Mini Catalogue

BROWSE THE CATALOGUE

The mini catalogue is now live! Read and download your copy here.

Shop Online

Access my online shop 24 x 7, 365 days of the year:

Current April hostess code:

VDKNV7BH

Shop Online

Join My Team

It's always a great time to join Stampin’ Up! New team members can get £130 worth of products for only £99 + free business supplies + free shipping + all the fun being a part of Stampin’ Up! Stampin' Up! has something for everyone: join my growing team and benefit from my support to enjoy Stampin' Up! however you choose.

If you're interested, call me for a chat to understand how I can help you realise your goals. Alternatively, if you have already decided to sign up and you just can't wait, please click here for the link to the online form where you can sign up and order your starter kit right away! 

Latest Kit!

Stampin Cut and Emboss

The Rock Legend Kit has all you need to make 8 cards with coordinating envelopes. Along with the new Panda Friends Kit, both are available from January 4th for just £14 each - get yours here!

2023-24 Annual Catalogue

BROWSE THE CATALOGUE

Click on the catalogue for a full list of current SU! supplies - if you would like to order any of the items featured, please drop me a line at [email protected] or give me a call on 07773 421446 - I'd be happy to help.

New Online Exclusives

There are new products available exclusively in the online store from 5 March - check them out here.

About Me

Hi I'm Joanne and live in Northampton and when I'm not looking after my husband and two beautiful children, am an avid crafter with a passion for all things Stampin' Up!

I must confess that I have never been a big rubber stamper - until I discovered Stampin' Up! that is. I love the fact that I can get such great results with co-ordinating stamps, inks, papers and punches - the possibilities are endless! Join me on my stamping journey as I share the things I love and be inspired to create amazing things yourself!

Follow Me

Monthly Newsletter

Box Builder

Click the button above to use Box Buster to create your custom box design using the Envelope Punch Board!

Kits Collection Now Available!

Stampin Cut and Emboss

The new Kits Collection from Stampin' Up! is now available!

Click here to see the current kits available and order yours online today.

I Design For


Stampin' Up Stuff

This is my personal blog and is not endorsed by Stampin’ Up! I hope you find it a plentiful source of ideas and personal inspiration but please don't copy my designs for contest submission or use for classes, publication or sale without express permission.