Happy Birthday Sister

by Joanne James18. June 2013 20:30

Today I'm back with the birthday card I promised yesterday: this time the card I made from her little brother. I saw a great card by Wendy Cranford on Pinterest a while ago and whilst this was for a LaLa Loopsy doll, I thought I could make a great likeness of Rebecca from it. Here's the link to Wendy's original card where she also provides a great video tutorial with step-by-step instructions on how she created her version. Now for my card:

I made my hair blonde and cut in a fringe - don't you just love the hair tied in bunches?! Also, instead of buttons for eyes, I used some punched navy circles and painted with Crystal Effects to make them shiny. Another sentiment courtesy of 'For My Family', this time pairing 'sister' with the 'Happy Birthday' from Wacky Wishes. Another set I'll be sorry to see go; if you would like to own this set, you need to host a party before the end of the month so get in touch!

Here's a close up of the little girl's face again:

I know, totally impractical for putting in an envelope, but I love the hair! So simple to recreate - just cut the card using paper snips into thin strands, then curl around a pencil - but so effective. The perfect card for little girls and I love that you can make them individual to look like the recipient. To be fair, this photo looks more like 'baby Rebecca' than my now 8 year-old - this is the photo that inspired my version of this card:

I guess in my mind's eye she will always look this way to me - beautiful!

Back tomorrow with another project - until then, happy stampin'!


Stampin' Up Supplies:

Stamps: For My Family, Wacky Wishes

Cardstock: Whisper White, Real Red, Daffodil Delight, Rich Razzleberry, Night of Navy, Blushing Bride, Summer Smooches Parade Designer Series Paper

Ink/Stampin' Write Markers: Real Red, Melon Mambo, Whisper White Kraft Ink

Tools: Circles #2 Originals Die, Small Heart Punch, Corner Punch, Dress Up Framelits, Itty Bitty Punches (circle), Small Oval Punch, Stamp-a-ma-jig

Finishing Touches: Basics Rhinestones

Summer Silhouettes Swaps

by Joanne James13. May 2013 22:00

As promised, today I'm going to share the swaps I made to take to Telford for the Stampin' Up! regional training day on Saturday; lots of excited crafty ladies (and a few gents!) spent the day crafting, swapping and getting up to speed with all the latest news from Stampin' Up!. As is customary at these events, we all created 'swaps' to share and showcase each other's work. I often find swaps a tricky concept - the desire to create something special, but at the same time simple enough that to create a large volume of them won't take hours or break the bank.

In my wisdom, I decided I would break the seal on a stamp set I bought at the start of the year, but haven't yet used: Summer Silhouettes. I loved the look of this stamp set and have seen many beautiful examples of cards 'random stamped' with the flowers in this set. This was however, my first challenge; as my dear husband so often says to me, "(you) don't do random" - and it would seem this follows me into my stamping. I lost count of the amount of card I cut, stamped and binned before getting to a design I was finally happy with! So I ended up with this as my 'first final design' (I know, bear with me!):
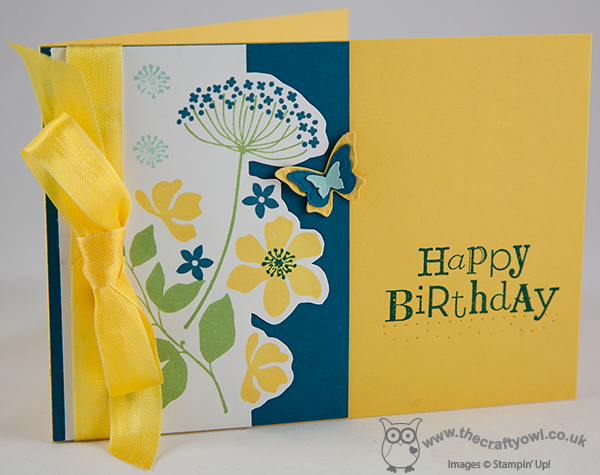
I loved the stamping and fussy cut edge, along with the sentiment and pierced border to ground it. However I didn't like the position of the butterfly, but couldn't move it without removing the ribbon, so here is my final (yes, really!) design:
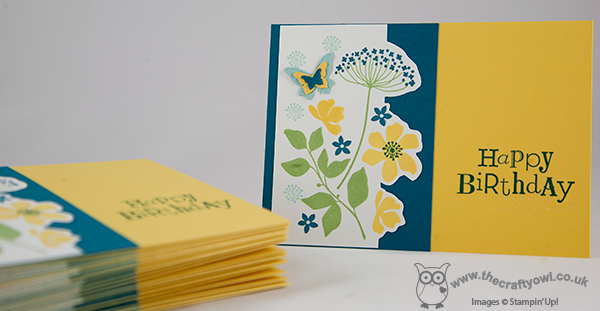
 

It took hours to finish them and I still could have made twice as many - there were so many people with great swaps! I will photograph some of my favourites and share those with you later in the week. If you would like to be one of the first to know what's going on in the world of Stampin' Up!, get free products (yes, all still to come!), great training and business advice and a permanent product discount to feed your own crafting habit, then this is a great time to join my team - until May 30th, you can get £155 of products for £99; add in a business supplies pack and you get a whopping £200 of kit for £99 - bargain! Check out the Special Offers box on the right hand side of my page or Contact me to talk about how you can sign up and start benefiting straight away; if you sign up in May, you will be one of the first to preview and order from the new annual catalogue due out on July 1st and you will have the opportunity to attend Stampin' Up's! European Convention in November, which is being held in Manchester in the UK this year.

Pop back tomorrow for another project; I have so much to share this week, including some great cards that we are making at this week's card class. Until then, happy stampin!


Stampin' Up Supplies:

Stamps: Summer Silhouettes, Wacky Wishes

Cardstock: Whisper White, Daffodil Delight, Island Indigo, Pool Party

Ink/Stampin' Write Markers: Daffodil Delight, Island Indigo, Pool Party, Wild Wasabi

Tools: Beautiful Wings Embosslits, Essentials Paper Piercing Pack, Piercing Tool

Finishing Touches: Daffodil Delight Seam Binding Ribbon


Happy Easter From The Crafty Owl

by Joanne James31. March 2013 12:24

Happy Easter blog followers! This is the first of two blog posts today and this one is for you: the Crafty Owl is entering into the spirit of things and is playing bunny dress up ready for his Easter egg hunt today: 

I could have simply made a rabbit from my owl punch (just one of the many things the owl can become - this is such a versatile punch!) but instead decided to dress him as a bunny rabbit, complete with hat ears and bunny nose - cute, eh?!

Happy Easter everyone - I'll be back later with a bunny of a different kind. Until then, happy stampin'!


Stampin' Up Supplies:

Stamps: Wacky Wishes (hostess)

Cardstock: Pretty in Pink, Whisper White, Basic Grey, Basic Black

Ink: Pretty in Pink

Tools: Owl Punch, 3/4" Circle Punch, 1 1/4" Circle Punch, Stamp-a-ma-jig

Tags: , , , , , , , , ,

Cards | Punch Art

Spring Sampler Easter Card

by Joanne James30. March 2013 23:30

Another quick post to share a last-minute Easter card I made today. This is a case of a Connie Babbert card seen here that was so quick to make with the aid of a couple of square punches, I just had to give it a go: 

My version uses a different sentiment stamp and Easter images, but is otherwise the same. I love the Sunshine and Sprinkles paper against the Lucky Limeade background. That's me done for today - back tomorrow with a bunny rabbit Easter card and matching gift box. Until then, happy stampin'!


Stampin' Up Supplies:

Stamps: Spring Sampler, Wacky Wishes (hostess)

Cardstock: Lucky Limeade, Whisper White, Sunshine and Sprinkles DSP

Ink/Stampin' Write Markers: Daffodil Delight, Lucky Limeade, Tempting Turquoise, Melon Mambo, Basic Grey

Tools: 1 1/4" punch, 13/8" punch, hexagon embossing folder

Finishing Touches: Old Olive Grosgrain Ribbon


Tags: , , , , , , , ,

Cards | Stamping

Which came first: the chick or the egg?

by Joanne James26. March 2013 21:51

Today I'm sharing one of my favourite Easter projects with you. I think the new oval framelits in the Spring-Summer seasonal catalogue were crying out to be made into an Easter gate-fold card, so here's my version: 

I used oval framelits 1-4 and 6 to create an Easter egg on the outside; I deliberately chose to keep the front quite simple with some paper piercing for interest and a large paper bow to tie the whole thing together. The outer oval lifts up to release the fold and reveal the surprise on the inside:

A cute punch art chick with a happy Easter message! So for this card at least, the egg came first. One last photo of a close up of the bow - a dramatic focal point for this card and I love it:


Hope you like it. Back tomorrow with more Spring loveliness; until then, happy stampin'!


Stampin' Up Supplies:

Stamps: Wacky Wishes

Cardstock: Daffodil Delight, Melon Mambo, Tangerine Tango, Old Olive

Ink: Tangerine Tango

Tools: Oval Framelits, Oval Paper Piercing Template, 1 3/4" Circle Punch, Two Step Bird Punch (for wings), Heart Punch (for feet - retired)


Tags: , , , , , , , ,

3D Projects | Cards | Punch Art

Two Minute Tuesday Easter Card

by Joanne James20. March 2013 22:14

Well, the weather outside has been raining on and off all day - so much for the first day of Spring! I have another Easter card for you today, a 4" square card that literally took only a couple of minutes to make: 

I wanted something plain and simple, but with some bold colour to remind me of brighter days. The images are from the Spring Sampler set in the Spring-Summer catalogue. I love the versatility of this set and have lots more to share with you over the coming days, so stay tuned. The sentiment is a partial stamp from the Wacky Wishes set again - this is the only Easter sentiment I own, so I warn you now you'll definitely be seeing more of this!

I have had a busy couple of days, with a day in London at the Biscuiteers Icing Cafe icing Easter biscuits yesterday and a 'Sounds of Spring' music concert at school this evening - I am willing the weather to get warmer and hoping it will soon oblidge! A class assembly tomorrow based on the musical 'Matilda', which should be fun and another Easter concert next week - don't you just love the end of term?

Also, whilst I remember - there was a video link about the new borders scoring plate missing from my last post; this has now been fixed, so if you'd like to see it, it's there now. One last reminder - Sale-a-bration finishes this Friday, so if you would like to place a £45 order and receive one of the 17 free gifts, or if you would like to sign up as a demonstrator and take advantage of the 25% extra free offer where you receive £162.50 worth of product on your starter kit for £99, you only have 2 days left to do so. Hopefully back tomorrow with some more Easter treats; until then, happy stampin'!


Stampin' Up Supplies:

Stamps: Spring Sampler, Wacky Wishes

Cardstock: Whisper White, Tempting Turqouise, Melon Mambo, Daffodil Delight

Ink: Tempting Turqouise, Melon Mambo, Daffodil Delight

Tools: 1 1/4" circle punch, circle die


Easter Chicks Simply Scored

by Joanne James17. March 2013 21:50

So I thought it was about time I started with some Easter cards, otherwise it will be here before we know it and I won't have shared any ideas with you. I took the opportunity to play with my Simply Scored Borders scoring plate today and used it to decorate some Easter eggs for my newly hatched chicks:


It's taken me a while to get used to the new scoring plate, but now that I have I'm finding it useful for all kinds of things. Stampin' Up! have made a great video tutorial showing how to use the new plate, which does work differently to the other plates as it has an overlay guide too - click on the video link here if you'd like to know more.

In case you're wondering where the chicks came from - they are the bird from the two-step bird punch, sponged around the edges to add definition. I love punches like this that have multiple uses!

The children had a Spring Fayre at school yesterday and won a runner-up prize in the Easter Egg Hunt of a chocolate egg and a chocolate rabbit - they were delighted and as they devoured the egg this afternoon, decided Easter has officially begun! I'll be back tomorrow with another Easter card; until then, happy stampin'!


Stampin' Up Supplies:

Stamps: Wacky Wishes

Cardstock: Crumb Cake, Wisteria Wonder, Island Indigo, Calypso Coral, Lucky Limeade, Daffodil Delight

Ink: Daffodil Delight, Island Indigo

Tools: Simply Scored Borders Scoring Plate, Ovals Framelits, Two-Step Bird Punch

Finishing Touches: Linen Thread

Tags: , , , , , , , , ,

Cards | Punch Art

2013 - A Year of Possibilities!

by Joanne James6. January 2013 19:55

So this is it - a new year, a new venture for me. I have finally taken the plunge and decided to devote some time to sharing some of my crafty thoughts and ideas with the world at large and one of the ways I'm going to do this is through my love of all things Stampin' Up. I will be using my blog to share my progress as I build my crafting business and hopefully in turn will inspire you to create some amazing things.

I'm not generally one for new year's resolutions, but this year I did set myself the goal of making every card I send, whatever the occasion. So here's the first one: a New Year Thank You card. New Year's Day saw the first James family get-together of the New Year and the first opportunity for my offspring to meet the newest member, a cute spaniel-poodle-cross puppy named Ollie, so I made this card as a thank you for my mother-in-law for hosting.


This card uses two of my favourite things: my owl punch (you will be seeing a lot more of him over the coming months - he was my first investment and is so versatile - I LOVE him and he inspired my logo!) and my new typeset alphabet. The sentiment is from the hostess set 'Wacky Wishes'; I simply inked up 'happy new year' with my Rich Razzleberry marker, omitting the 'merry christmas &' then added in the 'wishing you a' afterwards, using my stamp-a-ma-jig to ensure alignment.

I hope you like it. I'll be back tomorrow with some sneak peaks of what this year's sale-a-bration has to offer.


Stampin' Up Supplies

Stamps: Wacky Wishes (126410)

Paper: Crumb Cake (121685), Brights (121698) Rich Razzleberry, Pumpkin Pie, Tempting Turquoise, Melon Mambo, Regal Rose

Ink: Rich Razzleberry (126950)

Tools: Owl Builder Punch (118074), Typeset Alphabet Bigz (127553), 3/16" Corner (119871), Big Shot (113439), Stamp-a-ma-jig (101049)


Tags: , , , , ,

Scrapbooking

Stampin' Up! has introduced a new range of 12x12" scrapbooking product and kit - the full range is now available to purchase online. To download a copy of the new digital Scrapbooking Catalogue click here.

Mini Catalogue

BROWSE THE CATALOGUE

'Tis The Season - the new Stampin' Up! Mini Catalogue is here! For more details and to download your copy click here

Shop Online

Access my online shop 24 x 7, 365 days of the year:

Current September hostess code:

JQEHTZGK

Shop Online

2024-25 Annual Catalogue

BROWSE THE CATALOGUE

Click on the image to download your copy of the 2024-25 annual catalogue. For a full list of current SU! supplies, go to my online store. If you would like any help or advice, please drop me a line at joanne@thecraftyowl.co.uk or give me a call on 07773 421446 - I'd be happy to help.

Join My Team

It's always a great time to join Stampin’ Up! New team members can get £130 worth of products for only £99 + free business supplies + free shipping + all the fun being a part of Stampin’ Up! Stampin' Up! has something for everyone: join my growing team and benefit from my support to enjoy Stampin' Up! however you choose.

If you're interested, call me for a chat to understand how I can help you realise your goals. Alternatively, if you have already decided to sign up and you just can't wait, please click here for the link to the online form where you can sign up and order your starter kit right away! 

Latest Kits!

Stampin Cut and Emboss

The Christmas Ornaments Kit and Card Keeper Kit are the latest kits that will be arriving in the online store later this month - get yours here!

New Online Exclusives

There are new products available exclusively in the online store from 3 July - check them out here.

About Me

Hi I'm Joanne and live in Northampton and when I'm not looking after my husband and two beautiful children, am an avid crafter with a passion for all things Stampin' Up!

I must confess that I have never been a big rubber stamper - until I discovered Stampin' Up! that is. I love the fact that I can get such great results with co-ordinating stamps, inks, papers and punches - the possibilities are endless! Join me on my stamping journey as I share the things I love and be inspired to create amazing things yourself!

Follow Me

Monthly Newsletter

Box Builder

Click the button above to use Box Buster to create your custom box design using the Envelope Punch Board!

Kits Collection Now Available!

Stampin Cut and Emboss

The new Kits Collection from Stampin' Up! is now available!

Click here to see the current kits available and order yours online today.

I Design For


Stampin' Up Stuff

This is my personal blog and is not endorsed by Stampin’ Up! I hope you find it a plentiful source of ideas and personal inspiration but please don't copy my designs for contest submission or use for classes, publication or sale without express permission.