Music From The Heart FMS419

by Joanne James27. January 2020 19:48

I've got a super-quick post this evening to share a card I made with Lee Ann's sketch over at Freshly Made Sketches that I am hopefully just going to squeeze my entry in for:

The minute I saw the angle in Lee Ann's sketch I knew that it would be perfect for my first use of one of my favourite sets in the Spring mini catalogue - take a look:


Here's the low-down on today's card:

Music From The Heart is the set inspired by Million Sales Achiever Dawn Olchefske and as someone who has a family of musicians of one form or another this was a set I've wanted for a long time! Today's card is super-simple, stamped in black on Whisper White to look like sheet music with a black card base, then the piano coloured with a black Stampin' Blends combo and just two pops of red from the paper-pieced red foil heart-shaped lid of the piano and a teeny-tiny red foil punched heart to adorn my sentiment. A little bit of overhang from the sentiment label and the stitched circle for interest, and that's that. Quick to create and fortunately quick to blog as time is of the essence today!

Here is the visual summary of the key products used on today's project for you to pin for easy reference:


You can see all of my 'How To' summaries on my 'How To - Tips and Techniques' Pinterest board in case you've missed any. 

Enjoy your evening and I'll be back tomorrow with another project. Until then, happy stampin'!


Stampin' Up! Supplies Used:

Table built using Product Table Builder by The Crafty Owl - Independent Stampin' Up! Demonstrator.

Life Is Short - Buy The Shoes for PP475

by Joanne James26. January 2020 10:00

Today it's Sunday and time for this week's new challenge over at The Paper Players! It's my turn to host this week and I have my favourite, a sketch challenge, for you to work with:


My sketch involves an element of repeating pattern, which can be any shape you like. Whilst I used my stitched circles as a background for my pattern repeat, today's card is all about the shoes - and some rather special shoes at that! Take a look:


Here's the low-down on today's card:

Words To Live By - I love the sentiments in the 'Dressed to Impress' stamp set but my favourite is without doubt this one - I mean, has there ever been a truer word spoken?! I am one of those people who love shoes; I don't own as many pairs now as I once did and I've never owned a pair of floral high heels, but I would love to - so I would love to receive a birthday card like this! I used the florals in the stamp set to decorate the inside too, with a birthday sentiment from the Peaceful Moments stamp set:


Best Dressed Shoes - This is one of those cards that looks pretty simple, but took a long time to execute! I stamped twelve shoes onto Whisper White cardstock and used my All Dressed Up Dies to cut them out, then added some colour to the Petal Pink and Mint Macaron Stampin' Blends to the inside contours of the shoes for a little contrast. Then I stamped twelve shoes (plus two for the envelope) onto a selection of the Best Dressed Designer Series papers, choosing a selection of the small floral patterns and making sure that the shoes were stamped in a similar orientation so that the designs would co-ordinate and the shoes would look like pairs, then I fussy cut the outsides of the shoes and paper-pieced them onto the white backgrounds. Time consuming yes, but I love the finished effect!

Pick of The Pastels - I decided to mount each of my pairs of shoes on a stitched circle and used a selection of pastels inspired by the Best Dressed DSP (although I used Pool Party Instead of Mint Macaron as the latter was too dark). My sentiment was stamped in Blackberry Bliss on a shortened Stitched Rectangle to complete my card.

Here is the visual summary of the key products used on today's project for you to pin for easy reference:


You can see all of my Product and 'How To' summaries on my 'How To - Tips and Techniques' Pinterest board in case you've missed any. 

Before you reach for your ink and papers, check out what our amazing team has created to inspire you this week:

Here's a quick recap of our challenge rules:
 
1.  Create a new paper project
2.  Upload your creation to your blog with a link back to us and provide a direct link to the post featuring your challenge submission.
3.  Please link your card to no more than four challenges, TOTAL.
4.  Have FUN!

I'm looking forward to visiting your blogs this week and taking a look at your interpretation of this week's sketch.

Enjoy your day; we did all our sport Friday and yesterday, so today it's a quiet day with homework, ironing and maybe a movie. Enjoy the rest of your weekends and I'll be back tomorrow with another project. Until then, happy stampin'!


Stampin' Up! Supplies Used: 

Table built using Product Table Builder by The Crafty Owl - Independent Stampin' Up! Demonstrator.

Sale-A-Bration Lovely Lily Pad Shaker Card

by Joanne James5. January 2020 20:00

Today I'm sharing a second card (get me!) that uses the current sketch over at Inspire.Create and I'm squeezing in a link up:


I'm not that organised; I intended to blog this yesterday, but clearing away the Christmas decorations and a pre-season hockey get-together in the evening meant I ran out of time :-) Anyway, I digress! I used a trio of fun Sale-A-Bration items to create a Monet-inspired waterlily shaker card - take a look:


Here's the low-down on today's card:

Lily Impressions - With so many lovely free products to choose from, Sale-A-Bration is always a special time and today my card features three of the items you can obtain FREE with a £45 Stampin' Up! purchase. Whilst the sketch was the starting point for my card, the design is inspired by the lovely Lily Impressions Designer Series Paper. The impressionistic images and rich colours of these papers make elegant, bold backgrounds and I chose one of the waterlily patterns for my cardfront. I love the loose Monet-like brushstroke effect and if you look closely you can see the paper has the appearance of canvas, just like an oil painting. 

Lovely Lily - I didn't do a huge amount of stamping on this card. Aside from the sentiment (from the 'Botanical Bliss' stamp set) I stamped the large outlined waterlily in Melon Mambo on the inside on my shaker. I added a little one to my envelope and inside too, this time using both sides of the stamp to both outline and colour - yes, this set is reversible so will do both simply by reversing the stamp. 

Lilypad Dies - The third lily item in the Sale-A-Bration is the Lilypad Dies. A collection of outline and more detailed dies of both waterlily blooms, leaves and lilypads, along with an interesting diecut/border piece too. The dies are free with a £90 purchase, whereas the stamps and papers can be yours with two £45 purchases respectively. I used the largest outline to create the window for my shaker element and added some retired Melon Mambo sequins for the interactive element for a little co-ordinated sparkle.

Here is the visual summary of the key products used on today's project for you to pin for easy reference:


You can see all of my 'How To' summaries on my 'How To - Tips and Techniques' Pinterest board in case you've missed any. 

Enjoy your day and I'll be back tomorrow with another project. Until then, happy stampin'!


Stampin' Up! Supplies Used:

Table built using Product Table Builder by The Crafty Owl - Independent Stampin' Up! Demonstrator.

Welcome Little One For Our First Paper Players Challenge of 2020 PP472

by Joanne James5. January 2020 10:00

Today it's Sunday and time for our first challenge of 2020 over at The Paper Players! It's the turn of the fabulous Jaydee to host this week and she has a fun theme challenge for you to work with:


Our theme is 'something new' - a new year, a new season, new job, new baby - so many possibilities! I took some new product to make a card to welcome the arrival of a new baby, using Brian's layout over at CAS(E) This Sketch this week as my starting point and this is what I came up with - take a look:


Here's the low-down on today's card:

Welcome Witty-cisms - The sweet pram stamp I used on today's card sis from a new stamp set called 'Witty-cisms', inspired by one of Stampin' Up!'s Million Dollar Sales Achievers, Lisa Fast. A collection of fun stamps with witty sayings and cute hand-drawn illustrations, they are perfect for lots of different occasions and also for a spot of quick colouring if that's your thing. These images are great for quick and simple cards and can also be dressed up with a few layers and embellishments into something more detailed as I've done here.

Baby Blue - I chose to go monochromatic with today's colours and feature Coastal Cabana on my card as I had all the right bits and pieces in my collection (I used some retired Brights DSP but the current gingham would look lovely too). I stamped my image in Basic Grey as opposed to black to soften the image, which is something I often do on a baby card. I love cards like this - it would be just as easy to make in pink or a neutral too.

A Simple Embellishment Trio - I used some of the new white crinkle ribbon for a soft bow and a silver 'made with love' charm and felt border from the Follow Your Art Embellishment Kit to add the finishing touches to my card - I think that little heart charm is a neat play on words for a new arrival.

Here is the visual summary of the key products used on today's project for you to pin for easy reference:


You can see all of my Product and 'How To' summaries on my 'How To - Tips and Techniques' Pinterest board in case you've missed any. 

Before you reach for your ink and papers, check out what our amazing team has created to inspire you this week - including our fabulous new trio of guest designers, Allisa, Stef and Mary:

Here's a quick recap of our challenge rules:
 
1.  Create a new paper project
2.  Upload your creation to your blog with a link back to us and provide a direct link to the post featuring your challenge submission.
3.  Please link your card to no more than four challenges, TOTAL.
4.  Have FUN!

You can see all of my 'How To' summaries on my 'How To - Tips and Techniques' Pinterest board in case you've missed any. 

Enjoy your day; we are looking forward to a leisurely family lunch today before we are all back to school and work at various points next week. I have a card prepared though so will be back tomorrow with another project. Until then, happy stampin'!


Stampin' Up! Supplies Used: 

Table built using Product Table Builder by The Crafty Owl - Independent Stampin' Up! Demonstrator.

Santa and The Magic Of Christmas for AYSI 215

by Joanne James6. December 2019 12:00

Today I'm sharing my design team card for our new challenge over at As you See It where it's time for a festive 'fill in the blank' challenge:


There is so much that fills me with joy during the festive season but there can only be one way for me to complete this sentence - take a look:


Yes it's Santa and the magic of Christmas that brings me joy at this time of year. Here's the low-down on today's card:

Jolly Season Dies - I love the dies in particular that feature in the Night Before Christmas Suite; in addition to the die to cut out that large jolly Santa stamp, there are two fabulous sentiment diecuts and this delightful silhouette of Santa in his sleigh being pulled by his reindeer. This is one of those dies that make a great feature on a card and if you don't have it, you might like to know that it is discounted by 20% as part of the current year end closeouts, whilst supplies last.  

A Brayered Night Sky - I made this card with my stamp class earlier this week, which featured brayering using the sponge brayers. This was a refresher for some and a first time experience for others and the night sky gave the perfect opportunity to experiment. Having masked off the slope across the bottom using a post-it note, I then brayered from the top down in Pretty Peacock then added some Night of Navy on the upper outer edges. The sponge brayers are really easy to use and a little patience is all it takes to build up a night sky full of colour. A sprinkling of silver stars to back the flying sleigh is all that is needed to provide the perfect backdrop. 

In A Word - The word 'Believe' from the 'Holly Jolly Christmas' stamp set seemed a fitting sentiment to complete my card - after all, for those of us who believe in Santa and the magic of Christmas there is the opportunity for true holiday joy. 

Here is the visual summary of the key products used on today's project for you to pin for easy reference:


You can see all of my 'How To' summaries on my 'How To - Tips and Techniques' Pinterest board in case you've missed any. 

So I really love this card, however as I was writing up my post it occurred to me that maybe the first reindeer, aka Rudolf, should perhaps have been given a shiny red nose to light the way. What do you think - would this make a fun addition? Do leave me a comment below, I'd love to know your thoughts.

Enjoy your day and I'll be back tomorrow with another project. Until then, happy stampin'!


Stampin' Up! Supplies Used:

Table built using Product Table Builder by The Crafty Owl - Independent Stampin' Up! Demonstrator.

Night Before Christmas Memories and More Reindeer for PP469

by Joanne James24. November 2019 09:00

Today it's Sunday and time for this week's new challenge over at The Paper Players! It's my turn to host this week and I have my favourite, a sketch challenge for you to work with:


Despite the fact that I chose the sketch, I struggled with it initially - too many possibilities I think and I almost couldn't decide what to choose as my focal point! In the end I made a couple of cards - I'll share the second one with you tomorrow, along with a co-ordinating gift box. For today I settled on this colourful little fella - take a look:


Here's the low-down on today's card:

Night Before Christmas - I decided to use this bright and bold reindeer patterned paper from the Night Before Christmas paper pack as the starting point for my card. This bold pattern works really well for a background and the spots were one of my two for my second attempt at the 'Take Two' challenge over at Just Add Ink this week. The second part was the strip of (retired) copper glimmer paper that I used along the edge of my sentiment strip and the trio of Holiday Rhinestones I used for some added bling and sparkle.

A Majestic Deer - I used one of the deer stickers from the Night Before Christmas Memories and More Pack as my focal point. I backed him with a Mossy Meadow stitched circle and popped him up on dimensionals to make him stand out. He is slightly larger than the deer on the paper so works well to emphasise the design and bring it into focus. 

Itty Bitty Christmas - The sentiment on my card is from the 'Itty Bitty Christmas' stamp set. This is a great Christmas standard, with a ton of festive sentiments in a variety of shapes and sizes for both the inside and outside of cards.

Here is the visual summary of the key products used on today's project for you to pin for easy reference:


You can see all of my Product and 'How To' summaries on my 'How To - Tips and Techniques' Pinterest board in case you've missed any. 

Before you reach for your ink and papers, check out what our amazing team has created to inspire you this week:

Here's a quick recap of our challenge rules:
 
1.  Create a new paper project
2.  Upload your creation to your blog with a link back to us and provide a direct link to the post featuring your challenge submission.
3.  Please link your card to no more than four challenges, TOTAL.
4.  Have FUN!

You can see all of my 'How To' summaries on my 'How To - Tips and Techniques' Pinterest board in case you've missed any. 

Enjoy your day; we had a day of sport yesterday with both hockey match and swimming competitions so today will hopefully be a slightly more restful one. I'll be back tomorrow with another project. Until then, happy stampin'!


Stampin' Up! Supplies Used: 

Table built using Product Table Builder by The Crafty Owl - Independent Stampin' Up! Demonstrator.

Important Stampin' Up! News: Purple Posy Ink Pad Discontinued With Immediate Effect

by Joanne James5. November 2019 22:00


Today I have an update from you regarding Purple Posy ink from Stampin' Up, which I have pretty much copied for the news release, as follows:

Despite Stampin' Up!'s efforts to resolve issues with Purple Posy ink, we have learned that the ink colour is still shifting over time. This means that the colour is coordinating more loosely than we typically allow with our colours. Due to these ongoing challenges, we have decided to discontinue Purple Posy classic ink. As of 5 November 2019, the following items will no longer be available to purchase:

  • Purple Posy Classic Stampin’ Pad (item 150084)
  • Purple Posy Classic Stampin’ Ink Refill (item 150091)
  • 2019–2021 In Color Classic Stampin’ Pad Assortment (item 150087)

We are unable to replace Purple Posy ink pads for customers who have already received them. However, anyone with concerns regarding the colour shifting properties of their Purple Posy ink pads should contact Demonstrator Support directly to arrange for a £7.00 coupon code as compensation. 

All other Purple Posy products (such as Purple Posy Stampin’ Write Marker, Purple Posy Cardstock, Purple Posy Stampin’ Blends, etc.) will remain available for purchase.

All of Stampin’ Up!’s exclusive ink colours are run through a vigorous series of tests to get ahead of challenges like this, and to ensure colours are accurate and meet our standards of coordination. Purple Posy did pass regular testing standards in time-simulating ovens, but we have now identified that it fell short when it came to actual time passing. The colour begins to shift once the ink has rested in the ink pad for about six weeks.

It is rare for Stampin’ Up! or our ink manufacturer to have such persistent issues with ink; Purple Posy has certainly been an anomaly. We completed full testing on 11 distinct batches of Purple Posy Classic Stampin’ Ink before releasing the current version. We are now confident that no additional efforts would uphold our coordination needs over time. 

So there it is - Purple Posy ink and ink refills are no more. If anyone has any issues with an existing ink pad that they would like to report, please get in touch. Fortunately for us, the other non-ink products in the range will still be available until June 2021, so there will be lots more opportunity to enjoy this lovely colour. 

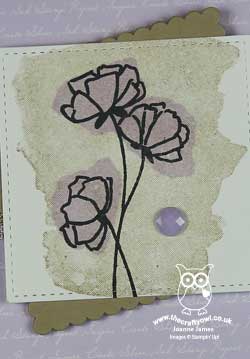
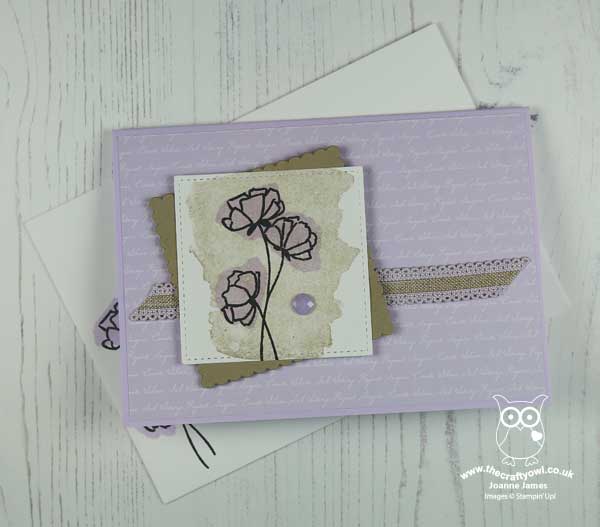
This seems like a good opportunity to share the latest set of cards that the ladies in my in-colour club received, which were in fact a CASE  of a card made by my dear friend and AYSI teamie Jan Clothier of Thinking Stamping, who made this lovely card a while ago and I liked it so much I cased it for my ladies with her permission - you can see Jan's original card here and you can find a close up of my Purple Posy version below:

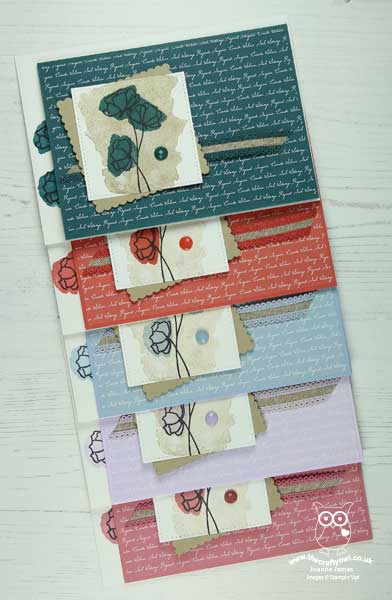
I hadn't used the 'Love What You Do' set for a while so it was good to ink it up again. Here's a shot showing all of the cards in the 2019-21 In-Color set:

So pretty - thank you Jan for the inspiration!

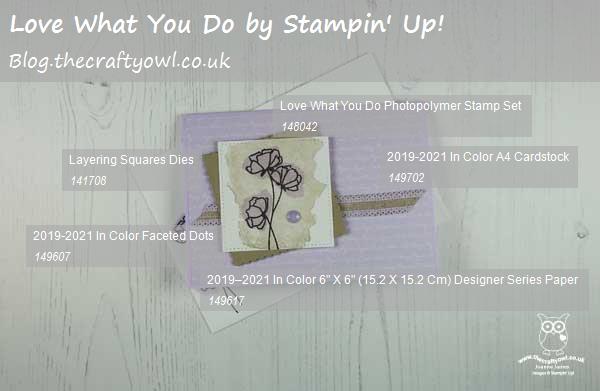
Here is the visual summary of the key products used on today's project that you can still buy for you to pin for easy reference:


Apologies that this is in Purple Posy, but I'd made and photographed these cards before the Stampin' Up! announcement was made. Whilst I did use Purple Posy ink for the blooms on my card, you could colour these with Stampin' Write markers and achieve a pretty similar effect. Such creativity will still be required if we are to enjoy colour coordination with this delicate soft purple from now on. You can see all of my 'How To' summaries on my 'How To - Tips and Techniques' Pinterest board in case you've missed any. 

Enjoy your day and I'll be back tomorrow with another project. Until then, happy stampin'!


Stampin' Up! Supplies Used:

Table built using Product Table Builder by The Crafty Owl - Independent Stampin' Up! Demonstrator.

#Elfie - Such A Christmas Cutie!

by Joanne James7. October 2019 17:30

Today I'm squeezing in my card for this week's Freshly Made Sketches challenge that I intended to blog on Saturday, but, well, the day was just too busy!


I made my card on Saturday afternoon as I was enjoying some World Card Making Day craftiness and indulged in two of my favourite past-times, colouring and fussy cutting to create this festive card - take a look:


My card features this fun Christmas elf from the #Elfie stamp set, inspired by Million Sales Achiever Karen Duke and I just love him! I fussy cut each of my three stamped images and mounted them on white stitched squares as I liked the added definition, then added my heat-embossed sentiment. A little stamping to the inside completed my card:


Easy as that! On reflection I'm wondering whether on this occasion I should have snipped away the bauble from the bottom image on the front of my card just to give a better balance - what do you think? 

Either way, I still love this cute little chap!

Here is the visual summary of the key products used on today's project for you to pin for easy reference:


You can see all of my 'How To' summaries on my 'How To - Tips and Techniques' Pinterest board in case you've missed any. 

I've started the week with my monthly technique class this morning which was a lot of fun (I'll share some of those cards later in the week) and some of the usual cooking and cleaning that seems an ongoing task in the James household. As is the ironing - that's where I'm headed next, wish me luck! Enjoy your evening and I'll be back tomorrow with another project. Until then, happy stampin'!


Stampin' Up! Supplies Used:

Table built using Product Table Builder by The Crafty Owl - Independent Stampin' Up! Demonstrator.

Country Home Thankful Cards for PP462

by Joanne James6. October 2019 09:00

Today it's Sunday and time for this week's new challenge over at The Paper Players! It's my turn to host this week and I have a seasonal theme challenge for you to work with:


At this time of year our thoughts often turn to giving thanks so I thought this would be a good theme for this week. I created not one but two cards this week, both using the colour combination over at TGIF Challenges. The first one uses this week's Fusion sketch (sketch only). I wanted to use the Country Home set for my cards today; it's one of my favourite sets for autumn thank you cards. For my first card I paired my milk churn of autumn foliage with some of the gorgeous patterned papers from the Woven Threads suite, along with some Grapefruit Grove coloured ribbon and pearls:


I tweaked my sentiment by replacing the stamped word 'happy' with a diecut from the Word Wishes Framelits set for added emphasis and finished my sentiment on the inside of my card:


My second card for Just Add Ink uses one of the other sentiments and foliage arrangements from the same set, this time with a piece of linen effect designer series paper from the Pressed Petals Specialty DSP that I embossed with my Tin Tile Embossing Folder for added texture:


You can see it more closely here, along with the detail on my cotton balls:


In Europe, due to ongoing customs issues we have been unable to obtain the Snowfall Accents Puff Paint on page 19 of the Autumn-Winter catalogue since the catalogue launch, which is a shame as it would be perfect to use on these. This week we learned that this product will not arrive before the catalogue end and as such has now been withdrawn from sale. Never fear though - I have a plan! I created exactly the same effect using some Tombo adhesive and white embossing powder using the same technique I used previously for an aeroplane smoke trail. I even made a video - here it is in case you aren't familiar with this technique and would like to see how it's done:

Give it a try and let me know how you get on and what you use it for - I'd love to see your projects!

Here is the visual summary of the key products used on today's projects for you to pin for easy reference:


You can see all of my Product and 'How To' summaries on my 'How To - Tips and Techniques' Pinterest board in case you've missed any. 

Before you reach for your ink and papers, check out what our amazing team has created to inspire you this week:

Here's a quick recap of our challenge rules:
 
1.  Create a new paper project
2.  Upload your creation to your blog with a link back to us and provide a direct link to the post featuring your challenge submission.
3.  Please link your card to no more than four challenges, TOTAL.
4.  Have FUN!

You can see all of my 'How To' summaries on my 'How To - Tips and Techniques' Pinterest board in case you've missed any. 

Enjoy your day; I am busy with preparations for my upcoming luxury weekend crafting retreat so I will hopefully be spending some time in my craft room ticking a few more jobs off my list, in between the usual weekend homework and a birthday party run for one of the James Juniors tomorrow afternoon. I'll be back soon with another project. Until then, happy stampin'!


Stampin' Up! Supplies Used: 

Table built using Product Table Builder by The Crafty Owl - Independent Stampin' Up! Demonstrator.


We'll Walrus Be Friends Friendship Card

by Joanne James30. September 2019 07:00

Happy Monday everyone! I am starting the week with a card for the current challenge over at Festive Friday that is also my second using this week's Freshly Made Sketches sketch: 


I chose friendship, blue and orange as my 3 items from the Festive Friday inspo list and made this sweet card using one of my favourite sets in the annual catalogue, 'We'll Walrus Be Friends':

I stamped my main image on a Whisper White stitched oval, popping my goldfish up on dimensionals, and coloured it with my Blends and a liberal dose of clear Wink of Stella on the iceberg. I popped this onto a base embossed with the High Seas embossing folder. Both the iceberg sparkle and embossed waves are difficult to see on my photo, but they add so much to this card in real life. I love this card - I am going to send it to one of the James Juniors in their school bag one day when they need a little cheering up!

Here is the visual summary of the key products used on today's project for you to pin for easy reference:

You can see all of my 'How To' summaries on my 'How To - Tips and Techniques' Pinterest board in case you've missed any. 

Enjoy your day and I'll be back tomorrow with another project. Until then, happy stampin'!


Stampin' Up! Supplies Used:

Table built using Product Table Builder by The Crafty Owl - Independent Stampin' Up! Demonstrator.

Mini Catalogue

BROWSE THE CATALOGUE

The mini catalogue is now live! Read and download your copy here.

Shop Online

Access my online shop 24 x 7, 365 days of the year:

Current March hostess code:

S9F2XJJW

Shop Online

Join My Team

It's always a great time to join Stampin’ Up! New team members can get £130 worth of products for only £99 + free business supplies + free shipping + all the fun being a part of Stampin’ Up! Stampin' Up! has something for everyone: join my growing team and benefit from my support to enjoy Stampin' Up! however you choose.

If you're interested, call me for a chat to understand how I can help you realise your goals. Alternatively, if you have already decided to sign up and you just can't wait, please click here for the link to the online form where you can sign up and order your starter kit right away! 

Latest Kit!

Stampin Cut and Emboss

The Rock Legend Kit has all you need to make 8 cards with coordinating envelopes. Along with the new Panda Friends Kit, both are available from January 4th for just £14 each - get yours here!

2023-24 Annual Catalogue

BROWSE THE CATALOGUE

Click on the catalogue for a full list of current SU! supplies - if you would like to order any of the items featured, please drop me a line at [email protected] or give me a call on 07773 421446 - I'd be happy to help.

New Online Exclusives

There will be new products available exclusively in the online store from 5 March - check them out here.

About Me

Hi I'm Joanne and live in Northampton and when I'm not looking after my husband and two beautiful children, am an avid crafter with a passion for all things Stampin' Up!

I must confess that I have never been a big rubber stamper - until I discovered Stampin' Up! that is. I love the fact that I can get such great results with co-ordinating stamps, inks, papers and punches - the possibilities are endless! Join me on my stamping journey as I share the things I love and be inspired to create amazing things yourself!

Follow Me

Monthly Newsletter

Box Builder

Click the button above to use Box Buster to create your custom box design using the Envelope Punch Board!

Kits Collection Now Available!

Stampin Cut and Emboss

The new Kits Collection from Stampin' Up! is now available!

Click here to see the current kits available and order yours online today.

I Design For


Stampin' Up Stuff

This is my personal blog and is not endorsed by Stampin’ Up! I hope you find it a plentiful source of ideas and personal inspiration but please don't copy my designs for contest submission or use for classes, publication or sale without express permission.