Flowers For Every Season Floral Birthday Card

by Joanne James22. June 2020 11:25

Happy Monday everyone! Today is a special day - not one, but two, yes both of the James Juniors are back to school! There was much excitement in the James household this morning and whilst it's only for a couple of weeks, and for one it's only for a couple of days each week, the excitement at seeing friends and teachers face to face again was palpable! The house is now eerily silent, but it does mean that I am racing through my jobs today and am getting my blog post in early too! Today I'm sharing a card that I made inspired by the lovely Amy's sketch over at Freshly Made Sketches:

A super versatile sketch I'm sure you'll agree and I decided to get snipping for my floral creation today - take a look:


Here's the low-down on today's card:

Flowers For Every Season - Whilst flowers are by no means mandatory for this sketch, I initially reached for my Flowers For Every Season Memories and More cards as I wanted to incorporate the adhesive sentiments into my card. I couldn't find any flowers that worked for me though, so I reached for my co-ordinating papers and decided to get fussy cutting! I wanted to create some layering with my flowers, with some behind and some in front of my label, so separated the flowers to make this work. 

A Sweet Label - My sentiment label is from the Stitched So Sweetly Die set - such a great set for labels with a good variety of shapes and sizes. 

Textile Texture - I added some texture to the top layer of my Misty Moonlight cardstock using the new Textile Texture embossing folder which is lovely for a little extra detail.

This card was simple to put together once the fussy cutting was completed. I used another leftover edge piece of DSP to decorate the inside of my card too:


Waste not, want not and all that!

Here is the visual summary of the key products used on today's project for you to pin for easy reference:


You can see all of my 'How To' summaries on my 'How To - Tips and Techniques' Pinterest board in case you've missed any. 

Enjoy your day. I'm racing through my jobs before early school pick up. I'll be back tomorrow with another project. Until then, happy stampin'!


Stampin' Up! Supplies Used:

Table built using Product Table Builder by The Crafty Owl - Independent Stampin' Up! Demonstrator.

Tis The Season For Santa Hats - Not! FMS400

by Joanne James26. August 2019 14:00

So today is the hottest August Bank Holiday Monday on record here in the UK and I am sharing a Christmas card with you - go figure!! I managed to play along with week 3 of the Freshly Made Sketches 400th birthday celebrations so it just had to be done:

I thought the panels would be perfect to showcase some designer series paper, so I used another of the patterns in my Night before Christmas paper pack and this is what I came up with:


I created a couple of layered panels then decided to make my sentiment the focal point of my Stitched Oval and used one of the festive dies from the Jolly Season dies that are also in the Night Before Christmas Suite, with a little offset layering to make it stand out. I fussy cut a santa hat from a leftover scrap of paper and added this at a jaunty angle to bring the whole thing together. The only stamping on my card was the sentiment on the inside of my card:


And my card was done!

Here is the visual summary of the key products used on today's project for you to pin for easy reference:


You can see all of my 'How To' summaries on my 'How To - Tips and Techniques' Pinterest board in case you've missed any. 

Enjoy your day and keep cool! I'll be back tomorrow with another project. Until then, happy stampin'!


Stampin' Up! Supplies Used:

Table built using Product Table Builder by The Crafty Owl - Independent Stampin' Up! Demonstrator.

Copacobana Birthday Statements for ASYI

by Joanne James2. May 2019 07:00

Today I'm sharing a card for this week's colour challenge over at As you See It:

I've not managed to play along with this lovely group for a couple of weeks but when I saw this week's fabulous bright colour palette it was another one that I couldn't resist! Heather's inspiration photo is very 'copacabana' (yes, I have been signing the song ever since I read the challenge post!)  and I decided to try an idea that I saw on one of the samples in the Spring-Summer catalogue that I've never tried before - take a look:


Here's the low-down on today's card:

I like large single-image stamps as they can be great for clean and simple and more layered cards and both of the main stamps in the 'Birthday Statements' stamp set lend themselves to this. I don't usually stamp them in a bright colour though unless I'm leaving them uncoloured, so the sample on page 19 of the catalogue intrigued me. I stamped my image in Lovely Lipstick, then coloured it with a combination of light and dark Blends markers in Pineapple Punch, Pink Pirouette (retired but the closest I could get to Powder Pink) and light Lovely Lipstick. I decided to carry on the bright theme and mount my coloured panel on a Lovely Lipstick card base with a strip of Pineapple Punch in-colour DSP and finished the whole thing off with some Lovely Lipstick ribbon and a bow. 

I think I like this colour variation; it makes for one bright card, but I have plenty of soon-to-be-teenager classmates of Ben's that I know will love it!

Here is the visual summary of the key products used on today's project for you to pin for easy reference:


You can see all of my 'How To' summaries on my 'How To - Tips and Techniques' Pinterest board in case you've missed any. 

Enjoy your day and I'll be back tomorrow with another project. Until then, happy stampin'!


Stampin' Up! Supplies Used:

Table built using Product Table Builder by The Crafty Owl - Independent Stampin' Up! Demonstrator.

Everything Is Rosy Is Now Available To Buy - Order Yours Today!

by Joanne James1. May 2019 09:00

Just a quick post to let you know that the Everything Is Rosy Product Medley is now available to order. You can read all about this kit in my earlier post here; also here's a quick reminder of what is included:

Contact me to order yours or alternatively click on the link below that will take you directly to my online store to purchase:

Table built using Product Table Builder by The Crafty Owl - Independent Stampin' Up! Demonstrator.


The Everything Is Rosy Product Medley costs £74 and is available from today only whilst stocks last or until May 31st, whichever comes sooner. Order yours today - race you to the shop!


Purple Springtime Impressions Corner Card

by Joanne James1. May 2019 07:00

Today I'm sharing a quick clean and simple card for this week's challenge over at CAS(E) This Sketch that also works for another entry into the Addicted to CAS challenge which is all about contrasts:


This sketch was perfect for a tone-on-tone Springtime Impressions floral Corner diecut contrasted with a white front panel:


I diecut the edge of my white panel to but up to my gorgeous Grape diecut and adhered both pieces to my Highland Heather card base, paper-piecing a few of the flower centres and stamping my birthday sentiment to finish. I also trimmed the left-hand corner of the diecut to fit my portrait orientation.

That's all there is to it! 

Here is the visual summary of the key products used on today's project for you to pin for easy reference:


You can see all of my 'How To' summaries on my 'How To - Tips and Techniques' Pinterest board in case you've missed any. 

Enjoy your day and I'll be back tomorrow with another project. Until then, happy stampin'!


Stampin' Up! Supplies Used:

Table built using Product Table Builder by The Crafty Owl - Independent Stampin' Up! Demonstrator.

Butterfly Beauties in Blue For Just Add Ink

by Joanne James30. April 2019 07:00

Today I'm sharing a card for this week's colour challenge over at Just Add Ink:


I've not managed to play along with this lovely group for a couple of weeks but when I saw this week's fabulous bright colour palette I couldn't resist! I decided to go for a bold design to really make the most of all that colour and used my Butterfly Beauty Thinlits Dies for the very first time - take a look:


Here's the low-down on today's card:

A Blended Background - I wanted something with lots of colour for my background but not too much detail so as to detract from the butterflies, so decided to use the two lightest colours and apply them using a sponge dauber in a circular motion until the colours were blended and covered the whole layer. I used Shimmery White cardstock for my base; I find this helps the colours blend better and I also love the subtle shimmer it adds to the card. 

Butterfly Beauties Indeed - I loved these butterflies the moment I saw them and I've had them for months, so I'm not sure why it's taken me so long to get them out of the packet as they really are gorgeous and the star of the show for sure on today's card. I used both of the large dies and layered them together, with a smaller layered butterfly to anchor my sentiment; the set rally is choc-full of butterflies in all shapes and sizes though - lots of creative possibilities. I'm so glad these are carrying over into the main catalogue as it will give me lots more opportunities to play with them. Just a quick reminder that whilst both the Beauty Abounds stamp set and the Butterfly Beauty Thinlits Dies are carrying over, the 10% bundle discount price will not, so if you want to take advantage of that you need to order before the new catalogue goes live on 4th June.

Friendship Abounds - The dies in the Beauty Abounds bundle are rather spectacular, but the stamp set is rather special too: alongside some generic sentiments, it has two great pairs of sentiments that are just perfect for that special friend in you life. The one I used on my card today finishes on the inside with '...out of a whole world of people' (I forgot to take a photo so you'll have to take my word for it!!) How lovely is that?

Here is the visual summary of the key products used on today's project for you to pin for easy reference:


You can see all of my 'How To' summaries on my 'How To - Tips and Techniques' Pinterest board in case you've missed any. 

Enjoy your day. I'm early posting for a change and mine is shaping up to be a busy one. and I'll be back tomorrow with another project. Until then, happy stampin'!


Stampin' Up! Supplies Used:

Table built using Product Table Builder by The Crafty Owl - Independent Stampin' Up! Demonstrator.

Everything Is Rosy - Limited Edition Kit Available May 1st

by Joanne James29. April 2019 16:00

When I attended Onstage recently, we were updated on some exciting new Stampin' Up! developments, one of which was the development of a new concept called the 'product medley'. Product medleys are a concept based on demonstrator feedback. In addition to being filled to the brim with cute, coordinating products, they have been designed to provide you with endless creative possibilities.

The Everything Is Rosy Product Medley is our first product offering of this kind and this exclusive, limited-time collection of coordinating, petal-packed products has everything you need to let your creativity bloom.

The Everything Is Rosy Product Medley costs £74 and includes these exclusive products:


Here's a close-up of the stamp set detail:

And here's a selection of photos of projects made with the Everything Is Rosy Product Medley (there are more of these to view on my Facebook page that you can access here):


The nice people at the Stampin' Up! home office have also produced this short video that shows the products in the suite in more detail:

The set was shared with demonstrators at Stampin' Up!'s recent demonstrator-only Onstage event, however we have been unable to pre-order it so we will be waiting in line with you to get our hands on it! I can assure you the samples shared above really don't do this suite justice; having seen it in real life it really is beautiful, especially the rose gold elements. Everything is Rosy costs £74 and is available from May 1st until May 31st only or while supplies last, so if this set is for you, be ready to order as soon as it launches on May 1st as it is likely to be hugely popular!

Detailed Deer Craft Retreat Pillow Gift and Christmas Card

by Joanne James20. November 2018 19:00

I've been busy decorating today so I'm a little later with my post again. Hopefully it's worth the wait though: I'm sharing another of the pillow gifts that the lucky ladies received on my Creative Escapes Craft Retreat a few weeks ago, and a co-ordinating card that I made to go with it since I decided I liked the box design so much! Firstly, here is the pillow gift box:


I liked the box so much when I got home I made another one and decided to make a card using same design to co-ordinate with it:


Here's the low-down on today's projects:

Luscious Layers - There's so much I love about this card! My most favourite thing is the layering of the diecuts to create the focal point. I used a Stitched Label, the jumping deer from the Detailed Deer Thinlits and a 'merry' in copper foil from the Merry Christmas Thinlits dies. Gorgeous, even if I say so myself!

And More Joyous Noel - The paper I used that inspired my centrepiece is from the gorgeous copper-foiled Joyous Noel paper pack. This paper is now sold out across the globe, so I hope you already have a stash as it's my favourite this season and I still have projects using it to share with you.  

Merry Christmas In Many Ways - The Merry Christmas To All bundle allows you to create many different festive sentiment combinations for the holiday season with a combination of stamps and dies. I used two different combinations for my card and box to give you a flavour of the flexibility it offers. the diecuts are quite large and perfect if a statement sentiment is the order of the day. 

I'm linking my card up with the current challenges over at Just Add Ink where they are looking for big bold sentiments and Fusion where the sketch inspired the layout for today's Christmas card (I flipped it and used the mirror image).


Here is the visual summary of the key products used on today's project for you to pin for easy reference:


You can see all of my 'How To' summaries on my 'How To - Tips and Techniques' Pinterest board in case you've missed any. 

Finally here is a photograph of both of my projects together:

Enjoy your evening and I'll be back tomorrow with another project. Until then, happy stampin'!


Stampin' Up! Supplies Used:

Table built using Product Table Builder by The Crafty Owl - Independent Stampin' Up! Demonstrator.

Have a Fun Night In With A Lots of Happy Card Kit

by Joanne James22. January 2018 20:00

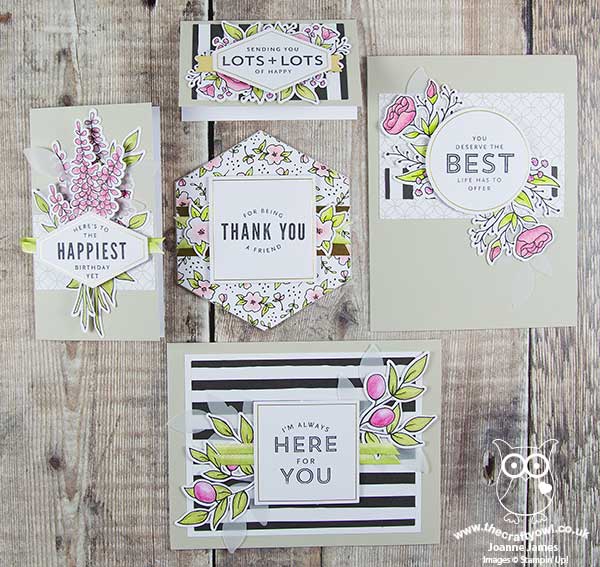
I've started the week with one of the James Juniors home from school with the dreaded lurgy, so no time to craft 'from scratch' today. Days like this are perfect days to work on a kit though, where all the hard work and prep is done for you. So today I'm sharing not one card but 5 - yes the five different all-occasion card designs that feature in the fabulous new 'Lots of Happy Card Kit' - take a look:


Here's the low-down on this kit:

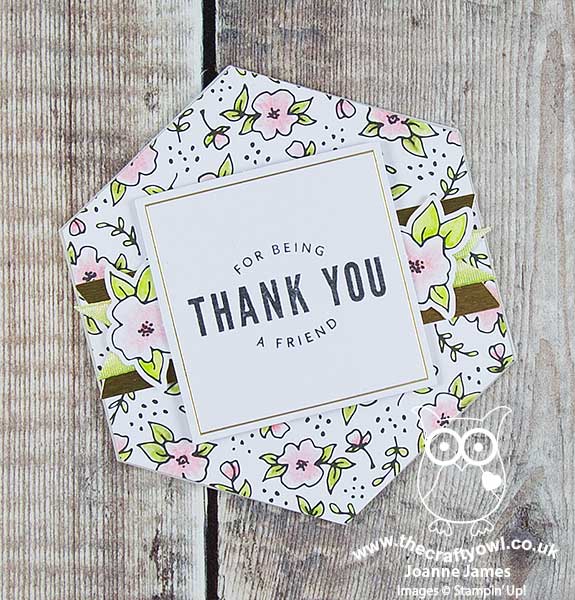
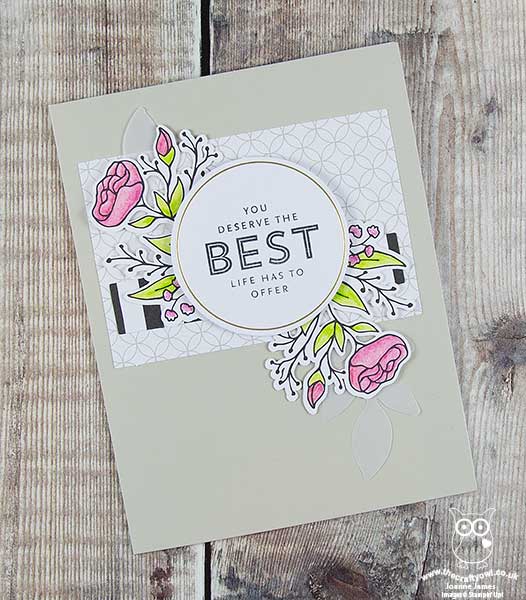
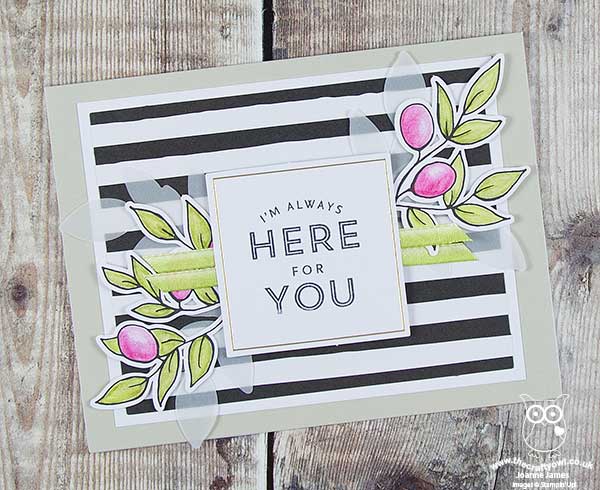
Lots of Happy, Lots To Love - There's lots to love in this all-inclusive kit: with 4 each of 5 designs, you can create a total of 20 all-occasion cards using the included 'Lots of Happy' stamp set and then colour these using the Watercolour Pencils that are also included in the kit. two of the four pencils that are included are exclusive to this kits and not available with the standard pencil set. Here are each of the 5 designs individually:


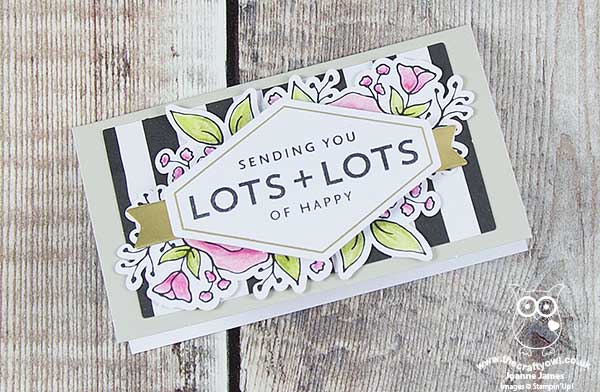
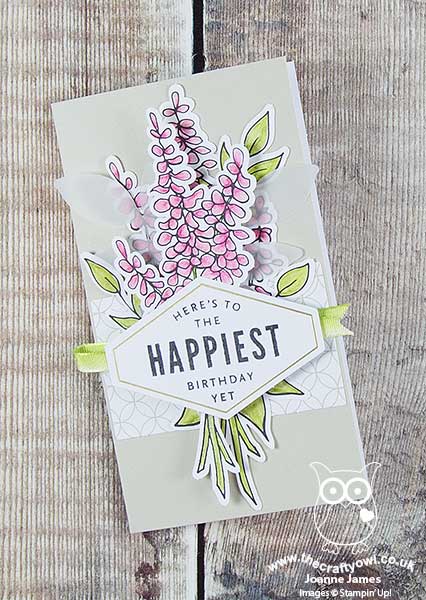
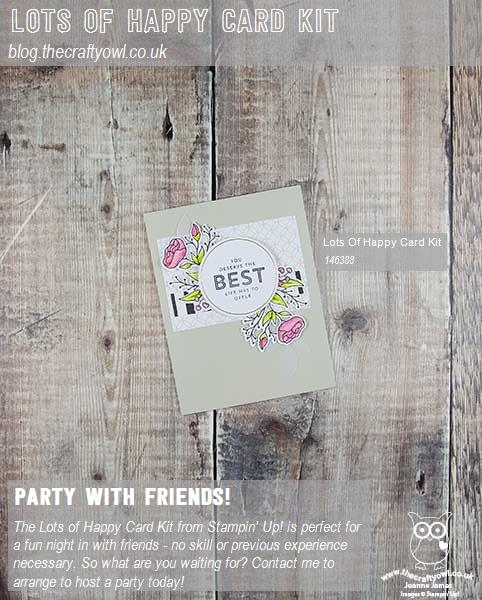
A Fun Night In - The Lots of Happy Card Kit is perfect for a fun night in with friends - if ever you needed an excuse to get together on a wintry afternoon or evening and have some fun, this is it! No skill or previous experience necessary, so whether you consider yourself a crafter or a complete novice that just loves to send beautiful handcrafted cards, this kit is for you! The theraputic benefits of colouring are well-known (you can read all about that in my previous post here) - add some refreshments - tea and cake or wine and nibbles, either works! - and a fun night is guaranteed! If you would be interested in hosting a fun evening with friends, do get in touch - I would love to help you to host a night to remember! What's more if you invite 7 friends to participate during Sale-A-Bration - each kit costs £31.50 each - as the hostess you can get your kit for FREE!

And There's More - This fabulous kit also has a refill available, so if you enjoyed it the first time around, you can reuse your stamp set, block, ink and pencils and create even more cards! A refill costs just £19 - that's less than £1 per card, bargain!

Also the lovely people at Stampin' Up! have also produced a video showing this kit in more detail if you'd like a closer look:

Here is the visual summary of the key products used on today's project for you to pin for easy reference:


You can see all of my 'How To' summaries on my 'How To - Tips and Techniques' Pinterest board in case you've missed any. 

I know I often say this when a new kit comes along, but this really is a good one - the end results are so contemporary and pretty, I love it! Contact me to get one for yourself today!

I'll be back tomorrow with another project. Until then, happy stampin'!


Stampin' Up! Supplies Used:

Table built using Product Table Builder by The Crafty Owl - Independent Stampin' Up! Demonstrator.

Brightly Lit Christmas 3 Ways From Simple To Stepped Up - Part 2

by Joanne James20. December 2017 22:00

I've been away for a few days with my family to experience the delights of the German Christmas markets and enjoy some much-needed pre-Christmas R&R, but have just managed to squeeze in a post for you this evening amidst some last-minute card writing to share the second part of my Brightly Lit Christmas set and possibly one of my favourite cards of the season - take a look:


 Here's the low-down on today's card:

A Framed Christmas Lampost - I created my delightful snowy lampost scene and use the crossbar lampost framelit to create a gorgeous frame for my mini focal point, something I picked up from a wonderful crafty friend of mine, the talented Amanda Bates over at The Craft Spa; thanks for the inspiration, Amanda!

Light The Lamps - The best bit of this stepped-up card? The lamps light up! I used a Chibi circuit kit to create a circuit behind the main panel and when you press the presents, the lamps light as you can see on this zoomed-in photo below:


How cool is that?! These circuits are easy to create although with three bulbs on this card, a little pricey and only really suitable for a special card, but a fun way to step up a card with the Christmas Lampost Thinlits Dies for sure.

Pick A Piece Of Paper - The only stamping on my card is the little 'Merry' banner across my wreath; the wreath itself and the presents were diecut from the Christmas Around The World Designer Series Paper. This paper is the one I initially found the most difficult to work with, yet in reality have used most - it's amazing how creative you can be when challenged! 

Here is the visual summary of the key products used on today's project for you to pin for easy reference:


You can see all of my 'How To' summaries on my 'How To - Tips and Techniques' Pinterest board in case you've missed any. 

Enjoy your day and I'll be back soon with another project. Until then, happy stampin'!


Stampin' Up! Supplies Used:

Table built using Product Table Builder by The Crafty Owl - Independent Stampin' Up! Demonstrator.

Sale-A-Bration 2025

It's time for Sale-A-Bration 2025! Shop, host and earn benefits between 7 January - 28 February. Download your copy of the Sale-A-Bration brochure here!

Mini Catalogue

BROWSE THE CATALOGUE

New Year, new products - the new Stampin' Up! Mini Catalogue is here! For more details and to download your copy click here

Shop Online

Access my online shop 24 x 7, 365 days of the year:

Current February hostess code:

 3JRGYMXT

Shop Online

Join My Team

And when you join during Sale-A-Bration, new team members can build your starter kit by choosing £130 worth of products for only £99 + free business supplies + free shipping and either TWO Stampin' Write marker sets and the exclusive Handmade Designs stamp set OR an additional £30 in FREE products. Stampin' Up! has something for everyone: join my growing team and benefit from my support to enjoy Stampin' Up! however you choose.

If you're interested, call me for a chat to understand how I can help you realise your goals. Alternatively, if you have already decided to sign up and you just can't wait, please click here for the link to the online form where you can sign up and order your starter kit right away! 

Scrapbooking

Stampin' Up! has introduced a new range of 12x12" scrapbooking product and kit - the full range is now available to purchase online. To download a copy of the new digital Scrapbooking Catalogue click here.

Latest Kits!

Stampin Cut and Emboss

The Birthday Bash Kit is just one of the latest kits in the online store - get yours here!

2024-25 Annual Catalogue

BROWSE THE CATALOGUE

Click on the image to download your copy of the 2024-25 annual catalogue. For a full list of current SU! supplies, go to my online store. If you would like any help or advice, please drop me a line at joanne@thecraftyowl.co.uk or give me a call on 07773 421446 - I'd be happy to help.

New Online Exclusives

There are new products available exclusively in the online store from 7 January - check them out here.

About Me

Hi I'm Joanne and live in Northampton and when I'm not looking after my husband and two beautiful children, am an avid crafter with a passion for all things Stampin' Up!

I must confess that I have never been a big rubber stamper - until I discovered Stampin' Up! that is. I love the fact that I can get such great results with co-ordinating stamps, inks, papers and punches - the possibilities are endless! Join me on my stamping journey as I share the things I love and be inspired to create amazing things yourself!

Follow Me

Monthly Newsletter

Box Builder

Click the button above to use Box Buster to create your custom box design using the Envelope Punch Board!

Kits Collection Now Available!

Stampin Cut and Emboss

The new Kits Collection from Stampin' Up! is now available!

Click here to see the current kits available and order yours online today.

I Design For


Stampin' Up Stuff

This is my personal blog and is not endorsed by Stampin’ Up! I hope you find it a plentiful source of ideas and personal inspiration but please don't copy my designs for contest submission or use for classes, publication or sale without express permission.

DSP Special Release

Check out 3 popular designer series paper designs in fresh new colourways! Available exclusively in the online store from 3 December - check them out here