by Joanne James25. May 2014 20:23Sunday is always a good day, but it's doubly good when followed by a Bank Holiday - looking forward to tomorrow already! We've had a restful day today after yesterday's busy one and also managed our first BBQ of the year, albeit having brought everything inside to eat as it was rather breezy outside. Today's card uses the colours over at this week's Colour Me...! challenge and Jen Mitchell's clean rectangular sketch over at Freshly Made Sketches for my layout:
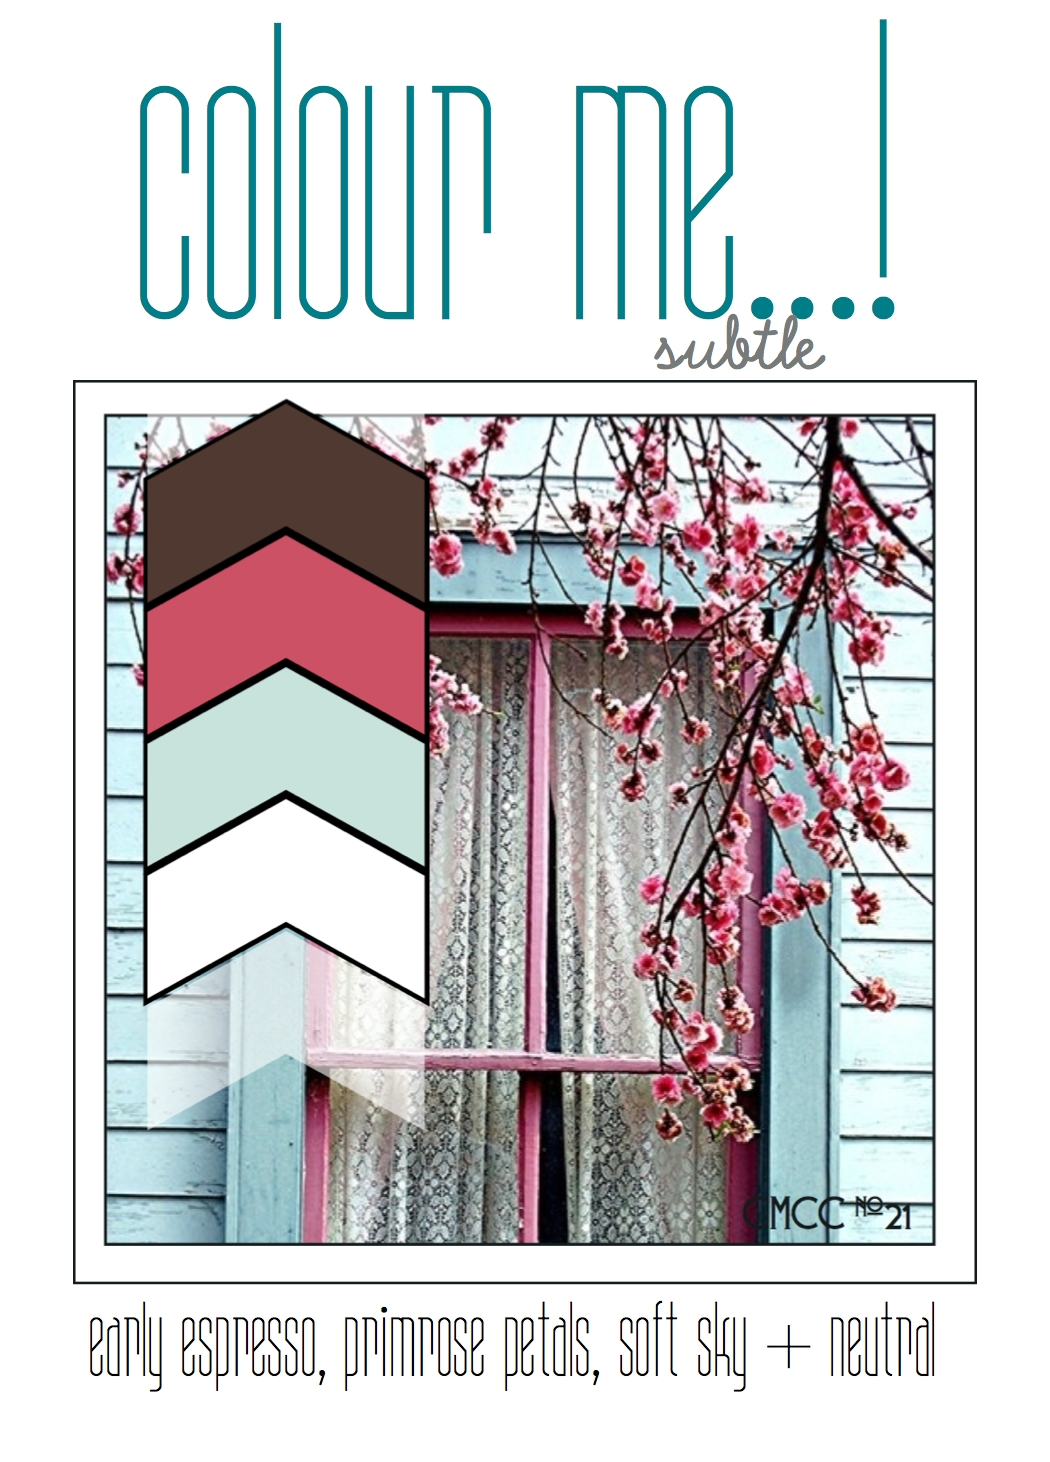
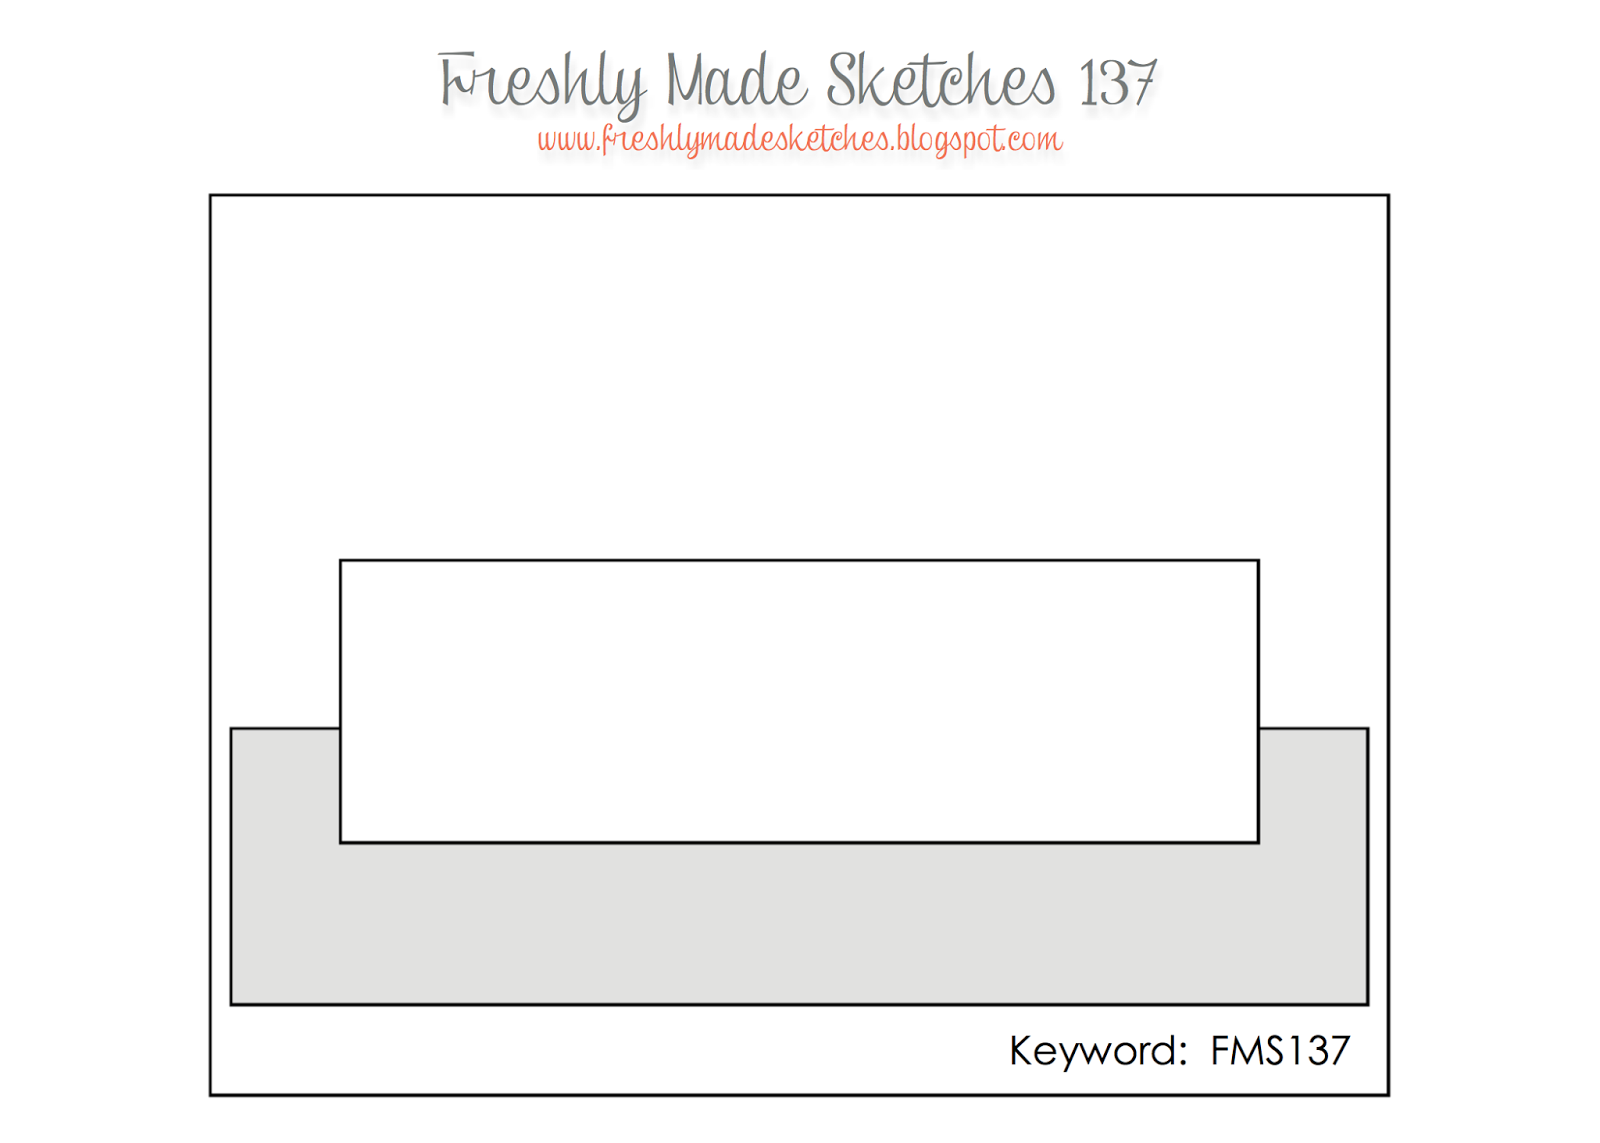
I rotated the sketch through 90 degrees to create my card and took my inspiration directly from the photo alongside the colour palette. Here is my card:
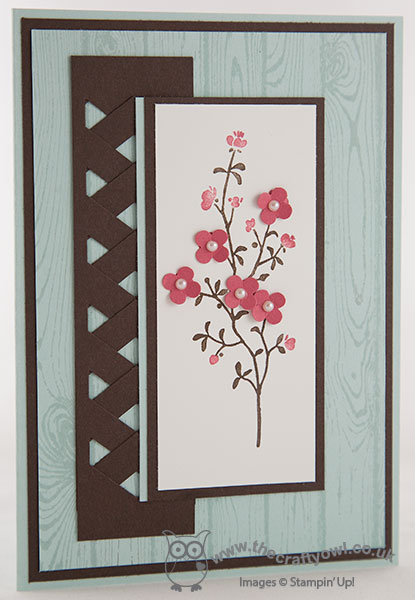
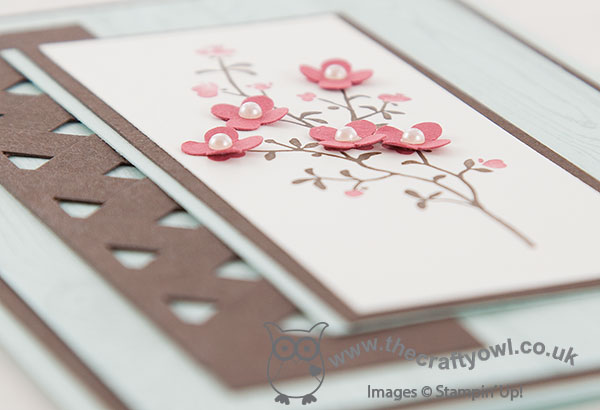
I used Soft Sky for my base and layered with a mat of Early Espresso and then a further layer of Soft Sky that I stamped with the Hardwood stamp in the same colour. I created a trellis using two pieces of Early Espresso punched with my Chevron Border punch and made the focal point of my card the cherry blossom from the Morning Meadow hostess stamp set, which I inked up with my Early Espresso and Primrose Petals marker pens then stamped onto Whisper White. I punched some flowers out of Primrose Petals cardstock using one of my Itty Bitty punches, added pearls to the centres and added these onto the stamped image on the largest flowers to add dimension and interest. I then matted this panel onto Early Espresso and added an off-centre panel of Soft Sky - this goes against the grain from a design perspective for me, but I needed to have the Early Espresso mat onto the Hardwood layer, yet broken with some Soft Sky on the opposite side so that the panel didn't just merge into the trellis and it looks so much better with than without, so convention is out of the window! I also chose not to use a sentiment on the front of my card as I didn't want to add another layer; I decided to keep my sentiment on the inside of my card.
I hope you like today's card; back tomorrow with another card. until then, happy stampin'!
Stampin' Up! Supplies Used:
by Joanne James24. May 2014 15:26I seem to be using a lot of my favourite brights this week and today I wanted to share a card that I made using the Colour Q challenge colours this week, one of my favourite colour palettes:
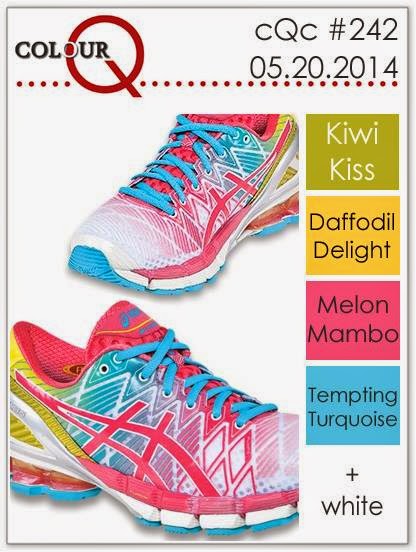
Aren't those trainers so cool?! You wouldn't get lost in the crowd wearing those, for sure! I took the inspiration for my card from their bold, vibrant pattern and this is what I came up with:
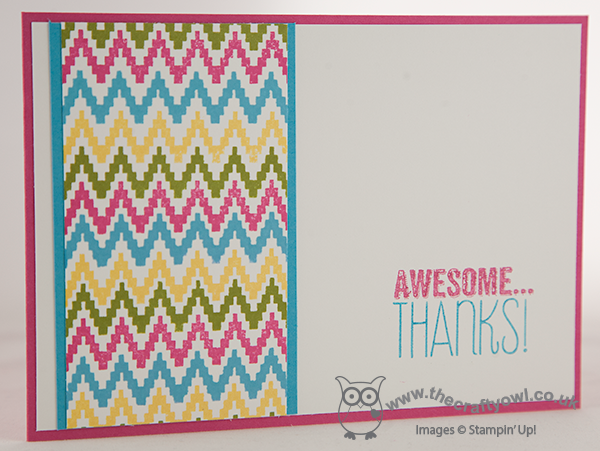
I decided to use one of the wave patterns from the Eye Catching Ikat photopolymer set to create a repeat pattern in the challenge colours (I subsitituted Kiwi Kiss with Old Olive as I don't have the former colour in my collection). I went with quite a simple layered layout, because I wanted the stamped pattern to be the focal point. I still can't quite believe just how easy the photopolymer stamps are to align without the need for a stamp-a-ma-jig - this pattern really didn't take long at all to create, so much so that I made two cards in record time, I just couldn't stop stamping! I mounted my patterned layer onto a strip of Tempting Turquoise. I inked my sentiment using my Brights Stampin' Write Markers, picking up the blue and the Melon Mambo of my card base to tie in with the overall design.
Don't forget, if you would like to own the Eye Catching Ikat stamp set, it is available free with a £60 order until the end of May, so you still have a week to get your order placed. Today is a busy day for me - trampolining parties to attend (Rebecca, not me!!) and a swimming gala this evening. Hope you are all enjoying your weekends. I'll be back tomorrow with another card; until then, happy stampin'!
Stampin' Up! Supplies Used:
by Joanne James23. May 2014 18:31
Just a quick reminder to let everyone know that the Clearance Rack has been updated and there are now lots of new items available, some with as much as 80% off. There are lots of festive papers and accessories and my most favourite ever Expressions thinlits dies too. So if you want to get a very early headstart on your Christmas projects, check it out now - I don't think some of these things will be around for long.
So, what are you waiting for - click here to go the clearance rack in my online store and grab a bargain whilst stocks last!
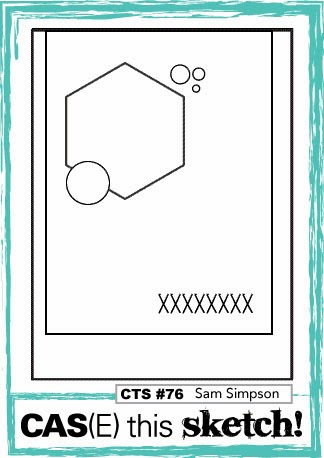
by Joanne James22. May 2014 15:30I had a hugely productive creative day yesterday (I love days like that!) and decided to have another go at a card with the sketch layout from CAS(E) This Sketch (although I'm too late to link up to this challenge with this sketch). I am linking up with Addicted to CAS though as I have another 'over the edge' birdie and today's card features the zingy colour palette over at Color Throwdown:
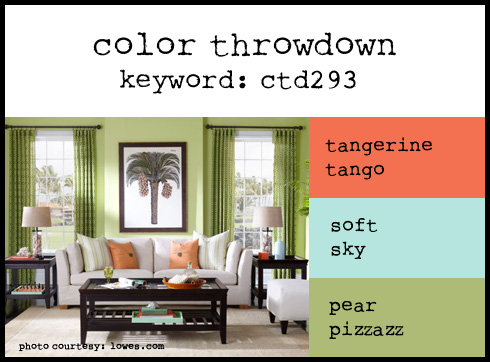
So using the color throwdown photo for inspiration, I decided to create a 'new home' card. There is only one set is the annual catalogue that features a new home welcome - the hostess set 'Sweetly Framed' - so I decided to create something using some punch art with an idea that I've had swimming around in my head for a while. Here's my card:
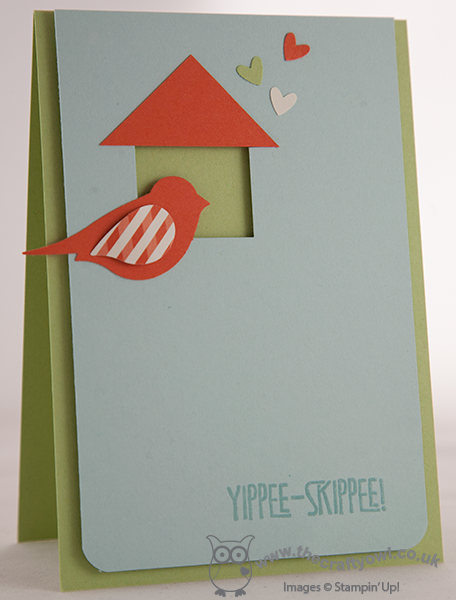
I used Pear Pizzazz for my base, and popped my Soft Sky panel up on dimensionals and created a little bird house by punching a 1" square out and topping with a Tangerine Tango triangle cut from half a square for the roof. I punched a Tangerine Tango bird using the bird punch and highlighted the bird's wing by using a scrap of Retro Fresh DSP, adhering with rolled glue dots to give some height. I added some punched co-ordinating coloured hearts punched with my owl punch. Lastly, what to use as a sentiment? I eventually decided on 'Yippee-Skippee!' from the stamp set of the same name, stamped in Versamark and heat embossed in clear powder - not quite 'Welcome to your new home', but it's exactly how I felt when I bought a new house, both times, so it seemed more than appropriate! Another very clean and simple card, created with just a few punches and a sentiment.
Back tomorrow with another project; until then, happy stampin'!
Stampin' Up! Supplies Used:
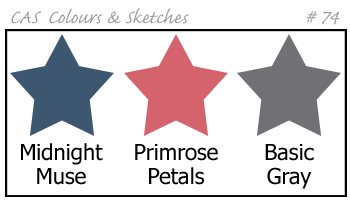
by Joanne James21. May 2014 16:41Today's card is a last minute entry for this week's CAS Colours and Sketches colour challenge, which is to use the following colours:
I also used the above sketch from CAS(E) This Sketch as my starting point, although I would be the first to admit that my card isn't the most literal of interpretations; the card I've prepared for tomorrow's blog post is much better! Here is my card:
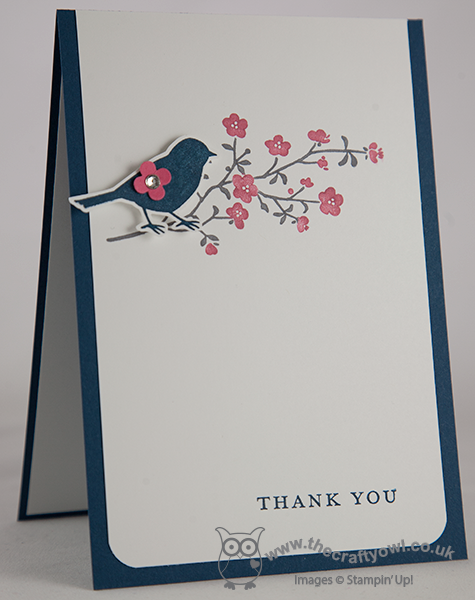
I decided to use the Morning Meadow hostess set for today's card - this set will only be available until the end of June, so if it's on your wishlist get in touch with me to book a party soon, otherwise you'll miss it. I inked the branch with my Basic Grey and Primrose Petals marker pens, then stamped the bird in Midnight Muse and fussy cut him and placed him on a dimensional, with a little rhinestone-centred punched flower for added interest. I allowed the tail of my bird to overhang the edge of the card - I think I'll join my card up to Addicted to CAS too, where the current challenge is 'off the edge'.
A quick post from me today; back tomorrow with another project. until then, happy stampin'!
Stampin' Up! Supplies Used:
by Joanne James21. May 2014 16:25It's Wednesday again and they're here: today's Wednesday Weekly Deals! This week's deals are included below - they will be available for one week only, before a new collection of deals is announced.
As always, if you want to take advantage of any of the deals on offer, you can support my business by placing your order online by clicking here or using the link to my store on the right hand side of my blog page where it says 'Shop Online' or with me in person. Don't forget to add the Hostess Code for May (you can find this under the 'Shop Online' section on the right).
Here's a summary of this week's one-week only Wednesday deals - click on each item to go to the online store to purchase:
Some great deals in there - classic notecard envelopes reduced to £3.71 per pack of 40, as well as ribbon in the soon-to-be-retired in-colours and glass glitter and sparkly brights brads - remember, it's never too early to stock up on supplies for Christmas projects!
Back later with today's creative post; until then, happy shopping!
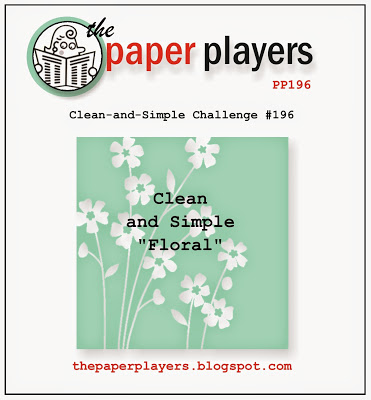
by Joanne James20. May 2014 21:20Good evening blog readers! Well, I really feel like I'm in catch-up mode this week, but I guess I shouldn't be too hard on myself - it is only Tuesday after all! Today I'm sharing a card I made for this week's sketch challenge over at Create with Connie and Mary. I kept the flower as per the sketch so I will also be linking up with The Paper Players, where this week's challenge from Ann is a clean and simple floral card and Less is More where the challenge theme is flowers:
Having played around with various floral sets, eventually I decided to dust off my 'Too Kind' set, as I haven't used it in a while and set about creating my card - here it is:

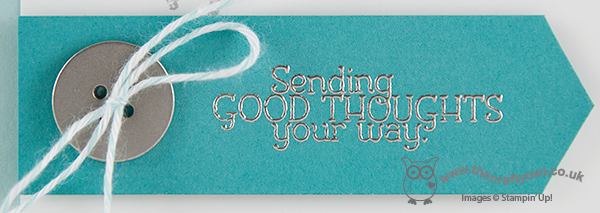
I chose an unconventional floral colour scheme, using blues and greys, but I think it works! I love the flowers in this stamp set - the two-step stamping really adds an extra dimension, which is perfect when you're trying to create a clean and simple card. A stamp-a-ma-jig makes light work of aligning the images though - this little tool is so useful! I decided to create a banner from the banner shape in the sketch and use it to highlight my sentiment which I heat embossed in pewter embossing powder, finished with a pewter button threaded with retired Pool Party baker's twine - here's a close-up:
I also added Dazzling Diamonds to my flower petals to give a little sparkle and shimmer. A really clean and simple floral card; not where I started out at all, but I really like the end result.
Back tomorrow with another project; until then, happy stampin'!
Stampin' Up! Supplies Used:
by Joanne James19. May 2014 19:19I haven't had any time for crafting today, so I'm going to share with you a simple pop up card designed by Monica Gale that I made at our quarterly training session last month and that I made with my ladies at our recent Fresh Prints All Day Craft Event - here is the outside of the card:
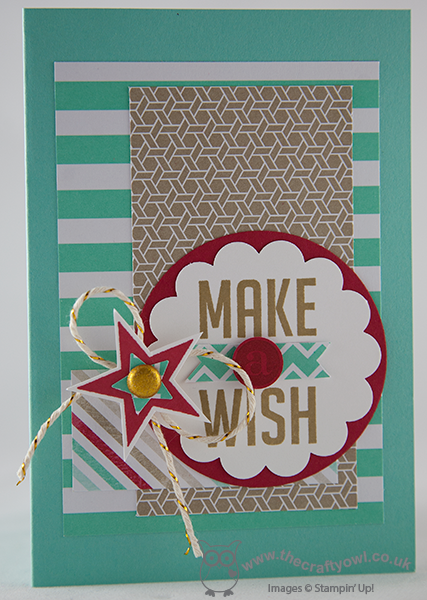
I added a few layers of Fresh Prints papers onto a Coastal Cabana card base, then stamped the 'Make a Wish' stamp from the Perfect Pennants set in Crumb Cake and punched out with a 2 3/8" Scalloped Circle punch layered onto a 2 1/2" circle out of Real Red cardstock, The banner was cut from a scrap of DSP and the 'a' stamped on red card and punched out and popped on a dimensional for added dimension. To decorate, I stamped a star from 'Simply Stars' in Real Red on Whisper White cardstock, added a DSP star using the Merry Minis star punch and secured with a gold glimmer brad with a twist of gold threaded baker's twine behind for a little added sparkle.
Inside the card there is a really simple little pop up made by cutting two short horizontal slits in the liner, which is made out of a notelet:
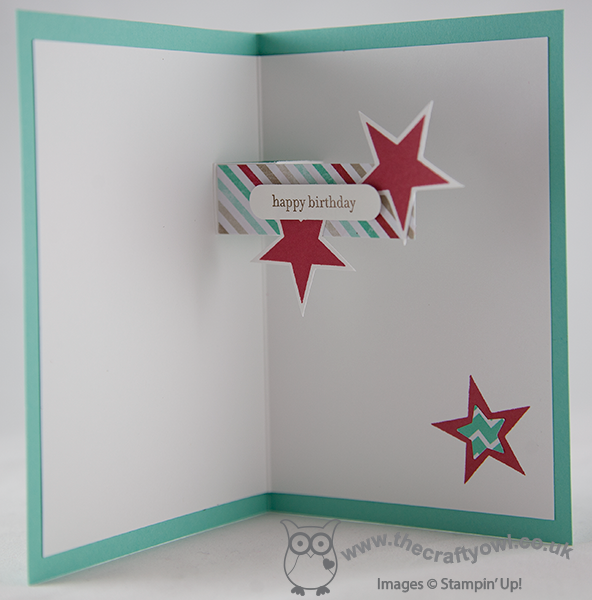
A few more stars and a simple birthday greeting and it's done - a fun little pop card suitable for either gender. I'm hoping to get into my craft room tomorrow and catch up on my crafting, although there is a big basket of ironing competing for my attention, so might need to get that out of the way first!
Either way, back tomorrow with another project; until then, happy stampin'!
Stampin' Up! Supplies Used:
by Joanne James16. May 2014 17:55I have had the busiest day today - last minute preparations for the Stampin' Up! UK Regional Training Event in Telford tomorrow coupled with lots of little jobs. Best part of my day though was getting to spend an hour in the sunshine watching Rebecca's team win their second rounders match of the week (go girls!) and I'm even managing to squeeze in a quick blog post, which I thought might be touch and go today!
I have had a few baby cards to make lately, all of them girls, but I know someone who is due a baby boy anytime soon so thought I would get ahead for once and make my card ready. I decided to make a monochrome boy card to pair with the monochrome girl card I designed a couple of weeks ago for the Pals Paper Arts 200th anniversary challenge (you can see my original baby girl card here). Here is today's card:
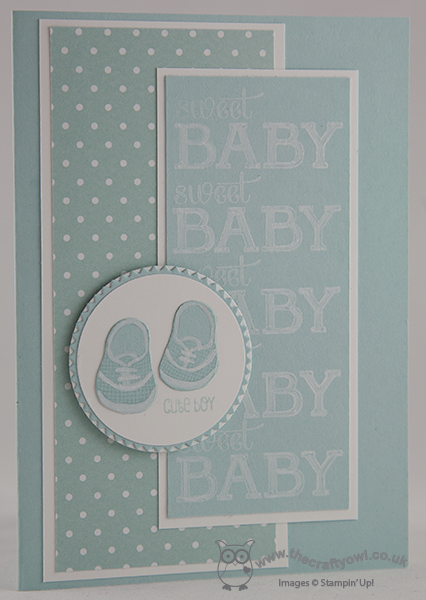
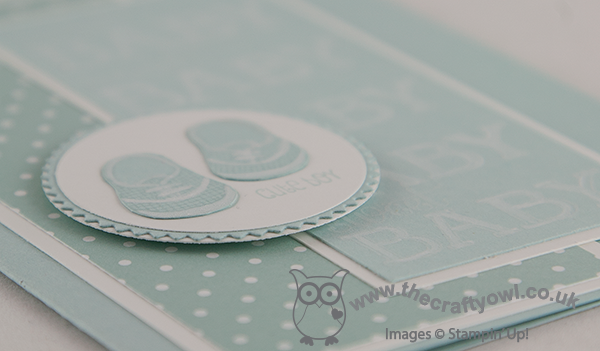
Using a Soft Sky base, I matted both of my cardstock layers on Whisper White and used a piece of Polka Dot DSP from the Subtles DSP stack for panel 2, whilst for panel 3 I stamped the 'sweet baby' stamp repeatedly in Whisper White onto Soft Sky cardstock - a stamp-a-ma-jig is essential for this - and coloured the word 'baby' with my chalk marker to give it a powdery look. Lastly, my focal point is the cute little boy shoes that I fussy cut and decorated with my chalk marker; to finish I layered this circle on a blue starburst mat and a further white circle.
Another pastel monochrome creation - not quite as fussy as the little girl one, but then in my experience boys never are!
Back tomorrow with another card and news of what's been happening at the regional event; until then, happy stampin'!
Stampin' Up! Supplies Used:
996af647-2d57-4ea6-ba5c-3ad558d82aae|0|.0|96d5b379-7e1d-4dac-a6ba-1e50db561b04
Tags: Baby cards, Baby We've Grown, Stampin' Up Supplies, Stampin' Up Card ideas, Stampin' Up Card, Starburst Framelits, Stampin' Up, Stamp-a-ma-jig, Shop online, Big Shot, Magnetic Platform
Cards | Stamping
by Joanne James14. May 2014 21:40I've had a busy couple of days preparing swaps and finishing my preparations for the Stampin' Up! event at Telford on Saturday and I've still got more to do! Today I'm sharing my card for this week's challenge over at Less is More, where Chrissie and the team are looking for one layer thank you cards. I decided to try something something a little different, using my retired but never-to-be parted with Expressions Thinlits. Here is my card:
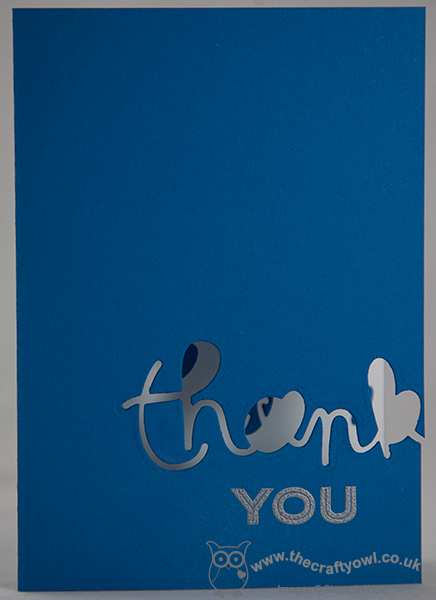
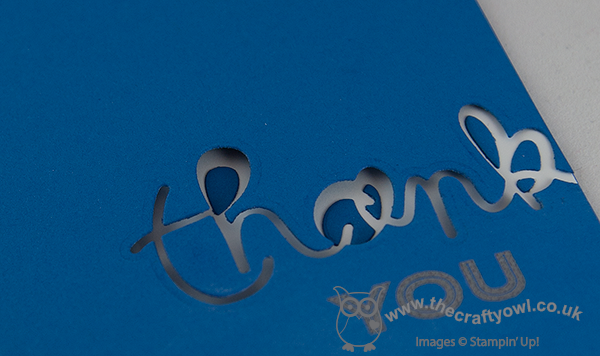
I decided to make a thank you card that would be suitable for a male, or at the very least gender neutral - so I went for a nice bright blue. Now I know the eagle-eyed amongst you are thinking - but the framelit says 'thankful', right? Well that's true - as I only wanted the 'thank' part, I positioned it over the edge of the card and cut it to the edge so that it looks as if the writing is going off the edge of the card. I adhered the cut-out pieces from the middle of the word to the inside of the card, to maintain the definition of the lettering - you can see it more clearly on the photo below:
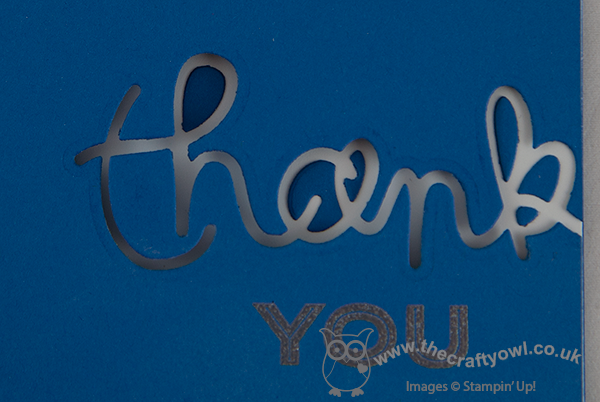
To finish my sentiment, I inked up the 'you' from the 'thank you' sentiment in the 'Simply Celebrate' set and heat embossed it with silver embossing powder. A clean and simple thank you card that's just a little bit different! I'm also linking my card up to 'Addicted to CAS', where the current challenge is appropriately 'off the edge'. Right, I'm off to get my nails done!
Back tomorrow with another project; until then, happy stampin'!
Stampin' Up! Supplies Used: