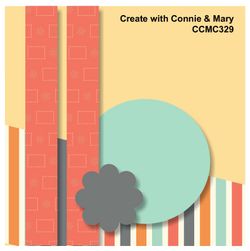
by Joanne James11. June 2015 08:00It's Thursday and time for a new challenge over at Create With Connie and Mary. Today we have a new sketch challenge for you:
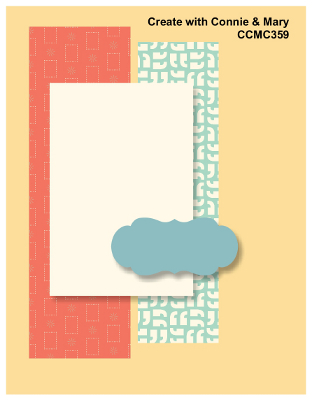
When I made this card I was still waiting for my box of new catalogue goodies to arrive, so was rather restricted in terms of supplies - I was actually missing having a selection of DSP for all those layers! I decided to go with a rather loose interpretation of the sketch and build the layers using stamps; here's my card:
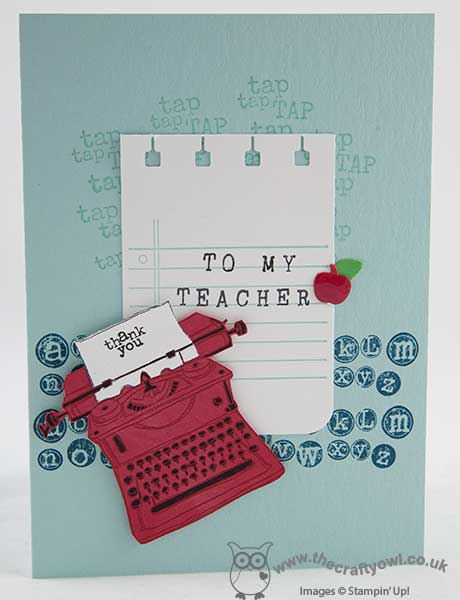
I decided to rotate the sketch through 90 degrees, although I stuck with the vertical shape, and use the 'tap tap tap' stamp set and create a teacher thank you card. I stamped the first two panels onto my Pool party base with the alphabet stamp in Island Indigo and the tap tap in Pool Party. I used a piece of Whisper White stamped with the notepaper stamp in Pool Party for my central panel, rounding the corners with my Project Life corner rounder. I also punched the top with my now retired spiral border punch, but you could just as easy leave this edge straight. I stamped 'TO MY TEACHER' using my Rotary Alphabet stamp - so useful for bespoke messages and sentiments - and added a bright Real Red typewriter that I stamped in Versamark then heat embossed in clear, then coloured the keys in with my black Stampin' Write marker.
There are two fun elements to my card that you might be wondering where they came from: the red apple and leaf is punched using my new Tree Builder punch and painted with Crystal Effects for added shine and secondly, the thank you sentiment on my paper pieced paper in the typewriter. This isn't one of the sentiments that comes with this set - I created it by using my stamp-a-ma-jig and inking a combination of parts of the other sentiments in the set to spell 'thank you'. The 'a' is from the word 'tap' - and I love how it stands out slightly from the others, it looks like a proper old typewriter font.
If you would like to see a more literal interpretation of this week's sketch, I also used it for yesterday's card which you can see here. Looking forward to seeing what you do with our sketch this week. As for me, I have a team meeting planned today and a bunch of household chores. I'll be back tomorrow with more creative inspiration for you. Until then, happy stampin'!
Stampin' Up! Supplies Used:
- Tap Tap Tap Clear-Mount Stamp Set
- Punch Corner Project Life
- Tree Builder Punch
- Clear Stampin' Emboss Powder
- Embossing Buddy
- Heat Tool (Uk)
- Versamark Pad
- Crystal Effects
- Island Indigo Classic Stampin' Pad
- Pool Party Classic Stampin' Pad
- Pool Party A4 Cardstock
- Real Red A4 Cardstock
- Basic Black Stampin' Write Marker
- Whisper White A4 Cardstock
- Alphabet Rotary Stamp
- Tuxedo Black Memento Ink Pad
by Joanne James4. June 2015 08:00It's Thursday and time for a new challenge over at Create With Connie and Mary and this week we have a colour challenge for you:

I decided to do a little watercolouring with one of my favourite sets from the new catalogue - a hostess set called 'Best Thoughts':
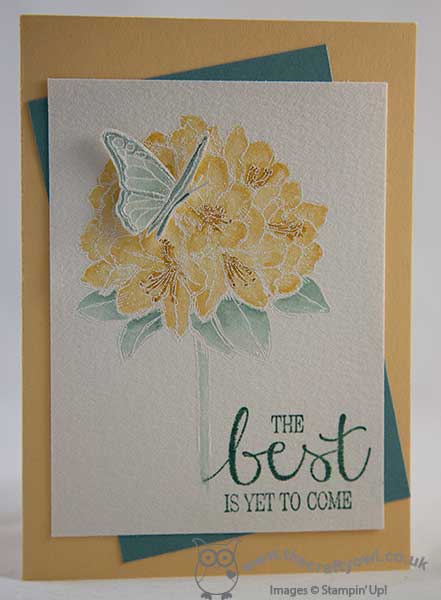
I went for a simple layout using a base of So Saffron and an offset panel of Lost Lagoon, then stamped the flower image in Versamark and heat embossed it in white. I stamped the sentiment directly in Lost Lagoon, then used my aquapainter and all three colours to ink my flower. I did the same with the butterfly on a separate piece of watercolour paper and when dry, applied some Dazzling Diamonds to his wings using my two-way glue pen then fussy cut him out and popped him up on a dimensional so it looks as if he has landed on the flower.
I wasn't sure if these colours would work for this card, as you don't really see yellow hydrangeas, however I think this flower looks great in any colour and this colour combination, whilst unusual, is really effective. This is such a beautiful set and is exclusive to customers who host a party (or place an individual order of £150 or more). If you would like to host a Stampin' Up! party and earn this set for free, please do get in touch - I would love to share the loveliness of the new catalogue with you and your friends. Or perhaps you would be interested in joining my Stampers 6 Club - I am just about to start another round so if you would like to get on board, this is perfect timing.
I do hope you like today's card; the rest of the team have used these colours in so many different ways, so do pop by their blogs for even more inspiration. I look forward to seeing your work in our gallery this week. I have another busy day today with a couple of functions to attend; back tomorrow with another project. until then, happy stampin'!
Stampin' Up! Supplies Used:
- Best Thoughts Clear-Mount Stamp Set
- Watercolor Paper
- Embossing Buddy
- Versamark Pad
- White Stampin' Emboss Powder
- Heat Tool (Uk)
- Aqua Painters
- Lost Lagoon Classic Stampin' Pad
- Hello Honey Classic Stampin' Pad
- Lost Lagoon A4 Cardstock
- So Saffron Classic Stampin' Pad
- So Saffron A4 Cardstock
9f2f0cdb-9b51-4614-b644-becef5660478|1|5.0|96d5b379-7e1d-4dac-a6ba-1e50db561b04
Tags: Best Thoughts, Earn Free Product, Earn Free Products, Host a Party, Watercolouring, Stampin' Up Supplies, Stampin' Up Card ideas, Stampin' Up Card, Stampin' Up, Stampers 6 Club, Shop online, Create With Connie And Mary
Cards | Host a Party | Stamping
by Joanne James31. March 2015 22:16Well, what a Sale-A-Bration this has been! I have enjoyed it immensely - some of the best free products we've seen as part of this promotion and I would like to thank everyone who has shopped with me, hosted a party or joined my team during the last 3 months. Today I wanted to share some little packages I made last month for my recent Stampers Six Club customers and new recruits using the Mini Treat Bag Thinlits Dies. I've had to make quite a few of these so I was glad to be able to make good use of some of the fabulous Best Year Ever paper I earned free during Sale-A-Bration:
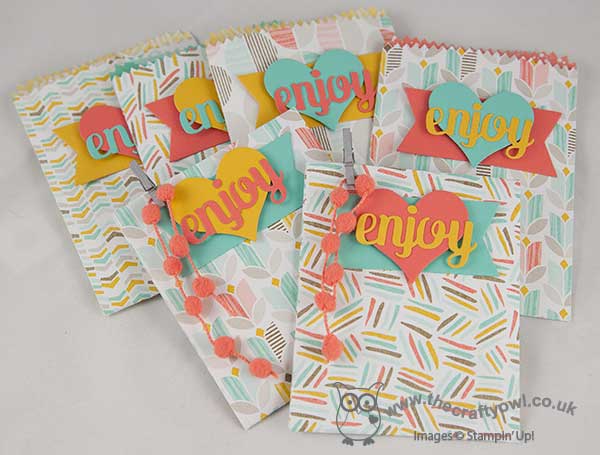
These treat bags are so easy to make and come with a range of fun thinlit pieces that can be used to decorate them or embellish cards or other projects. I kept these quite simple, with a layered panel on the front in co-ordinating cardstock and added some Calypso Coral pompom trim to the decoration with a mini peg to hold the bags shut - here's a close-up:
Whilst the paper may no longer be available, the Mini Treat Bag Thinlits Dies are in the seasonal catalogue and still available until 2nd June and there are a whole bunch of other DSPs available that would look just as good. These bags really are so cute and it's easy to make lots of these in no time at all; they would make great party bag favours too.
That's me done for today; back tomorrow with a fun card and news of a new set of Wednesday Weekly Deals. Until then, happy stampin'!
Stampin' Up! Supplies Used:
84cc1cf7-561c-4905-b19c-e62f9477f136|0|.0|96d5b379-7e1d-4dac-a6ba-1e50db561b04
Tags: Best year Ever, Sale-a-bration, Sale-A-Bration 2015, Promotions, Shop online, Stampin' Up, Stampers 6 Club, Stampin' Up Card, Stampin' Up Card ideas, Stampin' Up Supplies, Mini Treat Bag Thinlit Die, Big Shot
3D Projects | Promotions | Sale-a-bration
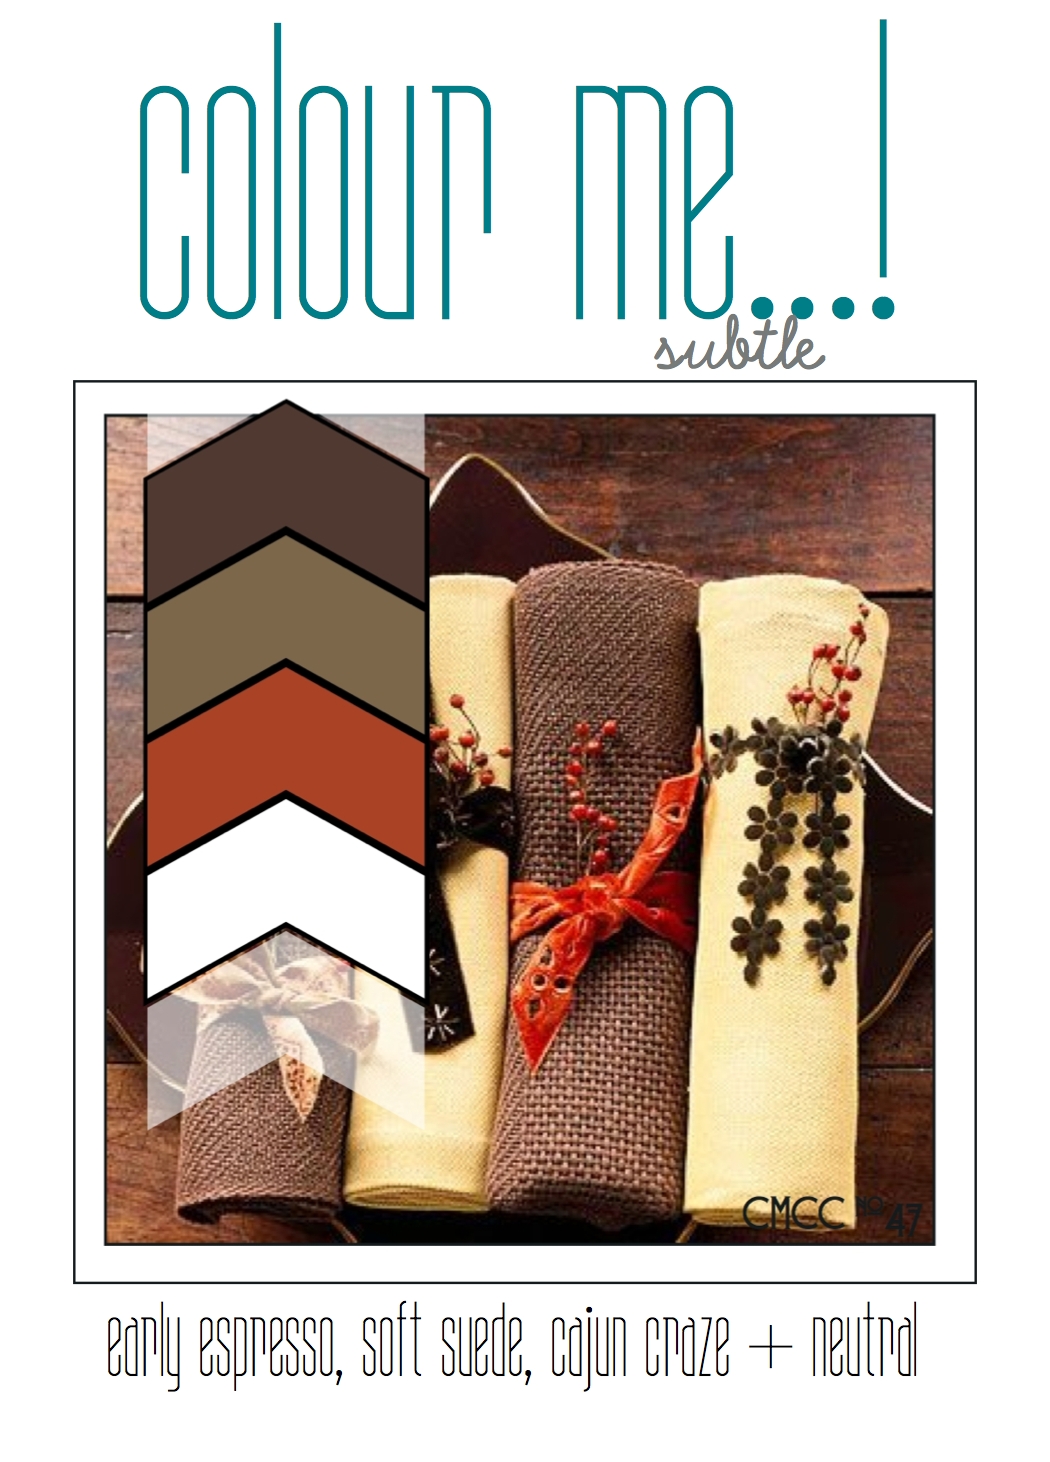
by Joanne James19. November 2014 08:57Today's card is for this week's Colour Me...! card challenge where we have are working with a subtle palette of autumnal browns:
I also decided to use the rather unusual sketch layout over at Create With Connie and Mary for my card this week. Here is my card:
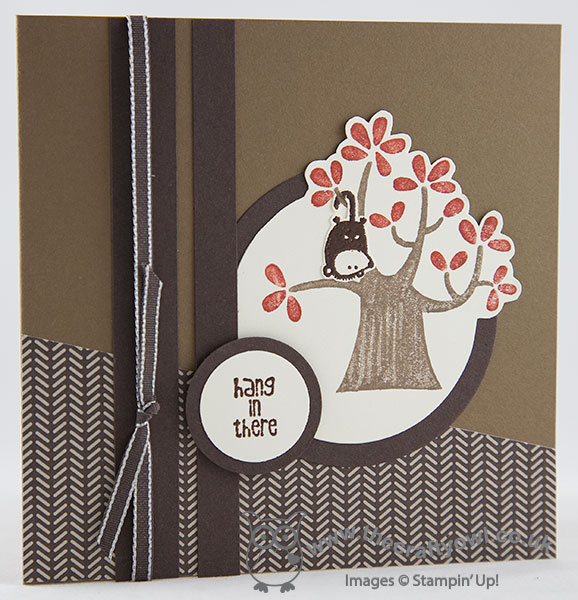
I used Soft Suede as my card base and layered a piece of paper from the Trim The Tree DSP stack at an angle across the bottom of the card. For the main image, I used the tree from the Nuts About You hostess set and having inked it up with my Soft Suede and Cajun Craze Stampin' Up! markers, stamped in out onto very Vanilla cardstock and partially cut out using my circle framelits, fussy cutting the leaves so that they would overhang the edge of the circle. I deliberately created a streaky finish on the tree truck to make it look a little bit like tree bark. I stamped both the sentiment and little creature (is it a possum? I'm really not sure what he's supposed to be, but he's cute all the same!) in Versamark and heat embossed them with Early Espresso embossing powder. I fussy cut the animal and adhered him over the tree so that he looked like he was 'hanging in there'. I finished with some strips of Early Espresso and a piece of retired Early Espresso taffeta ribbon to complete my card.
I made this card for a female friend who is having a tough time of it recently and I wanted to send her a little something to brighten her day and just let her know I was thinking of her. I really liked the finished card, then I read on a blog somewhere this week that it was the author's view that a thinking of you/get well card should always be in brighter colours to lift the recipients mood. As someone who was entirely happy with her card until I read this, and who also loves bright colours, I'm now having second thoughts - maybe I should remake it with something less subtle; what do you think? Either way, I still love today's card!
Feel free to leave a comment on today's card, before hopping over to check out the amazing cards by the rest of the Colour Me...! team:
We look forward to seeing your striking creations - what do these colours inspire you to create?
Back tomorrow with another project; until then, happy stampin'!
Stampin' Up! Supplies Used:
2b88f6d9-3d40-41ef-9196-a5f5a9f0f3cc|0|.0|96d5b379-7e1d-4dac-a6ba-1e50db561b04
Tags: Circles Framelits, Big Shot, Nuts About You, Host a Party, Trim The Tree, Stampin' Up Supplies, Stampin' Up Card ideas, Stampin' Up Card, Stampin' Up, Stampers 6 Club, Shop online, Colour Me...!
Cards | Stamping
by Joanne James27. July 2014 08:00Good morning everyone - it's Sunday and time for my Design Team card over at The Paper Players where Ann has a great sketch challenge for us this week:
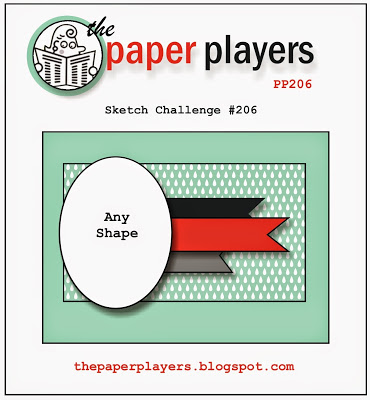
Now I love a sketch challenge and often I follow a sketch completely to the letter. Today is something of the exception to the rule though - when I saw the 'any shape' piece, I really wanted to use one of the flowers from the Bloom with Hope hostess stamp set that I had coloured with my set of Cherry Cobbler Blendabilities. As a consequence though, the layers didn't work for me - so I switched them about and offset them - I hope Ann doesn't mind! Take a look at this week's card to see what I mean:
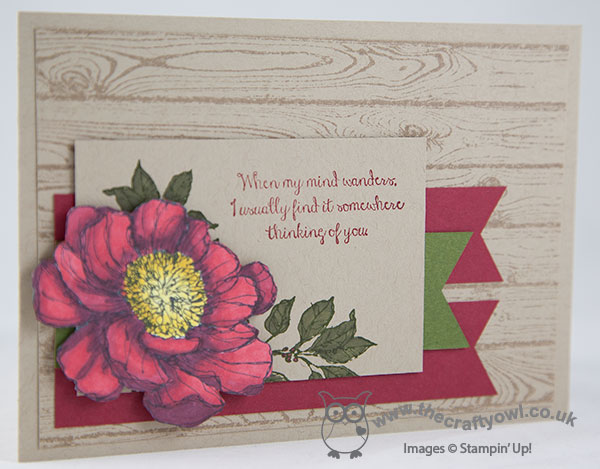
I wanted my flower to take centre stage so went with a neutral Crumb Cake card base, with a Hardwood stamped mat. I really wanted to use a sentiment alongside my flower - this stamp set has a great selection of really useful ones, but to follow the sketch literally I would have needed to stamp my sentiment on one of the banner flags to be seen, but this didn't work as I wanted them to bring some additional colour to my card. So I decided to tuck my banners behind my central rectangle; this allowed me to both stamp my sentiment onto it and add some leaves, which I stamped in Mossy Meadow and coloured with my Old Olive Blendabilities (they work on coloured cardstock too!). Here's a picture of my fussy cut flower, coloured with Cherry Cobbler and Daffodil Delight Blendabilities, in all its glory:
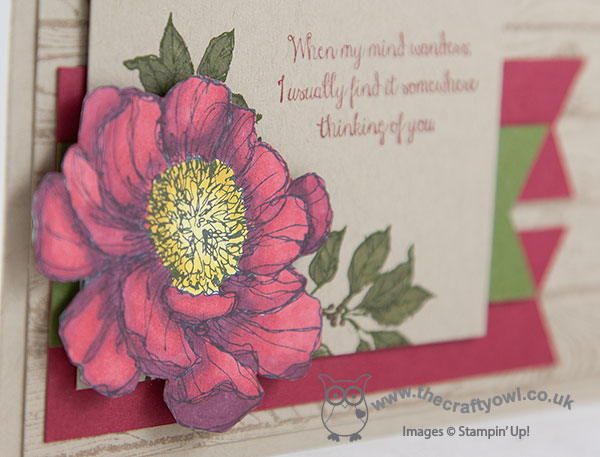
Isn't it just lovely? I'm still getting used to my alcohol markers and how they differ from water-based colouring. I am no expert (yet!) but I think this flower shows you can get great results without much experience - it looks much more 3D than with ordinary markers and a blender pen. I have a little tip for you too - when you fussy cut a coloured flower like this one, you invariably end up with some white that shows around the cut edge. If you run your marker around the edge of the flower, it takes that away and makes your flower look just a little more finished.
If you would like to know more about Blendabilities, do check back for more hints, tips, techniques and tricks as I learn what works best. Better still, if you live in Northampton and the surrounding area, get in touch about attending my August card class where we will be using Blendabilities, along with the lovely Blended Bloom stamp. Also, if the 'Bloom with Hope' set has caught your eye and you would like your own set, do get in touch to book to host a party or enquire about my new Stampers 6 Club that is beginning next month: for a monthly commitment of £25 a month for 6 months, you get to be the hostess one month and enjoy a minimum of £25 hostess credits to spend free on anything in the catalogue, including hostess sets. Party freebies without needing to actually invite your friends round! There is one space left in this current club - get in touch if you'd like it to be yours!
Do pop on over to The Paper Players blog to see what everyone else did with this sketch - there are some great cards there this week! I'll be back tomorrow with another card; until then, happy stampin'!
Stampin' Up! Supplies Used:
by Joanne James25. July 2014 08:00Yay it's Friday already! Today I'm sharing my card for this week's theme challenge over at Less is More where it's all about taking inspiration from the song 'Singing in the Rain'. Given the glorious weather we've been having in the UK of late, I'm just hoping today's card isn't tempting fate! Here it is:
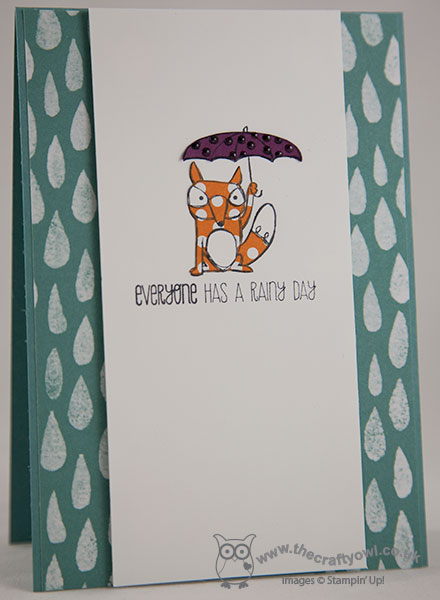
I don't have many stamps that fit with the theme of rain, even less so singing in the rain, but I have been wanting to use this sheet of DSP from the Moonlight DSP stack on something to do with rain as the pattern says 'raindrops' to me, so this seemed like a good opportunity. I also found this cute little fox with an umbrella in one of the new hostess sets, Life's Adventure, so this gave me enough to get started.
I actually took much of my inspiration from Sarah's card this week, as she had a cute paper pieced duckling on her DT card and I decided to do a little paper piecing of my own. I stamped the fox onto the card layer, then again onto some spare white cardstock, onto a piece of Pumpkin Pie retired dotty paper and lastly the umbrella onto a piece of Rich Razzleberry. I then cut each out carefully with my paper snips and paper pieced them together - you can see the detail on the picture below, including the Crystal Effects that I added to the spots on the umbrella (I think they look more like raindrops!)
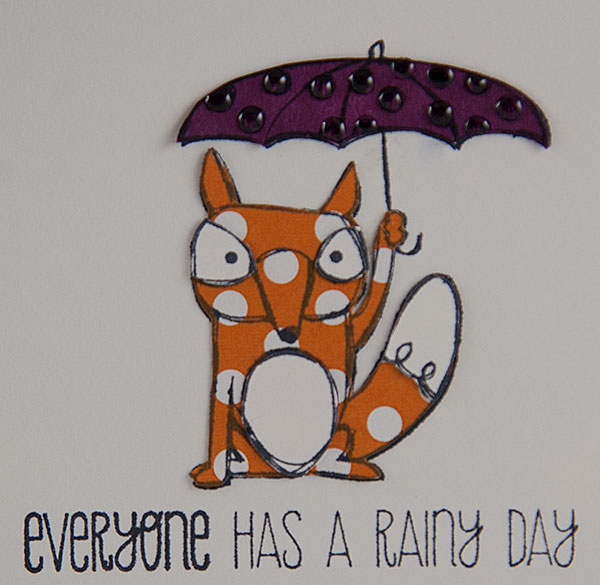
Cute, eh?! Whilst this card is all about the rain, I'm sure the bright colours would cheer someone up who was feeling a little down - I'll let you know when I eventually send it to someone, assuming I remember! Life's Adventure is an exclusive hostess stamp set, that you can only purchase if you either host a Stampin' Up! party or are a member of my Stampers 6 Club: for those of you that haven't heard of this before, this is where you commit to a minimum spend of £25 per month for 6 months and then in one month o the 6 you get to be the hostess, with a minimum of £25 of free hostess credits to spend. A virtual party, if you will, with none of the hassle of hosting or inviting your friends around if that's not your thing. I am starting a new Stampers 6 Club in August and currently have one space left - if you would like to participate, then get in touch. Once this last space has been filled, I will begin collating a waiting list for an additional Stampers 6 Club so either way you've nothing to lose.
Back tomorrow with another project; until then, happy stampin'!
Stampin' Up! Supplies Used: