Penned Flowers Thank You in Pretty Peacock and Gold

by Joanne James16. February 2023 14:00

Today I'm sharing a card I made to squeak in an entry for this week's Just Us Girls Challenge using the colour combo over at AAA Cards and the Paper Craft Crew layout:


So the best thing to add sparkle to a card? Glimmer paper, of course! No shed, no mess - it's the best! I chose some gold glimmer paper (sadly now retired again, but every time it comes back I grab some to keep me going!) and paired it with some (retired) Pretty Peacock ink and cardstock for a clean an simple card using a bundle I haven't used in ages - take a look:


Here's the low-down on today's card:

I stamped the posy image from the 'Hand Penned Petals' stamp set directly onto my cardfront for a tone-on-tone effect, then added a strip of (retired) designer paper that I sponged in ink to dull the white pattern and trimmed this with a border cut from distressed gold paper. I then diecut the same posy image from gold glimmer paper and popped it on dimensionals, slightly offset from the stamped image:

I heat embossed my sentiment in gold and added a trio of gold enamel dots for a final touch of sparkle.

Were you a fan of Pretty Peacock when it was an in-colour a few years ago? If so, I have some news for you! This colour, along with one other previous retired in-colour, Lost Lagoon, are returning with the launch of some Online Exclusives on 1st March - this will be a rolling collection of products that will only be available online. I'll have more on that at the start of March - if you can't wait that long, do get in touch; for those who join Stampin' Up! before the end of this month, there is the opportunity to order these items that are currently on pre-order as part of your starter kit - another reason to join Stampin' Up! sooner rather than later!

Here is the visual summary of the key products used on today's project for you to pin for easy reference:


You can see all of my 'How To' summaries on my 'How To - Tips and Techniques' Pinterest board in case you've missed any. 

Enjoy your day and I'll be back tomorrow with another project. Until then, happy stampin'!


Stampin' Up! Supplies Used:

Table built using Product Table Builder by The Crafty Owl - Independent Stampin' Up! Demonstrator.

Loveliest Layers Coral CAS Hello Card

by Joanne James15. February 2023 18:06

It's half term week so with the kiddos around, I haven't had much time for crafting or blogging, but I am popping by today I'm sharing a card that I made for a couple of challenges that are allowing me the opportunity to indulge my new-found love of stencils:


The team at AAA Birthday are asking for birthday cards featuring stencils and the team at Inkspirational are also using stencils - with an optional addition of splatter. I went all-in and used both on my card - take a look:


Here's the low-down on today's card:

Nothing too complicated here: I stencilled my flower using the Loveliest Layers Decorative Masks in Petal Pink and Calypso Coral, with leaves in Soft Succulent, then added splatters both with a Soft Succulent marker and a mix of adhesive and water, that I then sprinkled with gold and heat embossed. You can see that detail more closely below:


I finished my card with a fussy cut gold heat-embossed sentiment that continues inside my card with 'and wishing you a happy birthday' and a trio of enamel dots. I don't usually add splatters to my clean and simple cards, but I quite like the effect for a change. 

Here is the visual summary of the key products used on today's project for you to pin for easy reference:


You can see all of my 'How To' summaries on my 'How To - Tips and Techniques' Pinterest board in case you've missed any. 

Enjoy your day and I'll be back tomorrow with another project. Until then, happy stampin'!


Stampin' Up! Supplies Used:

Table built using Product Table Builder by The Crafty Owl - Independent Stampin' Up! Demonstrator.

Adorable Owls Baby Card PP627

by Joanne James12. February 2023 08:00

Today it's Sunday and time for this week's new challenge over at The Paper Players! It's the turn of the fabulous Ann to host this week and she has a fresh colour challenge for us to work with:


I thought these colours were perfect for a card to welcome a new baby so I grabbed Linda's layout over at Freshly Made Sketches and my 'Adorable Owls' stamp set and set to work. I This is what I came up with:


Here's the low-down on today's card:

I added a piece of Balmy Blue Country Gingham to the lower portion of my cardfront, then added a horizontal panel of clouds cut using the Basic Borders Dies. I stamped and coloured two owls in the challenge colours with my Stampin' Blends, then fussy cut them out. I sat my baby owl on her own cloud, courtesy of the Give It A Whirl Dies, popped up on dimensionals, then added my second owl. My baby owl has a pink bow since Rebecca's piano teacher has just become a father to a beautiful daughter named Harriet, so this card will be winging its way to him to congratulate the family on their new arrival. My heat-embossed sentiment is from the 'Charming Sentiments' bundle, which I diecut with the co-ordinating dies: 

These sentiments come in two halves - I used the second one on the inside of my card:

'Adorable Owls' is such a cute stamp set and even better because it's free with a £45 order during Sale-A-Bration which runs until the end of the month - got to love a free stamp set, right?!

Here is the visual summary of the key products used on today's project for you to pin for easy reference:


You can see all of my Product and 'How To' summaries on my 'How To - Tips and Techniques' Pinterest board in case you've missed any. 

Before you reach for your ink and papers, check out what our amazing team has created to inspire you this week:

Here's a quick recap of our challenge rules:
 
1.  Create a new paper project
2.  Upload your creation to your blog with a link back to us and provide a direct link to the post featuring your challenge submission.
3.  Please link your card to no more than four challenges, TOTAL.
4.  Have FUN!

Enjoy your day; the James Juniors are on half term this week, so this will be a week of exam revision mixed with a little R&R before getting back to it. I'll be back tomorrow with another project. Until then, happy stampin'!


Stampin' Up! Supplies Used: 

Table built using Product Table Builder by The Crafty Owl - Independent Stampin' Up! Demonstrator.

Happy Galentines Day Hearts Cards

by Joanne James11. February 2023 20:00

Today I've a quick post to share a couple of cards I made using this week's Color Throwdown palette and SUO Challenges #SUOC319 theme of Galentine's Day:


I created two cards in the same design - take a look:


This card uses some striped Country Floral Lane DSP in Sweet Sorbet; I also created a second, brighter version, using Poppy Parade and some retired host DSP from the previous mini catalogue:


The coolest thing about both cards is the sentiment:


I made a custom 'Happy Galentine's Day' sentiment using the Valentine's stamp in the 'Love For You' stamp set and stamping it by masking the 'v' and heat embossing the sentiment in gold, then selectively masking the 'g' in the word 'gets' on one of the other sentiments in the set and then heat embossing for a second time. This results in the perfect sentiment for the occasion:


A few gold enamel shapes added a final touch of sparkle to my cards. Finally, here's a photo of both cards together:


Galentine's Day is traditional celebrated on 13th February - will you be sending girly greetings to the women in your life?

Here is the visual summary of the key products used on today's project for you to pin for easy reference:


You can see all of my 'How To' summaries on my 'How To - Tips and Techniques' Pinterest board in case you've missed any. 

Enjoy your evening; I spent the day at the side of the hockey pitch again; spring is clearly on the way - I managed a short coat and could still feel my toes when the final whistle blew - progress! I'll be back tomorrow with another project. Until then, happy stampin'!


Stampin' Up! Supplies Used:

Table built using Product Table Builder by The Crafty Owl - Independent Stampin' Up! Demonstrator.


Daffodil Daydream Vellum Daffodils Easter Card AYSI 292

by Joanne James10. February 2023 12:00

Today I'm sharing my design team card for our new challenge over at As you See It where it's time for a seasonal 'fill in the blank' challenge:
 

My favourite thing about Spring - this was an easy one! I always know that spring is on its way when I see daffodils poking their heads through the soil and there is something so cheery about their trumpets nodding in the wind, in their various shades of yellow. I love a tulip too, but as a Welsh person my national flower will always win out. So I grabbed my 'Daffodil Daydream' stamp set and set to work. I have made many cards with this set, and I'm sure that flowers will be a popular choice for Deborah's fill in the blank challenge this week, so I set out to create with mine in a different way. Inspired by a number of cards I'd seen on Pinterest using other kinds of flowers, this is what I came up with - take a look:
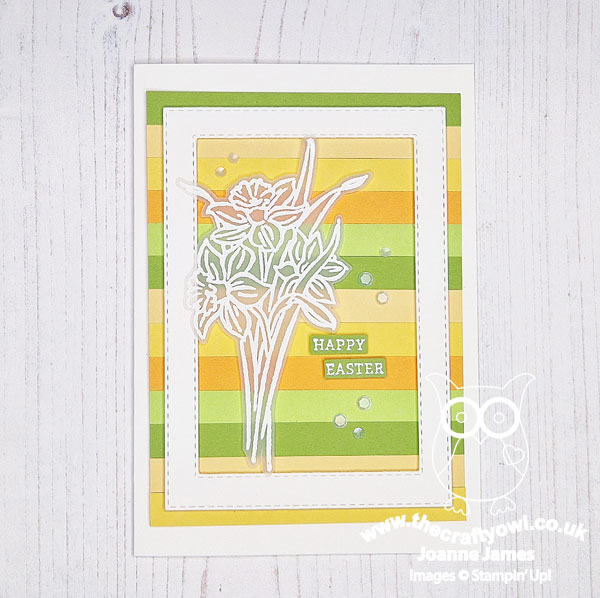
 

Here's the low-down on today's card:

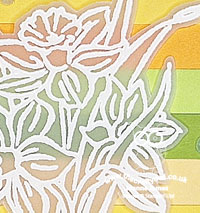
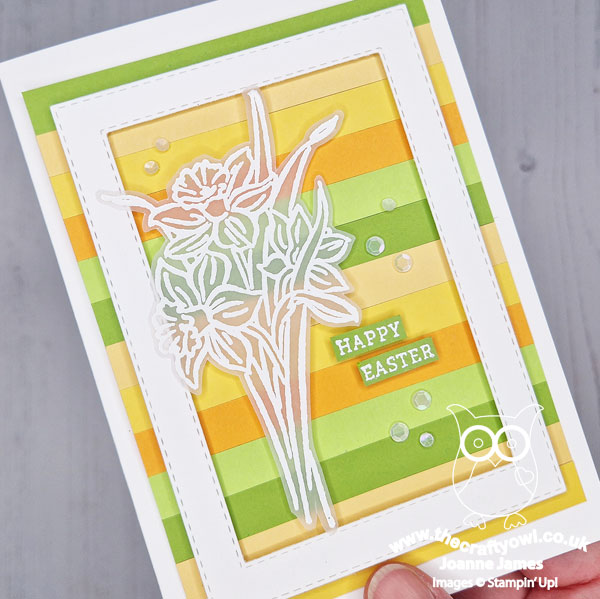
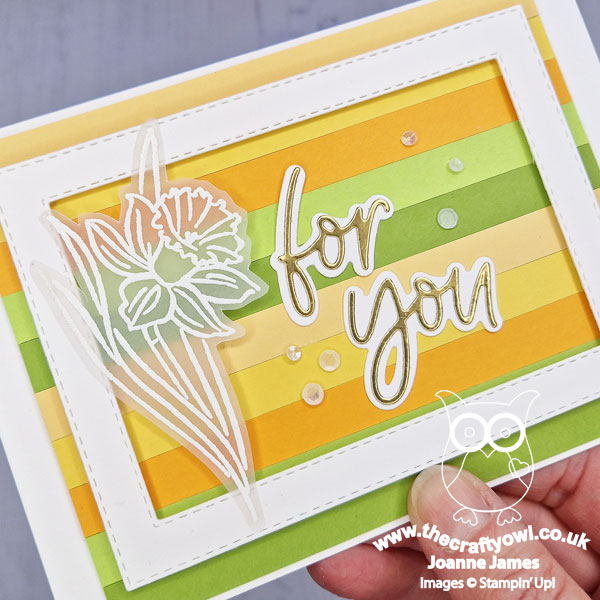
Ring The Changes With Vellum - I decided that instead of stamping and colouring my daffodils, I would heat emboss them in white onto vellum. For those of you that are not big fans of colouring, this is a great alternative way to use those line-drawn stamps. I wanted them to stand away from my background, so used a white frame made using my stitched rectangle dies and carefully adhered the points of my vellum flower to the frame, adding a small foam pad beneath the leaf that sits directly on the background as it can't be seen beneath the embossing.

Use Up Those Scraps - I used a selection of stripes measuring 1cm in width in a repeating pattern to add colour to my card, using the five colours I would have used if I was colouring the image. This is a great way to use up scraps that are leftover from other projects - we all have these random strips, don't we? My top tip for creating this kind of background is to cut a piece of white cardstock slightly smaller than your desired finished size and glue your strips to this before trimming the edges to size to create a neat finish. I added a sentiment combined from the two in the set, along with a scattering of clear sequins to complete my card:
A Daffodil Pair - I loved this card so much, I created a second one using the other daffodil in the set too. This time I rotated it from portrait to landscape, as the single daffodil is smaller:
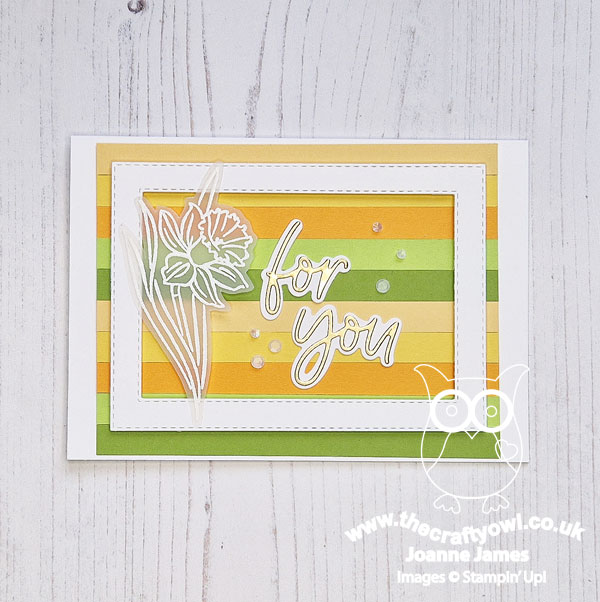
 

I paired this with a layered diecut sentiment from my favourite Love For You Dies, for a card that could work for any occasion - I will probably send it to one of my dearest old school friends for St David's Day on March 1st - I know she will appreciate it! Check out the detail below:
 

Here's a photo of both cards together - which one do you prefer?
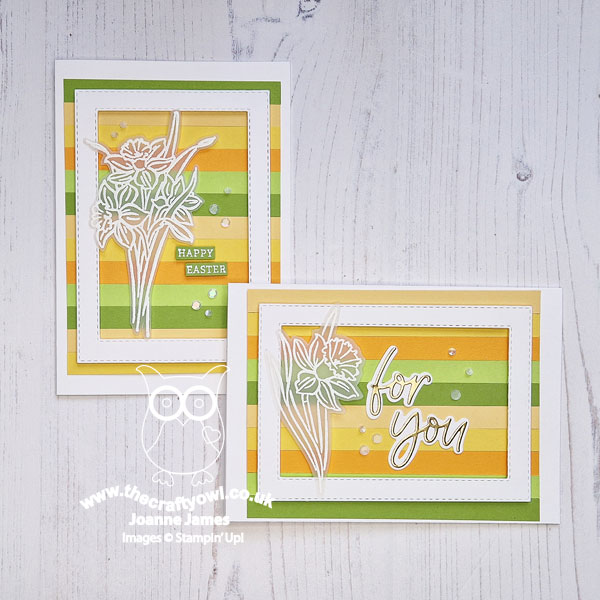
 

I love them both and had so much fun experimenting with this technique. This was such a fun way to bring new life to this much-loved stamp set. 

Here is the visual summary of the key products used on today's project for you to pin for easy reference:
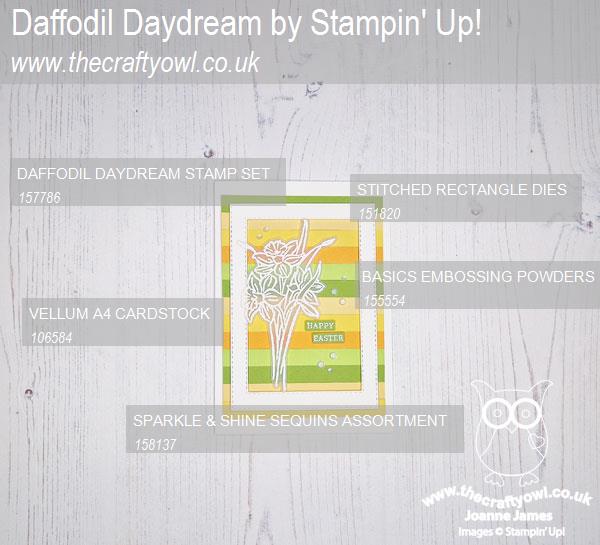
 

You can see all of my 'How To' summaries on my 'How To - Tips and Techniques' Pinterest board in case you've missed any. 

Here's a summary of our challenge rules:

  • Create any card, scrapbooking page, 3D project or packaging project that fits the challenge.
  • Please include the challenge graphic and link back to the challenge in your blog post. Turn off word verification so we can leave you lots of lovely comments. Make sure you link the post not the whole blog to the Linky. Use #AYSIXXX when uploading to a public gallery.
  • If you’re unsure about ‘the rules’, check the details under the Challenge Guidelines tab on the As You See It Challenge homepage.
  • In a Fill in the Blank challenge, complete the sentence in the Challenge Banner with the phrase that is true for you and create your project using the words you used. Tell us what you said in your blog or on your site.
We look forward to seeing your creations in the AYSI gallery.

Enjoy your day and I'll be back tomorrow with another project. Until then, happy stampin'!


Stampin' Up! Supplies Used:
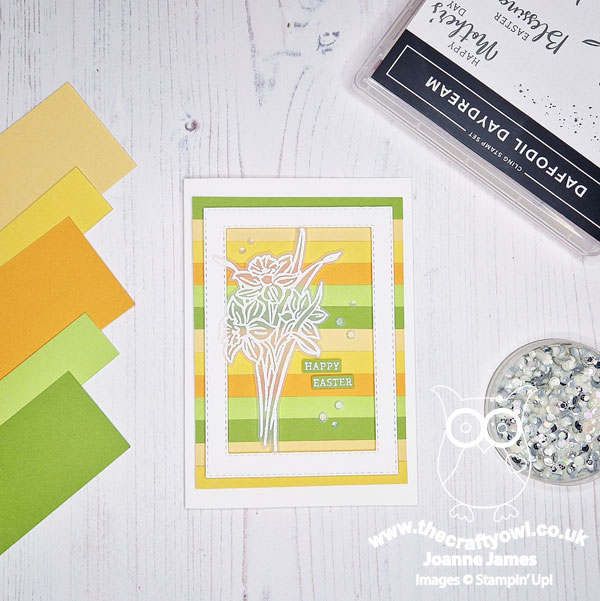
 

Table built using Product Table Builder by The Crafty Owl - Independent Stampin' Up! Demonstrator.

Love is Kindness and Blessed Easter TTT196

by Joanne James9. February 2023 16:00

It's Thursday and time for a new challenge over at TicTacToe! It's the turn of Team X to host this week and the lovely Elizabeth is our featured designer this week. This is the fun board that we are playing along with: 

       RRCB 199

I took the diagonal of heart/free/diecut on our board (it also works for the first column heart/red/stitching) and was totally inspired by the image over at The Card Concept too for my clean and layered card - those pretty tulips and the chalkboard hearts. This led me to go rooting through my retired stamps for the perfect stamp - and I ended up finding not one but two stamps, so I made two cards! Since they are old stamps and my colours also match the current challenge over at Retro Rubber (I used pink, white and green) I'm linking up there too. So here's my first card - take a look:


Here's the low-down on today's card:

Love Is Kindness - 'Love is Kindness' is a stamp from way back in 2015 but one I couldn't part with! I love those wrapped tulips and that sentiment quote is just so beautiful and true. It is actually a single wood-mount stamp, but for today's card I stamped just the sentiment first in Versamark onto Basic Black cardstock so that I could heat emboss it in white and cut it out with my (retired) Sweet & Sassy Hearts Framelit Dies. I then stamped the stamp again in black onto white cardstock, so that I could fussy cut the tulips and colour them with my Stampin' Blends. I added a piece of Sweet Sorbet baker's twine before adding to the edge of my chalkboard heart. 


Stitched Greenery - The background for both of my cards features the current Stitched Greenery coverplate die. I don't use this nearly enough - it gives such a delicate background detail and adds interest without overwhelm. A few complimentary pink sequins was the final finishing touch for my cards - here's a photo of them both together:


A Blessed Easter Bonus - As I mentioned above, whilst rooting through my retired stamps, the next one on the shelf was 'Blessed Easter' from 2014 and I thought these tulips would also work in this colourway. I switched out the heart for an oval and added an Easter sentiment. A little extra envelope decoration on this one too:


 Here's a close up of this one - which version do you prefer? Do leave me a comment below - I'd love to hear your thoughts. 


I have to say for me I think the first one wins - but I love them both and hope you enjoyed seeing the same idea with two different sets.

Here is the visual summary of the key products used on today's project for you to pin for easy reference:


You can see all of my Product and 'How To' summaries on my 'How To - Tips and Techniques' Pinterest board in case you've missed any. 

A tictactoe board offers so many creative possibilities - how does this week's board inspire you? Why not have a go? We would love to see you in the gallery and who knows - you might be selected for Designer's Choice and be eligible to be a guest designer on a future challenge. 

Enjoy your day; I'll be back tomorrow with another project. Until then, happy stampin'!


Stampin' Up! Supplies Used: 

Table built using Product Table Builder by The Crafty Owl - Independent Stampin' Up! Demonstrator.


Sentiment Silhouette Stencilled Candles Birthday Card

by Joanne James8. February 2023 11:00

Today I've a quick post to share a card that was inspired by the pretty rainbow stencilled card over at Time Out:


I decided to keep with the layout and rainbow-coloured ink blending for my CASE of the pretty Gina K card, but wanted to try something with the candles in the Sentiment Silhouette dies that I had out on my desk. This is what I came up with:


Here's the low-down on today's card:

I adhered a collection of diecut candles to a white panel that I had masked off the edges and I adhered them with low tack adhesive (I actually used Tombo, that I allowed to dry and go 'tacky' so that my diecuts would be repositionable and removable after colour had been applied), before adding a rainbow of colour with blending brushes, then removing the diecuts to give a 'stencillled' effect. I added a heat embossed 'celebration' sentiment from 'Simply Fabulous' to complete my clean and simple card:


Simple but effective - a birthday card with universal appeal!

Here is the visual summary of the key products used on today's project for you to pin for easy reference:


You can see all of my 'How To' summaries on my 'How To - Tips and Techniques' Pinterest board in case you've missed any. 

Enjoy your day and I'll be back tomorrow with another project. Until then, happy stampin'!


Stampin' Up! Supplies Used:

Table built using Product Table Builder by The Crafty Owl - Independent Stampin' Up! Demonstrator.

Around The Bend CAS Thank You Card CCS 504

by Joanne James7. February 2023 13:00

It's Tuesday and time for a new challenge over at CAS Colours & Sketches. We are into the second month of the year and I am your hostess for February! Our first challenge is a colour challenge: 


For my card today I took the opportunity to have another play with my Around the Bend Dies and create a clean and simple thank you card - take a look:


Here's the low-down on today's card:

Today's card features the detailed corner die. I added a piece of Country Gingham Balmy Blue check to my Balmy Blue card base, then overlaid a piece of white featuring the corner diecut on top. Onto this white panel, I stamped a simple 'thanks' from the 'Biggest Wish' stamp set and added a diecut flower with leaves using other dies in the set:

 I love the embossed detail on the diecuts in this set - it adds interest and allows a single flower to take centre stage, with nothing else needed to compliment that pretty corner detail.

Here is the visual summary of the key products used on today's project for you to pin for easy reference:


You can see all of my 'How To' summaries on my 'How To - Tips and Techniques' Pinterest board in case you've missed any. 

As a reminder, for our colour challenges, you must use all of the stated challenge colours. You may also use neutral colours; however, the challenge colours should be the most noticeable ones featured on your card. We use Stampin' Up! color names for reference, but you are welcome to use any other companies' products as long as you match the challenge colours as closely as possible.

Enjoy your day; I'm looking forward to catching up on some crafting before a super-late school run this evening; the youngest of the James Juniors is having to forgo his weekly club hockey practice in order to participate in a whole school House Singing competition. Apparently his house is singing 'I Will Survive' by Gloria Gaynor - having listened to the practice, I'm not sure the audience will, but there we are!!

I'll be back tomorrow with another project. Until then, happy stampin'!


Stampin' Up! Supplies Used:

Table built using Product Table Builder by The Crafty Owl - Independent Stampin' Up! Demonstrator.
 

Sweet Songbirds Thank You Card PP626

by Joanne James5. February 2023 08:00

Today it's Sunday and time for this week's new challenge over at The Paper Players! It's the turn of the fabulous LeAnne to host this week and she has a fun theme challenge for you to work with:


I  used Jen's layout over at Freshly Made Sketches and the fresh colour palette over at Color Dare (I used all of the colours except Linen) and made a thank you card featuring a sweet songbird - take a look:


Here's the low-down on today's card:

I used a stencil I had made previously using one of the Basic Border Dies along with a blending brush to create a cloudy sky using Pool Party ink, then added a solid panel in the same colour that I had embossed with music using the Merry Melody 3D Embossing Folder as the backdrop for my songbird. I stamped my branch and the bird's legs onto a piece of white cardstock and fussy cut them, then stamped my bright blue songbird in Tahitian Tide, punched it out using my co-ordinating Songbird Builder Punch and popped the bird up on dimensionals for a little extra lift. A stamped punny musical greeting and a trio of additional music notes complete my scene:

I like the addition of the texture behind the bluebird and love that this bundle worked for our music theme - I haven't used it nearly enough! Not to mention I was a little pressed for time this week, so I was pleased that this card came together quite easily. I wanted to make a few in alternative colourways, but they will have to wait for another time!

If the Sweet Songbirds bundle is on your wishlist, you might be pleased to know that the Songbird Builder Punch can now be yours FREE with a £45 purchase as one of the additional products that are available this month as part of Stampin' Up!'s Sale-A-Bration promotion - for full details read last week's post here.

Here is the visual summary of the key products used on today's project for you to pin for easy reference:


You can see all of my Product and 'How To' summaries on my 'How To - Tips and Techniques' Pinterest board in case you've missed any. 

Before you reach for your ink and papers, check out what our amazing team has created to inspire you this week:

Here's a quick recap of our challenge rules:
 
1.  Create a new paper project
2.  Upload your creation to your blog with a link back to us and provide a direct link to the post featuring your challenge submission.
3.  Please link your card to no more than four challenges, TOTAL.
4.  Have FUN!

Enjoy your day; ours will be a homework-filled one! I'll be back tomorrow with another project. Until then, happy stampin'!


Stampin' Up! Supplies Used: 

Table built using Product Table Builder by The Crafty Owl - Independent Stampin' Up! Demonstrator.

More Reasons To Sale-A-Brate - New FREE Products Added

by Joanne James3. February 2023 12:50

We are in our second and final month of this year's Sale-A-Bration promotion: you all know that this year's Sale-A-Bration promotion will end on 28th February and in addition to hosting and joining benefits (you can read about those here) you also earn a free product for every £45/90 spend - you can see the existing items here.

Good news: from now until the 28th February, there are more reasons to celebrate! You will also be able to choose from the catalogue items below (you must use the special code as detailed as opposed to the usual item code to get one of these items free with a £45/90 spend):


Remember, you need to use the special Sale-A-Bration item code for each product - these are different to the standard product codes for these items, which are still available to purchase in the annual catalogue. 

If you have your eye on any of the other Sale-A-Bration items, do bear in mind that they will only be available whilst stocks last - it is possible that they could run out before the end of the promotion, so don't leave it to0 late to place your order. 

I'll be back soon with another project. Until then, happy shopping!


Mini Catalogue

BROWSE THE CATALOGUE

The mini catalogue is now live! Read and download your copy here.

Shop Online

Access my online shop 24 x 7, 365 days of the year:

Current April hostess code:

VDKNV7BH

Shop Online

Join My Team

It's always a great time to join Stampin’ Up! New team members can get £130 worth of products for only £99 + free business supplies + free shipping + all the fun being a part of Stampin’ Up! Stampin' Up! has something for everyone: join my growing team and benefit from my support to enjoy Stampin' Up! however you choose.

If you're interested, call me for a chat to understand how I can help you realise your goals. Alternatively, if you have already decided to sign up and you just can't wait, please click here for the link to the online form where you can sign up and order your starter kit right away! 

Latest Kit!

Stampin Cut and Emboss

The Rock Legend Kit has all you need to make 8 cards with coordinating envelopes. Along with the new Panda Friends Kit, both are available from January 4th for just £14 each - get yours here!

2023-24 Annual Catalogue

BROWSE THE CATALOGUE

Click on the catalogue for a full list of current SU! supplies - if you would like to order any of the items featured, please drop me a line at [email protected] or give me a call on 07773 421446 - I'd be happy to help.

New Online Exclusives

There are new products available exclusively in the online store from 5 March - check them out here.

About Me

Hi I'm Joanne and live in Northampton and when I'm not looking after my husband and two beautiful children, am an avid crafter with a passion for all things Stampin' Up!

I must confess that I have never been a big rubber stamper - until I discovered Stampin' Up! that is. I love the fact that I can get such great results with co-ordinating stamps, inks, papers and punches - the possibilities are endless! Join me on my stamping journey as I share the things I love and be inspired to create amazing things yourself!

Follow Me

Monthly Newsletter

Box Builder

Click the button above to use Box Buster to create your custom box design using the Envelope Punch Board!

Kits Collection Now Available!

Stampin Cut and Emboss

The new Kits Collection from Stampin' Up! is now available!

Click here to see the current kits available and order yours online today.

I Design For


Stampin' Up Stuff

This is my personal blog and is not endorsed by Stampin’ Up! I hope you find it a plentiful source of ideas and personal inspiration but please don't copy my designs for contest submission or use for classes, publication or sale without express permission.