Butterfly Basics Reverse Panel Card

by Joanne James29. February 2016 09:00

Another Monday, another week! I have a busy week in store and am looking forward to it already! Firstly, to all those celebrating a leap year birthday today - a very happy birthday to you! Today I am sharing a card using this week's sketch over at Freshly Made Sketches and the colours over at Pals Paper Arts:

   Pals Paper Arts PPA289

I knew immediately how I wanted today's card to look and had a clear picture in my mind. My card did turn out as I hoped, save for the need to flip the sketch to its mirror image - take a look:

I turned to my 'Butterfly Basics' stamp set for my card today. I haven't used this set in ages and it's so easy to forget the great sets in the current annual catalogue when we have Sale-A-Bration and the current seasonal catalogue to keep us busy. I just knew that the long stemmed flower was going to be perfect for that long panel though. I stamped the image in Night Of Navy and coloured the flower with Blushing Bride and Pear Pizzazz inks and my blender pen. I matted this image on pink and navy, the reversed this matting for my sentiment, which I stamped in Versamark and heat embossed in white. I stamped my butterfly in Night of Navy on both sides of a piece of vellum and punched it out with my Itty Bitty Butterfly punch and adhered it to my sentiment panel. I also covered my butterfly liberally in Wink of Stella, which adds such a lovely sparkle in real life. I had to mirror-image the sketch because of the way the leaves fall on the stem - I'm hoping Jen isn't going to be too upset by this! Lastly, to finish I added a trio of Blushing Bride enamel dots from the Love Blossoms Embellishment kit. I just love these - they are so sparkly! This is one of those cards that makes great use of colour to accentuate the layers and by stamping the flower in Night of Navy instead of grey or black the whole thing really co-ordinates well. 

Here is today's visual summary for easy reference:


I have my piano lesson this morning then am off to London today for an appointment before returning in time for the school run. So a busy day in store! Back tomorrow with another project; until then, happy stampin'!


Stampin' Up! Supplies Used:

Table built using Product Table Builder by The Crafty Owl - Independent Stampin' Up! Demonstrator.

White With a Hint of Gold - Gratefulness Card

by Joanne James24. June 2014 13:00

This week the peeps over at CAS(E) This Sketch and Fusion have joined forces on their challenge blogs with a great sketch and inspiration photo:

I took the inspiration for my card from both the photo and the sketch and came up with the following card:

For a largely white card, there's a lot going on here; all-white cards are also incredibly difficult to photograph well, so I hope you can see some of the more subtle elements of design. Firstly, I used a Whisper White card base and ran this through my Big Shot with the Wildflower Meadow Textured Impressions Embossing Folder to give a nice relief pattern that I thought worked well with the butterfly. I created a layered banner using my Banner Framelits, cutting one in Whisper White and another slightly longer one in gold foil to extend beyond the length of it. On the uppermost white banner, I stamped my sentiment in Versamark and heat embossed it with gold embossing powder - this sentiment is a 'sneak peek' from a new set called 'Something to Say', out next week (not long now!).

I then did something I've never done before: I glittered a butterfly! Now whilst my 9 year old daughter loves anything with glitter, I'm generally not a fan of the stuff. I love Stampin' Up!'s glimmer paper as this is a great no-shed alternative, and I've had 2 pots of glitter sitting in my drawer since before Christmas and until now unopened for fear of the ensuing mess that would be created! As my card came together, I knew that glitter was going to be the only way to go to get the look I was after and create the contrast in texture of all the gold elements. So, I was brave - out came the heat and stick powder and gold glitter, and this sparkly vellum butterfly is the result. And I love it - even though I think I will be brushing gold glitter out of my butterfly punch for some time to come. Lastly, I substituted the stitching in the sketch layout for two rows of sequins to add one last gold element to my card.

I made this card with my Mother-In-Law in mind; she is always there to help me out of a fix and last week was no exception: Rebecca came home from school the week before last with instruction to make a weasel costume for the forthcoming production of 'Wind In the Willows' - to be held this week! Not only did she need a weasel costume, this weasel required a brightly coloured waistcoat and cravat to look the part. Fortunately for me MIL came to the rescue and a few days later had managed to tailor the most amazing waistcoat and cravat I've ever seen just from bits and bobs in her sewing box. Rebecca is destined to be the best dressed weasel around at her production on Thursday (I'll post a picture of her in costume later in the week!); as for me - my Mother-In-Law's goodness does indeed make me very grateful, so Kathy this one is for you!

Back tomorrow with another project and this week's Wednesday Deals; until then, happy stampin'!


Stampin' Up! Supplies Used:

* Something To Say Stamp Set - available 1st July

Table built using Product Table Builder by The Crafty Owl - Independent Stampin' Up! Demonstrator.


Make a Cake Quatrefancy Wedding Card

by Joanne James18. June 2014 08:45

Back so soon, I know - here is today's creative post! I'm sharing a card I made using the sketch over at Create with Connie and Mary this week:

I decided to use some of my retiring stamps and papers for my card and started out making a birthday card because the cake reminded me of Rebecca's birthday cake at the weekend, but by the time I had everything laid out on my desk I decided that the card would make a nicer wedding card. Here's my finished card:

I made a 5" square card and matted a piece of Quatrefancy paper onto Midnight Muse and a Pool Party base (I know technically the dots on the paper are Island Indigo, but since the dots are so small the whole thing still works, even though I've not followed the colours exactly for the rest of the card - what a rule-breaker am I??!) I then stamped a three tier cake with butterfly decoration from the 'Make a Cake' stamp set, stamping the base section twice, once in Midnight Muse for the stand and then again in Pool Party. I fussy cut the Pool Party cake out and used it to create the base layer for my cake. I used my oval framelits to cut out my framed oval and finished with a Mr & Mrs banner flag from the 'Banner Greetings' stamp set, a couple of double-stamped and punched butterflies to echo those on top of the cake and a strip of silver glimmer paper for just the right amount of sparkle.

I really like this finished card but despite where my mind started out it looks absolutely nothing like Rebecca's kitkat cake that I made for her birthday this past weekend:

If that's not death by chocolate, then I don't know what is - it did taste delicious though!

Back tomorrow with another project; until then, happy stampin'!


Stampin' Up! Supplies Used:

Table built using Product Table Builder by The Crafty Owl - Independent Stampin' Up! Demonstrator.


Video Tutorial: Extra Wide Pouches Using the Scalloped Tag Topper Punch

by Joanne James20. February 2014 21:28

Good evening everyone! Today I have a video tutorial to share with you that I prepared a couple of weeks ago that shows you how to make an extra-wide pouch using the Scalloped Tag Topper Punch. Here's the finished extra-wide pouch:

Here is a standard size treat pouch made with the Scalloped Tag Topper Punch - you can find my previous video tutorial on how to make this here:

As you can see, when compared to the standard-size punch, the extra-wide version is about 1" or 2.5cm wider and taller. The video tutorial shows you how to adapt your punch and shares my top tip for a smooth punch every time - go and take a look:


Here are the measurements I used in the video in case you didn't catch them:

Cardstock: 2 3/4" x 7 3/4" or 7cm x 19.5cm

Score at: 3 3/4" and 4" or 9.5cm and 10cm

I hope you found this video tutorial useful - this is such a versatile punch with so many uses beyond a standard tag. The treat pouches make great little wedding favours too.

Back tomorrow with another project; until then, happy stampin'! 

Stampin' Up! Supplies Used:

Table built using Product Table Builder by The Crafty Owl - Independent Stampin' Up! Demonstrator.


One Layer Papillion Potpourri Thank You Cards

by Joanne James24. September 2013 11:17

My second post of the day today, so a quick creative one this time! I just wanted to share some thank you cards I made recently for some customers to pop into the bags with their orders. I made quite a few, so needed something that was quick to execute. I decided to use a selection of the butterflies in the Papillion Potpourri stamp set to create this simple one layer card:

I used the lovely pre-cut and scored Stampin' Up! notelets and the colour scheme was inspired by the Birthday Basics DSP that I also had out on my desk to make the card I'm going to share with you tomorrow. A simple sentiment and a co-ordinating stamped envelope and voila - a pretty card set in no time at all!

Don't forget, the Papillion Potpourri stamp set and co-ordinating Bitty Butterfly punch bundle is available to order at a 15% discount during the month of September, so you have just under a week to take advantage of this offer. If you live local to me, I will be placing an order later this week so if you would like to save on p&p contact me to add you order to it. Otherwise just go to my online store to place your order by clicking on the supplies links below or for the bundle on the right hand side of my blog page.

Also, if you haven't yet checked out the Clearance Rack in my online store, go take a look! There are some great bargains to be had, with some items as much as 80% off.

Back tomorrow with another card; until then, happy stampin'!


Stampin' Up! Supplies Used:

 Whisper White Note Cards & EnvelopesPapillon Potpourri Clear-Mount Stamp SetGumball Green Classic Stampin' PadRaspberry Ripple Classic Stampin' PadSummer Starfruit Classic Stampin' PadCrisp Cantaloupe Classic Stampin' PadBermuda Bay Classic Stampin' Pad

Delightful Dozen - Clear-Mount Stamp Set - by Stampin' Up!

Tags: , , , , , , ,

Cards | Promotions | Shop Online | Stamping

Happy 70th Birthday Ann!

by Joanne James3. September 2013 21:51

Today I'm sharing a birthday card commission that I made for my sister-in-law's very special Mum, who celebrates her 70th birthday today. I decided to use a combination of some of my favourite of this year's in-colours and the lovely Secret Garden framelits. Here's the finished card:

I love the pretty ruffle trim ribbon and added a tiny sliver of silver glimmer paper to add a little sparkle. I must confess to having had a few failed attempts before producing a card that I was really happy with - I needed this card to be 'just right' and am pleased to say I was happy with the finished result. Here's a quick picture of the card I made for Ann to wish her a special 70th birthday: 

Not the best of photographs, I'm afraid - when flat you can see the sentiment through the aperture cut with an oval framelit - but hopefully good enough to give you an idea. This one uses a similar colour scheme and the Flower Shop stamp set - check out the vellum flowers on the front, which I stamped then heat embossed with Iridescent Ice for a lovely sparkle.

One last thing on my original card: did you notice the little butterfly stamped on vellum that highlighted my label? Here's a close-up:


This is one of the butterflies in the Papillion Potpourri stamp set, punched out with the Bitty Butterfly punch - these are the items on offer at 15% off when you buy them together before 30th September - you can read more about this offer here.

Both James Juniors are back at school tomorrow; whilst I'll miss them not being at home, I can't deny that I'm looking forward to getting back into my craft room for a bit more creating - lots to do!

Do come back in the next day or so to see what I've been creating; I'm looking forward to sharing some of my Christmas ideas and September is a month of birthdays for me, so I'll have lots on this front too. Until next time, happy, stampin'!


Stampin' Up Supplies:

Stamps: Secret Garden, Delightful Dozen, Memorable Moments, Papillion Potpourri

Cardstock: Whisper White, Strawberry Slush, vellum

Ink/Stampin' Write Markers:  Strawberry Slush, Crisp Cantaloupe, Pistachio Pudding

Tools: Secret Garden Framelits, Oval Framelits, Bitty Butterfly Punch, Stamp-a-ma-jig

Finishing Touches: Strawberry Slush Stretch Ribbon Trim, Silver Glimmer Paper, Basics Pearls

Sunshine and Sprinkles Scrapbook Page

by Joanne James19. April 2013 21:09

Today I thought I would share something a little different: as many of my followers will know, I love to design and make cards. I'm not a scrapbooker - it's just not my 'thing'. In many ways this may surprise those close to me, as we are a household of keen photographers and have a collection of literally thousands of memories captured on slide, film and digitally. I love to have photographs on display - for me though, I struggle to design a page without a specific photograph in mind.

All that being said, I made a scrapbook page at training last Sunday and I thought I would share it with you, as even though I haven't yet chosen the photos to put on it, the layout could be used and adapted in so many ways I'm sure it will inspire some of you reading this, who I know are keen scrapbookers. Here is my finished page: 
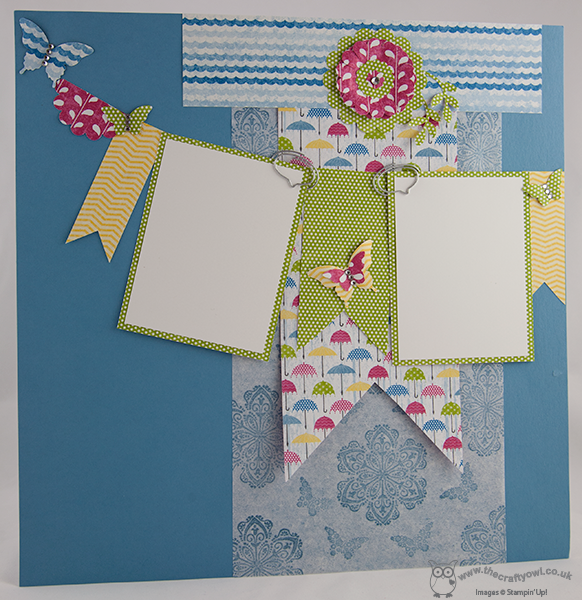
This page was designed by the lovely Bekka Prideaux and features one of my favourite current designer papers in the Spring Summer catalogue, Sunshine and Sprinkles. I also like the background stamped sheet - this is Marina Mist ink stamped straight on to filter paper.

Here's a close-up of the top section - there's so much going on here: 
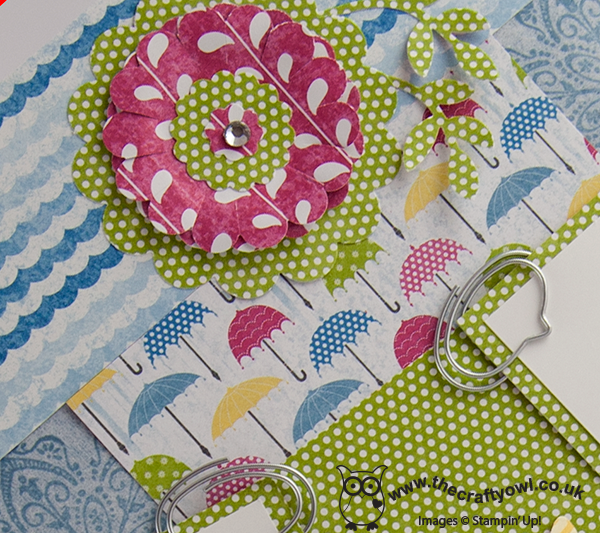
Did you notice the lovely speech bubble paper clips too - aren't they cute? You may have overlooked them in the catalogue (p.28, Spring Summer Cat.): there are 2 different packs - each with 8 of 3 different designs (there is an arrow and a coat hanger in this set too) and at £4.50 per pack they represent great value. One or two on a scrapbook page or card is enough to add just the right amount of detail. One more photo - a close-up of one of the butterflies:
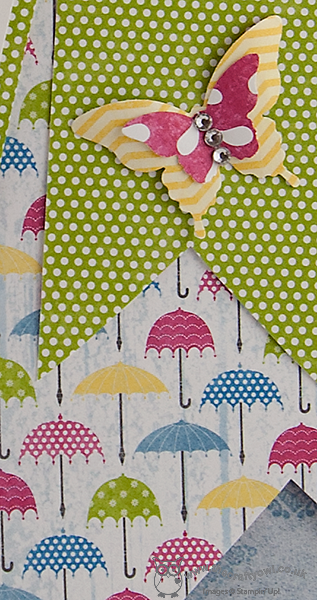
As Bekka herself would say, you can never have too many butterflies! I love the way the Bitty Butterfly punch is layered with the Elegant Butterfly punch to create a double one and the rhinestones add just enough 'bling' without overpowering the page. I really like this layout and there's even some space on the base page if you wanted to add some journalling or commentary. For those of you that enjoy journalling, I will have more great Stampin' Up! news coming soon - all 'top secret' currently, but watch this space - that's all I'm saying for now!

I hope you enjoyed the change in direction today; back with another card tomorrow. Unti then, happy stampin'!


Stampin' Up Supplies:

Stamps: Mixed Bunch, Papillon Potpourri

Cardstock: Marina Mist, Whisper White, Sunshine and Sprinkles DSP

Ink/Stampin' Write Markers: Marina Mist

Tools: Elegant Butterfly punch, Bitty Butterfly punch, 2-Step Bird punch, 1 3/4" Scallop Circle punch, 2 3/8" Scallop Circle punch, 7/8" Scallop Circle punch, Itty Bitty Shapes punch

Finishing Touches: Cute Clips, Basics Rhinestones

Mini Catalogue

BROWSE THE CATALOGUE

The mini catalogue is now live! Read and download your copy here.

Shop Online

Access my online shop 24 x 7, 365 days of the year:

Current March hostess code:

S9F2XJJW

Shop Online

Join My Team

It's always a great time to join Stampin’ Up! New team members can get £130 worth of products for only £99 + free business supplies + free shipping + all the fun being a part of Stampin’ Up! Stampin' Up! has something for everyone: join my growing team and benefit from my support to enjoy Stampin' Up! however you choose.

If you're interested, call me for a chat to understand how I can help you realise your goals. Alternatively, if you have already decided to sign up and you just can't wait, please click here for the link to the online form where you can sign up and order your starter kit right away! 

Latest Kit!

Stampin Cut and Emboss

The Rock Legend Kit has all you need to make 8 cards with coordinating envelopes. Along with the new Panda Friends Kit, both are available from January 4th for just £14 each - get yours here!

2023-24 Annual Catalogue

BROWSE THE CATALOGUE

Click on the catalogue for a full list of current SU! supplies - if you would like to order any of the items featured, please drop me a line at [email protected] or give me a call on 07773 421446 - I'd be happy to help.

New Online Exclusives

There will be new products available exclusively in the online store from 5 March - check them out here.

About Me

Hi I'm Joanne and live in Northampton and when I'm not looking after my husband and two beautiful children, am an avid crafter with a passion for all things Stampin' Up!

I must confess that I have never been a big rubber stamper - until I discovered Stampin' Up! that is. I love the fact that I can get such great results with co-ordinating stamps, inks, papers and punches - the possibilities are endless! Join me on my stamping journey as I share the things I love and be inspired to create amazing things yourself!

Follow Me

Monthly Newsletter

Box Builder

Click the button above to use Box Buster to create your custom box design using the Envelope Punch Board!

Kits Collection Now Available!

Stampin Cut and Emboss

The new Kits Collection from Stampin' Up! is now available!

Click here to see the current kits available and order yours online today.

I Design For


Stampin' Up Stuff

This is my personal blog and is not endorsed by Stampin’ Up! I hope you find it a plentiful source of ideas and personal inspiration but please don't copy my designs for contest submission or use for classes, publication or sale without express permission.