New Stitched Shapes Framelits and 25% Off Stamp Sets

by Joanne James1. November 2016 07:00

I'm back today with some great news for the start of November: from today we have the early release of a new product from the 2017-18 annual catalogue, Stitched Shapes Framelits, and a product promotion!

StitchFramelit_DemoHeader_SPUK

A Great New Product

Let’s start with the Framelits: the Stitched Shapes Framelits Dies are a set of 12 dies that include four circles, four ovals and four squares that coordinate with our Layering Circles, Ovals and Squares.  Brilliant!

These new dies are available for purchase beginning November 1 – that’s today!

So, what makes these Framelits a necessity?  When run through the Big Shot, these dies leave a detailed stitch around the edge of the Framelit.  The stitched look is so on-trend right now and will add a great extra touch to your stamped projects. Here’s a video with details about the new dies and some great project ideas:


Aren't they great? You are definitely going to want to add these to your framelit collection.

Here are the measurements for these new shapes:

Circles:  1-3/8″, 1-7/8″, 2-3/8″, 2-7/8″

Squares: 1-3/16″, 1-5/8″, 2-1/8″, 2-5/8″

Ovals: 1-3/4″ x 13/16″, 2-1/4″ x 1-5/16″, 2-3/4″ x 1-13/16″, 3-1/4″ x 2-5/16″


25% Off Selected Stamp Sets

What's more, there's a promotion to run alongside the launch of these new framelits too! As if the new Stitched Shapes Dies weren’t great enough…there is also a long list of stamp sets from the Autumn-Winter Catalogue and Annual Catalogue are available for 25% off during November.  Yes, you heard it - 25% OFF! here's the complete list:


Right - I'm off to put in my order for these fabulous new framelits and then get on with my busy day of back-to-back classes. I will be back later with today's project blog post; until then, happy shopping! Oh and don't forget to use this month's hostess code SQN297RD when placing your order online to get a little thank you in the post from me!

Table built using Product Table Builder by The Crafty Owl - Independent Stampin' Up! Demonstrator.


Detailed Santa Thinlits Shaker Card

by Joanne James30. October 2016 09:00

It's Sunday and time for a new challenge over at The Paper Players! It's the turn of the lovely LeAnne to host this week and she has a fun tic tac toe challenge for you to work with:


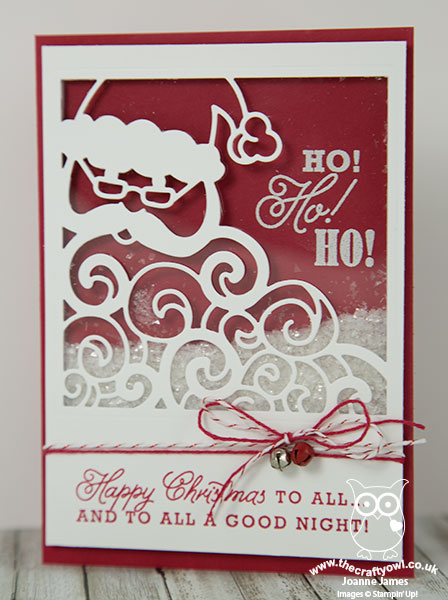
Normally I find these such a challenge (I know, I know - that's the whole point!) but today I knew exactly where I was going on the grid: straight down the left with Red, Santa and Diecut. I ended up making a couple of cards (if you check out the card on yesterday's post here you will see it also fits this column) but today's card is definitely one of my most favourite  - take a look:


Here's the low-down on today's card:

Detailed Santa Thinlits Die - Today I've used the whole of the diecut Santa image to create the front for my shaker card. I cut it in extra thick Whisper White and added a piece of window sheet behind, so that you could see both my white heat embossed 'ho ho ho' sentiment and the contents of my shaker. I left a wider border at the bottom in order to accommodate my embellishments and Real Red stamped sentiment - a line from my most favourite festive poem, 'Twas The Night Before Christmas', by Clement C. Moore. I recited this poem at Christmas concerts as a child on a number of occasions and I still know all the words -  I now read it to my own children each Christmas, it has become a James family tradition.

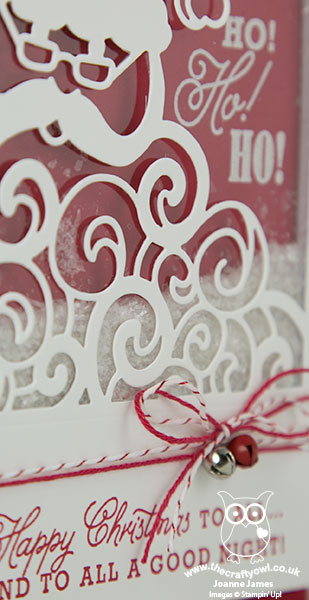
Snowy White - I used the white Mica Flakes on page 41 of the seasonal catalogue for my shaker card contents today. These are one of those products that could be easily overlooked  yet I love these soft flakes - perfect for snow, beards and great for shaker cards! I rubbed my Embossing Buddy over the inside of the window to reduce static so that they would shake freely and the whole thing is held in place using foam adhesive strips - they really do make shaker cards so easy. Check out the detail here of the mica flakes and the diecut:


Jingle All The Way - To finish my card today, I added some red and white Candy Cane Lane baker's twine and a couple of mini jingle bells, perfect for my red and white colour scheme today.

Here is the visual summary of the key products used on today's project for you to pin for easy reference:


You can see all of my 'How To' summaries on my 'How To - Tips and Techniques' Pinterest board in case you've missed any. 

I can't tell you how much I love this card, I might even have to send it to myself - shakers are such fun! 

Before you reach for your ink and papers, check out what our amazing team has created to inspire you this week:

The Paper Players Design Team
 
 
Here's a quick recap of our challenge rules:
 
1.  Create a new paper project
2.  Upload your creation to your blog with a link back to us and provide a direct link to the post featuring your challenge submission.
3.  Please link your card to no more than four challenges, TOTAL.
4.  Have FUN! 


I look forward to seeing what you create with this week's tic tac toe board. We have a week off from hockey so it's only basketball that's calling today, then I have a few errands to run but hopefully a restful afternoon in store before Rebecca returns to school tomorrow. Ben has another week off, much to Rebecca's dismay! Well, I guess you can't have everything! 

One last reminder: the 'Buy 3, Get 1 Free' offer on designer paper ends tomorrow. You can read the full details here if you need to refresh your memory about what's included. 

B3G1DSP_DemoHeader_UKSP

Enjoy the rest of your weekend as it will be over all too quickly; I'll be back tomorrow with another project; until then, happy stampin'!


Stampin' Up! Supplies Used:

Table built using Product Table Builder by The Crafty Owl - Independent Stampin' Up! Demonstrator.

Detailed Santa Thinlits Banner Card

by Joanne James29. October 2016 19:37

I hope you're all enjoying a lovely weekend. Today I have a card using this week's sketch over at Freshly Made Sketches:

I've finally managed to break the seal on Detailed Santa Thinlits Dies and been putting them through their paces. Today's card also features a new background stamp - take a look:


Here's the low-down on today's card:

Detailed Santa Thinlits Die - Although I haven't used it before, this Santa die was one of my first purchases from the seasonal catalogue. I adore the detail of his face and beard and there are so many ways in which he can be used. Here I've cut a section of the image in Whisper White and mounted it on a banner of Real Red. You can't see in the photograph, but the whole of the white layer has been brushed with clear Wink of Stella and has a lovely subtle shimmer to it.

Put A Label On It - I stamped my sentiment from the co-ordinating 'Greetings From Santa' stamp set and cut it out with one of my Project Life Cards and Labels Framelits, great for memory keeping but perfect for card making too.

A Merry Medley - For my base, I chose to use the 'Merry Medley' background stamp, stamped in Soft Suede onto neutral kraft cardstock. I like that it adds interest without fuss and too much detail, yet is in keeping with the festive theme of my card.

Here is the visual summary of the key products used on today's project for you to pin for easy reference:


You can see all of my 'How To' summaries on my 'How To - Tips and Techniques' Pinterest board in case you've missed any. 

I'll be back tomorrow with another santa project, this time for this week's new challenge over at The Paper Players; until then, happy stampin'!


Stampin' Up! Supplies Used:

Table built using Product Table Builder by The Crafty Owl - Independent Stampin' Up! Demonstrator.

Santa's Train Watercolour Christmas Card

by Joanne James24. September 2016 20:11

It's the weekend and I managed to squeeze in a little crafting time this afternoon to make a card for this week's challenge over at Freshly Made Sketches where Amy has given us a great sketch to work with:

So many possibilities! I decided on a little watercolouring and another Christmas card - here's my card:


Here's the low-down on today's card:

Santa's Train - I stamped the train from 'Christmas Magic' in archival black onto watercolour paper and got to work with my inks and an aquapainter to colour it in with a traditional predominantly red and green colour scheme. I also created a mask for the train and added in some trees behind to add some perspective to my winter scene.

A Wink And A Sparkle -  Difficult to see on my photograph, I added a touch of gold Wink of Stella to the bell and brass elements on my train, some clear Wink of Stella on the trees and snowy ground and some retired red Dazzling Details to my holly wreath for a little sparkle. It's very subtle but it looks very pretty in real life, I assure you!

Greetings From Santa - The 'Christmas Magic' stamp set has some lovely greetings, but none of them worked for the sentiment strip as per the sketch. Instead I chose to use this one from the 'Greetings From Santa' set which has a better fit.

Here is the visual summary of the key products used on today's project for you to pin for easy reference:


 You can see all of my 'How To' summaries on my 'How To - Tips and Techniques' Pinterest board in case you've missed any. 

I'll be back tomorrow with a card for our new challenge over at The Paper Players and I'm the hostess, so you won't want to miss it. Until then, happy stampin'!


Stampin' Up! Supplies Used:

Table built using Product Table Builder by The Crafty Owl - Independent Stampin' Up! Demonstrator.

Mini Catalogue

BROWSE THE CATALOGUE

The mini catalogue is now live! Read and download your copy here.

Shop Online

Access my online shop 24 x 7, 365 days of the year:

Current April hostess code:

VDKNV7BH

Shop Online

Join My Team

It's always a great time to join Stampin’ Up! New team members can get £130 worth of products for only £99 + free business supplies + free shipping + all the fun being a part of Stampin’ Up! Stampin' Up! has something for everyone: join my growing team and benefit from my support to enjoy Stampin' Up! however you choose.

If you're interested, call me for a chat to understand how I can help you realise your goals. Alternatively, if you have already decided to sign up and you just can't wait, please click here for the link to the online form where you can sign up and order your starter kit right away! 

Latest Kit!

Stampin Cut and Emboss

The Rock Legend Kit has all you need to make 8 cards with coordinating envelopes. Along with the new Panda Friends Kit, both are available from January 4th for just £14 each - get yours here!

2023-24 Annual Catalogue

BROWSE THE CATALOGUE

Click on the catalogue for a full list of current SU! supplies - if you would like to order any of the items featured, please drop me a line at [email protected] or give me a call on 07773 421446 - I'd be happy to help.

New Online Exclusives

There are new products available exclusively in the online store from 5 March - check them out here.

About Me

Hi I'm Joanne and live in Northampton and when I'm not looking after my husband and two beautiful children, am an avid crafter with a passion for all things Stampin' Up!

I must confess that I have never been a big rubber stamper - until I discovered Stampin' Up! that is. I love the fact that I can get such great results with co-ordinating stamps, inks, papers and punches - the possibilities are endless! Join me on my stamping journey as I share the things I love and be inspired to create amazing things yourself!

Follow Me

Monthly Newsletter

Box Builder

Click the button above to use Box Buster to create your custom box design using the Envelope Punch Board!

Kits Collection Now Available!

Stampin Cut and Emboss

The new Kits Collection from Stampin' Up! is now available!

Click here to see the current kits available and order yours online today.

I Design For


Stampin' Up Stuff

This is my personal blog and is not endorsed by Stampin’ Up! I hope you find it a plentiful source of ideas and personal inspiration but please don't copy my designs for contest submission or use for classes, publication or sale without express permission.