Hot Pink Picture Perfect Hummingbird Card

by Joanne James10. May 2016 22:00

Good evening everyone! I hope your week has started well. I've had my first technique class of the month yesterday along with both a rounders and cricket match (observing not participating, and both wins!), and a second technique class and this month's Project Life Memory Keeping class today so it's been a busy couple of days. Just time to pop in this evening and share the first of the cards from this month's technique class, featuring the Hummingbird in the 'Picture Perfect' stamp set. I used this week's sketch over at As You See It for my layout:

AYSIChallenge134   SIP One Element Wonder 47 800

I'm also linking up with Stamp Ink Paper again this week, as their challenge is to feature one main element on your project and make it really stand out. The hummingbird is the most tricky stamp in the set to align, but when you get it right is so worth it in terms of the result. Here is my finished card:
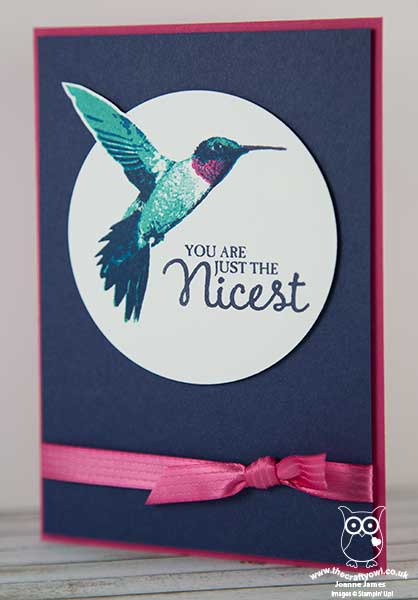
Here's the low-down on today's card:

Picture Perfect Hummingbird - 'Picture Perfect' is a multi-step image stamp set, with each of the stamps having two, three or four layers. The hummingbird comes in four pieces; for my bird I stamped my first layer in Bermuda Bay, I stamped the second stamp in Melon Mambo, the third layer in Pacific Point and the fourth and final one in Night of Navy. Whilst it sounds complicated, this set is made from photopolymer which makes lining up the images really straightforward. I find it helpful to use the eye to align the images and use a piercing mat or similar foam pad as a base for your stamping for an even image. I do prefer to stamp my bird in the order that the stamps are numbered and if all else fails, a stamp-a-ma-jig will help you to align the images perfectly.  It is definitely a stamp where positioning improves with practice and I must say my ladies today stamped with amazing results, each producing four perfectly stamped hummingbirds on the first attempt!

Partial Die Cutting using Circle Framelits - I stamped my bird onto a piece of Whisper White and having fussy cut his wing tip by hand, I then cut a partial circle up to the diagonal before adhering behind so that it aligned with my cut away circle on my card base. Circle Framelits are invaluable for this kind of partial diecutting, as you simply roll through the Big Shot to the desired point without cutting the whole way through. I've used this technique with this stamp before here; it adds an interesting detail to an otherwise clean and simple card.

Pop of Pink - Melon Mambo is one of my favourite pinks in the Stampin' Up! colour collections and whilst there is only the smallest amount featured on the throat of my bird, I picked up this colour in both my card base and satin knotted ribbon to give a real pop of colour to my otherwise blue card.

Here's today's visual summary of the key things needed to make today's card for easy reference:
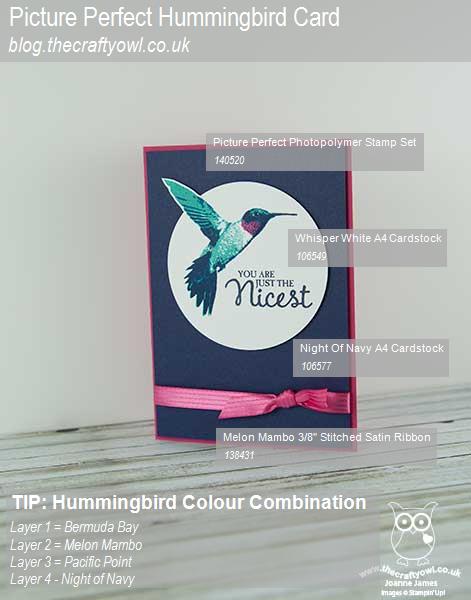
 

You can see all of my 'How To' summaries on my 'How To - Tips and Techniques' Pinterest board in case you've missed any. 

That's all from me today; I have another busy day tomorrow, with my Coffee and Card Drop In Session at Bell of Northampton in Kingsthorpe and I'll also be at the in-store Spring Open Evening at Bells too. you can find full details on the latter here

Hopefully I'll squeeze in time for a quick blog post with another of my Picture Perfect class cards. Until then, happy stampin'!


Stampin' Up! Supplies Used:

Table built using Product Table Builder by The Crafty Owl - Independent Stampin' Up! Demonstrator.

Comments (4) -

amy
amyUnited States
5/11/2016 6:30:44 AM #

Super cute!!! Thank you for joining us at AYSI, good luck!!! Amy DT

Heather Cooper
Heather CooperCanada
5/13/2016 7:17:01 PM #

This is lovely, Joanne, and I agree about the difficulty in lining up all the hummingbird images. I found more success when I stamped them in the opposite order, as the darker image made it easier to see to line up the other lighter ones, but you seem to have mastered it anyway! You have certainly succeeded in making that beautiful bird the focal point! Thanks for contributing to our gallery at As You See It Challenges!

Jane Knudsen
Jane KnudsenUnited States
5/14/2016 4:12:23 AM #

What a very beautiful card!  A great idea to use these colors as they make the hummingbird sing!  Plus I really love how clean and simple this is!  I love CAS cards!  Thank you for joining us at As You See It!

Carolyn Lindenmayer
Carolyn LindenmayerAustralia
5/14/2016 11:45:56 AM #

Hi Joanne, that hummingbird is gorgeous in that colour combo and I love the contrast of the ribbon on the card.  That is beautiful.  Thanks so much for joining us this week at Stamp Ink Paper.  Carolyn xx

Comments are closed

New Online Exclusives

There are new products available exclusively in the online store from 5 November - check them out here.

Latest Kits!

Stampin Cut and Emboss

The Layered Landscapes Kit and Nature's Paintings Kit are the latest kits in the online store - get yours here!

Shop Online

Access my online shop 24 x 7, 365 days of the year:

Current November hostess code:

9NKXDTTR

Shop Online

Mini Catalogue

BROWSE THE CATALOGUE

'Tis The Season - the new Stampin' Up! Mini Catalogue is here! For more details and to download your copy click here

Scrapbooking

Stampin' Up! has introduced a new range of 12x12" scrapbooking product and kit - the full range is now available to purchase online. To download a copy of the new digital Scrapbooking Catalogue click here.

2024-25 Annual Catalogue

BROWSE THE CATALOGUE

Click on the image to download your copy of the 2024-25 annual catalogue. For a full list of current SU! supplies, go to my online store. If you would like any help or advice, please drop me a line at joanne@thecraftyowl.co.uk or give me a call on 07773 421446 - I'd be happy to help.

Join My Team

It's always a great time to join Stampin’ Up! New team members can get £130 worth of products for only £99 + free business supplies + free shipping + all the fun being a part of Stampin’ Up! Stampin' Up! has something for everyone: join my growing team and benefit from my support to enjoy Stampin' Up! however you choose.

If you're interested, call me for a chat to understand how I can help you realise your goals. Alternatively, if you have already decided to sign up and you just can't wait, please click here for the link to the online form where you can sign up and order your starter kit right away! 

About Me

Hi I'm Joanne and live in Northampton and when I'm not looking after my husband and two beautiful children, am an avid crafter with a passion for all things Stampin' Up!

I must confess that I have never been a big rubber stamper - until I discovered Stampin' Up! that is. I love the fact that I can get such great results with co-ordinating stamps, inks, papers and punches - the possibilities are endless! Join me on my stamping journey as I share the things I love and be inspired to create amazing things yourself!

Follow Me

Monthly Newsletter

Box Builder

Click the button above to use Box Buster to create your custom box design using the Envelope Punch Board!

Kits Collection Now Available!

Stampin Cut and Emboss

The new Kits Collection from Stampin' Up! is now available!

Click here to see the current kits available and order yours online today.

I Design For


Stampin' Up Stuff

This is my personal blog and is not endorsed by Stampin’ Up! I hope you find it a plentiful source of ideas and personal inspiration but please don't copy my designs for contest submission or use for classes, publication or sale without express permission.