Traveler Happy Birthday Trio for Pals Paper Arts

by Joanne James17. June 2014 10:25

Today's card is for this week's Pals Paper Arts challenge, where Team 2 have chosen a rather patriotic colour palette this week, with one last opportunity to use Midnight Muse before it retires at the end of the month:

I decided these colours would make a perfect masculine card and so have another sneak peek using the Traveler stamp set, coming in the new 2014 annual catalogue. Here is my card:

I stamped three of the stamps in the set - the ocean liner, the globe and the steam train - in Midnight Muse, then cropped these images and mounted them on individual mats in the same colour, followed by a larger Real Red and Midnight Muse panel. This is then overlaid on a crossways panel finished with some Real Red candy dots and lastly a sentiment stamped in Midnight Muse with one of the Itty Bitty Banners stamps and cut out with the co-ordinating framelit. I even gave the inside some star treatment with a steam train - I don't do this often enough, and even when I do I often forget to share with you: 

I really like this set, having used it so much already. Despite its 'vintage' look, it lends itself to a more modern finish too. I'm also linking my card up to Addicted to CAS where the theme this week is 'transport'. Back tomorrow with the Wednesday Deals and another card. Until then, I'm off to prepare for a private class tomorrow, get on with some admin and then hopefully squeeze in a make or two as well - happy stampin'!

Stampin' Up! Supplies Used:

*Traveler Stamp Set - available 1st July 2014.

Table built using Product Table Builder by The Crafty Owl - Independent Stampin' Up! Demonstrator.


Horse Punch Art SUO #90

by Joanne James17. February 2014 21:26

Today I've had the most fun day. I was privileged to be invited to run a Crafty Owl birthday party for a 10 year old and her classmates, which was great fun. We made some wall art and they had a fun time punching shapes and using the Big Shot to create their masterpieces. When I run a craft party, I always create a punch art kit for the party bags so that the children can continue the crafty fun at home. For today's party, the birthday girl loves horses so I knew that a pony needed to feature on my card. I had a quick surf on Pinterest for some general inspiration then set to work creating my card. This is what I came up with:

I used a variety of punches to create my card (see full list below) and some Core d'inations cardstock embossed with the woodgrain embossing folder to give texture to my stable door. I've always loved grey horses so made my card with a grey pony, but since my eight year-old informed me that this made it look like a donkey, the kits I made for the party girls all had brown horses to remove any doubt!

The girls loved their kits and I'm sure they will have had as much fun completing them as they did at the party itself. I'm linking today's card up with the challenge over at SUO Challenges where the theme this week is 'Punch Art', so this card fits perfectly.

I ended my day with a trip to the cinema to see the new Lego Movie; it was a great children's movie for half term and fulfilled one of Ben's main aims for the week, so all in all a good day was had by all.

Back tomorrow with another project; until then, happy stampin'!


Stampin' Up! Supplies Used:

Table built using Product Table Builder by The Crafty Owl - Independent Stampin' Up! Demonstrator.

An Apple for the Teacher

by Joanne James12. July 2013 20:45

That's it for another year - school is officially out! Where does the time go? Today I'm sharing some of my teacher thank you gifts with you. I love to create handmade gifts and as some of my readers know, one of my other hobbies is biscuit making. So for my end of year teacher gifts, I decided to make apple-shaped chocolate iced biscuits, presented in the fab new Tag a Bag Gift Boxes and finished with a decorated tag from the co-ordinating accessory kit:

I often make mini-cookies and present in glass jars, but on this occasion these gift boxes were the perfect size and shape to hold ten of my apple biscuits. These boxes are great value at £6.25 for eight boxes and as they're food safe they are perfect for biscuits, cupcakes or other edible as well as non-edible gifts. I also made use of my accessory kit to seal and label the boxes. Here's a close up of one of the tags:

Wondering how I made the apples? I used the heart from my Hearts a Flutter framelits and then removed the bottom point with my Petite Curly Label Punch, added a leaf and stalk and done. A quick stamped and cut Bitty Banner 'thank you' and some Gumball Green ribbon added the finishing touch. One more photo for you with one of the biscuits out of the box so that you can see exactly what they look like:

Hoping to be back tomorrow with another project; have a busy day making tomorrow, as I have swaps to prepare for quarterly team training on Sunday and I haven't even started yet - oops! Until then, happy stampin'!


Stampin' Up Supplies:

Stamps: Bitty Banners

Cardstock: Whisper White, Real Red, Gumball Green, Chocolate Chip

Ink/Stampin' Write Markers: Real Red

Tools: Hearts a Flutter Framelits, Bitty Banners Framelits, 3/4" Circle Punch

Finishing Touches: Tag a Bag Gift Boxes, Tag a Bag Accessory Kit, White Baker's Twine

Best of Flowers - Something Old, Something New

by Joanne James21. June 2013 19:26

I've had a very busy day baking today and making last minute preparations for a school summer fete tomorrow, so am rewarding myself with a trip to the cinema later to see 'Man of Steel' (well, Henry as a superhero - what could be better?!) As a result, an early blog post from me - well, it's either early or not at all, so I'm giving the illusion of being more organised at least!

Today I'm sharing a couple of cards I made with another of the sets from this month's 25th anniversary 'Best of Flowers' stamp set. I shared a couple here previously using the miniature daisy stamp; this time it's the turn of the hydrangea. I made a couple of cards, one in pink and one in blue, and whilst the stamp is a new version of an old favourite, the colours I chose are really the 'something old' I'm referring to here; here's the first card I made:

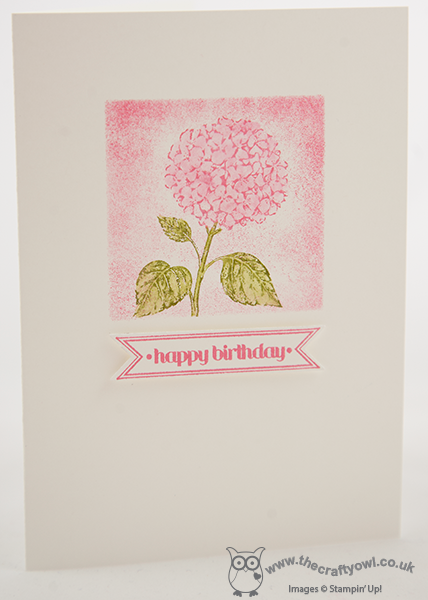
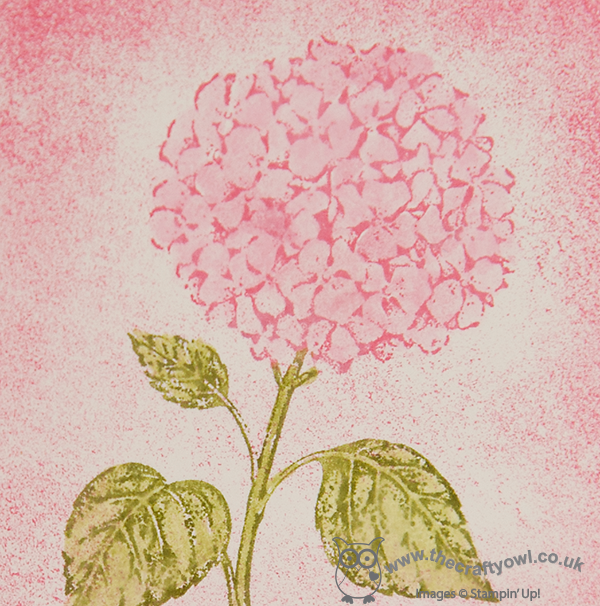
I chose a simple design and having inked my stamp with markers, I then used a blender pen to achieve a graduated colour on the blossom and leaves. I inset the flower in a square that I masked off and sponged around the edges for definition, in the same colour. Here's a close-up of the flower itself: 


I then decided to add an Itty Bitty 'Happy Birthday' banner by way of sentiment, and cut this out and popped it up on a couple of dimensionals so that I was not completely a one layer card. Here's the blue version in the same design:


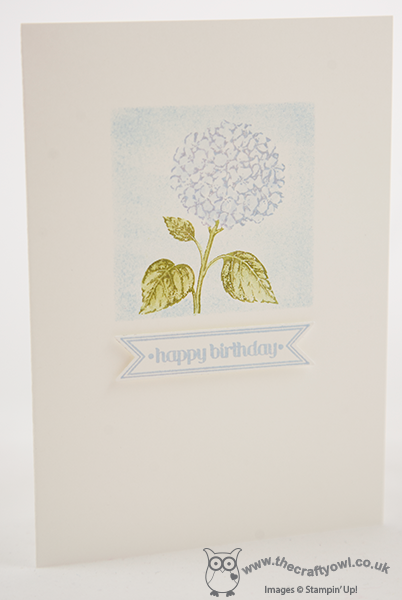
Very simple - like me! - and monochromatic. Did you guess the colours? Yes, it's Regal Rose and Bashful Blue, both colours that are leaving us at the end of this month to make way for some new additions to our colour families. They both reminded me of hydrangea colours though and seemed to justify one last use.

So that's all for today; I won't promise a post tomorrow, as our school fete has a reputation for going on long into the night with clearing up and counting of money. If I'm home at a reasonable hour, I'll be sure to share another card and the day's events with you; if not, I'll see you Sunday. Until then, happy stampin'!


Stampin' Up Supplies:

Stamps: Best of Flowers, Itty Bitty Banners

Cardstock: Whisper White

Ink/Stampin' Write Markers: Regal Rose, Bashful Blue, Old Olive

Tools: Itty Bitty Banners Framelits, Sponge

Tiptoe Through the Tulips

by Joanne James18. May 2013 20:19

A busy week this week! I was partying last night - will share the card later this week - with an old and dear friend of mine who was celebrating a milestone birthday, so no blog post, I'm afraid. I've so much ready to share though - so keep checking back for lots of card and crafting inspiration as I should be back to daily posts now. Today I thought I would share a card inspired by a Wendy Weixler card (you can see her original card here) but I changed a few things, including the colourway to reflect the tulips in my garden, which finally bloomed a couple of weeks ago:

Tulips are one of my favourite flowers and there's nothing like a bunch of spring blooms to brighten your day. I love the dimension and depth of this card; the tulips are made using a heart punched with the Small Heart Punch, then the hearts are cut in half down the centre and three halves layered to achieve the petal effect. The leaves were made using the smallest of the oval framelits, just cutting away the edges. Here's a couple of photos of the tulips on my garden, which inspired my choice of pink and purple colours:

 These are really blousy and frilly and open out into huge blooms, whereas the ones below are much more traditional in their shape and style:

I'll leave you with one last picture that shows a close up of the tulip punch art on my card today; back tomorrow with another project, until then happy stampin'!

Stampin' Up Supplies:

Stamps: Itty Bitty Banners

Cardstock: Whisper White, Rich Razzleberry, Melon Mambo, Pink Pirouette, Gumball Green, Polka Dot Parade DSP

Ink/Stampin' Write Markers: Rich Razzleberry

Tools: Small Heart Punch, Ovals Framelits, Windows Framelits, Bitty Banners Framelits, Perfect Polka Dots Embossing Folder

Mini Catalogue

BROWSE THE CATALOGUE

The mini catalogue is now live! Read and download your copy here.

Shop Online

Access my online shop 24 x 7, 365 days of the year:

Current March hostess code:

S9F2XJJW

Shop Online

Join My Team

It's always a great time to join Stampin’ Up! New team members can get £130 worth of products for only £99 + free business supplies + free shipping + all the fun being a part of Stampin’ Up! Stampin' Up! has something for everyone: join my growing team and benefit from my support to enjoy Stampin' Up! however you choose.

If you're interested, call me for a chat to understand how I can help you realise your goals. Alternatively, if you have already decided to sign up and you just can't wait, please click here for the link to the online form where you can sign up and order your starter kit right away! 

Latest Kit!

Stampin Cut and Emboss

The Rock Legend Kit has all you need to make 8 cards with coordinating envelopes. Along with the new Panda Friends Kit, both are available from January 4th for just £14 each - get yours here!

2023-24 Annual Catalogue

BROWSE THE CATALOGUE

Click on the catalogue for a full list of current SU! supplies - if you would like to order any of the items featured, please drop me a line at [email protected] or give me a call on 07773 421446 - I'd be happy to help.

New Online Exclusives

There will be new products available exclusively in the online store from 5 March - check them out here.

About Me

Hi I'm Joanne and live in Northampton and when I'm not looking after my husband and two beautiful children, am an avid crafter with a passion for all things Stampin' Up!

I must confess that I have never been a big rubber stamper - until I discovered Stampin' Up! that is. I love the fact that I can get such great results with co-ordinating stamps, inks, papers and punches - the possibilities are endless! Join me on my stamping journey as I share the things I love and be inspired to create amazing things yourself!

Follow Me

Monthly Newsletter

Box Builder

Click the button above to use Box Buster to create your custom box design using the Envelope Punch Board!

Kits Collection Now Available!

Stampin Cut and Emboss

The new Kits Collection from Stampin' Up! is now available!

Click here to see the current kits available and order yours online today.

I Design For


Stampin' Up Stuff

This is my personal blog and is not endorsed by Stampin’ Up! I hope you find it a plentiful source of ideas and personal inspiration but please don't copy my designs for contest submission or use for classes, publication or sale without express permission.