Sparkly Black and Gold Broadway Birthday Cards

by Joanne James21. May 2019 20:30

Having shared a couple of Broadway Birthday cards with you last week (you can see those here if you missed them) I promised to share another that I created at the same time that was a variation on the same theme, this time using the gold and black candle designer series paper. Here's my card:


Here's the low-down on today's card:

The centralised sentiment is still the focal point of my card, with a combination of both a stamped element and the diecut 'Wish' with gold metallic pearls to highlight my marquee-style Wish diecut, but more of the designer paper on show. 

Here is the visual summary of the key products used on today's project for you to pin for easy reference:


You can see all of my 'How To' summaries on my 'How To - Tips and Techniques' Pinterest board in case you've missed any. 

Enjoy your evening - I'll be back tomorrow with another project. Until then, happy stampin'!


Stampin' Up! Supplies Used:

Table built using Product Table Builder by The Crafty Owl - Independent Stampin' Up! Demonstrator.

Broadway Birthday You're Never Too Old in Two Colours

by Joanne James15. May 2019 09:00

Today I'm sharing a couple of cards that use this week's CAS(E) This Sketch layout:

I thought this would be a great design for a couple of birthday cards; I seem to be running out of these so need to stock up! This is what I came up with:


Here's the low-down on today's card:

Broadway Bound - My card started with a strip of Broadway Bound specialty DSP across the bottom edge of the front of my card. This pack has some fabulous foil designs but today's card features one of the reverse patterns - a row of fun party hats, perfect for a celebratory birthday card. These papers are designed to co-ordinate with the Broadway Birthday Bundle and form part of the Broadway Bound Suite. Whilst the other items in the suite are carrying over to the new annual catalogue, these papers are not so if you like them you only have a few more weeks to snap them up. The same goes for the in-colour Lemon-Lime Twist cardstock that I used for the base of my card; this is no longer available in a single colour pack or the Broadway Bound cardstock pack, however it is still available in the in-colour A4 collection (link below).

A Wish And A Sparkle - The centralised sentiment is the focal point of my card, with a combination of both a stamped element and the diecut 'Wish', which I embellished with a host of sparkly rhinestones to add to the marquee-feel of this fun card.  

Broadway Birthday Bundle - The Broadway Birthday stamp set and Broadway Lights framelits dies are available as a bundle in the current annual catalogue and whilst they are both carrying over to the new catalogue, they will not be available at the discounted bundle price. If you would like to take advantage of the additional 10% saving when you buy these items together, then order your bundle now whilst you still have the opportunity to do so.

I loved this card so much I made another one in more masculine colours too that is perfect for this week's challenge over at Stamp Ink Paper which is cards for men: 

Here's my masculine version:


Here is the visual summary of the key products used on today's project for you to pin for easy reference:


And here's the details for the second card:


You can see all of my 'How To' summaries on my 'How To - Tips and Techniques' Pinterest board in case you've missed any. 

I loved this sketch and made another card with it which I will link up later, along with a couple of alternative cards using the Broadway Birthday Suite which I will share with you another day. I have to get a few more jobs done then I'm off to watch one of the James Juniors play cricket this afternoon; it looks like he might just get to play his first game of the season without wind, rain or cancellation due to a waterlogged pitch. Today's sunny day is just perfect for cricket!

Enjoy your day - I hope you get to enjoy some sunshine wherever you are too. Until next time, happy stampin'!


Stampin' Up! Supplies Used:

Table built using Product Table Builder by The Crafty Owl - Independent Stampin' Up! Demonstrator.

Butterfly Beauty Inlaid Foil Diecut Birthday Card

by Joanne James9. May 2019 20:30

Today I'm sharing a card for the current challenge over at Stamps Ink Paper where they are all about winged things this week:

After I made this card for our challenge over at The Paper Players on Sunday, the frugal crafter in me couldn't bear to throw away the rectangle of foil that I cut my butterflies for the pop-up out of, so I save it, along with the inset pieces, and diecut more black butterflies using the large die in the Butterfly Beauty Thinlits set and created a second card by piecing together my offcuts - take a look:


Once I'd pieced the whole thing together, I added some ribbon and sequins beneath my sentiment banner then decorated the inside of my card with the co-ordinating Beauty Abounds stamp set:


The paper-piecing here was something of a labour of love, but that Lovely Lipstick foil is just too pretty to allow any of it to go to waste!

Here is the visual summary of the key products used on today's project for you to pin for easy reference:


You can see all of my 'How To' summaries on my 'How To - Tips and Techniques' Pinterest board in case you've missed any. 

I'll be back tomorrow with another project. Until then, happy stampin'!


Stampin' Up! Supplies Used:

Table built using Product Table Builder by The Crafty Owl - Independent Stampin' Up! Demonstrator.

Beauty Abounds Butterfly Pop Up Birthday Card for PP440

by Joanne James5. May 2019 09:00

Today it's Sunday and time for this week's new challenge over at The Paper Players! It's the turn of the fabulous Jaydee to host this week and she has a fun theme challenge for you to work with:


Cards for friends are the best kind to make and I had a few different cards made that fitted this theme, but decided to share a special card that I made for one of my best friends who is celebrating a milestone birthday next month. This card is also perfect for the #SUOC222 celebratory theme over at SUO Challenges this week. My card is is bright, sparkly and features one of her favourite things - butterflies. First of all, here's the outside:


A selection of butterflies, loosely watercoloured in Melon Mambo and Lovely Lipstick and painted with Wink of Stella, along with the bokeh stamp from the Beauty Abounds stamp set, were flicked with ink and white shimmer paint, along with a liberal sprinkle of white metallic sequins form the basis for the background to my extra-large cardfront (it measure 15cm x 21cm) which provide a colourful background for my focal sentiment, which I accented with some layered diecut butterflies cut using pieces of the main large die in the Butterfly Beauty Thinlits set.

The Beauty Abounds stampset has such great sentiments for friendship cards; this one is completed on the inside of my card along with a fun pop-up surprise:


My simple pop-up includes the whole of the large butterfly thinlit, layered in black over Lovely Lipstick foil (ssaved from Sale-A-Bration). Difficult to photograph well, but it's really impressive in real life and I know my friend will love it! I added the second part of the sentiment; ours is indeed a friendship over many years, that started with the birth of our first babies but has grown in to something much more - it is not that one thing but a million little things that keep it going as the years go by.  I included some sparkly numbers (there comes a time when a milestone birthday is worth celebrating but does not necessarily need to be seen on the front of the card in my view!) along with a little more decoration and a birthday sentiment from the 'Beautiful Day' set that the watercoloured butterfly on the front also came from. 

Here is the visual summary of the key products used on today's project for you to pin for easy reference:


You can see all of my Product and 'How To' summaries on my 'How To - Tips and Techniques' Pinterest board in case you've missed any. 

Before you reach for your ink and papers, check out what our amazing team has created to inspire you this week:

Here's a quick recap of our challenge rules:
 
1.  Create a new paper project
2.  Upload your creation to your blog with a link back to us and provide a direct link to the post featuring your challenge submission.
3.  Please link your card to no more than four challenges, TOTAL.
4.  Have FUN!

You can see all of my 'How To' summaries on my 'How To - Tips and Techniques' Pinterest board in case you've missed any. 

Enjoy your day; we had a busy day yesterday with sport and a quick shopping trip for new school shoes for the youngest of the James Juniors who seems to be having a major growth spurt this year, (no blog post as I got too engrossed in a movie about Ted Bundy that I was watching last night and struggled to multi-process) so are looking forward to a slightly quieter one today, which will culminate with the final episode of the current season of 'Line of Duty' on TV tonight; any of my UK readers also looking forward to this 'who dunnit?' finale? We are also lucky to have a public holiday here in the UK this weekend, so will be making the most of the extra day tomorrow even though the weather is no great shakes - it's cold and showery and we even had hail yesterday! I'll be back then with another project. Until then, happy stampin'!


Stampin' Up! Supplies Used: 

Table built using Product Table Builder by The Crafty Owl - Independent Stampin' Up! Demonstrator.

Balloons Floating Frame Birthday Cards

by Joanne James8. April 2019 11:30

Happy Monday everyone! Today I'm sharing a card using the sketch over at Freshly Made Sketches and the current colour palette at Fab Friday:


My card features a technique that is currently all the rage and I've been wanting to have a go at - the floating frame technique. This actually means I have two cards for you! Here's the first one:


And here's the second one, featuring the outer frame element:


Here's the low-down on today's card:

Floating Frames - The floating frame technique is really easy to create with a few basic tools: some 'Press and Seal' food wrap or similar, a framelit - I used my Rectangle Stitched Framelits Dies - and lots of dimensionals! You simply stamp and punch/diecut your images, lay them out, cover with Press and Seal, trim to frame size and cut out your central piece, before adhering dimensionals to the back of the diecut pieces and adhering to your chosen card base. Finally you remove the Press and Seal and your floating shapes remain in place. Jennifer McGuire has a fabulous video on this technique if you want to see one of these cards being made - you can see it here

Birthday Balloons - I've seen some fabulous examples of this technique, mostly using florals, but I was in need of some birthday cards and I thought the colours over at Fab Friday would be perfect for some bright and colourful balloons. I had so much fun making these cards I'm going to make a few more in alternative colour combos too - this is a great card design that would work well for both boys and girls, so makes a great storecupboard standby. I stamped my balloons with one of the stamps in the 'Happy Birthday Gorgeous' stamp set before punching them for added interest and I used one of the other balloon stamps in the set to decorate the envelope, as you can see below:

No need for a naked envelope here!

A Birthday Greeting - For my second card, I needed a larger greeting to sit inside my frame so my Well Written Framelits were the perfect choice. I also added an extra balloon for balance, tied with some white baker's twine. The same design could be used with other stamps and sentiments from this set too to make cards for other occasions - how many other combinations can you come up with? 

Here are the visual summaries of the key products used on today's projects for you to pin for easy reference:


You can see all of my 'How To' summaries on my 'How To - Tips and Techniques' Pinterest board in case you've missed any. 

Enjoy your day; we are having a kit clear-out in the playroom today. So far we've made an erupting volcano, an insect hut, a flying helicopter and two solar-powered motorised dinosaurs. You've got to love the Easter holidays! I'll be back tomorrow with another project. Until then, happy stampin'!


Stampin' Up! Supplies Used:

Table built using Product Table Builder by The Crafty Owl - Independent Stampin' Up! Demonstrator.


Elongated Birthday Edgelit Rainbow Cupcake Card

by Joanne James12. March 2019 21:00

I've had two days of back-to-back classes so things have been fairly busy here!  A quick post from me today to share the card that I mentioned in my Paper Players post on Sunday. Our theme this week is 'colours of the rainbow' so I couldn't resist creating one with the cupcake die in the Detailed Birthday Edgelit Die set too - take a look:


Here's the low-down on today's card:

A Rainbow Of Cupcakes - Just like Sunday's card - you can see it here if you missed it - I wanted to utilise all of the colours of the rainbow on my card. I played around with the edgelits on this card too in order to accommodate this, cutting two sets of three cupcakes from one piece of Whisper White cardstock to give me a total of six cupcakes. I used my seventh and final rainbow colour, violet, or in this case Highland Heather, as the background for my card and to highlight the detail on the cupcake cases.

 A Little Paper Piecing - The pieces for the cupcake details are larger and easier to manipulate than for the presents die, so on today's card I used the edgelits to cut a set of cupcakes in each colour and used the pieces from the frosting to inlay them into my white die surround.

Go Long - As a result of using two diecuts joined at the centre, my cardfront is long and narrow as opposed to the standard A6 size that I usually make. This is a nice way to ring the changes with a card and with my BoxBuster tool and trusty Envelope Punch Board on hand to make a custom envelope, need not be an issue when it comes to needing to mail it.

There's very little stamping on today's card - just a heat-embossed sentiment on the front and a greeting with cupcake decoration inside:

Here is the visual summary of the key products used on today's project for you to pin for easy reference:


You can see all of my 'How To' summaries on my 'How To - Tips and Techniques' Pinterest board in case you've missed any. 

I'll be back tomorrow with another project. Until then, happy stampin'!


Stampin' Up! Supplies Used:

Table built using Product Table Builder by The Crafty Owl - Independent Stampin' Up! Demonstrator.

Rainbow Presents Detailed Birthday Edgelit Card For PP432

by Joanne James10. March 2019 09:00

Today it's Sunday and time for this week's new challenge over at The Paper Players! It's the turn of the fabulous Claire to host this week and she has a fun theme challenge for you to work with:
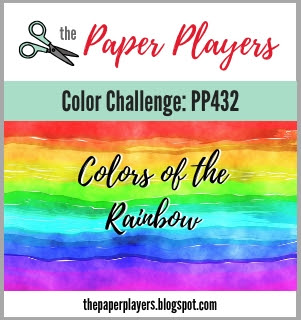
 

Colours of the rainbow - I love it! I decided a rainbow collection of birthday presents were the order of the day - take a look:
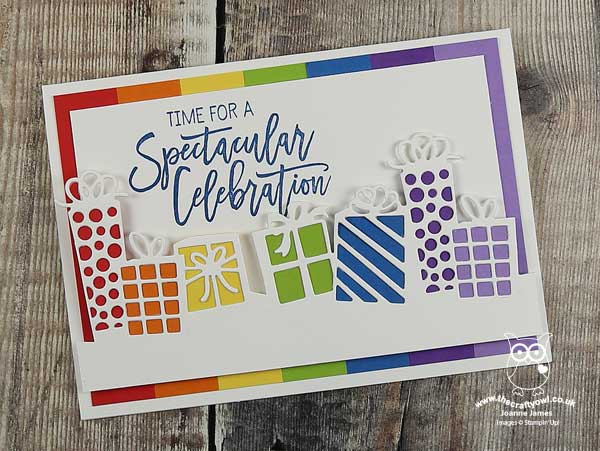
 

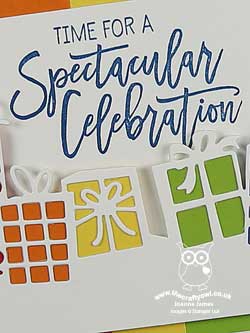
Here's the low-down on today's card:

I Can Sing A Rainbow - However you remember it (my personal favourite mnemonic is 'Richard Of York Gave Battle In Vain'), the perfect rainbow has seven colours: red, orange, yellow, green, blue, indigo and violet and I was determined to feature them all on my card! In addition to using cardstock in each of the rainbow colours to back my presents die (a great way to use up your scraps), I also created a background consisting of a vertical strip of each to tie in with the rainbow theme.  

Seven Present Solution - The focal point of my card is definitely the rainbow presents, courtesy of the fabulous Detailed Birthday Edgelit Dies. The eagle-eyed amongst you will notice that the actual die has only five presents, not seven. To create my row of seven gifts, I placed the die and white cardstock in my Bigshot and rolled through once, without going to the very end of the die, then moved the die along and rolled it again, to create a longer length of presents that I then trimmed to fit. Job done!

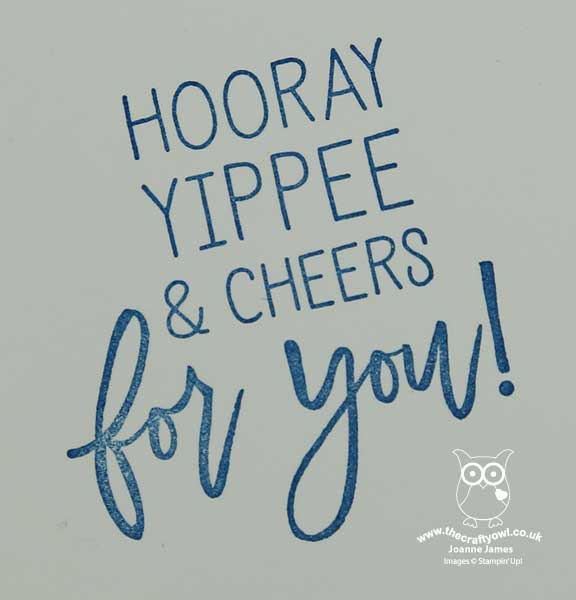
Birthday Cheer Inside and Out - There's very little stamping on this card - just a greeting on the front and a little more on the inside, courtesy of the co-ordinating 'Birthday Cheer' stamp set:
Here is the visual summary of the key products used on today's project for you to pin for easy reference:
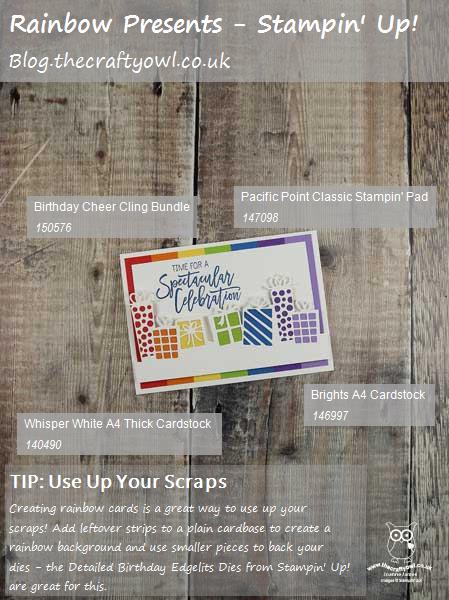
 

You can see all of my Product and 'How To' summaries on my 'How To - Tips and Techniques' Pinterest board in case you've missed any. 

I just love this set and card - the fun colours make it suitable for any person,  boy or girl, young or old - and this will definitely be a staple in my card box. Well, this one and the one that I will feature in another post later this week with a similar rainbow theme!

Before you reach for your ink and papers, check out what our amazing team has created to inspire you this week:

Here's a quick recap of our challenge rules:
 
1.  Create a new paper project
2.  Upload your creation to your blog with a link back to us and provide a direct link to the post featuring your challenge submission.
3.  Please link your card to no more than four challenges, TOTAL.
4.  Have FUN!

You can see all of my 'How To' summaries on my 'How To - Tips and Techniques' Pinterest board in case you've missed any. 

Enjoy your day; ours was a busy one yesterday at the swimming pool so I'm hoping today will be a little more relaxing. I'll be back tomorrow with another project. Until then, happy stampin'!


Stampin' Up! Supplies Used: 

Table built using Product Table Builder by The Crafty Owl - Independent Stampin' Up! Demonstrator.

Hello Cupcake Simple Sale-A-Bration Birthday Card

by Joanne James31. January 2019 22:25

I've had a busy day so just time to pop in with a quick post to share a simple birthday card that is super quick to make - take a look:

For this week's take on #SimpleStamping I have a CASE (Copy And Share Everything) of one of the samples in the current Sale-A-Bration brochure featuring the Hello Cupcake stamp set - a simple card base with a white panel and a flagged banner (I used the Triple Banner Punch to flag my ends, but you could cut them by hand using scissors), a single stamped image courtesy of the 'Hello Cupcake' stamp set, 3 ink colours and an optional sprinkle of self-adhesive sequins. Really easy to recreate with minimal supplies - just what #SimpleStamping is all about. 

Here is the visual summary of the key products used on today's project for you to pin for easy reference: 


You can see all of my 'How To' summaries on my 'How To - Tips and Techniques' Pinterest board in case you've missed any. 

I'll be back tomorrow with another project. Until then, happy stampin'!


Stampin' Up! Supplies Used:

Table built using Product Table Builder by The Crafty Owl - Independent Stampin' Up! Demonstrator.

Get Your Cake Builder Punch Now Whilst Stocks Last - and the Butterfly Duet Punch Too!

by Joanne James28. January 2019 09:00

Happy Monday everyone! First things first - an apology for the lack of posts last week; for those of you who have tried to access my blog or my website to access the BoxBuster and Envelope Expert tools between Tuesday and Thursday, I had a website outage that impacted both my blog and website and my email, and didn't manage to get it back online until late Thursday afternoon. I know many of you enjoy free access to my tools, and interruptions to service are far from ideal. I have been experiencing issues of one kind or another since I was hacked last October and it is proving incredibly difficult to maintain a consistent online presence. We are working on it and I would ask for your patience and understanding until these issues are fully resolved. If you are reading this and not already following me on Facebook, I urge you to do so here since this is where I will post updates of outages and such like, so you will at least be the first to know when I am back online. Here's hoping for a better week on the IT front!

Back to today's business; a slight change to my blog schedule and I'm sharing a card for a few challenges but that is born out an important business announcement - take a look:


There is a great sketch over at CAS Colours and Sketches that is also perfect to showcase some designer paper for the peeps over at TGIF Challenges. I decided to make a bright and colourful birthday card that also fits with the birthday theme over at SUO Challenges:


Here's the low-down on today's card:

A Piece of Cake - Today's fun cake comes from the 'Piece of Cake' stamp set in the Spring-Summer catalogue; great for birthday cakes and wedding cakes, you can use this set to create a cake for any season or occasion. after all there's always a reason to celebrate! The set also comes with lots of fun sentiment pairs - the reply to the 'cake is the answer ...' that I used on the front of my card is featured on the inside along with my birthday greeting:


How fun is that?! Sure to raise a smile, whatever the celebration.

How Sweet It Is - I coloured my cake with my Stampin' Blends, inspired by the spots and stripes patterns that I chose to highlight in my DSP squares. These patterns are two of my favourites in the bright and fun 'How Sweet It Is' Product Suite, that feature lots of sweets and candy, perfect to indulge your sweet tooth. they also co-ordinate with another of my favourite accessories, the glitter enamel dots from the main catalogue.

Get It While You Can - The Cake Builder Punch (item 148525) and the Butterfly Duet Punch (item 148523) have proved extremely popular since catalogue launch and sales have exceeded forecasts. Although not currently on backorder, stocks of these products are expected to run out within the next two weeks, after which they will no longer be orderable until back in stock. Whilst both punches are carrying over to the next annual catalogue in June, you are advised to get your orders in for these sooner rather than later. I am placing an order this week if you are local to me and would like to save on postage, jut get in touch. Alternatively, place your order directly online.

Here is the visual summary of the key products used on today's project for you to pin for easy reference:


You can see all of my 'How To' summaries on my 'How To - Tips and Techniques' Pinterest board in case you've missed any. 

I like this card so much I made a few using the same design, just switching out the background colours - they are so cheery, i'm definitely a predominantly 'brights' girl at heart!

I have a busy work week this week, so need to get cracking. Enjoy your day and I'll be back tomorrow with another project. Until then, happy stampin'! 


Stampin' Up! Supplies Used:

Table built using Product Table Builder by The Crafty Owl - Independent Stampin' Up! Demonstrator.

Sweet Soiree 18th Birthday Card

by Joanne James26. April 2018 20:30

I've had a few cards to make of late for milestone birthdays so thought I'd share one of them today, that uses last week's Freshly Made Sketches layout as inspiration - take a look:


I decided to use up some of the leftover bits and pieces from my Sweet Soiree Embellishment Kit (I just love this - it really does keep on going!) and layer a cake with some of the flowers, along with a silver doily, a circle of silver spotted acetate and a proper sparkly die cut sentiment  - so glad these 'Celebrate You' thinlits from this year's Sale-A-Bration offering are carrying over to the new annual catalogue. A background of co-ordinating Sweet Soiree paper and no stamping - well not on the front of my card anyway! I did stamp on the envelope and on the inside of my card:


I also added some numbers from the kit and a strip of foil washi tape to the inside of my card just to finish things off. Suitably special without being too over the top, I think - I'd love to hear your views, do feel free to leave me a comment below!

Here is the visual summary of the key products used on today's project for you to pin for easy reference:


You can see all of my 'How To' summaries on my 'How To - Tips and Techniques' Pinterest board in case you've missed any. 

I'll be back tomorrow with another project. Until then, happy stampin'!


Stampin' Up! Supplies Used:

Table built using Product Table Builder by The Crafty Owl - Independent Stampin' Up! Demonstrator.

Mini Catalogue

BROWSE THE CATALOGUE

The mini catalogue is now live! Read and download your copy here.

Shop Online

Access my online shop 24 x 7, 365 days of the year:

Current April hostess code:

VDKNV7BH

Shop Online

Join My Team

It's always a great time to join Stampin’ Up! New team members can get £130 worth of products for only £99 + free business supplies + free shipping + all the fun being a part of Stampin’ Up! Stampin' Up! has something for everyone: join my growing team and benefit from my support to enjoy Stampin' Up! however you choose.

If you're interested, call me for a chat to understand how I can help you realise your goals. Alternatively, if you have already decided to sign up and you just can't wait, please click here for the link to the online form where you can sign up and order your starter kit right away! 

Latest Kit!

Stampin Cut and Emboss

The Rock Legend Kit has all you need to make 8 cards with coordinating envelopes. Along with the new Panda Friends Kit, both are available from January 4th for just £14 each - get yours here!

2023-24 Annual Catalogue

BROWSE THE CATALOGUE

Click on the catalogue for a full list of current SU! supplies - if you would like to order any of the items featured, please drop me a line at [email protected] or give me a call on 07773 421446 - I'd be happy to help.

New Online Exclusives

There are new products available exclusively in the online store from 5 March - check them out here.

About Me

Hi I'm Joanne and live in Northampton and when I'm not looking after my husband and two beautiful children, am an avid crafter with a passion for all things Stampin' Up!

I must confess that I have never been a big rubber stamper - until I discovered Stampin' Up! that is. I love the fact that I can get such great results with co-ordinating stamps, inks, papers and punches - the possibilities are endless! Join me on my stamping journey as I share the things I love and be inspired to create amazing things yourself!

Follow Me

Monthly Newsletter

Box Builder

Click the button above to use Box Buster to create your custom box design using the Envelope Punch Board!

Kits Collection Now Available!

Stampin Cut and Emboss

The new Kits Collection from Stampin' Up! is now available!

Click here to see the current kits available and order yours online today.

I Design For


Stampin' Up Stuff

This is my personal blog and is not endorsed by Stampin’ Up! I hope you find it a plentiful source of ideas and personal inspiration but please don't copy my designs for contest submission or use for classes, publication or sale without express permission.