by Joanne James27. October 2016 08:05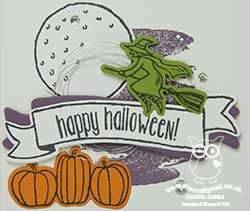
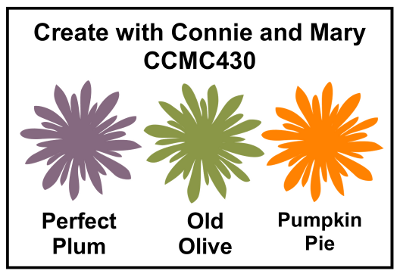
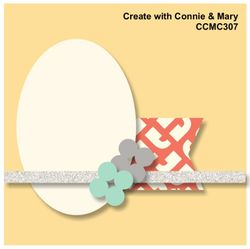
Today it's time for a new challenge over at Create With Connie and Mary and this week we have a colour combination for you:
It would be fair to say I struggled big time with these colours this week! I couldn't get away from the idea of Halloween, yet making them work was definitely a challenge! I ended up making two cards and I must confess I'm not completely happy with either of them! That said, I'm sharing my notelets with you anyway - here's the first one:
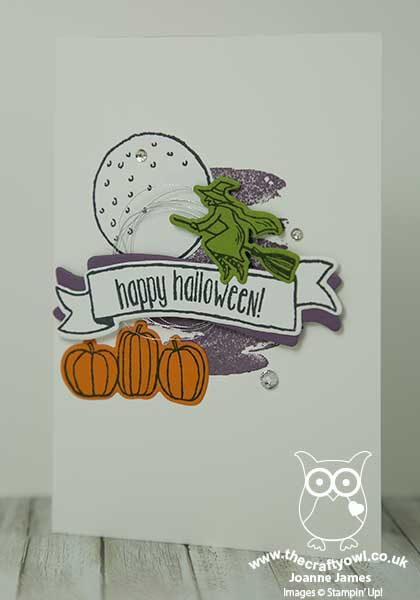
And here's the second one:

Both use a combination of the challenge colours and the Spooky Fun stamp set and co-ordinating Halloween Scenes Edgelits Dies. The second one also includes a sentiment from the 'Suite Seasons' stamp set and a background created with the spots stamp in the 'Perpetual Calendar' set, along with a sentiment banner on each. Each would be quick and easy to create, although first time around they took me longer than I would have liked!
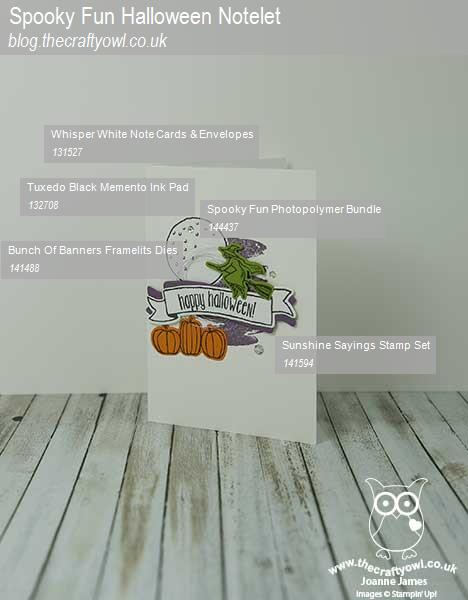
Here is the visual summary of the key products used on today's project for you to pin for easy reference:
You can see all of my 'How To' summaries on my 'How To - Tips and Techniques' Pinterest board in case you've missed any.
Do visit the other Design Team members to see what they did with this week's colours; there's lots of inspiration over on their blogs too!
Enjoy your day - we are off to Brick Live to play Lego all day, a James family passion! Hope you enjoy your day too and I'll be back tomorrow with another project. Until then, happy stampin'!
Stampin' Up! Supplies Used:
bbefe81b-6102-48f3-ab10-cd74210b8d77|0|.0|96d5b379-7e1d-4dac-a6ba-1e50db561b04
Tags: Create With Connie And Mary, Shop online, Shop Stampin' Up online, Stampin' Up, Stampin' Up Card, Stampin' Up Card ideas, Stampin' Up Supplies, Halloween, Halloween Scenes Edgelits, Perpetual Birthday Calendar Stamp Set, Spooky Fun, Banner Punch, Banner Greetings, Banners Framelits
Cards | Shop Online | Shop Stampin' Up! Online | Stamping
by Joanne James18. June 2014 08:45Back so soon, I know - here is today's creative post! I'm sharing a card I made using the sketch over at Create with Connie and Mary this week:
I decided to use some of my retiring stamps and papers for my card and started out making a birthday card because the cake reminded me of Rebecca's birthday cake at the weekend, but by the time I had everything laid out on my desk I decided that the card would make a nicer wedding card. Here's my finished card:
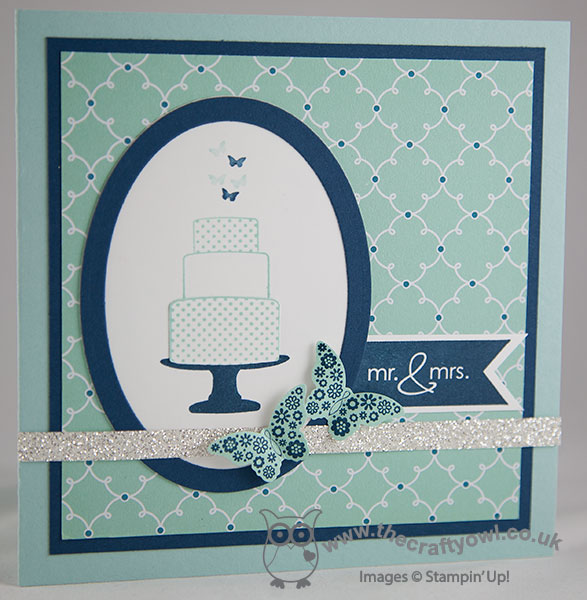
I made a 5" square card and matted a piece of Quatrefancy paper onto Midnight Muse and a Pool Party base (I know technically the dots on the paper are Island Indigo, but since the dots are so small the whole thing still works, even though I've not followed the colours exactly for the rest of the card - what a rule-breaker am I??!) I then stamped a three tier cake with butterfly decoration from the 'Make a Cake' stamp set, stamping the base section twice, once in Midnight Muse for the stand and then again in Pool Party. I fussy cut the Pool Party cake out and used it to create the base layer for my cake. I used my oval framelits to cut out my framed oval and finished with a Mr & Mrs banner flag from the 'Banner Greetings' stamp set, a couple of double-stamped and punched butterflies to echo those on top of the cake and a strip of silver glimmer paper for just the right amount of sparkle.
I really like this finished card but despite where my mind started out it looks absolutely nothing like Rebecca's kitkat cake that I made for her birthday this past weekend:
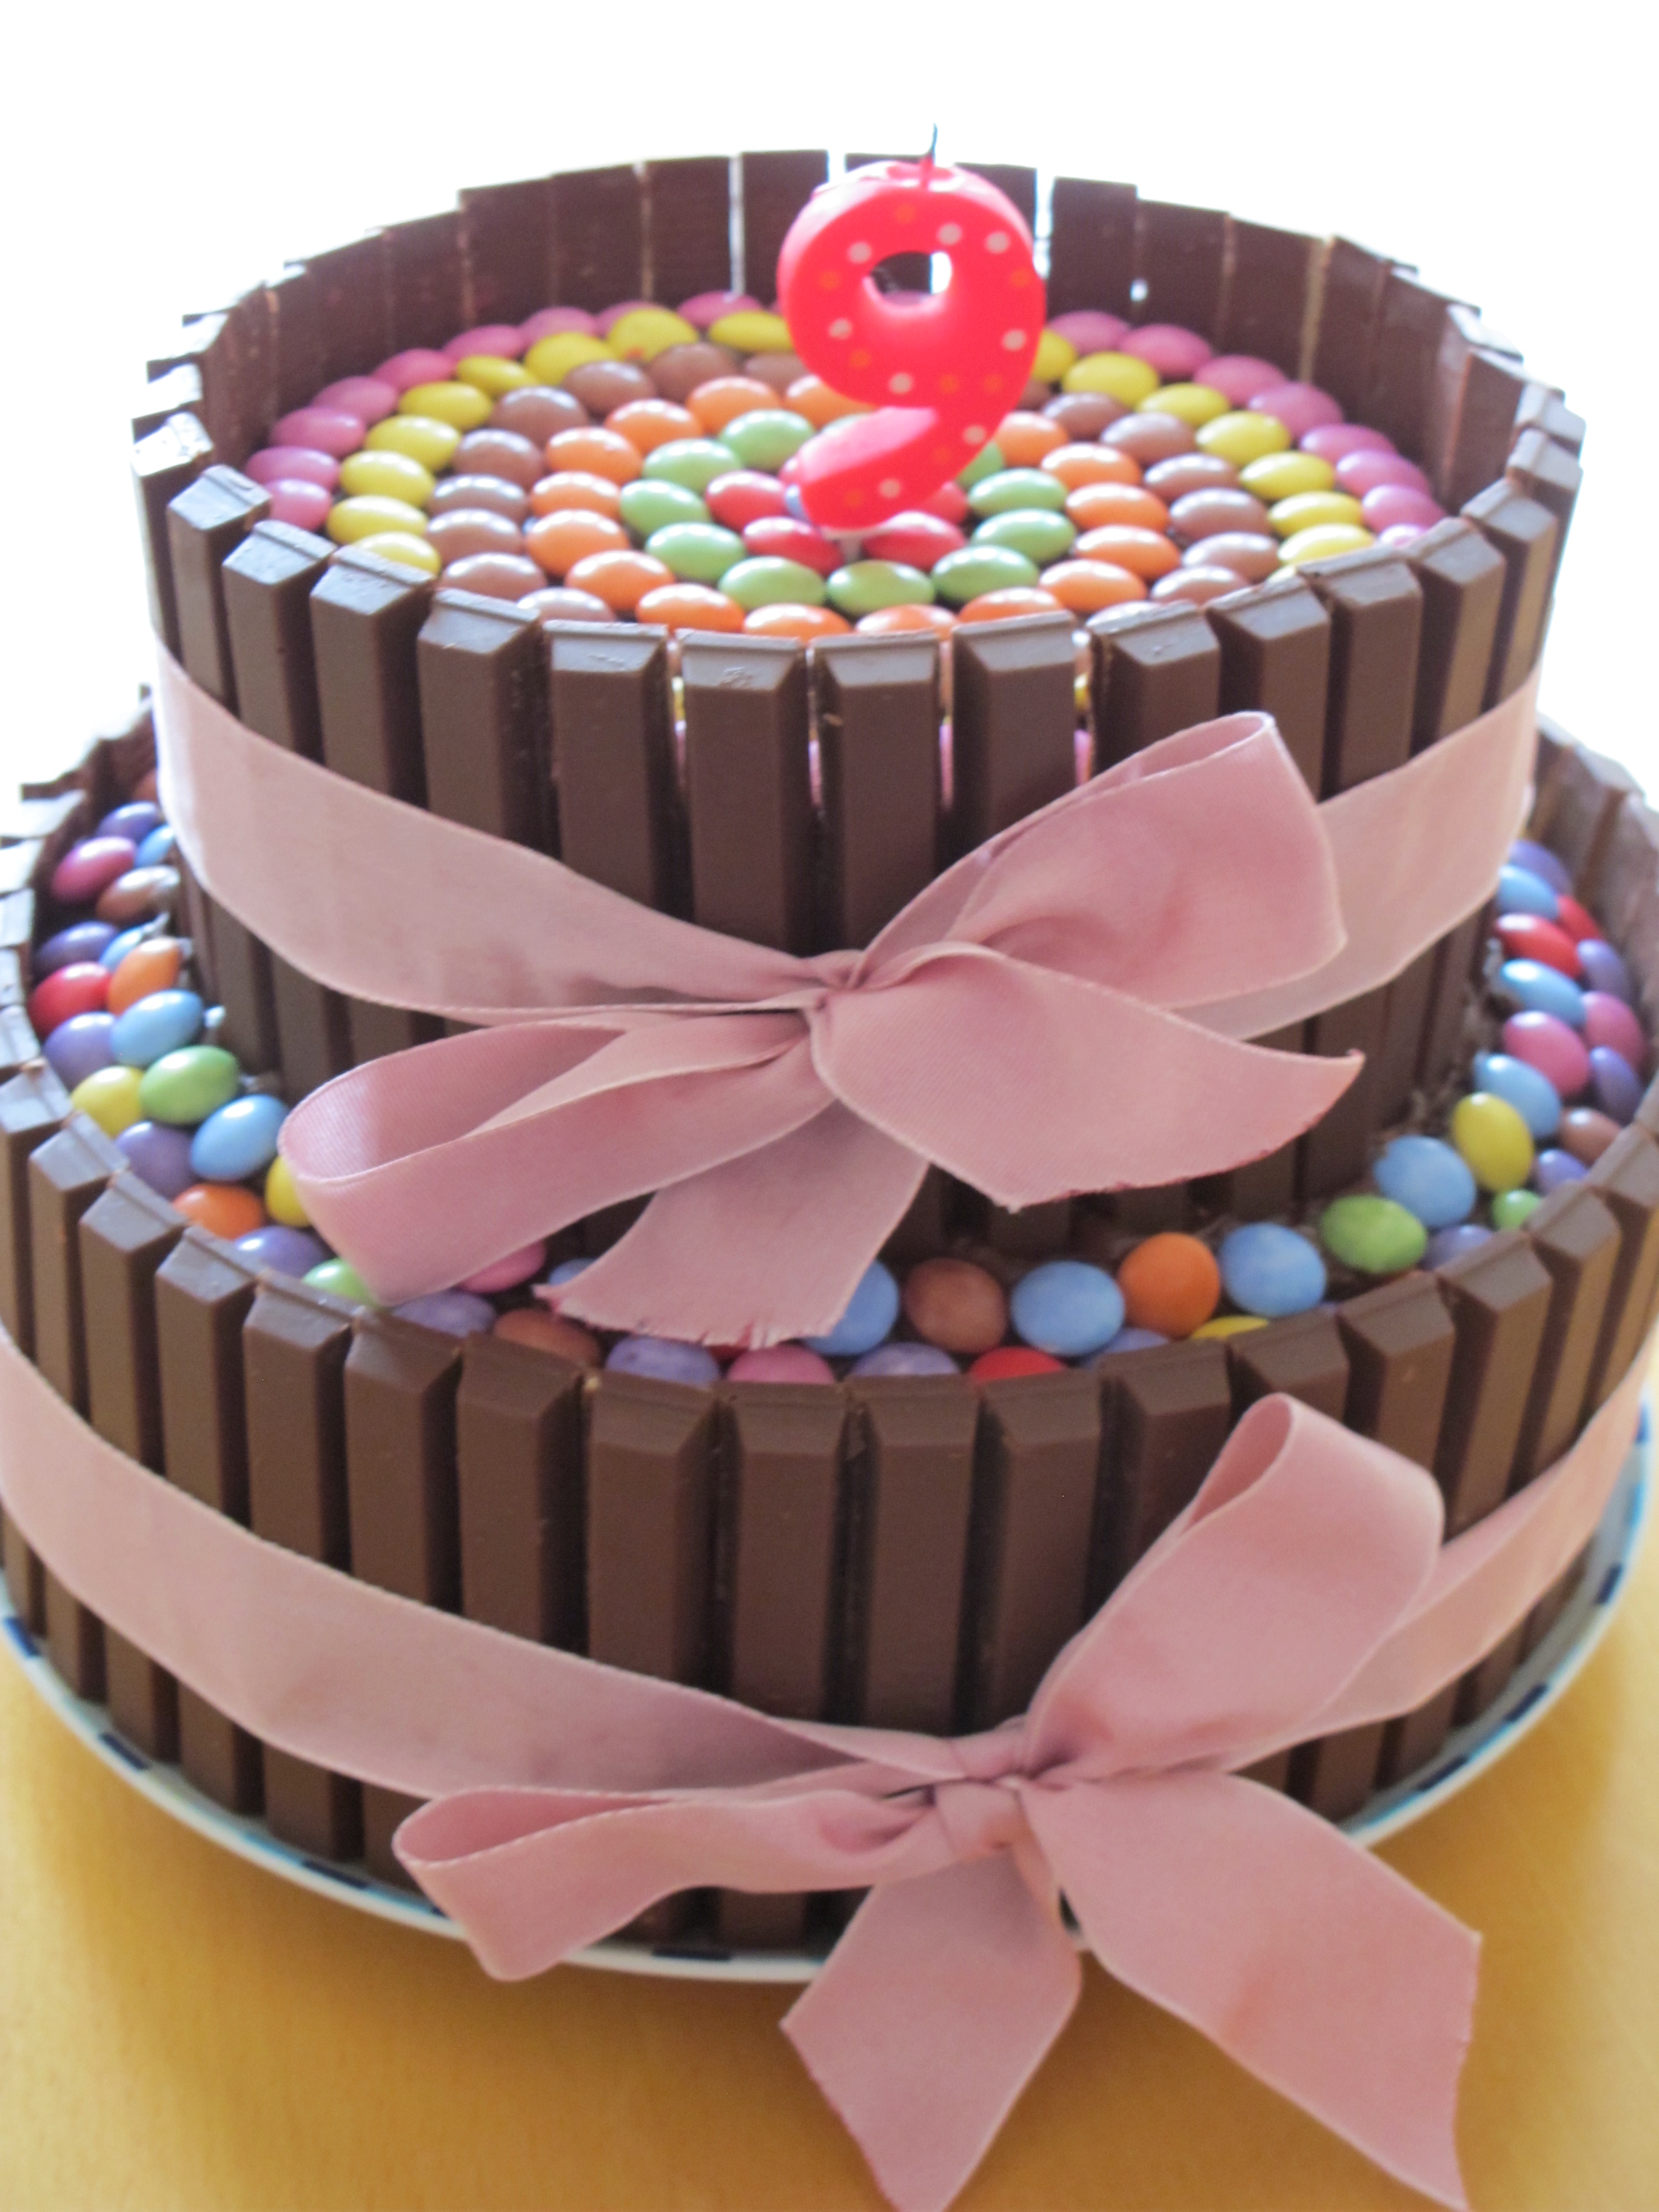
If that's not death by chocolate, then I don't know what is - it did taste delicious though!
Back tomorrow with another project; until then, happy stampin'!
Stampin' Up! Supplies Used:
93bcec03-573d-4108-ae97-7a7a62591318|0|.0|96d5b379-7e1d-4dac-a6ba-1e50db561b04
Tags: Banner Greetings, Big Shot, Ovals Framelits, Make a Cake, Papillon Potpourri, Shop online, Stampin' Up, Stamp-a-ma-jig, Stampin' Up Card, Stampin' Up Card ideas, Stampin' Up Supplies, Weddings
Cards | Stamping | Weddings
by Joanne James16. September 2013 22:32This is a short post I'm afraid - I've already typed this once and lost it, so am furiously retyping (I'm blaming the computer rather than the operator though - bloggers prerogative!) Today I'm sharing another of the mosaic cards from last week's class, this time showcasing the Quatrefancy Speciality Designer Series Paper:
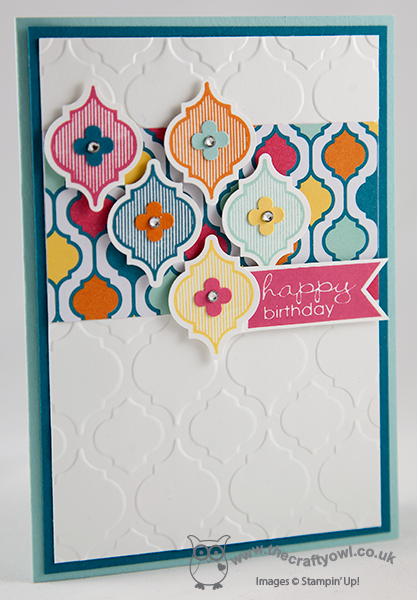
This is a CASe of a Janine Tinklenberg card that I saw on Pinterest. I love the bold colours of the designer paper and the stamped punched images really make it 'pop'. There really is so much you can do with this product suite; this card is simple in design, yet so effective.
Did you notice that all the cards in this month's class also featured the Banner Greetings stamp set? This is an exclusive hostess set that you can purchase with hostess credits earned on a qualifying party or individual order (£150 or more). There has never been a better time to host a party, with so many lovely new hostess sets in both the annual catalogue and Autumn-Winter seasonal catalogue to choose from. So what are you waiting for? Treat yourself to an early Christmas present of free crafting goodies and book a party with me today - get in touch to discuss available slots, there are still times available before Christmas.
Back tomorrow with another project; until then, happy stampin'!
Stampin' Up! Supplies Used:


181185fe-2d3c-4e62-987a-4e50dceac0c7|0|.0|96d5b379-7e1d-4dac-a6ba-1e50db561b04
Tags: Banner Greetings, Itty Bitty Punches, Mosaic Madness, Mosaic Embossing Folder, Mosaic Punch, Quatrefancy, Shop online, Stampin' Up Card, Stampin' Up Card ideas, Stampin' Up Supplies, Big Shot, Host a Party
Cards | Classes | Host a Party | Stamping
by Joanne James15. September 2013 20:52Hope you've all enjoyed a lovely weekend; mine's been great, but I must confess to not enjoying the weather; it feels like autumn has arrived with a vengeance and I don't much care for it. I am missing the Florida sunshine! Anyway, today's card is one we made in last week's Mosaic Madness class:
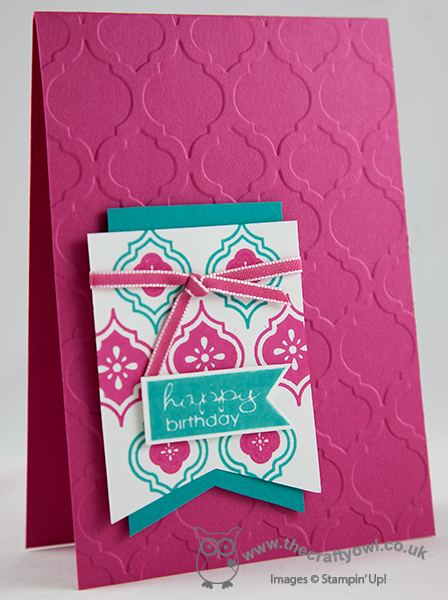
I've seen a few versions of this card on Pinterest and this is my take - bold and bright in Melon Mambo and Bermuda Bay. This was one of the more complicated cards we tackled, as it involves two-step stamping and accurate placement using the stamp-a-ma-jig to place the mosaic stamps accurately on the white flag. Some of my ladies chose to cheat a little and stamp their images onto scrap card and then punch them out and glue them to the flag, trimming to fit; that's fine too.
I really love this colour combination and the combination of the stamps with matching embossing folder is just right. This embossing folder is one of the most versatile and the pattern can be used either embossed or debossed, each giving a different effect. One last thing before I go - I hope you like the new-look supplies list at the end of this post. From now on, the idea is to show each of the products used with a direct line to my online store. This will make it really easy for you to purchase items and take advantage of any online hostess codes or offers or simply order your items any time, day or night. You may notice a few tweaks over the next few days as I make this happen, but if you have any questions about online ordering, please get in touch.
I'll share our other class cards with you this week. Until then, happy stampin'!
Stampin' Up! Supplies used:


