by Joanne James5. June 2014 21:30Today I'm doing one of those things that is somewhat dangerous if you're a cardmaking blogger and your intended recipients follow your blog - I'm blogging a card before I've sent it! So Barbara (affectionately known as 'Aunty Barbie' to Rebecca!) if you're reading this before Sunday - look away now!!!
Sandie's theme challenge over at The Paper Players this week is to create a card around the theme of love, weddings or anniversaries, and as I made a golden wedding anniversary card this week for a very special couple, I couldn't resist linking it up to share it. Here is my card:
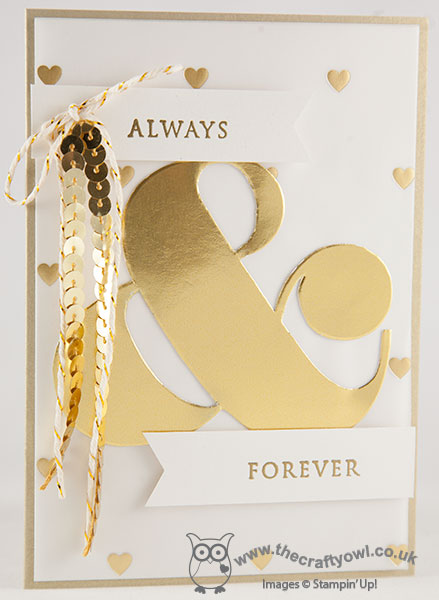
This card is a riot of gold products - 6 to be precise (or 7 if you count the gold Encore stamping inside, but that's mean because you can't see that!) Can you tell what they all are? I used Brushed Gold for my card base, then adhered a piece of Shimmer White cardstock to it, and a piece of gold Fancy Foil Designer Vellum to the top of that. I dry embossed the ampersand out of gold foil sheet and then fussy cut before adhering to my vellum top layer. I then made two flags out of Shimmer white card stock and heat embossed them with 'Always' and 'Forever' in gold embossing powder; these were both partial stamps from the 'This Day Forward' stamp set. I then popped the flags onto dimensionals and mounted them on opposing sides just touching the top and bottom of the ampersand. Lastly, I added a gold baker's twine bow and threaded this with a strand of gold sequins.
I think this card is just lovely - a fitting way to celebrate 50 years of marriage, which is some achievement in my book. Here's to Barbara and Bob and many more happy years together.
Back tomorrow with another card; until then, happy stampin'!
Stampin' Up! Supplies Used:
by Joanne James12. February 2014 09:56So I didn't quite manage to squeeze in another 'make' for you yesterday, but I'm here bright and breezy (or should that be windswept, given the gales we've had here for the last day or so!) this morning with today's card. Given my recent dalliances with the colour black, I thought I would try something different using black cardstock and one of my most favourite stamps - yes, the Flowerfull Heart (still available to order until Friday if you'd like one - click on the link to my online shop below!) Here is my card:
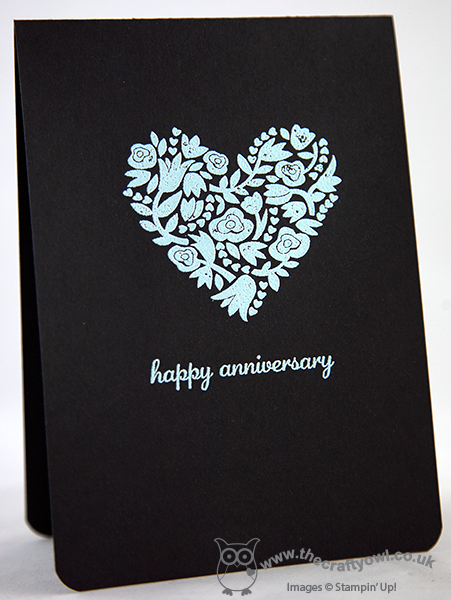
Now, I know you might be thinking "Anniversary card - on black??!" but hear me out! I wanted to use this stamp again with some heat embossing; I toyed with gold (well, it worked pretty well on this card I think) but eventually decided to use Pool Party embossing powder. My colour combination was inspired by one of the DSP patterns in the Sweet Sorbet pack that is available as one of the free Sale-A-Bration gifts currently when you spend £45 or more - the little blue Pool Party flowers with black centres. I would not necessarily have thought about using these colours together had it not been for this paper. A simple sentiment from the 'Express Yourself' hostess set (such a versatile set of greetings in a very usable font, it can be yours when you host a Stampin' Up! party - contact me to book yours) finishes this simple card.
So what do you think - a colour combination that works or one to be avoided, especially on a romantic card? I'd love to know what you think. I'm also linking this card up with the 'One Layer Card - Anything Goes' challenge over at Less is More this week (currently the only card using black for it's 'white space' - should I be worried?!) and CAS(E) This Sketch as my card uses their sketch again:
Funny how you can use the same two starting points, yet end up with two cards that couldn't be more different. Back tomorrow with another project; until then, happy stampin'!
Stampin' Up! Supplies Used:
9fe4b513-b28f-441e-b5cc-fe0fd6c2169c|0|.0|96d5b379-7e1d-4dac-a6ba-1e50db561b04
Tags: Embossing, Flowerfull Heart, Host a Party, Express Yourself, one layer cards, Sale-a-bration 2014, Shop online, Stamp-a-ma-jig, Stampin' Up, Stampin' Up Card, Stampin' Up Card ideas, Stampin' Up Supplies, Anniversary, Weddings
Cards | Host a Party | Promotions | Sale-a-bration | Stamping
by Joanne James12. February 2014 09:08Another early post from me today - makes me look organised, but if you'd witnessed the library book hunt that rampaged through the James household this morning before school, you could be forgiven for thinking otherwise! As promised, today's card uses the same stamp from the 'From This Day Forward' set that I used yesterday, but to give a completely different effect. Here is my card:
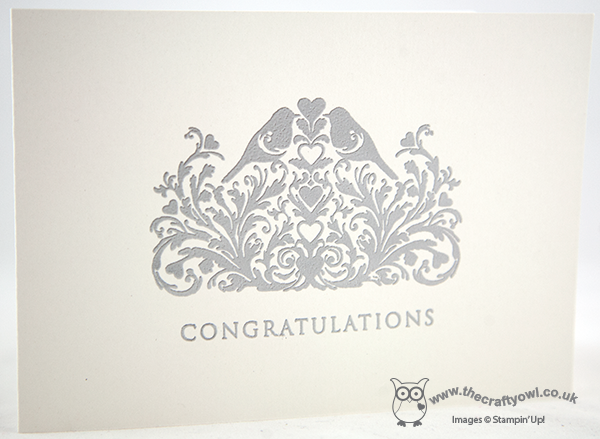
The photograph really doesn't do this card justice (not least because it is so difficult to get a great shot of an almost all-white card!) but up close, this card is really beautiful; I stamped the image and sentiment in Versamark onto Shimmery White cardstock - a lovely cardstock for this kind if project, it is flecked with minute specks of shimmer glitter and catches the light beautifully - and then heat embossed with silver embossing powder to add texture (important when your card is only one layer) and a lovely sheen).
It just goes to show that you don't always need lots of layers to create an impactful card - I'm getting quite into this one layer thing!
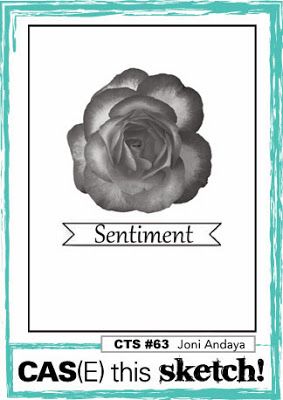
I'm going to link up today's card with this week's challenge over at 'Less is More' where the challenge is 'One layer - anything goes' and at CAS(E) this Sketch, as I used this sketch for my layout (turned through 90 degrees).
I'm off to get crafty - lots to do today! I might even pop back later and squeeze in another post.
Until then, happy stampin'!
P.S.: In case you're wondering we found the library book eventually - phew!
Stampin' Up! Supplies Used:
by Joanne James11. February 2014 09:58Good morning lovely blog readers! This morning's card is one I made as an acceptance card for a wedding invitation received recently. I actually had the stamp out on my desk for an alternative card which I will share with you tomorrow, when I decided it might work with this week's colour challenge combination at Pals Paper Arts:
When I originally saw this colour combination I did immediately think 'Valentine' (well, it's that time of year, right?!) Truth is, I've made lots of Valentine's cards already this year and I just don't have that many Valentine's to send them to! Instead, this is what I came up with:
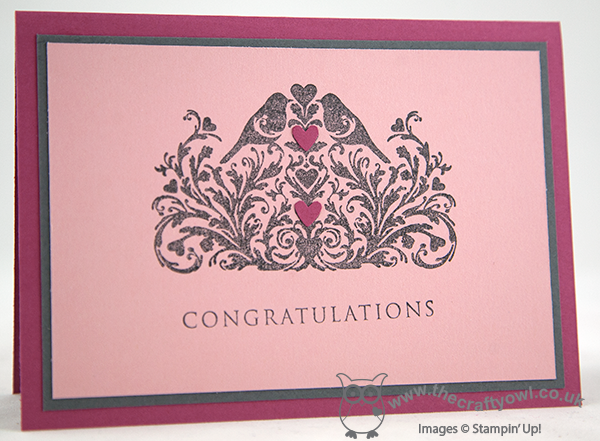
I decided to keep the design quite simple and stamped the image and sentiment in Basic Grey directly onto the Blushing Bride cardstock. I wasn't sure about this beforehand, but it looks so much nicer than on white, which left the image too stark. I quite like the slightly mottled effect of the stamping, which reminds me of stone, however this was more by accident than design - my Basic Grey inkpad is one of my few remaining old style pads and having used it to stamp a solid image, you can really see the difference when compared to the finish of the new foam pads. Needless to say, I have since ordered a new Basic Grey foam pad! I also stamped the image onto a scrap of Rose Red and cut out the two hearts with my paper snips and just paper pieced them in place - none of my myriad of heart punches, stamps or framelits were quite the right shape to take care of this for me. Worth it though, just to give a little 'pop' of colour and bring the colour scheme together.
I hope you like today's card; come back tomorrow to see an alternative card using this same stamp and don't forget to check out the folks over at Pals Paper Arts for more great ideas using this colour combination. Until then, happy stampin'!
Stampin' Up! Supplies Used:
by Joanne James21. January 2014 20:39Good evening blog readers! I had lots of jobs to do today, but after a morning of paperwork I decided the housework could wait and I spent the afternoon cardmaking instead (oops!!) Today I'm sharing another Valentine's card, this time with a more masculine feel. I used the colours from this week's challenge over at Create with Connie and Mary as my starting point:
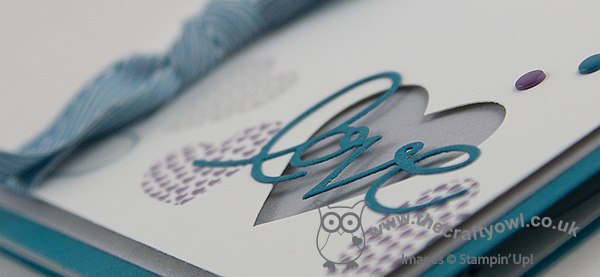
I decided to use my 'Hearts A Flutter' stamp set, as although this is one of my favourite sets and one I use a lot all year round, I haven't used it on any of my Valentine's cards yet this year. Here is my card:
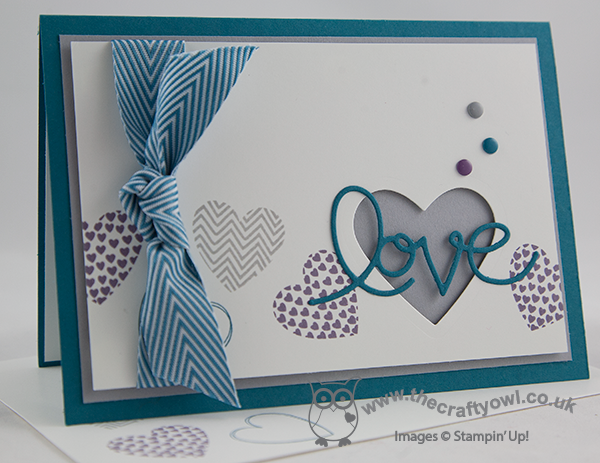
I stamped my hearts somewhat randomly across the lower half of my card, either side of my focal point. I mounted the top layer of cardstock on dimensionals for two reasons: firstly, to make the ribbon easier to attach and secondly so that the heart that I cut out (I used my hearts framelits for this) would have some depth and my die cut 'love' would have more impact. I deliberately chose to use Smoky Slate for my middle layer, as I wanted the heart to have a more masculine appeal, especially as I used ribbon on my card too; Island Indigo Chevron Ribbon isn't too girly, but adds a luxurious feel to the card. A few candy dots to finish just to add balance and done.
Whilst I designed this card with a man in mind, I think it would work equally well for a woman, especially if you're not the kind of person who is into all things pink and red.
Back tomorrow with another Valentine's themed card; until then, happy stampin'!
Stampin' Up! Supplies Used:
3b716918-6b62-4e10-9759-5e7a63b00c72|0|.0|96d5b379-7e1d-4dac-a6ba-1e50db561b04
Tags: Anniversary, Candy Dots, Hearts a Flutter, Hearts Framelits, Expressions Thinlits Dies, Magnetic Platform, masculine cards, Shop online, Stampin' Up, Stampin' Up Card, Stampin' Up Card ideas, Stampin' Up Supplies, Valentine's
Cards | Stamping
by Joanne James20. January 2014 20:33Today I have another Flowerfull Heart card to share with you; this time a larger A5 size card that could be used for a wedding, anniversary, birthday or Valentine's for someone special. So here is my card:
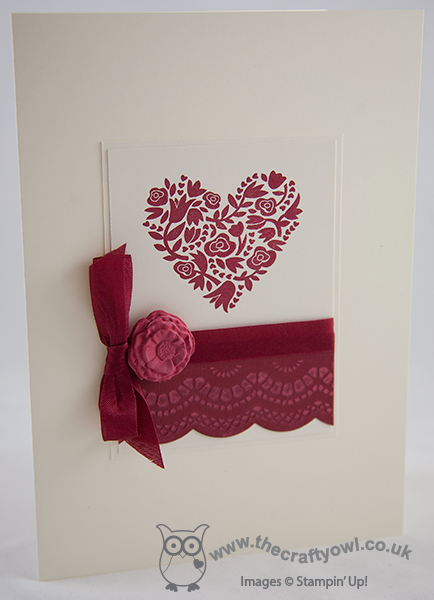
I love this card! It is elegant in its simplicity, yet at the same time packed with detail. Whilst the card has a lot of 'white space' (the actual base card colour is Very Vanilla, just to confuse you!), I created a double-layered centre panel on which I stamped both the Flowerfull Heart in Cherry Cobbler and then edged the bottom with some Cherry Cobbler Core'dinations cardstock, which I embossed then sanded lightly to show the contrasting layer. I covered the join with some Cherry Cobbler seam binding ribbon which I tied in a bow at the side, then lastly finished with a flower made from Stampin' Up!'s Simply Pressed Clay, which I first coloured with Cherry Cobbler reinker before moulding. Here's a close up of the flower:
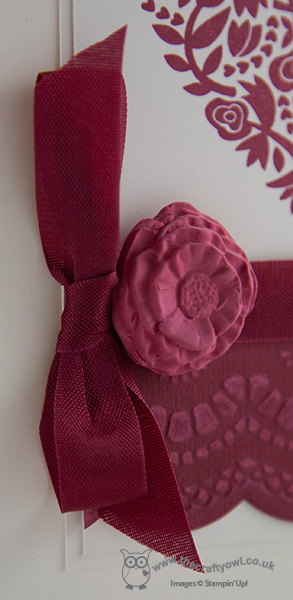
These really are so easy to make: you just press the clay into the mould, pop it out and leave it to dry. you can colour it before or after you put it in the mould, depending on the effect you're after.
A quick post from me today; having barely got rid of my last cold, I now seem to be catching another, so it's a hot drink and early night for me!
Back tomorrow with another project; until then, happy stampin'!
Stampin' Up! Supplies Used:
by Joanne James13. January 2014 21:13A busy day today: key highlights were getting to the bottom of the ironing basket (always worth celebrating!), finding Ben's mislaid PE training shoes at school and completing my card for this week's Pals Paper Arts Challenge. This week it's a colour challenge to incorporate the following colours:
I decided to stick with the Valentine's theme and use the contrasting colours to work up a card design that I've been wanting to have a go at for a while - here's my card:
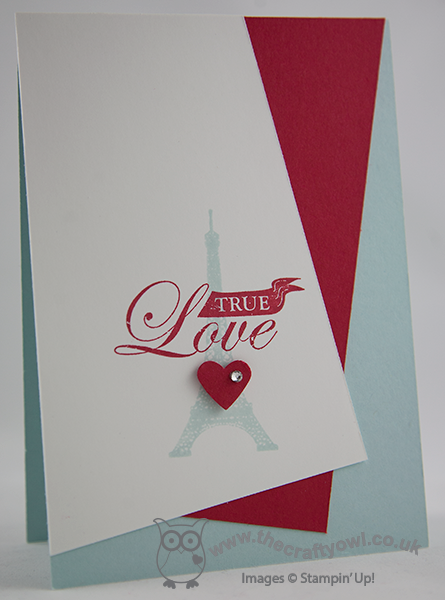
I'm not sure what the term is for this angular layered design (or even if there is one!) but it's the perfect simple layout to highlight both the Eiffel Tower and 'True Love' sentiment from the 'Follow Your Heart' stamp set; I used my Stamp-a-ma-jig to ensure perfect placement. Lastly, I added a small punched red heart with a rhinestone on a dimensional for added interest. I love the simplicity of this card and the statement that the bold red colour makes against the white and soft sky.
I hope you like my card - there's lots more inspiration from the Design Team over at Paper Pal Arts using this colour combination if you fancy having a go.
Back tomorrow with another card; until then, happy stampin'!
Stampin' Up! Supplies Used:
a07e3288-f9df-4767-bc3a-2c5db3e89d2d|0|.0|96d5b379-7e1d-4dac-a6ba-1e50db561b04
Tags: Anniversary, Follow My Heart, Heart Punch, Shop online, Stamp-a-ma-jig, Stampin' Up, Stampin' Up Card, Stampin' Up Card ideas, Stampin' Up Supplies, Valentines, Valentine's
Cards | Stamping
by Joanne James3. January 2014 15:55Good day, blog readers! I am sounding cheerier than I am feeling today; having got through Christmas without so much as a sniffle, I'm paying for it now. Since New Year's Eve I have been battling the worst cold I've had in ages - typical. Anyways, not to be deterred, today I have a special announcement - I have a new love in my life! I know you often here me say I love new products, but I an honestly say that I've never had as much fun with a single stamp as I'm having with the 'Flowerfull Heart' stamp that's available as part of the 'Whole Lot of Love' promotion. Along with the other items in this promotion, this stamp is only available until the end of January, but I can assure you I'll be sharing lots of ideas using this stamp this month.
Whilst this stamp is heart-shaped, the flower design means this stamp lends itself to a wide variety of cards, and not all valentine-related. All that said, for my first card I decided upon a classically elegant anniversary card:
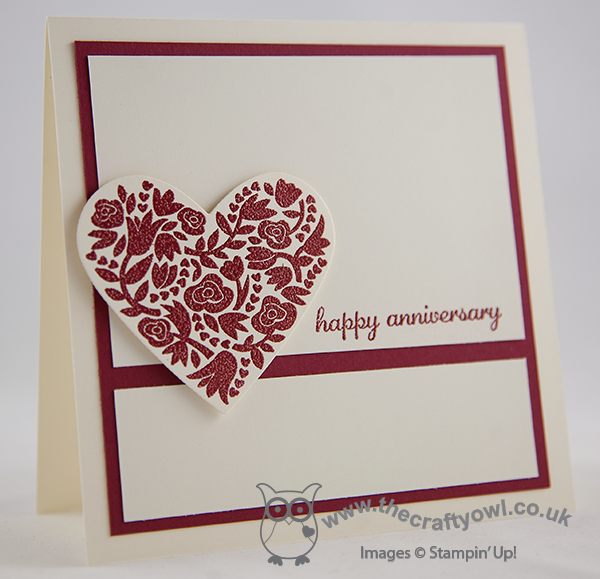
I went with the classic colours of Very Vanilla and Cherry Cobbler and stamped both the image and sentiment in Versamark and heat embossed in Cherry Cobbler embossing powder. You can just see the texture in the photo, but you can't really appreciate the glossy finish which looks beautiful in real life. the other thing I love about this stamp is that it fits inside one of the Hearts Framelits perfectly, so makes cutting out a cinch.
This card is very 'me' and true to my style; I'll be back to share another card I made with this stamp tomorrow. Until then, happy stampin'!
Stampin' Up! Supplies Used:
by Joanne James13. June 2013 22:37Last night's card class was fun as always but too late for a blog post and today has been another busy day making birthday cards for the young lady of the house and some Father's Day cards, ahead of the big birthday weekend. I'll share these in the next few days, but meanwhile tonight I thought I'd share the last of the Golden Anniversary cards I made recently. This one is quite different to the previous two; instead of leading with a 50th Anniversary sentiment, I used one of the stamps from the retiring Word Play set as the focus:
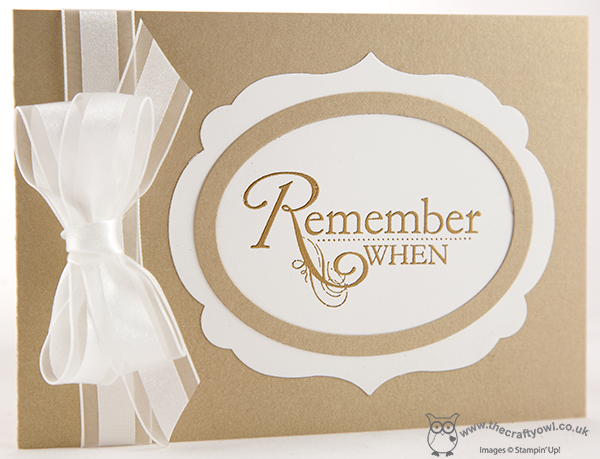
I've never used this stamp before, as it never seemed right for anything I was designing. I have toyed with using it as a feature stamp on a scrapbook page (a project for another time though!) then as I was thinking about what it would be like to celebrate 50 years of marriage myself (believe me, that is a LONG way off!) and it struck me how appropriate this stamp would be for a milestone anniversary card - 50 years is a lot of memories!
I decided to use white and brushed gold cardstock again and leave the layout quite simple, with Oval and Label Framelits making light work of the layered front. You can see the lovely gold embossing in this photo too - it adds a real shine. I finished the front with a fussy organza double bow then stamped the inside with my congratulatory anniversary message:
So that's all my Golden Anniversary cards for the time being - which one do you prefer? The other big news of the day is that registration for this year's Stampin' Up! European Convention opened today. Better still, this year convention is being held in Manchester in the UK. I've signed up already; if you would like to enjoy two days of stampin' fun from 22nd-23rd November, contact me for a chat about this and the other benefits being a Stampin' Up! demonstrator can offer.
Back tomorrow with another project - until then, happy stampin'!
Stampin' Up Supplies:
Stamps: Word Play, Memorable Moments
Cardstock: Whisper White, Brushed Gold
Ink/Stampin' Write Markers: Versamark
Tools: Ovals Framelits, Labels Framelits, Stamp-a-ma-jig
Finishing Touches: Gold Embossing Powder, Whisper White 5/8" Organza Ribbon
a656eef8-7190-45b6-91bc-92d3113532b5|0|.0|96d5b379-7e1d-4dac-a6ba-1e50db561b04
Tags: Anniversary, Big Shot, Embossing, Framelits, join Stampin' Up, memorable moments, Ovals Framelits, Stamp-a-ma-jig, Stampin' Up, Stampin' Up Card, Stampin' Up Card ideas, Stampin' Up Supplies, Word Play, Labels Framelits
Cards | Join My Team | Stamping
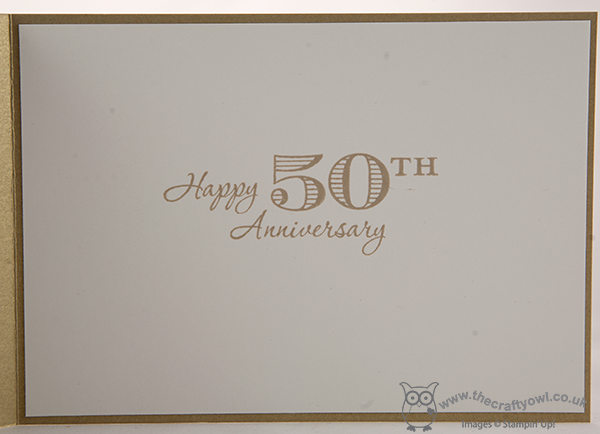
by Joanne James11. June 2013 22:48Very late post from me today, but having had a day out on a geography field trip, one of the children's classmates round for tea and a Parents' Association fete planning meeting, this feels like the first time I've sat down since breakfast! I've the second of my Golden Wedding Anniversary cards to share today, this one using the Hearts A Flutter stamps and framelits:
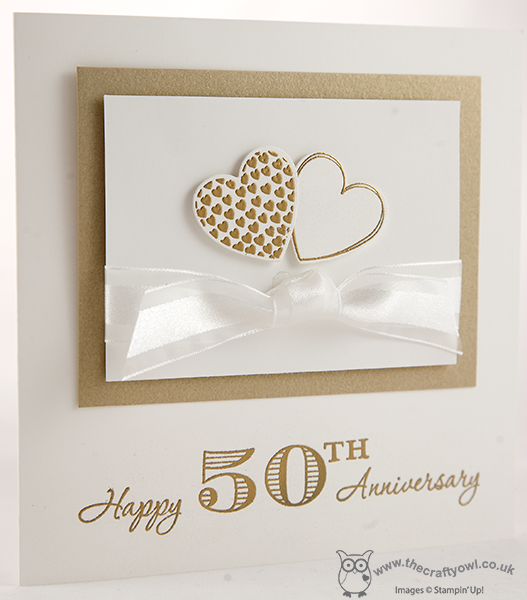
For this card I used a white card base with a raised brushed gold and white layered panel, with two gold embossed hearts. I have used the Hearts A Flutter stamps and framelits in many ways and love the versatility of this set. I used more gold embossing for the sentiment across the bottom of the card. So, quite different to yesterday's card but this is also on it's way to another couple celebrating 50 years of marriage - some achievement, for sure.
Back tomorrow with the last of the golden anniversary cards; until then, happy stampin'!
Stampin' Up Supplies:
Stamps: Hearts A Flutter, Memorable Moments
Cardstock: Whisper White, Brushed Gold
Ink/Stampin' Write Markers: Versamark
Tools: Hearts a Flutter Framelits, Stamp-a-ma-jig
Finishing Touches: Gold Embossing Powder, Whisper White 5/8" Organza Ribbon