Circle Sayings Beachy Peek A Boo Fancy Fold For AYSI 306

by Joanne James25. August 2023 12:00

Today I'm sharing my design team card for our new challenge over at As you See It where it's time for a seasonal theme challenge chosen by Deborah:


At the beach - wouldn't I like to be there right now? I most definitely would, but instead a card will have to do! I decided to feature sun, sea and sand on today's card which is also a fancy fold - take a look:


 Here's the low-down on today's card:

Circle Sayings - Today's card is a Peek-A-Boo fancy fold: when closed you see one thing in the window, then as you open the card the panel slips aside to reveal a second image or message. The Circles Sayings stamp set is perfect for this style of fancy fold card - it has lots of co-ordinating stamp images and sentiments that can be mixed and matched to create fun combinations. I used the sea and sun image for my first image, along with a fussy-cut partial sentiment attached to the frame and I paired it with the 'warm hello' sentiment, along with shells and sand for the peek-a-boo reveal:


Rays of Light - I wanted to add some additional colour to the front of my card, but without distracting from my seaside image. I decided on some ton-on-tone stamped detail using the Rays of Light stamp set, radiating out from the stamped image and fading into the base. Because I wanted my rays to radiate from the image, they wouldn't reach to the opposite edge of my card, so I added an Azure Afternoon ribbon and bow to balance my design. You can see the detail on the stamped image below, including some snowflake puff paint that I added to the wave foam for some extra dimension:


Peek-A-Boo Fancy Fold - This fold is really not tricky to execute - you just need to ensure the circle aperture is positioned correctly on each layer to ensure they align and that each of the mechanism panels are cut to the correct size. Here's a video that shows the peek-a-boo action:

Isn't that fun?! You can see another example of a card I made with this design here. I'm linking this one up over at The Paper Craft Crew where 'fun folds' is their theme this week.

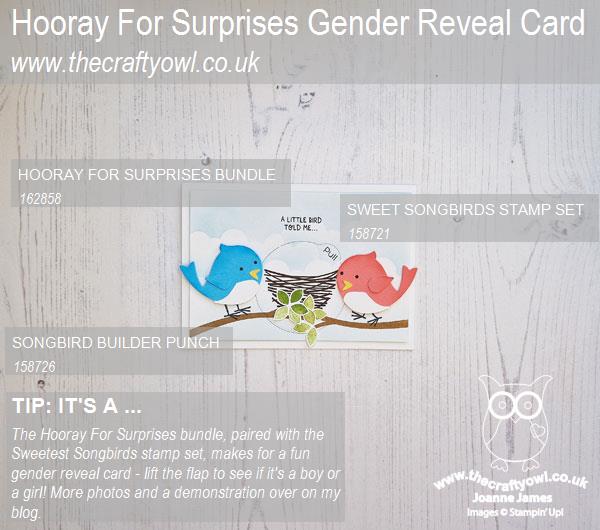
Here is the visual summary of the key products used on today's project for you to pin for easy reference:
 

You can see all of my 'How To' summaries on my 'How To - Tips and Techniques' Pinterest board in case you've missed any. 

Here's a summary of our challenge rules:

  • Create any card, scrapbooking page, 3D project or packaging project that fits the challenge.
  • Please include the challenge graphic and link back to the challenge in your blog post. Turn off word verification so we can leave you lots of lovely comments. Make sure you link the post not the whole blog to the Linky. Use #AYSIXXX when uploading to a public gallery.
  • If you’re unsure about ‘the rules’, check the details under the Challenge Guidelines tab on the As You See It Challenge homepage.
We look forward to seeing your creations in the AYSI gallery.

Enjoy your day and I'll be back tomorrow with another project. Until then, happy stampin'!


Stampin' Up! Supplies Used:
Table built using Product Table Builder by The Crafty Owl - Independent Stampin' Up! Demonstrator.

Shining Brightly Navy And Gold Christmas Wreath For FMS600

by Joanne James23. August 2023 12:00

Today I'm sharing a card that is special in more ways than one! It contains a sneak peek of some new Christmas products from the upcoming mini catalogue but more importantly I am a guest with the lovely ladies over at Freshly Made Sketches where the team are celebrating their 600th challenge - wow! I love to play along with their sketches whenever I get the opportunity and I was thrilled to be asked to join them alongside a number of other esteemed guests to celebrate this momentous occasion! This is the sketch we are basing our designs on:


I decided I would create a wreath with the circular element - this is what I came up with:  


Here's the low-down on today's card:

I diecut a couple of Country Wreaths Dies wreaths, one in brushed gold and one in gold foil, and layered them onto a panel of Shining Brightly specialty designer series paper on a Night of Navy card base. This is one of six single-sided foiled designs in Very Vanilla and Night of Navy in the pack - and they are all gorgeous! I heat-embossed my sentiment in gold onto navy cardstock - this is also from a new stamp set called 'Christmas Classics' - and added this to my card, along with a gold twine bow and trio of matt gold sequins:


I also added a little extra stamping from the same set to the inside of my card - check out the corner detail:


I just love the gold and navy colour combination of this card - expect to see lots more in this colourway in the upcoming festive season! 

Here is the visual summary of the key products used on today's project for you to pin for easy reference:


You can see all of my 'How To' summaries on my 'How To - Tips and Techniques' Pinterest board in case you've missed any. 

Be sure to check out the designs from the Freshly Made Sketches Team and the other guest designers this week - there will be some fabulous inspiration there for sure. Thank you and a huge congratulations from me to the team for inviting me to take part in the celebrations - here's to the next 600 challenges!

Enjoy your day and I'll be back on Friday with this week's new challenge over at As You See It. Until then, happy stampin'!


Stampin' Up! Supplies Used:

Table built using Product Table Builder by The Crafty Owl - Independent Stampin' Up! Demonstrator.

Festive And Fun With Spots and Stripes

by Joanne James21. August 2023 09:00

Another Monday, another week! I had a little time yesterday and I fancied a little colouring, so I decided to break out a new stamp set and create a couple of cards with Jen Mitchell's sketch layout over at Freshly Made Sketches this week. Here's her sketch:


Both my cards use the same layout: on the first one, I added the sentiment to the banner; on the second one I added my images to the banner and the sentiment on the panel. Both cards also feature the Merry Bold & Bright designer paper that will debut in the new mini catalogue - stripes on the first one, spots of the second one.

My first card I'm linking up over at 52 Christmas Card Throwdown where the theme is food - I thought this reindeer with his Christmas pudding would fit right in:


I made an extended banner for my sentiment using the Nested Essentials Dies and coloured the cute reindeer with my Blends markers for a smooth and streak-free finish:


My second card features a super colourful giraffe, decorating his tree for Christmas - take a look:


The sentiment is from the (retired) set 'Framed & Festive'. 

This is definitely the most colourful of the pair so I'm linking this one up over at TimeOut Challenges where their them is 'colourful' - I love the way the spots on the designer paper background mirror the spots on the giraffe too!


Nothing too fancy about these cards but they were definitely fun to make and great images to colour!

Here is the visual summary of the key products used on today's project for you to pin for easy reference:


You can see all of my 'How To' summaries on my 'How To - Tips and Techniques' Pinterest board in case you've missed any. 

The new Christmas products that you will see showcased on my blog this week will all be available to customers September 6th when the new mini catalogue goes live. I am currently packing up catalogues to send to my customers who have shopped with me in the last 12 months; if you aren't already on my mailing list and would like a copy of the new catalogue, do get in touch - I would be happy to help.

I have had a very productive start to the week - let's hope this continues! Enjoy the rest of your day and I'll be back tomorrow with another project. Until then, happy stampin'!


Stampin' Up! Supplies Used:

Table built using Product Table Builder by The Crafty Owl - Independent Stampin' Up! Demonstrator.

Dainty Delight Clean and Simple Thank You PP654

by Joanne James20. August 2023 08:00

Today it's Sunday and time for this week's new challenge over at The Paper Players! It's the turn of the fabulous Ann to host this week and she has a fun clean and simple challenge for us to work with:


I love clean and simple week! With the theme of 'insects' I was tempted to make another bee card this week, but instead decided to make a card showcasing one of the prettiest embellishments in the current catalogue - take a look:


Here's the low-down on today's card:

Brass butterflies - did you spot them? I stamped a simple spray of flowers and thank you sentiment from the 'Dainty Delight' stamp set, coloured my flowers with a variety of Blends (I've shared those that are still current below) and added a trio of brass butterflies for my insect embellishment:

These butterfly embellishments are small but pack a punch - when the catch the light they are so pretty! A super simple card today - #simplestamping at its best!

Here is the visual summary of the key products used on today's project for you to pin for easy reference:


You can see all of my Product and 'How To' summaries on my 'How To - Tips and Techniques' Pinterest board in case you've missed any. 

I'm also linking up today's card over at Color Dare; I went across the bottom row paprika/shortbread/mocha and also used honey yellow too.

Before you reach for your ink and papers, check out what our amazing team has created to inspire you this week:

Here's a quick recap of our challenge rules:
 
1.  Create a new paper project
2.  Upload your creation to your blog with a link back to us and provide a direct link to the post featuring your challenge submission.
3.  Please link your card to no more than four challenges, TOTAL.
4.  Have FUN!

Enjoy your day; I'll be back tomorrow with another project. Until then, happy stampin'!


Stampin' Up! Supplies Used: 

Table built using Product Table Builder by The Crafty Owl - Independent Stampin' Up! Demonstrator.

A Warm Hello With Circle Sayings For FF0141

by Joanne James18. August 2023 09:00

Today I have my card for the new challenge over at Festive Friday Card Making and Paper Crafting Challenge


The challenge that we are celebrating this week is 'National Beach Day' which is on 30th August. Remember the fun thing is that at Festive Friday you do not need to actually celebrate the occasion; your goal is to simply use three or more items from the inspiration list on your project. This week I used pastel colours, pearls and shells and this is what I came up with:


Here's the low-down on today's card:

I decided I would make a simple summery 'hello' card for my friend Elizabeth who leaves by the beach so I used a Pool Party background to evoke the sea and paired it with some pastel pinks an purples for a feminine touch. I added some horizontal stripes and coloured my collection of shells with co-ordinating Blends and a sprinkling of pearls and Fresh Freesia enamel gems:

Super simple and I really like that this card has a beachy, summery feel even with a pastel colour scheme. I'm also linking up over at Inspire.Create where their theme is summer so my shells should fit right in! I love collecting shells at the beach; I spent part of my vacation last year on Sanibel island off the coast of southern Florida, a place know for its magnificent shell beaches - here's one of my photos so you can see what I mean:


Shells as far as the eye could see for miles! I collected some beautiful shells and whilst I didn't find a prized junonia shell, I did see a beautiful conch one day whilst paddling in the sea - still inhabited though, so I left it where I found it. Perhaps I'll discover \n empty one next time!

Here is the visual summary of the key products used on today's project for you to pin for easy reference:


You can see all of my 'How To' summaries on my 'How To - Tips and Techniques' Pinterest board in case you've missed any. 

How does our board inspire you? I can’t wait to see what YOU create! For more inspiration, be sure to visit the rest of the Festive Friday Card Making and Paper Crafting Challenge Design team:

Enjoy your day and I'll be back tomorrow with another project. Until then, happy stampin'!


Stampin' Up! Supplies Used:

Table built using Product Table Builder by The Crafty Owl - Independent Stampin' Up! Demonstrator.

Biggest Wish Hap-Bee Birthday TTT 222

by Joanne James17. August 2023 18:00

It's Thursday and time for a new challenge over at TicTacToe! It's the turn of Team X to host this week and the lovely Betty is our featured designer this week. This is the fun board that we are playing along with: 


I went down the middle column with designer paper, free and birthday; I used the sketch over at Tuesday Morning Sketches for my layout and thought I'd play along with the lovely ladies over at Just Us Girls this week where the word of the week is 'bee'. I took the opportunity to use up some old honeycomb designed paper and went for a punny sentiment on my card today - take a look:


Here's the low-down on today's card:

I wanted a big, bold sentiment for those panels so decided on HAPPY BIRTHDAY from the stamp set 'Biggest Wish', but instead of stamping the HAPPY in its entirety, I masked off the PY and replaced with a bee punched from my ladybug builder punch for a punny sentiment. I punched the body in black, added some yellow stripes and a pair of vellum wings liberally coated with clear Wink of Stella - you can see the sparkle below:

I completed my card with a trio of hexagonal enamel dots to continue the honeycomb shape and bee theme. So what do you think? Does the punny sentiment work? I hope today's card makes you smile!

Here is the visual summary of the key products used on today's project for you to pin for easy reference:


You can see all of my Product and 'How To' summaries on my 'How To - Tips and Techniques' Pinterest board in case you've missed any. 

A tictactoe board offers so many creative possibilities - how does this week's board inspire you? Why not have a go? We would love to see you in the gallery and who knows - you might be selected for Designer's Choice and be eligible to be a guest designer on a future challenge. 

Enjoy your day; ... I'll be back tomorrow with another project. Until then, happy stampin'!


Stampin' Up! Supplies Used: 

Table built using Product Table Builder by The Crafty Owl - Independent Stampin' Up! Demonstrator.

Wanted to Say Feel Better Soon CCS 518

by Joanne James15. August 2023 12:00

It's Tuesday and time for a new challenge over at CAS Colours & SketchesThis week's challenge is a sketch challenge and Sue has asked that we contain our design to one vertical half of our card:


Feel free to flip or rotate the sketch when making your card. 

For my card today I decided to use a few more of the fruity Pink Fresh Studio washi diecuts that my friend Elizabeth shared with me and pair them with a gold foil diecut sentiment cut using the Wanted To Say Dies for a clean and simple get well soon card:


The gold detailing on the washi compliments the gold foil and since grapes are the traditional food gift when visiting someone who is under the weather these, along with the figs, were just right. I added a few glittery gold enamel dots to complete my card:

Clean and simple - I'm also linking up over at Just Add Ink where that just so happens to be their theme this week!

Here is the visual summary of the key products used on today's project for you to pin for easy reference:


You can see all of my 'How To' summaries on my 'How To - Tips and Techniques' Pinterest board in case you've missed any. 

As a reminder, for our colour challenges, you must use all of the stated challenge colours. You may also use neutral colours; however, the challenge colours should be the most noticeable ones featured on your card. We use Stampin' Up! color names for reference, but you are welcome to use any other companies' products as long as you match the challenge colours as closely as possible.

Enjoy your day and I'll be back tomorrow with another project. Until then, happy stampin'!


Stampin' Up! Supplies Used:

Table built using Product Table Builder by The Crafty Owl - Independent Stampin' Up! Demonstrator.

Textured Floral Birthday Blooms For PP653

by Joanne James13. August 2023 08:00

Today it's Sunday and time for this week's new challenge over at The Paper Players! It's the turn of the fabulous Anne Marie to host this week and she has a warm colour challenge for us to work with:


I love these warm colours together! I paired them with Jen T's fabulous sketch over at Freshly Made Sketches this week and grabbed one of my new sets to create a pretty birthday card - take a look:


Here's the low-down on today's card:

Textured Floral - You know when you think you have enough floral sets and you couldn't possibly need another one? Yep, that was so not me when we had the recent stamp sale! I picked up the Textured Floral stamp set and couldn't wait to create something with it. The texture on these stamps adds so much detail and whether you use in conjunction with the co-ordinating dies and layer or use the stamps along to create more of a collage feel, this is a stamp set with lots of possibilities. It's a great set for a beginner stamper too - you really can't go wrong with it! I stamped a mirrored collection of florals in opposing corners and added some additional Calypso Coral ink with a blending brush to achieve even greater warmth and colour.

A Straightforward Sketch? - I love Jen's sketch this week and it was perfect for me to experiment with my corner florals. When it came to that sentiment though, I dithered for ages! I did consider a simple horizontal sentiment stamped directly onto my floral panel (a more literal interpretation of the FMS layout), but my sentiment was overpowered by the bold florals. I ended up trying diecut sentiments in various shapes/colours, eventually settling on a white-on-black sentiment cut with one of my circular Stylish Shapes Dies. I added a twist of gingham ribbon behind it for a little extra detail:

I like this version better and I think with these bold colours the addition of black as a neutral works well. 

Finishing Touches - Finally you can see a hint of the decoration I added to the front of the envelope; I carried the design to the inside of the card too. No naked envelopes or insides here! I have lots of September birthdays to prepare for, so this one will be heading into my stash. I am looking forward to having more opportunities to play with this set!

Here is the visual summary of the key products used on today's project for you to pin for easy reference:


You can see all of my Product and 'How To' summaries on my 'How To - Tips and Techniques' Pinterest board in case you've missed any. 

Before you reach for your ink and papers, check out what our amazing team has created to inspire you this week:

Here's a quick recap of our challenge rules:
 
1.  Create a new paper project
2.  Upload your creation to your blog with a link back to us and provide a direct link to the post featuring your challenge submission.
3.  Please link your card to no more than four challenges, TOTAL.
4.  Have FUN!

Enjoy your day; we have nothing on, so will just be enjoying the peace and quiet! I'll be back soon with another project. Until then, happy stampin'!


Stampin' Up! Supplies Used: 

Table built using Product Table Builder by The Crafty Owl - Independent Stampin' Up! Demonstrator.

Crushed Curry Cheerful Daisies For AYSI 305

by Joanne James11. August 2023 12:00

Today I'm sharing my design team card for our new challenge over at As you See It where it's time for a recipe challenge chosen by me:


I love yellow, am a big fan of designer paper and make more thank you cards than any other type of card so I created my recipe with these things in mind and can't wait to see what you come up with! I decided to use the sketch over at Try Stamping On Tuesday for my layout and am featuring spots alongside my daisy as my entry for the current theme over at The Flower Challenge - take a look:


Here's the low-down on today's card:

I loved the TSOT layout this week and whilst I didn't go with the slimline option (I've been making a lot of those lately), I think it works as a standard card front too. Since the board contained so many of my favourite things, I thought I would challenge myself to use Crushed Curry as my main yellow; of all the yellows, this is probably the one I use the least and rarely use it outside of autumn/fall. I decided to keep my card monochromatic and use only shades of this colour. I used some of the Inked Botanicals designer series paper that features a spot design for the rear circle shape, then substituted the uppermost circle with a daisy stamped and diecut with the Cheerful Daisies bundle. After inking my flower petals, I used a blending brush on my stamp to remove some of the ink and soften the resulting stamped petals; you can see the contrast to the flower centre, which was stamped at full strength. I then used the same blending brush to add that excess ink to my mat layer behind the daisy, to allow my Very Vanilla leaves to standout from the base:

I stamped my sentiment in Early Espresso as it was less harsh than black and added a trio of (retired) enamel dots to complete my card. So what do you think? Is Crushed Curry a favourite yellow of yours or do you prefer others in the collection? I still prefer Lemon Lolly and Daffodil Delight, but at the same time I love how this card turned out.

Here is the visual summary of the key products used on today's project for you to pin for easy reference:


You can see all of my 'How To' summaries on my 'How To - Tips and Techniques' Pinterest board in case you've missed any. 

Here's a summary of our challenge rules:

  • Create any card, scrapbooking page, 3D project or packaging project that fits the challenge.
  • Please include the challenge graphic and link back to the challenge in your blog post. Turn off word verification so we can leave you lots of lovely comments. Make sure you link the post not the whole blog to the Linky. Use #AYSIXXX when uploading to a public gallery.
  • If you’re unsure about ‘the rules’, check the details under the Challenge Guidelines tab on the As You See It Challenge homepage.
We look forward to seeing your creations in the AYSI gallery.

Enjoy your day; we have birthday celebrations in the James household today so whilst the James Juniors are spending the morning paintballing with friends, I am baking a special birthday cake to enjoy at the celebrations later. I'll be back soon with another project. Until then, happy stampin'!


Stampin' Up! Supplies Used:

Table built using Product Table Builder by The Crafty Owl - Independent Stampin' Up! Demonstrator.

Holy Guacamole It's A Taco Fiesta Birthday

by Joanne James10. August 2023 19:00

Tomorrow is the 16th birthday for the youngest of the James Juniors, so I thought I'd squeak in a quick post to share one of the cards I made to celebrate his big day! I used the sketch over at Sketch Saturday (but had difficulty linking up so am not playing along) and this week's Color Throwdown colours:


I've had the 'Taco Fiesta' stampset for ages and until now it's sat uninked on the shelf. t was perfect with these colours and the fun circular sketch layout - take a look:


Here's the low-down on today's card:

I did some basic stamping on my base mat that followed the outer contours of the circles, then added some tone-on-tone stamping to each of the circles with some of the stamps in the set. I then topped each of the circles with a larger image that I stamped on white and coloured them with my Stampin' Blends. You can see the detail a little more closely below:

A simple twine bow, heat embossed sentiment and trio of mat dots complete my card.

Here is the visual summary of the key products used on today's project for you to pin for easy reference:


You can see all of my 'How To' summaries on my 'How To - Tips and Techniques' Pinterest board in case you've missed any. 

Enjoy your day and I'll be back tomorrow with another project. Until then, happy stampin'!


Stampin' Up! Supplies Used:

Table built using Product Table Builder by The Crafty Owl - Independent Stampin' Up! Demonstrator.

New Online Exclusives

There are new products available exclusively in the online store from 5 November - check them out here.

Latest Kits!

Stampin Cut and Emboss

The Perpetual Beauty Calendar Kit and Cherry Blossoms Treat Boxes Kit are the latest kits in the online store - get yours here!

Shop Online

Access my online shop 24 x 7, 365 days of the year:

Current December hostess code:

9NKXDTTR

Shop Online

Mini Catalogue

BROWSE THE CATALOGUE

'Tis The Season - the new Stampin' Up! Mini Catalogue is here! For more details and to download your copy click here

Scrapbooking

Stampin' Up! has introduced a new range of 12x12" scrapbooking product and kit - the full range is now available to purchase online. To download a copy of the new digital Scrapbooking Catalogue click here.

2024-25 Annual Catalogue

BROWSE THE CATALOGUE

Click on the image to download your copy of the 2024-25 annual catalogue. For a full list of current SU! supplies, go to my online store. If you would like any help or advice, please drop me a line at joanne@thecraftyowl.co.uk or give me a call on 07773 421446 - I'd be happy to help.

Join My Team

It's always a great time to join Stampin’ Up! New team members can get £130 worth of products for only £99 + free business supplies + free shipping + all the fun being a part of Stampin’ Up! Stampin' Up! has something for everyone: join my growing team and benefit from my support to enjoy Stampin' Up! however you choose.

If you're interested, call me for a chat to understand how I can help you realise your goals. Alternatively, if you have already decided to sign up and you just can't wait, please click here for the link to the online form where you can sign up and order your starter kit right away! 

About Me

Hi I'm Joanne and live in Northampton and when I'm not looking after my husband and two beautiful children, am an avid crafter with a passion for all things Stampin' Up!

I must confess that I have never been a big rubber stamper - until I discovered Stampin' Up! that is. I love the fact that I can get such great results with co-ordinating stamps, inks, papers and punches - the possibilities are endless! Join me on my stamping journey as I share the things I love and be inspired to create amazing things yourself!

Follow Me

Monthly Newsletter

Box Builder

Click the button above to use Box Buster to create your custom box design using the Envelope Punch Board!

Kits Collection Now Available!

Stampin Cut and Emboss

The new Kits Collection from Stampin' Up! is now available!

Click here to see the current kits available and order yours online today.

I Design For


Stampin' Up Stuff

This is my personal blog and is not endorsed by Stampin’ Up! I hope you find it a plentiful source of ideas and personal inspiration but please don't copy my designs for contest submission or use for classes, publication or sale without express permission.

DSP Special Release

Check out 3 popular designer series paper designs in fresh new colourways! Available exclusively in the online store from 3 December - check them out here

Last Chance Products

Last Chance Products will now be updated every other month - check them out here.