by Joanne James1. March 2024 13:00
It's the 1st of March: Sale-A-Bration is over for another year and to any fellow Welsh readers out there - Happy St David's Day! No daffodils here though; today I'm sharing my design team card for our new challenge over at As you See It where it's time for a seasonal theme challenge chosen by me:

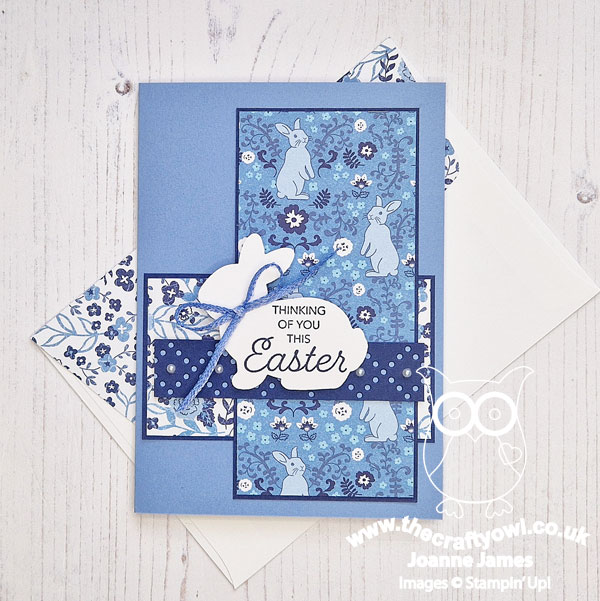
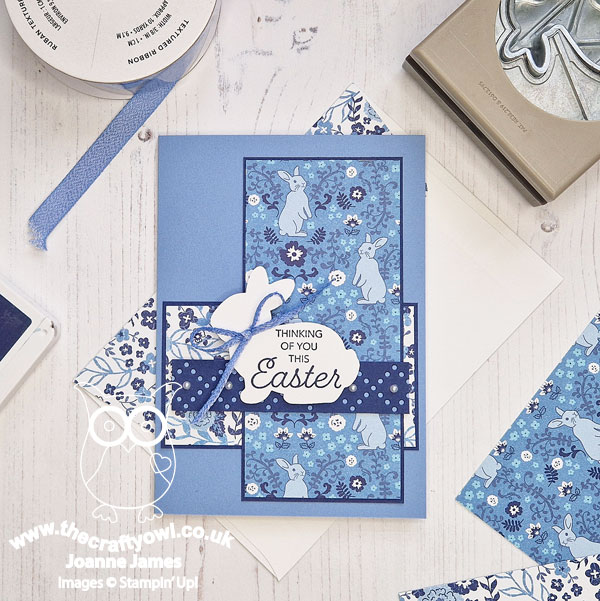
I thought Easter would be a good theme for our challenge this week given that it's at the end of this month, although it did mean I had to get creative as I haven't purchased any new Easter sets and I don't have the Easter Bunny set in the annual catalogue either. Never fear though - I got creative! This is what I came up with:
Here's the low-down on today's card:
Countryside Inn - I noticed that one of the papers in the Countryside Inn pack has a rabbit in the pattern that I thought would make a sweet background for an Easter card and this set the tone for my whole card. I used a Boho Blue card base and balanced it with another of the patterns in the pack.
Easter Bunny - I used a simple white rabbit punched with the Easter Bunny Punch as my focal point and stamped my greeting onto it directly - for those of you that picked up the 'Heartfelt Hellos' stamp set during Sale-A-Bration, this is where this sentiment comes from. A trimmed ribbon bow was all the decoration my rabbit needed:

Everyday Details - You may recognise the layout of my card: it's this week's Paper Players layout that I used for my card on Sunday. The rabbit is in place of the hot air balloon, and on today's card instead of a row of clouds, I created a layered border using one of the Everyday Details Dies, adding pearls to the diamond centres for a little added detail.
I'm pleased with how my card finished up; it's also a great way to show how the same layout can be used in different ways.
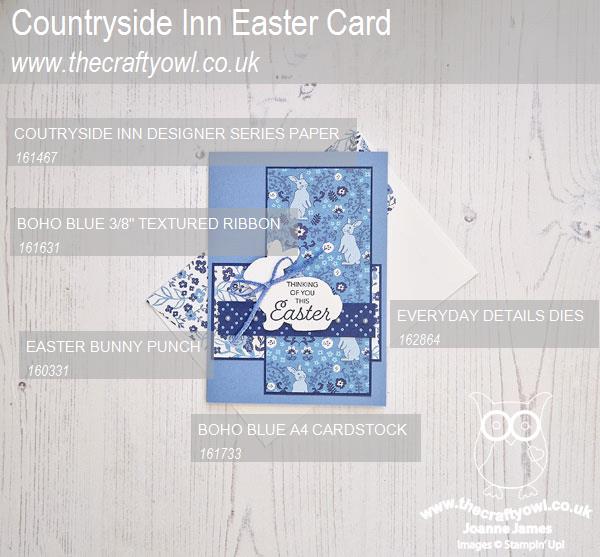
Here is the visual summary of the key products used on today's project for you to pin for easy reference:
You can see all of my 'How To' summaries on my 'How To - Tips and Techniques' Pinterest board in case you've missed any.
Here's a summary of our challenge rules:
- Create any card, scrapbooking page, 3D project or packaging project that fits the challenge.
- Please include the challenge graphic and link back to the challenge in your blog post. Turn off word verification so we can leave you lots of lovely comments. Make sure you link the post not the whole blog to the Linky. Use #AYSIXXX when uploading to a public gallery.
- If you’re unsure about ‘the rules’, check the details under the Challenge Guidelines tab on the As You See It Challenge homepage.
We look forward to seeing your creations in the AYSI gallery.
Enjoy your day; I am taking a well-earned break today following my final trips to both my local charity shop and waste tip respectively, which signify the end of my loft clearance project this week. Hopefully I will make it back into my craft room and I'll have something to come back and share with you tomorrow. Until then, happy stampin'!
bebca4da-1569-4d98-bc04-58fa7abede1c|0|.0|96d5b379-7e1d-4dac-a6ba-1e50db561b04
Tags: Stampin' Up, Stampin' Up Card, Stampin' Up Card ideas, Stampin' Up Supplies, Shop online, Shop Stampin' Up online, Shop Stampin' Up! Online, As You See It Challenge, Easter, Easter Bunny Punch, Countryside Inn, Everyday Details, Heartfelt Hellos
Cards | Shop Online | Shop Stampin' Up! Online | Stamping
by Joanne James9. February 2024 10:00
I haven't managed much in the way of crafty time this week (it's amazing how a car breakdown can take up hours of your time!) so today I'm sharing a clean and simple card yet one that still packs a punch! I used the current Sketch Saturday layout and a sentiment with this week's challenge over at Just Us Girls in mind:


I'm fully embracing red and hearts for a sweet Valentine's card full of love - take a look:
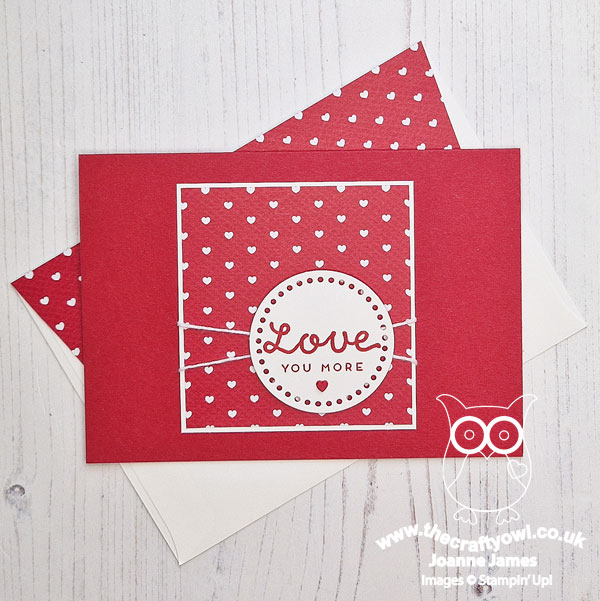
Here's the low-down on today's card:
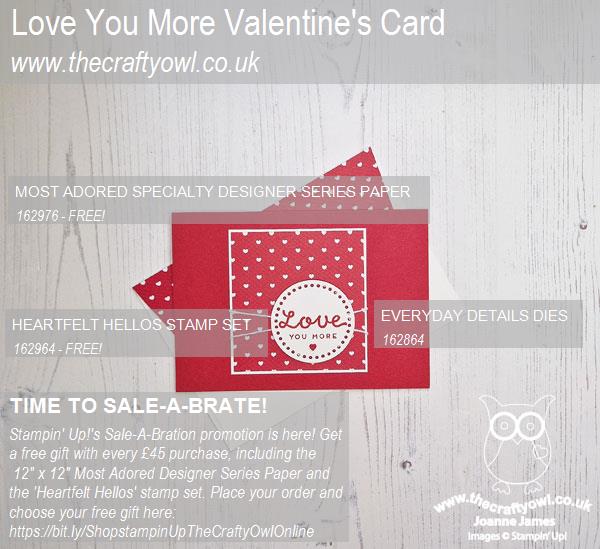
A simple layered panel, tied with twine and a focal sentiment pretty much sum up today's card. I'm loving the new Everyday Details Dies, one of which I used to diecut my sentiment label. The other two main elements - the heart patterned Most Adored designer series paper that I used for my panel and the sentiment from the 'Heartfelt Hellos' stamp set - are both items that you can choose FREE with a £45 purchase during the current Sale-A-Bration promotion: bonus! I added a single red resin heart below my stamped sentiment for a final tie in to that pretty paper:
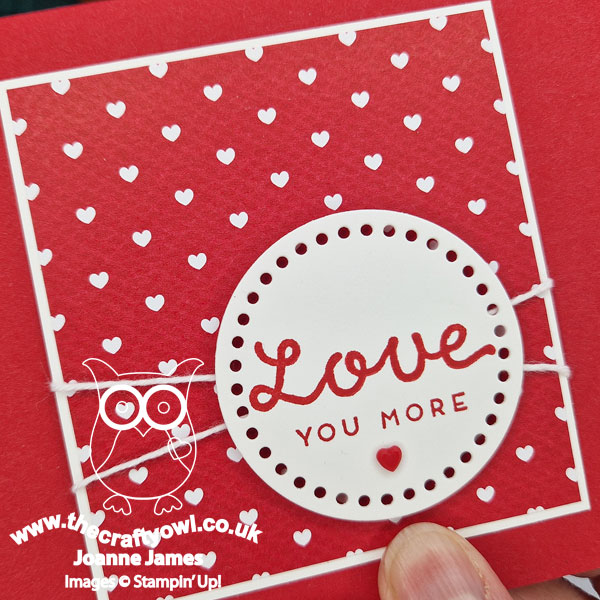
This is the perfect sentiment for the person in your life who has one of those never-ending conversations "Love you". "Love you more." "No, love you more." and so on - you know the ones?! The youngest of the James Juniors often uses this as a bedtime-stalling tactic, even now he's in his teens. Clearly, it works!
Here is the visual summary of the key products used on today's project for you to pin for easy reference:
You can see all of my 'How To' summaries on my 'How To - Tips and Techniques' Pinterest board in case you've missed any.
You have until the end of February to take advantage of Sale-A-Bration, whilst supplies last - so time to get shopping! Enjoy your day; I'm off to do some shopping of a different kind (grocery shopping - apparently craft supplies don't make a nutritious dinner!) but I'll be back early tomorrow with another project. Until then, happy stampin'!
Stampin' Up! Supplies Used:

b225beec-ccc2-47f3-9897-9f3a6a2f6d99|0|.0|96d5b379-7e1d-4dac-a6ba-1e50db561b04
Tags: Shop Stampin' Up! Online, Stamping Shop Stampin' Up online, Shop online, Stampin' Up, Stampin' Up Card ideas, Stampin' Up Supplies, Stampin' Up Card, Heartfelt Hellos, Most Adored, Sale-A-Bration 2024, Valentines, Valentine's, Everyday Details
Cards | Sale-a-bration | Shop Online | Shop Stampin' Up! Online | Stamping
by Joanne James29. January 2024 14:50
Today I'm sharing a card that I made using Jacquie's layout over at Freshly Made Sketches that also showcases the colour palette over at Hand Stamped Sentiments:


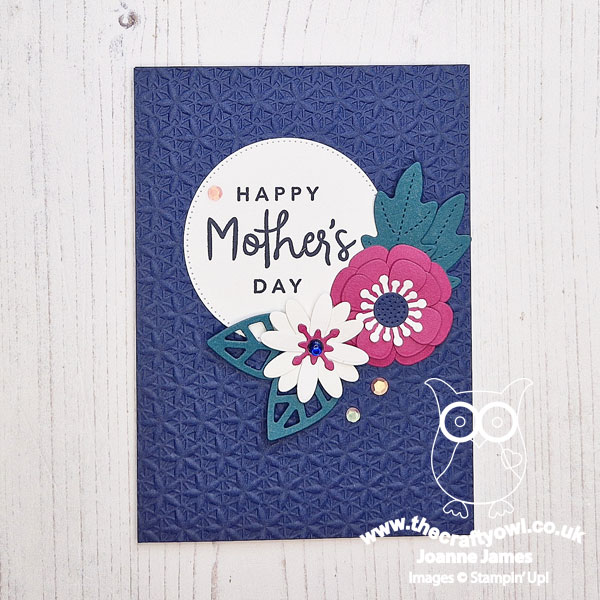
I couldn't resist a quick FMS entry this week since Jacquie's sketch is something of a 'go to' layout for me; the large circle works to showcase either a sentiment or an image with the smaller elements also offering lots of options. Today I decided to go with a sentiment from one of my Sale-A-Bration stamp sets, called 'Heartfelt Hellos' - take a look:
Here's the low-down on today's card:
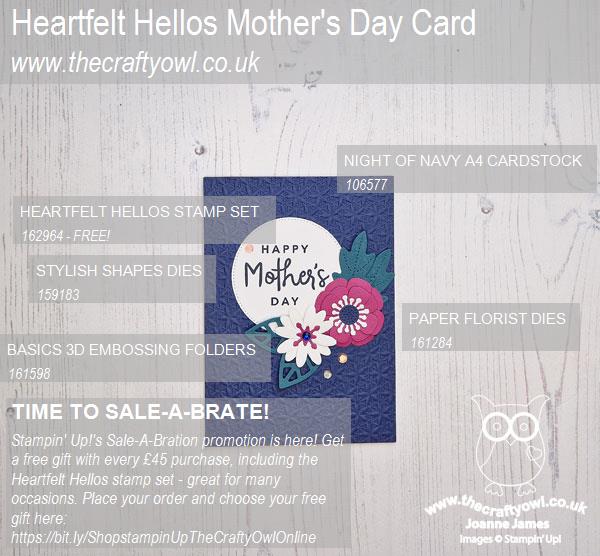
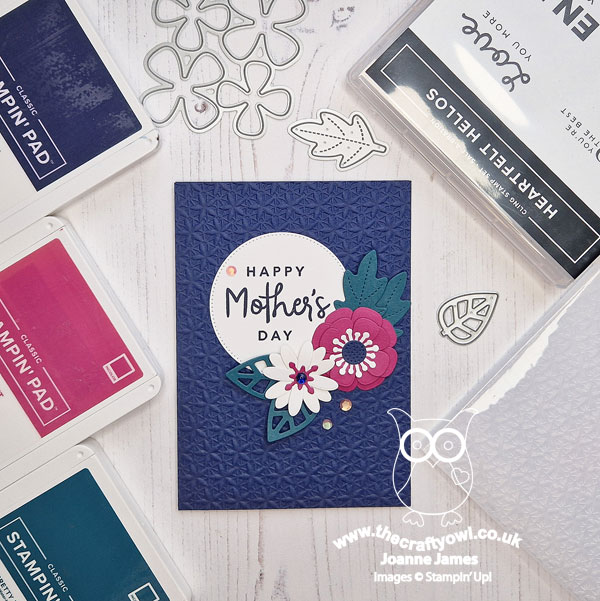
Heartfelt Hellos - I previously showcased the 'hello' from this set (if you missed that card, you can see it here) so today I thought I'd go with the larger Mother's Day sentiment (ages away, I know but it pays to be organised!) The 'heartfelt hellos' set has 6 different sentiments that work for lots of occasions: Easter, Mother's Day, Father's Day, Dad's Birthday, Valentine's Day, Anniversary, Birthdays and general wishes too. What's more it's FREE with a product purchase of £45 or more - bonus!
Paper Florist Bold Blooms - I used my Paper Florist Dies to create two bold blooms to accent my sentiment circle. I love the bold colour palette from Hand Stamped Sentiments, but needed to add in some white to balance these strong colours. I love how quickly these diecut flowers come together and here they pack a colourful punch:
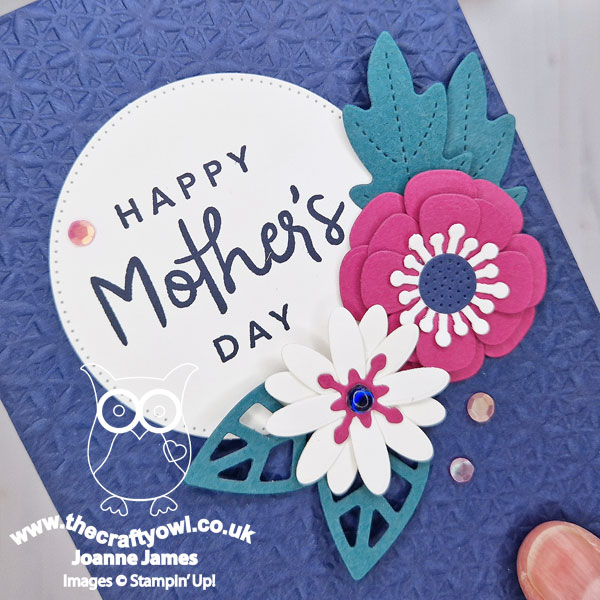
Basics Embossing - Finally, I decided to emboss the base of my card with one of the 3D Basics Embossing Folders. I haven't used this EF on anything before, but decided that these deep colours and my otherwise clean and uncluttered card could take the addition of the embossed finish. What do you think - do you like the added texture? Do leave me a comment below - I'd love to hear your thoughts.
Here is the visual summary of the key products used on today's project for you to pin for easy reference:
You can see all of my 'How To' summaries on my 'How To - Tips and Techniques' Pinterest board in case you've missed any.
I'm having a crafty start to my week so I'm off to get back to it! Enjoy the rest of your day and I'll be back tomorrow with another project. Until then, happy stampin'!
Stampin' Up! Supplies Used:
986f6964-2602-4ac7-bbc7-858557b293a7|0|.0|96d5b379-7e1d-4dac-a6ba-1e50db561b04
Tags: Shop Stampin' Up! Online, Stamping Shop Stampin' Up online, Shop online, Stampin' Up, Stampin' Up Card ideas, Stampin' Up Supplies, Stampin' Up Card, Mother's Day, Stylish Shapes Dies, Paper Florist Dies, Basics 3D Embossing Folders, Sale-A-Bration 2024, Earn Free Products, Heartfelt Hellos
Cards | Sale-a-bration | Shop Online | Shop Stampin' Up! Online | Stamping
by Joanne James9. January 2024 13:00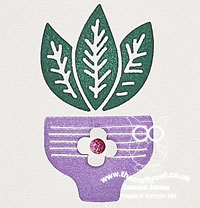
It's Tuesday and time for our first challenge of the year over at CAS Colours & Sketches. We have some new designers so do check out the refreshed team. The lovely Jeanne is hosting this month and our first challenge is a colour challenge:

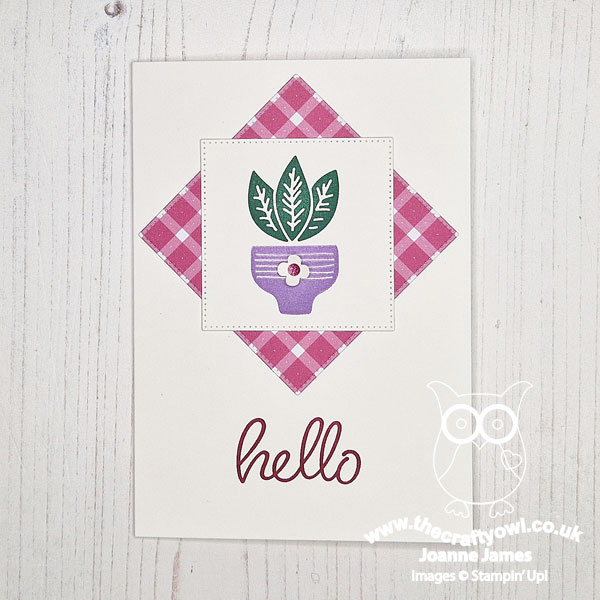
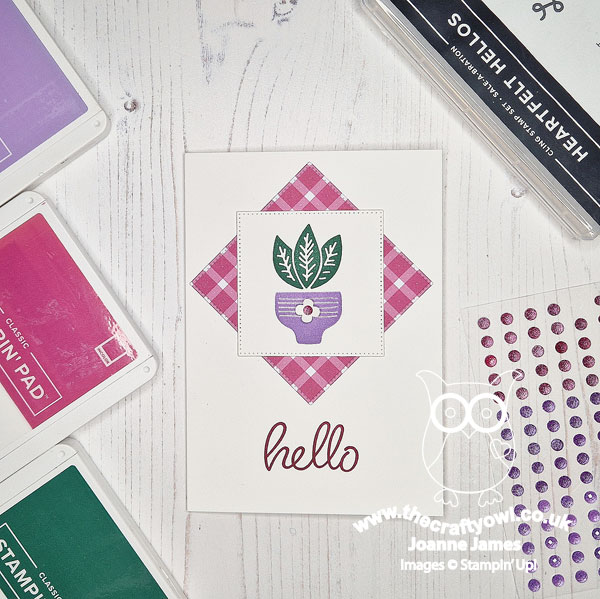
For my card today I was so tempted to go with Perennial Lavender again for today's card with this colour palette, but decided instead to change tack and break out a new stamp set that I received at our Online launch event for the mini catalogue, called 'Planted Paradise' - take a look:
Here's the low-down on today's card:
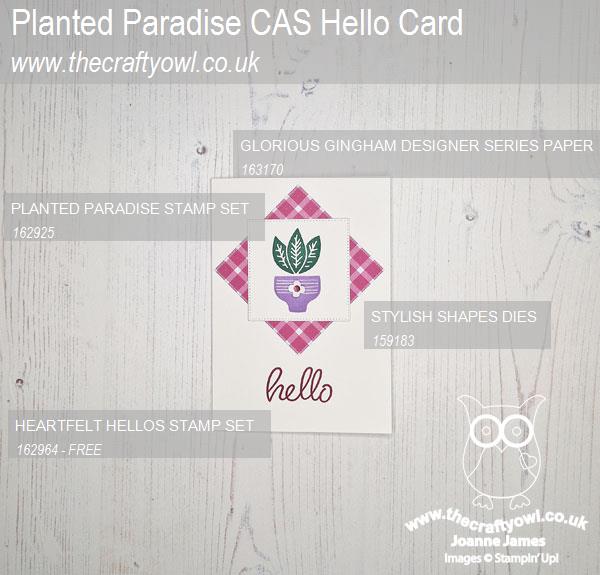
Planted Paradise - The 'Planted Paradise' stamp set is a reversible stamp set that contains lots of different pots and leaves that you can use to build your own plants, pots and hanging baskets - so fun! I actually intended to use an alternative pot in my design, until I remembered that the stamps are actually shown at 60% of size, so they are larger than I anticipated and I had to scale down my choices. I had originally intended to use the rounded flower-patterned pot - so I added a single punched flower to the one I eventually used in homage to that! These stamps are so easy to use and offer lots of creative options - if you like the ability to just stamp and see what you can create - this stamp set is for you.
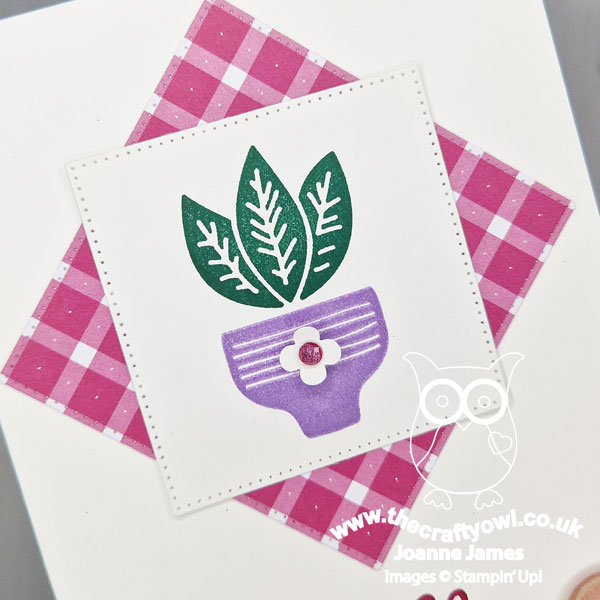
Glorious Gingham - Everything's better with gingham, right?! I used a square of Berry Burst gingham to back my pot, as a way to incorporate a pop of berry goodness and following the Try A Sketch on Tuesday that I included above (previously Try Stamping on Tuesday). The team are doubling up with Double Trouble where they want you to choose a background that reflects your introvert or extrovert personality. Well, since today is clean and simple day it's no surprise that I chose a clean white base, which I guess could fit either - which works for me, as I can be both introvert and extrovert!
Heartfelt Hellos - The 'Planted Paradise' stamp set is sentiment-free, so I needed to find one from elsewhere to complete my card. I wanted a 'Just For You' type set so that I could play along over at CAS on Friday this week as that is their theme, so I decided to ink up 'hello' from a new, FREE, set called 'Heartfelt Hellos' that can be yours too with a purchase of £45 or more. This is such a useful set with a mix of sentiments for a variety of occasions - I particularly love the font of the greeting I used on today's card.
Here is the visual summary of the key products used on today's project for you to pin for easy reference:
You can see all of my 'How To' summaries on my 'How To - Tips and Techniques' Pinterest board in case you've missed any.
As a reminder, for our colour challenges, you must use all of the stated challenge colours. You may also use neutral colours; however, the challenge colours should be the most noticeable ones featured on your card. We use Stampin' Up! color names for reference, but you are welcome to use any other companies' products as long as you match the challenge colours as closely as possible.
Enjoy your day and I'll be back later this week with another project. Until then, happy stampin'!
Stampin' Up! Supplies Used:
dc1dcd36-8534-4ec2-8e0f-4d071a2c1708|0|.0|96d5b379-7e1d-4dac-a6ba-1e50db561b04
Tags: Stampin' Up, Stampin' Up Card, Stampin' Up Card ideas, Stampin' Up Supplies, Shop online, Shop Stampin' Up online, Shop Stampin' Up! Online, CAS Colours and Sketches, Planted Paradise, Heartfelt Hellos, Stylish Shapes Dies
Cards | Shop Online | Shop Stampin' Up! Online | Stamping