#Elfie - Such A Christmas Cutie!

by Joanne James7. October 2019 17:30

Today I'm squeezing in my card for this week's Freshly Made Sketches challenge that I intended to blog on Saturday, but, well, the day was just too busy!


I made my card on Saturday afternoon as I was enjoying some World Card Making Day craftiness and indulged in two of my favourite past-times, colouring and fussy cutting to create this festive card - take a look:


My card features this fun Christmas elf from the #Elfie stamp set, inspired by Million Sales Achiever Karen Duke and I just love him! I fussy cut each of my three stamped images and mounted them on white stitched squares as I liked the added definition, then added my heat-embossed sentiment. A little stamping to the inside completed my card:


Easy as that! On reflection I'm wondering whether on this occasion I should have snipped away the bauble from the bottom image on the front of my card just to give a better balance - what do you think? 

Either way, I still love this cute little chap!

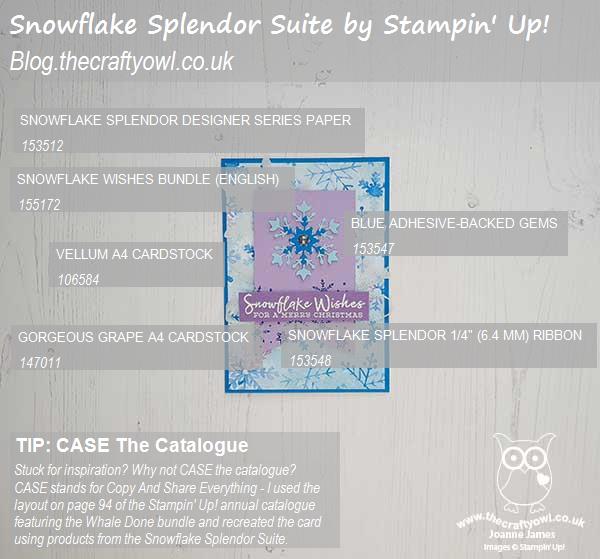
Here is the visual summary of the key products used on today's project for you to pin for easy reference:
 

You can see all of my 'How To' summaries on my 'How To - Tips and Techniques' Pinterest board in case you've missed any. 

I've started the week with my monthly technique class this morning which was a lot of fun (I'll share some of those cards later in the week) and some of the usual cooking and cleaning that seems an ongoing task in the James household. As is the ironing - that's where I'm headed next, wish me luck! Enjoy your evening and I'll be back tomorrow with another project. Until then, happy stampin'!


Stampin' Up! Supplies Used:

Table built using Product Table Builder by The Crafty Owl - Independent Stampin' Up! Demonstrator.

Country Home Thankful Cards for PP462

by Joanne James6. October 2019 09:00

Today it's Sunday and time for this week's new challenge over at The Paper Players! It's my turn to host this week and I have a seasonal theme challenge for you to work with:


At this time of year our thoughts often turn to giving thanks so I thought this would be a good theme for this week. I created not one but two cards this week, both using the colour combination over at TGIF Challenges. The first one uses this week's Fusion sketch (sketch only). I wanted to use the Country Home set for my cards today; it's one of my favourite sets for autumn thank you cards. For my first card I paired my milk churn of autumn foliage with some of the gorgeous patterned papers from the Woven Threads suite, along with some Grapefruit Grove coloured ribbon and pearls:


I tweaked my sentiment by replacing the stamped word 'happy' with a diecut from the Word Wishes Framelits set for added emphasis and finished my sentiment on the inside of my card:


My second card for Just Add Ink uses one of the other sentiments and foliage arrangements from the same set, this time with a piece of linen effect designer series paper from the Pressed Petals Specialty DSP that I embossed with my Tin Tile Embossing Folder for added texture:


You can see it more closely here, along with the detail on my cotton balls:


In Europe, due to ongoing customs issues we have been unable to obtain the Snowfall Accents Puff Paint on page 19 of the Autumn-Winter catalogue since the catalogue launch, which is a shame as it would be perfect to use on these. This week we learned that this product will not arrive before the catalogue end and as such has now been withdrawn from sale. Never fear though - I have a plan! I created exactly the same effect using some Tombo adhesive and white embossing powder using the same technique I used previously for an aeroplane smoke trail. I even made a video - here it is in case you aren't familiar with this technique and would like to see how it's done:

Give it a try and let me know how you get on and what you use it for - I'd love to see your projects!

Here is the visual summary of the key products used on today's projects for you to pin for easy reference:


You can see all of my Product and 'How To' summaries on my 'How To - Tips and Techniques' Pinterest board in case you've missed any. 

Before you reach for your ink and papers, check out what our amazing team has created to inspire you this week:

Here's a quick recap of our challenge rules:
 
1.  Create a new paper project
2.  Upload your creation to your blog with a link back to us and provide a direct link to the post featuring your challenge submission.
3.  Please link your card to no more than four challenges, TOTAL.
4.  Have FUN!

You can see all of my 'How To' summaries on my 'How To - Tips and Techniques' Pinterest board in case you've missed any. 

Enjoy your day; I am busy with preparations for my upcoming luxury weekend crafting retreat so I will hopefully be spending some time in my craft room ticking a few more jobs off my list, in between the usual weekend homework and a birthday party run for one of the James Juniors tomorrow afternoon. I'll be back soon with another project. Until then, happy stampin'!


Stampin' Up! Supplies Used: 

Table built using Product Table Builder by The Crafty Owl - Independent Stampin' Up! Demonstrator.


A Gift From Santa Christmas Card

by Joanne James4. October 2019 19:00

Friday already? Where did that week go?! I am just popping in with another Christmas card that I made for my stash inspired by the following challenges over at Sunday Stamps and Christmas Kickstart:

I couldn't resist using the sketch to showcase some fabulous festive designer series paper - take a look:


Since Christmas Kickstart is all about the presents, I decided that this gift-filled paper from the Night Before Christmas DSP pack would make a perfect centrepiece. This card is all about #SimpleStamping - the only stamping on the front of the card is my sentiment, which I thought it would be fun to make it look like a tag from the man in red himself - well, everyone knows that's who really brings the gifts at Christmas time, right?

I did do a little more stamping inside my card, using a sentiment from the 'Greatest Part of Christmas' stamp set, an exclusive hostess set available in the current Autumn-Winter catalogue that can be yours if you host a party before the end of the year, along with a few more gifts:


Isn't that a great sentiment for a loved-one at Christmas time?

Here is the visual summary of the key products used on today's project for you to pin for easy reference:


You can see all of my 'How To' summaries on my 'How To - Tips and Techniques' Pinterest board in case you've missed any. 

Enjoy your evening and I'll be back tomorrow with another project. Until then, happy stampin'!


Stampin' Up! Supplies Used:

Table built using Product Table Builder by The Crafty Owl - Independent Stampin' Up! Demonstrator.

Not Just For Grandmas - Tricolour Birthday Card JAI476

by Joanne James2. October 2019 10:30

No post from me yesterday I'm afraid as I was out hosting a Stampin' Up! party at the lovely Jane's house for her and all her friends and I didn't get a chance to post before I left. We had a fun evening of Christmas crafting, with delicious cake thrown in (the refreshments at Jane's always make the visit worthwhile!) I'm back to it today and just have time to squeeze in an entry for this week's challenge over at Just Add Ink

I loved this week's inspiration photo and it led me to create a card with a rather modern twist take a look:


Here's the low-down on today's card:

A Word About Inspiration - As my regular readers know, sketches are often my 'go to' starting point when I make a card, however sometimes inspiration comes from other areas. When it's a photo such as the one that inspired today's card, it can be interpreted in so many different ways. I knew I wanted to use florals, ideally tulips, and bright colours. It struck me that the photo had clearly defined lines of tulips within the borders and I decided it might be fun to use this idea on my card too. So I chose to create three distinct rows of flowers in each of the colours on the photo (I stamped them tone-on-tone then heat embossed them with clear embossing powder; difficult to see on the photo, but gives a lovely texture and shine) and backed them with a pale green Soft Sea Foam panel and a white card base. Using the cardstock in each of the colours, rather than stamping the flowers onto white and/or colouring them gives a strong, graphic feel to my card. Check out the JAI gallery to see how the DT team and other participants interpreted this week's inspiration! 

Not Just For Grandmas - My flower borders are made up by repeat-stamping the stamp featuring a trio of flowers (one is a tulip!) from the 'Grandma's House' stamp set. Whilst this set is all about the love of and for Grandmas, both this flower stamp and the house stamp in the set open up other creative possibilities - general birthdays, new home or pretty much anything that a flower can be used for! It's worth taking a second look at this kind of set, as they are often more versatile than they first appear.

The Perfect Pair - I finished my card with a diecut sentiment using the 'Well Written' framelits, paired with the super useful 'Well Said' stamp set. Together they can be used to create a ton of different sentiments for a wide variety of occasions - here's a peek at the inside of my card where you can see how I used it to finish my card: 


So what do you think - does this design work or would you have preferred a more traditional take on the photo inspiration? Do leave me a comment below - I would love to hear your thoughts!

Here is the visual summary of the key products used on today's project for you to pin for easy reference:


You can see all of my 'How To' summaries on my 'How To - Tips and Techniques' Pinterest board in case you've missed any. 

Enjoy your day; mine's a busy one. The youngest of the James Juniors is captaining his school rugby team this afternoon, hopefully to victory. Either way, I'm sure he will have a great time and one things for sure - there will be a fair amount of muddy kit heading my way this evening! I'll be back tomorrow with another project. Until then, happy stampin'!


Stampin' Up! Supplies Used:

Table built using Product Table Builder by The Crafty Owl - Independent Stampin' Up! Demonstrator.

We'll Walrus Be Friends Friendship Card

by Joanne James30. September 2019 07:00

Happy Monday everyone! I am starting the week with a card for the current challenge over at Festive Friday that is also my second using this week's Freshly Made Sketches sketch: 


I chose friendship, blue and orange as my 3 items from the Festive Friday inspo list and made this sweet card using one of my favourite sets in the annual catalogue, 'We'll Walrus Be Friends':

I stamped my main image on a Whisper White stitched oval, popping my goldfish up on dimensionals, and coloured it with my Blends and a liberal dose of clear Wink of Stella on the iceberg. I popped this onto a base embossed with the High Seas embossing folder. Both the iceberg sparkle and embossed waves are difficult to see on my photo, but they add so much to this card in real life. I love this card - I am going to send it to one of the James Juniors in their school bag one day when they need a little cheering up!

Here is the visual summary of the key products used on today's project for you to pin for easy reference:

You can see all of my 'How To' summaries on my 'How To - Tips and Techniques' Pinterest board in case you've missed any. 

Enjoy your day and I'll be back tomorrow with another project. Until then, happy stampin'!


Stampin' Up! Supplies Used:

Table built using Product Table Builder by The Crafty Owl - Independent Stampin' Up! Demonstrator.

A Pumpkin Holiday Haul for PP461

by Joanne James29. September 2019 09:00


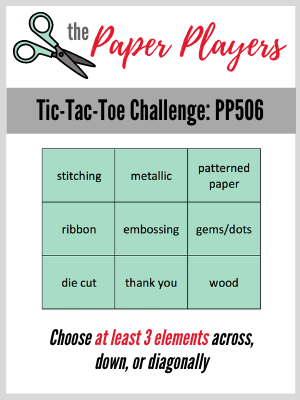
Today it's Sunday and time for this week's new challenge over at The Paper Players! It's the fifth Sunday of the month so my fellow Brit-turned Yank, the lovely Jaydee is host this week and she has a fun tic-tac-toe challenge for you to work with:


I always struggle with tic-tac-toe boards - almost too much choice! - so armed with this week's sketch over at Freshly Made Sketches and the Hand Stamped Sentiments colour palette I set to work and this is what I came up with:


Here's the low-down on today's card:

I liked this week's FMS sketch so much I ended up using it for a second time (which is weird, as I hardly ever use ovals on my cards - you can see tomorrow's card using the same sketch here). I thought that the HSS colours were perfect for an autumn-inspired card. I decided on a truck full of multi-coloured pumpkins and gourds, courtesy of the 'Holiday Haul' stamp set, one of the new sets exclusive to hostesses from the Autumn-Winter seasonal catalogue. I inked some of the pumpkins in Grapefruit Grove and added some Terracotta Tile with a sponge dauber for shading, then stamped some of the others in Mint Macaron and Pretty Peacock and fussy cut those and added them in. I created a Pretty Peacock frame for my oval using my Stitched Shapes Framelits and adhered my oval to my layered cardfront. My central panel was stamped tone-on-tone in Terracotta Tile all over with a cluster of leaves from a retired stamp set called 'A Little Something'. I couldn't find an appropriate sentiment in my stamp stash, so decided to leave it blank.

After all my fretting about which line of the tic-tac-toe board to complete, I ended up completing column 1 (fall, orange, leaves), row 3 (leaves, CAS, pumpkin) and the diagonal top left to bottom right (fall, diecut, pumpkin) - go figure!

My card will make the perfect notelet to send to my British penpal friend who now lives in the USA; she loves the way Americans embrace the season and I know she will already have started her collection of pumpkins to decorate her doorstep. If you like this fun set, it could be yours free with qualifying Stampin' rewards when you host a Stampin' Up! party - contact me to arrange yours.

Here is the visual summary of the key products used on today's project for you to pin for easy reference:


You can see all of my Product and 'How To' summaries on my 'How To - Tips and Techniques' Pinterest board in case you've missed any. 

Before you reach for your ink and papers, check out what our amazing team has created to inspire you this week:

Here's a quick recap of our challenge rules:
 
1.  Create a new paper project
2.  Upload your creation to your blog with a link back to us and provide a direct link to the post featuring your challenge submission.
3.  Please link your card to no more than four challenges, TOTAL.
4.  Have FUN!

You can see all of my 'How To' summaries on my 'How To - Tips and Techniques' Pinterest board in case you've missed any. 

Enjoy your day; we will be finishing our homework, having had a day of sport yesterday. I'll be back tomorrow with another project. Until then, happy stampin'!


Stampin' Up! Supplies Used: 

Table built using Product Table Builder by The Crafty Owl - Independent Stampin' Up! Demonstrator.

Knot Good Giraffe Get Well Soon Card for AYSI210

by Joanne James27. September 2019 13:00

I've been a busy bee this week with not much opportunity for blogging, but never fear! Today I'm sharing my design team card for our new challenge over at As you See It where it's time for a recipe challenge:


I went around the houses on this one for a while before I managed to come up with an idea that incorporated each of the elements, however I got there eventually with the help of the troubled giraffe from the 'Back On Your Feet' set - take a look:


Here's the low-down on today's card:

Back On Your Feet - I decided to feature the knotty giraffe from the 'Back On Your Feet' set on my card today. Perfect for a get well card, or even someone who's having a rough time of it, this comical giraffe and punny sentiment is sure to raise a smile. A simple stamp and colour with my Stampin' Blends and he was complete. The one thing that I was struggling to incorporate on this week's card was a diecut then I had a lightbulb moment (yes, sometimes it does happen!!) I used one of the dies from the Animal Friends Thinlits to create a giraffe-patterned background to tie in with my tag. Sorted!  

A Delightful Tag - I used the new Delightful Tag Topper Punch to create the tag that features my giraffe today. My trusty Scalloped Tag Topper Punch is one of my most-used punches - great for gift wrapping, customer bag tags and cards alike. Don't worry, this punch hasn't been replaced - I just added to it with another, slightly more fancy-topped one. If you don't have a tag punch, you should really consider investing in one - they will make creating your Christmas tags super quick and easy.

And The Rest Makes Three - Some stamped and punched leaves, Crumb Cake Nature's Twine and my punny sentiment (one the inside of my card it says "Hope things get better soon.") cropped with a rectangle stitched shape finish off this week's recipe board - and my card!

Here is the visual summary of the key products used on today's project for you to pin for easy reference:


You can see all of my 'How To' summaries on my 'How To - Tips and Techniques' Pinterest board in case you've missed any. 

I do love giraffes and learned lots about them when I visited South Africa on safari many years ago. Did you know you can tell whether they are a girl or a boy by the amount of hair on the end of their horns? Females usually still have hair, whereas males' horns are usually bare from wrestling with each other for the affections of said females. I wonder if this is also the reason for premature balding in males?! 

On that quizzical note I look forward to seeing what you make with this week's recipe challenge when I visit your blogs. Enjoy your day and I'll be back tomorrow with another project. Until then, happy stampin'!


Stampin' Up! Supplies Used:

Table built using Product Table Builder by The Crafty Owl - Independent Stampin' Up! Demonstrator.

Brightly Gleaming Meets So Many Stars for PP460

by Joanne James22. September 2019 09:00

Today it's Sunday and time for this week's new challenge over at The Paper Players! It's the turn of the delightful Claire to host this week and she has my favourite, a sketch challenge, for you to work with:


Tall and skinny - what fun! I love occasionally to change things up and give cards a completely different look by altering their size and shape. It didn't take me long to decide where to take Claire's sketch this week - take a look:


Here's the low-down on today's card:

I took two of my favourite things - the navy and copper star patterned paper from the Brightly Gleaming set and my Stitched Stars Dies - along with some copper foil and star and foil elements, and created a layered star centrepiece. I heat embossed my sentiment from the 'So Many Stars' set in copper onto Night of Navy cardstock, fussy cut around it and popped it up on a stack of dimensionals to complete my card. 

Here is the visual summary of the key products used on today's project for you to pin for easy reference:


You can see all of my Product and 'How To' summaries on my 'How To - Tips and Techniques' Pinterest board in case you've missed any. 

I'm linking my card up with SUOChallenges where they currently have a Designer's Choice challenge. I love this card - so much so, I made a second one straight afterwards! I just need to use my trusty BoxBuster tool to make a couple of bespoke envelopes now ready to send them!

Before you reach for your ink and papers, check out what our amazing team has created to inspire you this week:

Here's a quick recap of our challenge rules:
 
1.  Create a new paper project
2.  Upload your creation to your blog with a link back to us and provide a direct link to the post featuring your challenge submission.
3.  Please link your card to no more than four challenges, TOTAL.
4.  Have FUN!

You can see all of my 'How To' summaries on my 'How To - Tips and Techniques' Pinterest board in case you've missed any. 

Enjoy your day; I am singing with my choir in a harvest festival service this morning, then will be home to assist in finishing homework and the like in the afternoon. I'll be back tomorrow with another project. Until then, happy stampin'!


Stampin' Up! Supplies Used: 

Table built using Product Table Builder by The Crafty Owl - Independent Stampin' Up! Demonstrator.

Brightly Gleaming Foil Elements CAS Bauble Christmas Card

by Joanne James21. September 2019 21:15

I am a bad blogger! I've had such a busy week that I have managed very little to either create or blog. So a quick share from me with another all-out copper clean and simple metallic, inspired by last week's Paper Players challenge that uses this week's CAS(E) This Sketch layout:


I created another super clean and simple Christmas card, this time featuring a couple of Brightly Gleaming Foil Elements baubles and a heat embossed sentiment from the 'Perfectly Plaid' stamp set - take a look:


My card is a simple extra thick Whisper White card base, a layer of copper foil cut with the Rectangle Stitched Framelits, then my copper heat-embossed sentiment on a panel of Whisper White with two foil element baubles hanging from some retired copper metallic thread - definitely clean and simple!

Here is the visual summary of the key products used on today's project for you to pin for easy reference:

 to follow

You can see all of my Product and 'How To' summaries on my 'How To - Tips and Techniques' Pinterest board in case you've missed any. 

Enjoy your evening; I'll be back tomorrow with this week's card for The Paper Players. Until then, happy stampin'!


Stampin' Up! Supplies Used: 

Table built using Product Table Builder by The Crafty Owl - Independent Stampin' Up! Demonstrator.

Clean and Simple Copper Metallic Christmas Tree for PP459

by Joanne James15. September 2019 09:00

Today it's Sunday and time for this week's new challenge over at The Paper Players! It's the turn of the fabulous Anne Marie to host this week and she has a fun clean and simple challenge for you to work with:


I couldn't resist going all-out copper for my metallic and created a super clean and simple Christmas card featuring a heat embossed tree from the 'Perfectly Plaid' stamp set - take a look:


Since it is clean and simple week, it's worth a reminder of what we at The Paper Players mean by Clean and Simple:

  • Minimal layers and embellishments
  • Plenty of open space, aka "white" space
  • Simple and uncluttered
My card is a simple extra thick Whisper White card base, a layer of copper foil cut with the Rectangle Stitched Framelits, then my copper heat-embossed Christmas tree on a panel of Whisper White with the addition of a simple single copper star embellishment - I didn't even add a sentiment to the front of my card. Just 3 layers with a single image and embellishment and a ton of white space - definitely clean and simple!

Here is the visual summary of the key products used on today's project for you to pin for easy reference:


You can see all of my Product and 'How To' summaries on my 'How To - Tips and Techniques' Pinterest board in case you've missed any. I loved this CAS challenge; I created another card for this theme too which I will hopefully share with you later in the week!

Before you reach for your ink and papers, check out what our amazing team has created to inspire you this week:

Here's a quick recap of our challenge rules:
 
1.  Create a new paper project
2.  Upload your creation to your blog with a link back to us and provide a direct link to the post featuring your challenge submission.
3.  Please link your card to no more than four challenges, TOTAL.
4.  Have FUN!

You can see all of my 'How To' summaries on my 'How To - Tips and Techniques' Pinterest board in case you've missed any. 

Enjoy your day; we are hoping to make the most of what is turning out to be a pleasantly warm weekend with possibly the last BBQ of the year, along with homework and more cooking of our gluts of home-grown produce. I'll be back tomorrow with another project. Until then, happy stampin'!


Stampin' Up! Supplies Used: 

Table built using Product Table Builder by The Crafty Owl - Independent Stampin' Up! Demonstrator.

New Online Exclusives

There are new products available exclusively in the online store from 5 November - check them out here.

Latest Kits!

Stampin Cut and Emboss

The Layered Landscapes Kit and Nature's Paintings Kit are the latest kits in the online store - get yours here!

Shop Online

Access my online shop 24 x 7, 365 days of the year:

Current November hostess code:

9NKXDTTR

Shop Online

Mini Catalogue

BROWSE THE CATALOGUE

'Tis The Season - the new Stampin' Up! Mini Catalogue is here! For more details and to download your copy click here

Scrapbooking

Stampin' Up! has introduced a new range of 12x12" scrapbooking product and kit - the full range is now available to purchase online. To download a copy of the new digital Scrapbooking Catalogue click here.

2024-25 Annual Catalogue

BROWSE THE CATALOGUE

Click on the image to download your copy of the 2024-25 annual catalogue. For a full list of current SU! supplies, go to my online store. If you would like any help or advice, please drop me a line at joanne@thecraftyowl.co.uk or give me a call on 07773 421446 - I'd be happy to help.

Join My Team

It's always a great time to join Stampin’ Up! New team members can get £130 worth of products for only £99 + free business supplies + free shipping + all the fun being a part of Stampin’ Up! Stampin' Up! has something for everyone: join my growing team and benefit from my support to enjoy Stampin' Up! however you choose.

If you're interested, call me for a chat to understand how I can help you realise your goals. Alternatively, if you have already decided to sign up and you just can't wait, please click here for the link to the online form where you can sign up and order your starter kit right away! 

About Me

Hi I'm Joanne and live in Northampton and when I'm not looking after my husband and two beautiful children, am an avid crafter with a passion for all things Stampin' Up!

I must confess that I have never been a big rubber stamper - until I discovered Stampin' Up! that is. I love the fact that I can get such great results with co-ordinating stamps, inks, papers and punches - the possibilities are endless! Join me on my stamping journey as I share the things I love and be inspired to create amazing things yourself!

Follow Me

Monthly Newsletter

Box Builder

Click the button above to use Box Buster to create your custom box design using the Envelope Punch Board!

Kits Collection Now Available!

Stampin Cut and Emboss

The new Kits Collection from Stampin' Up! is now available!

Click here to see the current kits available and order yours online today.

I Design For


Stampin' Up Stuff

This is my personal blog and is not endorsed by Stampin’ Up! I hope you find it a plentiful source of ideas and personal inspiration but please don't copy my designs for contest submission or use for classes, publication or sale without express permission.