Tag A Bag Pocket Book

by Joanne James30. July 2013 14:35

An early post from me today (or a late one from yesterday, depending on your perspective!) as I'm off to London; not to see the Queen, but to meet the nice people at DK Books to talk about all things crafty - should be fun! For today's post, I've another project made at our recent quarterly team training session, this time a Pocket Book designed by Bekka Prideaux and made using the Tag A Bag Gift Bags as pockets in a book. Here's a picture of the finished mini-album, with one of the Tag A Bag Accessory Kit Gift Tags making a nice cover label:


This is another project that makes use of the Crushed Curry/Bermuda Bay colour combination and features the Flower Shop stamp set, both on the cover and inserts and punched to make the flower embellishment on the front of the card. This is what the book looks like inside:

The bags are decorated with alternating colour stamps and each small section has a section of card in the corresponding colour. This little pocket book could be used in a variety of ways; you can write on the bag pages and card inserts, fill the bags with small items and seal using the other items in the accessory kit (twine, mini pegs, tags and tape) or use to mount photos or clip notes to. The whole thing fastens neatly with chevron ribbon. One last picture to show you a close up of the lovely embellishment on the front cover:

Back tomorrow with another project; until then, happy stampin'!


Stampin' Up Supplies:

Stamps: Flower Shop

Cardstock: Bermuda Bay, Crushed Curry

Ink/Stampin' Write Markers: Bermuda Bay, Crushed Curry

Tools: Simply Scored, Pansy Punch

Finishing Touches: Tag A Bag Gift Bags, Tag A Bag Accessory Kit, Crushed Curry 3/4" Chevron Ribbon, Coastal Cabana In Colour Boutique Details


Tags: , , , , ,

3D Projects | Stamping

Tag-A-Bag Gift Bag Hostess Gift

by Joanne James28. July 2013 19:50

After all the excitement of yesterday's pop-up card, today I'm sharing another of the projects I made at my recent quarterly training. The new annual catalogue has some great new packaging options; today's project is a great way to dress up one of the bags from the 'Tag a Bag Gift Bag' kits for a quick gift:

A simple outer open fronted box adds some structure and the addition of a bright Chalk Talk gift tag, with a flower punched from one of the tags in the gift bag kit, finished with a Strawberry Slush embellishment and a showy bow of Crushed Curry Chevron Ribbon; a simple bag is turned into something truly gift-worthy with little effort. Great for a small thank you or hostess gift.

Back tomorrow with another project featuring the Tag-a-Bags; until then, happy stampin'!


Stampin' Up Supplies:

Stamps: Chalk Talk

Cardstock: Bermuda Bay, Whisper White

Ink/Stampin' Write Markers: Strawberry Slush

Tools: Chalk Talk, Pansy Punch

Finishing Touches: Tag A Bag Gift Bag, Tag A Bag Accessory Kit, Crushed Curry 3/4" Chevron Ribbon, Strawberry Slush, In Colour Boutique Details

Tags: , , , , , , , , ,

3D Projects | Boxes | Host a Party | Stamping

Raspberry Ripple Covered Notebook

by Joanne James16. July 2013 21:59

A really quick post from me today to share a covered notebook I made for Rebecca's teacher last week to go with her end of term thank you gift. As someone who loves arts and crafts herself, Rebecca was keen to give her teacher a special book she could use to jot down notes and such like and was adamant that it should sparkle! So this is what we made:

Some More Amore DSP, glimmer paper and trusty elegant butterfly punch were all that we needed to turn a plain notebook into something special. We also added some in-colour satin stitched ribbon to the bind as a finishing touch. We also added a personal message inside, along with the poem 'Unity' by Cleo Swarat, which is all about the role of teacher and parent in educating a child and talks of the teacher being a sculptor, which given Rebecca's teacher majored in Art seemed appropriate for her.

That's all for today - back tomorrow with another project. until then, happy stampin'!


Stampin' Up Supplies:

Cardstock: Raspberry Ripple, More Amore (DSP)

Tools: Elegant Butterfly Punch, 1 3/4" Scallop Circle Punch, Itty Bitty Punches

Finishing Touches: Raspberry Ripple Satin Stitched Ribbon, Silver Glimmer Paper, Basics Rhinestones

Tags: , , , , ,

3D Projects

An Apple for the Teacher

by Joanne James12. July 2013 20:45

That's it for another year - school is officially out! Where does the time go? Today I'm sharing some of my teacher thank you gifts with you. I love to create handmade gifts and as some of my readers know, one of my other hobbies is biscuit making. So for my end of year teacher gifts, I decided to make apple-shaped chocolate iced biscuits, presented in the fab new Tag a Bag Gift Boxes and finished with a decorated tag from the co-ordinating accessory kit:

I often make mini-cookies and present in glass jars, but on this occasion these gift boxes were the perfect size and shape to hold ten of my apple biscuits. These boxes are great value at £6.25 for eight boxes and as they're food safe they are perfect for biscuits, cupcakes or other edible as well as non-edible gifts. I also made use of my accessory kit to seal and label the boxes. Here's a close up of one of the tags:

Wondering how I made the apples? I used the heart from my Hearts a Flutter framelits and then removed the bottom point with my Petite Curly Label Punch, added a leaf and stalk and done. A quick stamped and cut Bitty Banner 'thank you' and some Gumball Green ribbon added the finishing touch. One more photo for you with one of the biscuits out of the box so that you can see exactly what they look like:

Hoping to be back tomorrow with another project; have a busy day making tomorrow, as I have swaps to prepare for quarterly team training on Sunday and I haven't even started yet - oops! Until then, happy stampin'!


Stampin' Up Supplies:

Stamps: Bitty Banners

Cardstock: Whisper White, Real Red, Gumball Green, Chocolate Chip

Ink/Stampin' Write Markers: Real Red

Tools: Hearts a Flutter Framelits, Bitty Banners Framelits, 3/4" Circle Punch

Finishing Touches: Tag a Bag Gift Boxes, Tag a Bag Accessory Kit, White Baker's Twine

Clockworks Notepad

by Joanne James26. May 2013 20:28

What a lovely Bank Holiday weekend this is turning out to be, with surprisingly glorious weather! I struggled to tear myself away from the garden to blog today, but wanted to share with you another project using the same Clockworks stamp set I used on the boxed notelets set yesterday, this time a covered notebook:

To create the notebook cover, I first scored a sheet of Basic Grey cardstock in a grid pattern, then took a piece of Whisper White card and randomly stamped it all over with the Clockworks stamps, using a Stamp-a-ma-jig to ensure the numerals on the clockfaces lined up correctly with the wider at the top. The coral stamp pattern was also lightly scored for texture and the whole thing sprayed with a Gumball Green coloured spritzer mist. A large Vintage Faceted Button was added to the centre of the complete clockface, whilst a second smaller one was added to a flower made from 3 flowers punched with the Fancy Flower punch, spritzed with water then scrunched and left to dry. The flags were also hand-crimped and finished with one stamped with another partial stamp from the 'One in a Million' stamp set.

I really like the finished effect and wonder if this notepad would make a nice Father's Day gift (maybe minus the flower?!). More masculine projects to come in the next couple of weeks, so do pop back if you're in need of some Father's Day inspiration. Just a reminder too that this months 15% discount offer on the This and That journal bundle ends on Friday this week, so if you'd like to take advantage of this, do drop me a line in advance of this date to place your order. Whilst the items will still be available after this date, the bundle will be available at the full price of £ not at £29.24 with the 15% discount.

Back tomorrow with another project, assuming I can tear myself away from the sunshine! Until then, happy stampin'!


Stampin' Up Supplies:

Stamps: One in a Million, Clockworks

Cardstock: Basic Grey, Whisper White, Gumball Green, Calypso Coral, More Mustard, Pool Party

Ink/Stampin' Write Markers: Calypso Coral, Gumball Green, Pool Party, More Mustard, Basic Grey

Tools: Simply Scored, Stamp-a-ma-jig, Fancy Flower Punch, Spritzer

Finishing Touches: Vintage Faceted Buttons, Calypso Coral Baker's Twine

Tags: , , , , , ,

3D Projects | Stamping

Happiness Notelets Box

by Joanne James25. May 2013 21:01

A change from owls today! I thought I would share with you one of the 'make and take' projects I made at the Stampin' Up! regional training event in Telford a couple of weeks ago, a little box made using the Two Tags die containing a set of mini notelets. So first, a close up of the box itself:

The box was decorated with a double-layered fancy flower, stamped with one of the stamps from the Clockworks stamp set and the centre and box front finished with some stamped First Edition designer series paper. An in-colour Gumball Green dahlia adds the accent colour that really makes this project 'pop'. The box contains a set of notelets, decorated with Clockworks and a sentiment from the One in a Million stamp set:

This would make a lovely gift set - it's always handy to have a set of notelets on hand. I like the flag detail on the box too; do you recognise the 'happiness' stamp? It's actually a section of the wedding sentiment stamp in the 'One in a Million' set - I've just trimmed away the first part that said 'Wishing you a lifetime of' - a neat trick to extend the versatility of your stamps.

That's all for today; back tomorrow with another project (assuming I can tear myself away from the lovely weather outside!) - until then, happy stampin'!


Stampin' Up Supplies:

Stamps: One in a Million, Clockworks

Cardstock: Calypso Coral, Whisper White, First Edition Designer Series Paper

Ink/Stampin' Write Markers: Calypso Coral, Gumball Green, Pool Party

Tools: Two Tags Bigz Die, Big Shot, Fancy Flower Punch

Finishing Touches: In Colour Dahlia

Four Legged Friends

by Joanne James14. May 2013 21:32

Today I thought I'd share a couple of projects that I made for my good neighbour and friend and fill you in on the story that goes with them. My neighbour is MAD about dogs! Not just a dog-lover - I mean, head-over-heels, mad about her canine friends (and other animals too, but that's a whole other story!) Anyway, anyone reading this who knows me, knows that I am SO not like this; it's not that I don't like animals, it's just that I've never really had a pet and I don't really understand the pet-owner bond; combined with my OCD cleaning obsession this means that I can't imagine having a four legged friend running round the house, as much as my children plague me to get one. As a consequence, I have been known to say the wrong thing on occasion as far as pets are concerned; I would like to think I've learned from some of my previous faux-pas though, so when my neighbour's beloved great dane, Chelsea, passed away recently I decided to do something special to remember her. I decorated a box frame to house a favourite picture of her and this is the finished result: 
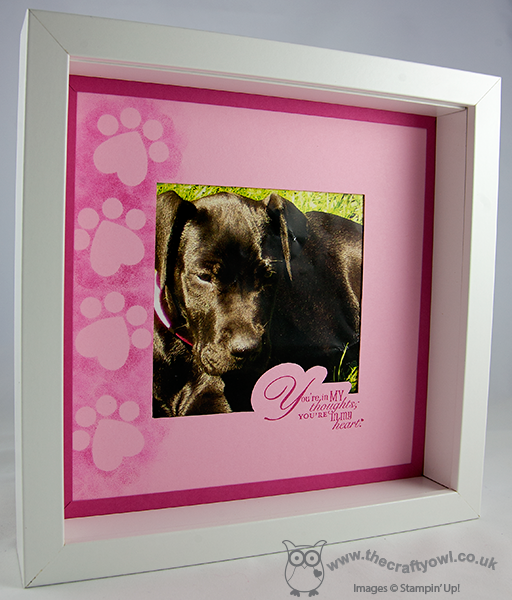
You might think it a bit pink, but for all her size and stature, she was a real girly dog if there is such a thing, with a bright pink collar and always to be seen wearing a bright pink necktie. The sentiment, 'You're in my thoughts, you're in my heart" seemed so appropriate in the circumstances. Whilst Chelsea will never be forgotten, her passing has been followed by the arrival of a new neighbour; a beautiful grey baby great dane puppy called Storm. To welcome her, I made a card, similar to one I'd seen designed by Mary Fish. You can see her card here; and this is my version:
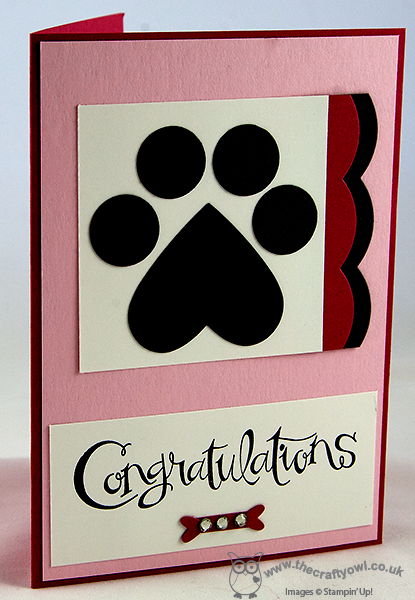
I did add some grey stitched grosgrain ribbon across the front too, but I can't find the photo with ribbon so you'll just have to use your imagination! I stayed with the pink theme toned in with grey - I love the punch art paw print, don't you? Lastly, for all you other many dog lovers reading this, I thought you might like to see a picture of the new puppy - so here she is, Storm in all her glory:

Isn't she just the cutest?! That's all for today - back tomorrow with another project. Until then, happy stampin'!


Stampin' Up Supplies:

Stamps: Word Play, Sassy Salutations

Cardstock: Regal Rose, Melon Mambo, Basic Grey, Whisper White, Pretty in Pink, Rose Red

Ink/Stampin' Write Markers:  Melon Mambo, Basic Grey

Tools: Full Heart Punch, Owl Punch, 3/4" Circle Punch, Large Scallop Edgelits

Finishing Touches: Basics Rhinestones

Dotty Dress Up Lip Balm Boxes

by Joanne James7. May 2013 17:51

Another dress up project today, but today I'm going 3D with these cute boxes, the perfect size to hold a lip balm. I actually made a couple of these as quick gifts, but then couldn't resist making a third one for myself! I got busy with my polka Dot Parade paper; here they are - guess which one is mine?

The first one is in Marina Mist polka dots with taffeta ribbon:

The second one is in Real Red with some of the flower trim: 

Lastly, Rich Razzleberry with some stitched grosgrain ribbon:


I think there's something very 'Pretty Woman' about these and they really are so easy to make. They make great little treat boxes, or would make lovely table favours for a leavers prom too, perhaps with a couple of chocolates inside. Another great use for this versatile set (oh, and in case you were wondering - the red one is mine!).

One last thing - further to my post last week about Stampin' Up!'s new This and That Journal and the discounted bundle offer that can be purchased in May (see the 'Special Offers' section in the side bar for more details), I will be posting a 'This and That' journal tip on my Facebook page each day for the rest of the month, with lots of thoughts and ideas on how you can get great use from your journal. Click the 'follow me on Facebook' icon on the right-hand side to make sure you see these tips in your daily news feed and do drop me a line when you're ready to purchase yours!

Back tomorrow with another project - until then, happy stampin'!

Stampin' Up Supplies:

Cardstock: Marina Mist, Real Red, Rich Razzleberry, Whisper White, Polka Dot Parade DSP

Ink: Marina Mist, Real Red, Rich Razzleberry

Tools: Dress Up Framelits, Big Shot, Jewelry Tag Punch

Finishing Touches: Taffeta Ribbon Marina Mist, 1/4" Stitched Grosgrain Ribbon Rich Razzleberry, Flower Trim, Baker's Twine

Tags: , , , , , , , ,

3D Projects | Boxes

Fashionista Gift Tag Set

by Joanne James3. May 2013 20:49

No stamping today! I have another Dress Up project from last month's quarterly training session: this time a lovely set of gift tags in a nice little pocket holder made using the Pop n' Cuts base again. Here's the outside of the box, decorated with its own dress on a Cute Clip hanger and another of those little filter paper flowers:

Open up the box to reveal a lovely set of dressed mannequin gift tags, each one with its own outfit:

This kind of holder is so easy to make just by adding in a couple of central score lines and box section to hold the tags; it would also make a nice notelet holder. As for the tags - what better way to ensure a gift for someone special is 'all dressed up'? My particular favourite outfit combo is the embossed filter paper sundress with the hot pink patterned bolero cardigan; leave me a comment and let me know which one you prefer, or better still how you would dress yours?

If you would like to get your hands on a gift tag set like the one above, you can do one of three things:

host a party during the month of May - this will be my hostess gift to thank you for booking a party and if you have party sales totally £300 or more, you could use your hostess credits to obtain the Pop 'n' Cuts Card base, Pop 'n' Cuts Dress Form and All Dressed Up framelit and stamps bundle ABSOLUTELY FREE!*

ask me about a class - if I have enough interested crafters, I will run a class featuring the Dress Up framelits and Pop 'n' Cuts base and you can learn how to make this set and more

contact me via joanne@thecraftyowl.co.uk to place your order today

So many choices - I hope one of them tick's your box and I look forward to hearing from you. Back tomorrow with anohter project - until then, happy stampin'!


*Hostess credits for party sales of £300 totalling £75 (£50 plus £25 bonus if you host a party before May 30th) with one item purchased at 50% discount price


Stampin' Up Supplies:

Cardstock: Marina Mist, Sunshine and Sprinkles DSP

Ink: Basic Grey

Tools: Dress Up Framelits, Big Shot, Itty Bitty Punches, Elegant Bouquet Embossing Folder, Fancy Fan Embossing Folder, Heart Punch

Finishing Touches: Basics Rhinestones, 1/4" Stitched Grosgrain Ribbon Basic Grey, Creped Filter Paper, Cute Clips

IT'S HERE! This and That - Stampin' Up's Answer to Journalling On the Go

by Joanne James1. May 2013 08:54

Today is going to be 'Two Post Wednesday' (I know catchy!!) as there's big news as well as beautiful cards to share!

Calling all scrapbookers and journal writers - 'This and That' has arrived! If like me, you're always living life in the fast lane, but love to capture the funny and memorable moments in everyday life, this is the set for you - true journalling 'on the go'.

Check out this video to get a great look at everything that's on offer as part of this new package:

This and That will debut in the 2013-2014 annual catalogue, but Stampin' Up! is giving you the chance to get it now. During the month of May, there is an exclusive 15% product discount on this 5 item bundle when all 5 items are purchased together. The items can be purchased separately, but why would you do that when you can buy the bundle and save 15%? The 'This and That' range will be added to as time goes on, but the bundle discount is valid from 1st-31st May only and the items will only be available to purchase individually and at full price in the new annual catalogue from 1st July. The bundle contains plenty of stickers, washi tape and designer series paper, such that you will have enough to make cards and decorate other items too - lots of new, fun crafting items with tons of uses; can't wait to share my creations!

Click on the image below to download the details of the products on offer:

If you would like to order a 'This and That' product bundle, don't delay and contact me today to place your order. There's no limit to how many bundles you can purchase - which is great news, as this would make a great gift set for a crafty child or even reluctant writer; a great way to encourage handwriting practice without it seeming a chore!

Back later with today's project post. until then, happy stampin'!

Tags: , , , , , ,

3D Projects | Promotions | Scrap Booking

New Online Exclusives

There are new products available exclusively in the online store from 5 November - check them out here.

Latest Kits!

Stampin Cut and Emboss

The Layered Landscapes Kit and Nature's Paintings Kit are the latest kits in the online store - get yours here!

Shop Online

Access my online shop 24 x 7, 365 days of the year:

Current November hostess code:

9NKXDTTR

Shop Online

Mini Catalogue

BROWSE THE CATALOGUE

'Tis The Season - the new Stampin' Up! Mini Catalogue is here! For more details and to download your copy click here

Scrapbooking

Stampin' Up! has introduced a new range of 12x12" scrapbooking product and kit - the full range is now available to purchase online. To download a copy of the new digital Scrapbooking Catalogue click here.

2024-25 Annual Catalogue

BROWSE THE CATALOGUE

Click on the image to download your copy of the 2024-25 annual catalogue. For a full list of current SU! supplies, go to my online store. If you would like any help or advice, please drop me a line at joanne@thecraftyowl.co.uk or give me a call on 07773 421446 - I'd be happy to help.

Join My Team

It's always a great time to join Stampin’ Up! New team members can get £130 worth of products for only £99 + free business supplies + free shipping + all the fun being a part of Stampin’ Up! Stampin' Up! has something for everyone: join my growing team and benefit from my support to enjoy Stampin' Up! however you choose.

If you're interested, call me for a chat to understand how I can help you realise your goals. Alternatively, if you have already decided to sign up and you just can't wait, please click here for the link to the online form where you can sign up and order your starter kit right away! 

About Me

Hi I'm Joanne and live in Northampton and when I'm not looking after my husband and two beautiful children, am an avid crafter with a passion for all things Stampin' Up!

I must confess that I have never been a big rubber stamper - until I discovered Stampin' Up! that is. I love the fact that I can get such great results with co-ordinating stamps, inks, papers and punches - the possibilities are endless! Join me on my stamping journey as I share the things I love and be inspired to create amazing things yourself!

Follow Me

Monthly Newsletter

Box Builder

Click the button above to use Box Buster to create your custom box design using the Envelope Punch Board!

Kits Collection Now Available!

Stampin Cut and Emboss

The new Kits Collection from Stampin' Up! is now available!

Click here to see the current kits available and order yours online today.

I Design For


Stampin' Up Stuff

This is my personal blog and is not endorsed by Stampin’ Up! I hope you find it a plentiful source of ideas and personal inspiration but please don't copy my designs for contest submission or use for classes, publication or sale without express permission.