The Stampin' Up! Retiring List Is Here!

by Joanne James18. April 2016 20:00

The retiring lists are here! Discover what stamps and accessories, including the 2014-16 In Colours, are retiring at the beginning of June this year. Retiring products are only available WHILE STOCKS LAST, so if you've still items on your wish list from this year's annual or spring-summer seasonal catalogues, you need to check the retiring lists and if they're on it put an order in pronto!


Please click on the images below to see the complete lists in the online store:

 Retiring Stamps          Retiring Accessories

                               STAMPS                                  EVERYTHING ELSE

You can click on this link to access and download the complete Retiring List (in pdf format):

Retiring Stamps & Accessories - available April 18-May 31 (while stocks last)


You have just 6 weeks left to shop from the current annual and seasonal catalogues. Some of the items on these lists will sell out quickly and once they're gone, they're gone. So what are you waiting for? Don't delay, shop today! Click here to go straight to my online store - remember to include this month's hostess code UD3KDWM4 to receive a special thank you from me. If you live in or around Northampton, if you would like to save on postage and collect your order on delivery, please email me on [email protected] or phone me with your order.

I'll be back tomorrow with a creative post; until then, happy shopping!

2015-17 In Colour Definitely Dahlia Cards

by Joanne James18. April 2016 18:00

Hi everyone! I'm a little later with today's post as I've had some serious housework to get sorted after my few days away at the UK Onstage event and I'm busy getting ready for the announcement of the Stampin' Up! Retiring List that is happening this evening at 8pm.

Today's share though is a great clean and simple card that I sent out as a thank you card to the lovely ladies that placed orders online with me last month and have been meaning to post here for a few weeks now! I inked up my Definitely Dahlia stamp for the first time and decided to make a feature of the outgoing in-colours as a reminder to stock up on reinkers, cardstock and accessories before the retiring list is issued and stocks run out:


As I write this, the ever-popular Blackberry Bliss ink and cardstock has already sold out - if you haven't already got your supplies of the other colours, then get your order in quick! Once the retiring list is live at 8pm this evening, the outgoing in-colours will be the first things to sell. As for today's card - simple enough, with just a wooden embellishment and some rhinestones added to the beautiful dahlia which really does all the hard work here. Such a lovely background/feature stamp!

On the upside, whilst we are saying goodbye to these colours, we will of course be saying 'hello' to a new set just six weeks from now. 


Back later with news of the retiring lists; until then, happy stampin'!


Tags: , , , , , ,

Cards | Shop Online | Stamping

Pretty Petals Punched Butterflies Card

by Joanne James17. April 2016 09:00

It's Sunday and time for a new challenge over at The Paper Players! It's the lovely Sandy's turn to host our challenge this week and she has a great clean and simple challenge for you to play along with:


I was a little pressed for time this week in getting ready for Stampin' Up! Onstage at Telford (also the reason for a lack of blog posts over the last two days) so a clean and simple challenge couldn't have come as a better time! I used this week's sketch over at Mojo Monday for my layout and decided to go with punched rather than stamped butterflies for both impact and speed:

As you can see, today's card really is clean and simple. Here's the low down:

Pretty Petals - I reached for this paper pack to use as the starting point for my card and settled on this rather bold pattern, as I knew I needed only a small amount so wanted it to be impactful. My Pretty Petals paper set the colour combination for my card and provided the perfect backdrop to my sentiment from 'Tin of Cards'.

Can You Keep A Secret? - The DSP has a small amount of Calypso Coral around the flower heads, which I substituted with Watermelon Wonder as I wanted to use the wide satin ribbon in this colour for my banner. Sssh, don't tell - although honestly I think it's impossible to see the difference even up close. Here is the colour palette I used on my card:


A Trio of Punched Butterflies - I used a trio of solid colour butterflies to complete my card, punched using the Bitty Butterfly and Elegant Butterfly punches. I layered one of them and finished them all with pearls as a simple embellishment.

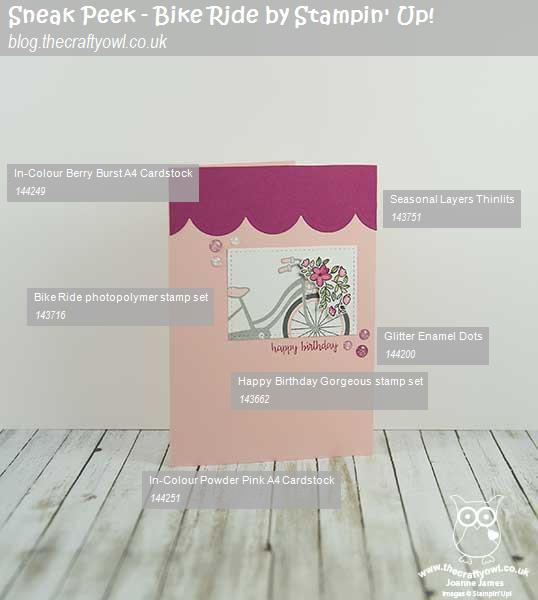
Here is the visual summary of the key products used on today's project for you to pin for easy reference:
 

You can see all of my 'How To' summaries on my 'How To - Tips and Techniques' Pinterest board in case you've missed any. 

So as you can see, a clean and simple card for this week's butterfly challenge. I'm also linking up with the lovely team over at the Global Design Project where their theme this week is 'nature' and a butterfly definitely qualifies for that!

Before you reach for your ink and papers, check out what our amazing team has created to inspire you this week:

The Paper Players Design Team
 
 
Here's a quick recap of our challenge rules:
 
1.  Create a new paper project
2.  Upload your creation to your blog with a link back to us and provide a direct link to the post featuring your challenge submission.
3.  Please link your card to no more than four challenges, TOTAL.
4.  Have FUN! 


I look forward to seeing your clean and simple cards this week. We are off to basketball today and back to hockey today ...

Back tomorrow with another project; until then, happy stampin'!


Stampin' Up! Supplies Used:

Table built using Product Table Builder by The Crafty Owl - Independent Stampin' Up! Demonstrator.

Bear Hugs - Papa Bear Gone Fishin'

by Joanne James14. April 2016 08:05

Today it's time for a new challenge over at Create With Connie and Mary and this week we have a colour combination for you:


This colour combination left me stumped for a while, until I decided that Soft Suede would be a good colour for a bear - take a look:

The low-down on today's card is as follows:

Papa Bear - I stamped my Daddy Bear from the 'Bear Hugs' stamp set in Early Espresso on Soft Suede card stock and cut him out using my Big Shot and co-ordinating Bear Hugs Framelits, curving his arms in slightly so that he could 'hold' on to his fishing pole. 

Gone' Fishin' - The 'Bear Hugs' set comes with lots of fun embellishments; I decided to go with a fish on this card that I coloured in Mint Macaron and Lost Lagoon with my Aquapainter, then painted liberally with clear Wink of Stella to give him shimmery scales. I attached my fish to a piece of white baker's twine, which I in turn knotted to my cocktail stick fishing pole. How cute?!

Geometrical Forest - I decided I needed to conjure up some forest or at least a feeling of the outdoors behind my lake, but was somewhat at a loss as to how to do this with such a limited colour palette. I perused my designer series papers and bingo - this geometrical design, whilst not including trees of any kind, works as a background. I do think those triangles are evocative of trees (ok, I know it's a stretch, but if you have a better suggestion do leave me a comment below - I'd love to hear it!) And where did I find it? In the 'It's My Party' Designer Series Paper stack of all places!

Here is the visual summary of the key products used on today's project for you to pin for easy reference:


You can see all of my 'How To' summaries on my 'How To - Tips and Techniques' Pinterest board in case you've missed any. 

Do visit the other Design Team members to see what they did with this week's colours; there's lots of inspiration over on their blogs too!

Enjoy your day and I'll be back tomorrow with another project; until then, happy stampin'!


Stampin' Up! Supplies Used:

  • Bear Hugs Clear-Mount Bundle
  • It's My Party Designer Series Paper Stack
  • Soft Suede A4 Cardstock
  • Early Espresso Classic Stampin' Pad
  • Lost Lagoon A4 Cardstock
  • Lost Lagoon Classic Stampin' Pad
  • Mint Macaron Classic Stampin' Pad
  • Ovals Collection Framelits Dies
  • Whisper White A4 Cardstock
  • Rhinestone Basic Jewels
  • Whisper White Baker's Twine
  • Clear Wink of Stella

Rose Wonder Envelope Slider Card

by Joanne James13. April 2016 18:33

Today I'm sharing one of the cards that I made in my Technique card class yesterday - a lovely card with a stamped panel that slides out of an envelope-type wrapper. I saw this gorgeous card by Lou Kitzelman in a blog hop a while ago and was inspired to create my own version, changing up the colours and embellishments.

This is what the card looks like with both pieces together:


The card consists of an inner panel of Basic Black cardstock (cut 3mm narrower than the back piece of the sleeve), onto which a piece of Shimmery White cardstock is added that has the large rose image stamped on it in Archival Black that has been watercoloured with Watermelon Wonder and Cucumber Crush inks and an aquapainter. You need to make sure that you stamp the rose overhanging each of the sides and bottom of the panel, so that there is room for the diecut of the sleeve to wrap around it and attach to the back panel of the sleeve. A panel of Whisper White was also adhered to the reverse of the card on which to write a personal message. 


Some wide Watermelon Wonder satin ribbon is threaded through the top of this insert and tied with some black and white baker's twine, and a sentiment added. I cut the sentiment out with the cordinating framelit in the set then fussy cut around the edge to make it slightly smaller. I then cut another blank label in black and used this as a base for the sentiment piece and attached it to the card over some folded ribbon with dimensionals. 

To create the sleeve, I cut a flower and leaves with the co-ordinating thinlit in Basic Black, then having place the stamped insert panel onto the sleeve base, aligned the diecut to the stamped image and wrapped the ends of the diecut piece around the insert and back panel and glued the overhanging elements only to the reverse of the sleeve. 

The Rose Wonder stamp set and co-ordinating Rose Garden thinlit dies are such a versatile set and I really love that they match up completely, which makes this kind of card work really well. It is so very pretty in real life - the Shimmery White cardstock adds a wonderful lustre and the colours are so vibrant.

Here is the visual summary of the key products used on today's project for you to pin for easy reference:


You can see all of my 'How To' summaries on my 'How To - Tips and Techniques' Pinterest board in case you've missed any. 

I'll be back tomorrow with my card for this week's new challenge over at Create With Connie and Mary; until then, happy stampin'!


Stampin' Up! Supplies Used:

Table built using Product Table Builder by The Crafty Owl - Independent Stampin' Up! Demonstrator.

Last Chance For Wednesday Weekly Deals!

by Joanne James13. April 2016 10:00

It's Wednesday and time for the last week of Wednesday Weekly Deals! As I mentioned last week, improvements in stock control at Stampin' Up! mean that this is the last week that they will be offered. They will be replaced with less frequent but better 'Specials' promotions on an adhoc basis - please make sure you're checking my blog regularly for details. So for the final week, there really are some great deals - as always, these offers are valid for one week only. 

If you want to take advantage of any of the deals on offer, you can support my business by placing your order online by clicking here or using the link to my store on the right hand side of my blog page where it says 'Shop Online' or with me in person. Don't forget to add the new Hostess Code for April UD3KDWM4 if your order is under £150 and be sure to make sure that you don't check the 'no contact' box if you'd like to be kept updated with the progress of you order and receive a little thank you in the post from me. If you are local, then give me a call to place your order if you'd like to save on P&P.

Here's a summary of this week's one-week only Wednesday deals - click on each item to go to the online store to purchase:

Table built using Product Table Builder by The Crafty Owl - Independent Stampin' Up! Demonstrator.
 

Some great bargains to be had this week: my favourite sentiment set of the moment, 'Suite Sayings', the always-useful 1" square punch, the Bear Hugs framelits (I will be using these on tomorrow's blog card so look out for that!) and the Rose Wonder stamp set which you can see on today's creative post. And last but certainly not least, the White Perfect Accents - I will be buying these up in bulk this week!

Back shortly with today's creative post; until then, happy shopping!

Coffee and Card - Party Pop-Up Card

by Joanne James12. April 2016 10:00

I've had a busy day today with both my first Technique Class of the month and my monthly Project Life Memory Keeping Class. Today's card though is all about tomorrow; it's the card that we will be making at my Drop-in Coffee and Card morning at Bell of Northampton. This week we will be making a pop up card using the Party Pop-Up Thinlits - take a look:

I've featured a card front similar to this one on my blog previously (you can read the detail here) - for this one though the fun happens on the inside:

I used one of the fun Party Pop-Up Thinlits for a surprise inside greeting, cut out of Whisper White and coloured with my Stampin' Write markers to co-ordinate with the front of my card. Added gold Wink of Stella for the candle flames, of course!

Here is the visual summary of the key products used on today's project for you to pin for easy reference:


You can see all of my 'How To' summaries on my 'How To - Tips and Techniques' Pinterest board in case you've missed any.  

I would love you to join me at Bell's tomorrow between 10-12 (you can find a reminder of the full details here) - hope to see you there!

I will be back tomorrow with one of the cards from today's technique class featuring the Rose Wonder bundle and the new, final set of Weekly Deals; until then, happy stampin'!


Stampin' Up! Supplies Used:

Table built using Product Table Builder by The Crafty Owl - Independent Stampin' Up! Demonstrator.

Crafternoon Tea at Bell of Northampton - Spaces Available!

by Joanne James11. April 2016 19:00

I have had a busy start to my week: the James Juniors are back at school after an enjoyable Easter break so today has been spent catching up on correspondence, spending more time making my swaps for Onstage later this week and planning for my week ahead, which includes the fist of this month's Technique Classes tomorrow - more on that later this week.

Today I want to share a home decor project that I will be making at my 'Crafternoon Tea' event that I am holding at Bell of Northampton in Kingsthorpe on Saturday 7th May, featuring the Botanical Builder Framelits Dies and the 'Hello Life' stamp set:

All instruction and materials will be provided for the session and each person will leave with a decorated 9” x 9” frame to keep. Check out this close-up of the gorgeous flowers: 

Once you’ve completed your project, you can tuck into a scrumptious afternoon tea for two with scones and cakes alongside a large selection of sandwiches stuffed to bursting with egg mayonnaise, chicken and horseradish, cheddar cheese with chilli jam and many more scrumptious fillings freshly prepared by Tea and Cake @ Bell.

The session will run from 10am-2pm on Saturday 7th May and cost £56 for two people. Buy it for yourself or as a gift! Why not treat yourself and your mum, friend or daughter to a voucher for an indulgent afternoon tea and crafting session! There are still spaces left for this event - I would love you to join me! If this is something that appeals to you, click here to make your booking online.

I'll be back tomorrow with a 'sneak peek' of the card that I will be making in my drop-in Coffee and Card Session at Bell's on Wednesday this week between 10-12 noon. Until then, happy stampin!

Tags: , , , ,

3D Projects | Classes

Botanical Builder Flowers And A Happy Hello From The Paper Players

by Joanne James10. April 2016 09:00

It's Sunday and time for a new challenge over at The Paper Players! It's my turn to host our challenge this week and I have an interesting colour combination for you to play along with:


I knew when I chose my colour palette some months ago that I would do something with flowers; for my card this week I was inspired to use the Botanical Builder Framelits Dies - I just love those flowers and I knew they would be great to create the tropical flowers I had in mind with my colour scheme. I also used this week's sketch over at Mojo Monday for the layout for my card:


Here's the low-down on today's card:

Lots of Layers - I love layers and this card has lots of them! I kept them either plain or with a unified pattern of polka dots so that they wouldn't overwhelm the sentiment and flowers that are the focal point of my card.

Subtles versus Brights - Balancing my colour choices today may be considered a challenge in itself. I used my Brights largely as accent colours, although the one thing I did differently on my card was stamp my sentiment if Soft Sky, the lightest colour. This is a real departure for me as normally I would stamp it in the strongest darkest colour for impact, yet sometimes it pays to take a more subtle approach - I hope you agree :-)

The Perfect Accent - Yes I used those White Perfect Accents for my flowers again - I love them, whether left 'naked' as here today or coloured up using my Sharpies. They make such a great flower centre.

Here is the visual summary of the key products used on today's project for you to pin for easy reference:


You can see all of my 'How To' summaries on my 'How To - Tips and Techniques' Pinterest board in case you've missed any. 

Before you reach for your ink and papers, check out what our amazing team has created to inspire you this week:

The Paper Players Design Team
 
 
Here's a quick recap of our challenge rules:
 
1.  Create a new paper project
2.  Upload your creation to your blog with a link back to us and provide a direct link to the post featuring your challenge submission.
3.  Please link your card to no more than four challenges, TOTAL.
4.  Have FUN! 


I look forward to seeing what you create with this week's colours. We are off to basketball today but no hockey - one more week off for Easter until we are back on the pitch! This means cycling if the sun is shining or board games if it rains - let's see where we end up!

Back tomorrow with another project; until then, happy stampin'!


Stampin' Up! Supplies Used:

Table built using Product Table Builder by The Crafty Owl - Independent Stampin' Up! Demonstrator.

Endless Thanks Customer Thank You Notelets

by Joanne James9. April 2016 22:06

It's the weekend and mine has started as busily as ever! I have a quick post today to share some of my customer thank you cards this month that also feature this week's colours over at Color Throwdown:

I just loved this collection of brights with a dash of Mint Macaron thrown in and the fun door wreath in the inspiration picture, so decided to create a  collection of bright spring flowers for my notecards:

This card really doesn't need much explanation: I used the challenge colours and the Endless Thanks stamp set, available at a discount as part of this week's Weekly Deals. I stamped a simple collage of flowers and leaves onto a Whisper White notecard, added a banner that I fussy cut and popped up on dimensionals for extra height and a trio of rhinestones to finish my card.

Endless Thanks is a great stamp set for mass production of thank you cards, so one I turn to frequently when I want to make customer thank you cards to pop in with their orders for example. It has a variety of sentiment combinations and will work in lots of different colour combinations too. 

Here is the visual summary of the key products used on today's project for you to pin for easy reference:


You can see all of my 'How To' summaries on my 'How To - Tips and Techniques' Pinterest board in case you've missed any. 

I'll be back tomorrow with a a card for this week's new challenge over at The Paper Players. It's a colour challenge and I'm the hostess this week, so you wont want to miss it! Until then, happy stampin'!


Stampin' Up! Supplies Used:

Table built using Product Table Builder by The Crafty Owl - Independent Stampin' Up! Demonstrator.

Mini Catalogue

BROWSE THE CATALOGUE

The mini catalogue is now live! Read and download your copy here.

Shop Online

Access my online shop 24 x 7, 365 days of the year:

Current April hostess code:

VDKNV7BH

Shop Online

Join My Team

It's always a great time to join Stampin’ Up! New team members can get £130 worth of products for only £99 + free business supplies + free shipping + all the fun being a part of Stampin’ Up! Stampin' Up! has something for everyone: join my growing team and benefit from my support to enjoy Stampin' Up! however you choose.

If you're interested, call me for a chat to understand how I can help you realise your goals. Alternatively, if you have already decided to sign up and you just can't wait, please click here for the link to the online form where you can sign up and order your starter kit right away! 

Latest Kit!

Stampin Cut and Emboss

The Rock Legend Kit has all you need to make 8 cards with coordinating envelopes. Along with the new Panda Friends Kit, both are available from January 4th for just £14 each - get yours here!

2023-24 Annual Catalogue

BROWSE THE CATALOGUE

Click on the catalogue for a full list of current SU! supplies - if you would like to order any of the items featured, please drop me a line at [email protected] or give me a call on 07773 421446 - I'd be happy to help.

New Online Exclusives

There are new products available exclusively in the online store from 5 March - check them out here.

About Me

Hi I'm Joanne and live in Northampton and when I'm not looking after my husband and two beautiful children, am an avid crafter with a passion for all things Stampin' Up!

I must confess that I have never been a big rubber stamper - until I discovered Stampin' Up! that is. I love the fact that I can get such great results with co-ordinating stamps, inks, papers and punches - the possibilities are endless! Join me on my stamping journey as I share the things I love and be inspired to create amazing things yourself!

Follow Me

Monthly Newsletter

Box Builder

Click the button above to use Box Buster to create your custom box design using the Envelope Punch Board!

Kits Collection Now Available!

Stampin Cut and Emboss

The new Kits Collection from Stampin' Up! is now available!

Click here to see the current kits available and order yours online today.

I Design For


Stampin' Up Stuff

This is my personal blog and is not endorsed by Stampin’ Up! I hope you find it a plentiful source of ideas and personal inspiration but please don't copy my designs for contest submission or use for classes, publication or sale without express permission.