Succulent Garden Meets You've Got This

by Joanne James18. April 2017 13:00

Today I'm sharing a card for this week's new challenge over at CAS Colours and Sketches where I am the guest designer this month. This week it's a colour challenge:


Since each of these colours appears in the Succulent Garden Designer Series Paper (still available on the retiring list - grab it while you can!), I used that as my starting point for my card today - take a look:

Here's the low-down on today's card:

Clean and Simple with Designer Series Paper - I decided to use a piece of the Succulent Garden designer series paper that I hadn't previously cut into for my card today. Whilst 'clean and simple' is all about the clean space with minimal layers and embellishments, it is possible to use DSP on a clean and simple card - you just have to use it sparingly. I used just a small 2.5" x 2.5" square, cut out with my square Stitched Shape Framelit for a little added detail. By keeping the rest of my cardfront plain, it retains an overall 'CAS' feel.

A Two Tone Sentiment - Inking up your sentiment with Stampin' Write Markers is a great way to ring the changes with a stamped sentiment. My chosen sentiment from the 'You've Got This' stamp set has two different font styles so really lends itself to different colours. I've used Old Olive and Tip Top Taupe; next time you're crafting get your markers out and try this with your sentiment stamps, I'd love to see what you create!

CASE Your CAS - My card today is a CASE 'copy and selectively edit' of this CAS 'clean and simple' card made a few weeks ago by my friend and Paper Players team mate LeAnne Pugliese. I changed out the paper, used an oval instead of a circle for my sentiment and switched flowers for succulents to make this card my own, but the similarities are clear to see. Thank you for the inspiration LeAnne!

Here is the visual summary of the key products used on today's project for you to pin for easy reference:


You can see all of my 'How To' summaries on my 'How To - Tips and Techniques' Pinterest board in case you've missed any. 

Enjoy your day and I'll be back tomorrow with another project. Until then, happy stampin'!


Stampin' Up! Supplies Used:

Table built using Product Table Builder by The Crafty Owl - Independent Stampin' Up! Demonstrator.

Get Retiring Products Before They're Gone!

by Joanne James10. April 2017 19:00

I have a card to share today but first things first - the list of products that will be retiring from this year's annual and Spring-Summer seasonal catalogues has been announced! You can read the full list by clicking here; there are some tremendous bargains to be had - I will have a review of the things I am going to miss most tomorrow, however if you want to stock up on any of the retiring in-colour items, especially re-inkers, I would urge you to do that sooner rather than later as they are always the first things to sell out. Click on the links below to take you directly to my online shop to purchase any of the in-colour items that are still in stock at time of posting:

Table built using Product Table Builder by The Crafty Owl - Independent Stampin' Up! Demonstrator.

Today I'm sharing a card that uses these departing in-colours - take a look:


I used Stampin' Up!'s Whisper White notelets and a bold sentiment from the 'Thankful Thoughts' stamp set, cut out using my square Stitched Shape Framelits to create an elongated rectangular panel, along with a variety of combinations of the in-colour designer series paper stacks, along with some white ribbon for a finishing touch. I made a whole collection of them in each of the retiring colours and decorated the envelope flaps to co-ordinate too. Here's a glimpse of one in each colour:


You can see all of my 'How To' summaries on my 'How To - Tips and Techniques' Pinterest board in case you've missed any. 

Enjoy your day and I'll be back tomorrow with another project. Until then, happy stampin'!


Stampin' Up! Supplies Used:

  • Thankful Thoughts stamp set
  • Whisper White Notelets and Envelopes

Mediterranean Moments and Easter Chick Punch Art

by Joanne James3. April 2017 08:00

I've a busy this week ahead with this month's technique classes then a trip to Amsterdam for Onstage Live with thousands of other Stampin' Up! demonstrators from across Europe for the launch of the new Stampin' Up! Annual Catalogue - a whole two months ahead of its publish date - just one of the many things I love about being a Stampin' Up! demonstrator. More of that in future posts for sure, so this is a week I have to be organised! Today I have a couple of cards to share: here is the first one for this week's challenges over at The Color Throwdown and CAS Colours and Sketches:


I love this sketch layout - perfect for a large image. I chose to use one of the sketched images from the 'Mediterranean Moments' set and unusually decided to stamp it directly onto a coloured background:

I stamped in Night of Navy rather than black and added an enamel dot to my sentiment banner, but otherwise the stamped image speaks for itself and is perfect uncoloured for a clean and simple card. I also stamped one of the other images from the Mediterranean Moments set on the inside of my card. I'm also linking this card up with the challenge over at Less Is More where the recipe this week is to use three pastel colours.

Here is the visual summary of the key products used on today's project for you to pin for easy reference:


You can see all of my 'How To' summaries on my 'How To - Tips and Techniques' Pinterest board in case you've missed any. 

Stampin' Up! Supplies Used:

Table built using Product Table Builder by The Crafty Owl - Independent Stampin' Up! Demonstrator.


My second card today is for this week's Freshly Made Sketches challenge where the sketch was perfect for a fun Easter card idea that I had:

I saw some great Easter biscuits on Pinterest and one of them got me thinking about creating a round punch art-style chick - take a look:


I used my stitched shape circle framelit, a heart and flower framelit and the smallest shape from the Blossom Punch to create my fun chick and added a few co-ordinating strips of floral Brights designer series paper. My sentiment is from the Sale-A-Bration set 'Hey Chick' but if you don't have this you could add a 'Happy Easter' from Teeny Tiny Sentiments instead. A lighthearted clean and simple take on the sketch this week.

Here is the visual summary of the key products used on today's project for you to pin for easy reference:


You can see all of my 'How To' summaries on my 'How To - Tips and Techniques' Pinterest board in case you've missed any. 

Enjoy your day and I'll be back tomorrow with another project. Until then, happy stampin'!


Stampin' Up! Supplies Used:

Table built using Product Table Builder by The Crafty Owl - Independent Stampin' Up! Demonstrator.

Easter Basket Bunch For The Paper Players

by Joanne James26. March 2017 09:00

To all my UK readers - Happy Mother's Day! It is of course Sunday and time for this week's new challenge over at The Paper Players! My good friend the super-talented Claire is the hostess this week and she has a sketch for us to work with:


I love a good sketch and this one has some great layering options. I decided that I would use the pretty Spring colours over at Fab Friday to create a basket of flowers for an Easter card - take a look:


Here's the low-down on today's card:

I kept my layers fairly neutral - a stitched circle in Mint Macaron, a panel of Calypso Coral By The Shore designer series paper - and used the Easter sentiment from the 'Suite Sentiments' set on a Very Vanilla banner, with the real focal point for my card being my basket of flowers. I cut and layered my basket using the Basket Builder framelits then stamped my daffodils and peach flowers in Memento Black onto solid colour cardstock using the Basket Bunch set and cut the out with the co-ordinating framelits, finishing them with some Calypso Coral subtles candy dots. I love the Basket Bunch bundle, not only for the Easter eggs and bunny, but also the perfect daffodils (well, I am Welsh so it is to be expected!). The framelits make cutting out these little pieces so easy and offer some great layering options too.

I'm also linking up with those lovely ladies over at As You See It too - for me, there is nothing that says Spring more than daffodils. They are so bright and cheery and inexpensive and I love to have them cut in a vase, but also to see them along the banks and hedgerows as I drive around the countryside. At the moment there are rows and rows of them on my journey driving Ben to school - they never fail to brighten my day!

Here is the visual summary of the key products used on today's project for you to pin for easy reference:


You can see all of my Product and 'How To' summaries on my 'How To - Tips and Techniques' Pinterest board in case you've missed any. 

Before you reach for your ink and papers, check out what our amazing team has created to inspire you this week:

The Paper Players Design Team
 
 
Here's a quick recap of our challenge rules:
 
1.  Create a new paper project
2.  Upload your creation to your blog with a link back to us and provide a direct link to the post featuring your challenge submission.
3.  Please link your card to no more than four challenges, TOTAL.
4.  Have FUN! 


I look forward to seeing what you create with our sketch this week. Enjoy the rest of your weekend as it will be over all too quickly; I'm looking forward to a family lunch and maybe, just maybe, a sneaky visit into my craft room this afternoon. I'll be back tomorrow with another project; until then, happy stampin'!


Stampin' Up! Supplies Used:

Table built using Product Table Builder by The Crafty Owl - Independent Stampin' Up! Demonstrator.

Boy and Girl Moon Baby Cards

by Joanne James19. March 2017 09:00


It's Sunday and time for this week's new challenge over at The Paper Players! It's my turn to host again this week and I have a clean and simple challenge for us to work with:


I've had the need for a few baby cards recently - all girls, funnily enough, whereas the last time I had a run on baby cards it was all boys, funny how that happens! So I decided that this week's challenge would be a great opportunity to replenish my stock, especially as we have some great new Stampin' Up! baby sets in the Spring-Summer Catalogue. I decided to create two cards today, identical in design but one each in a boy and girl colour scheme, using this week's sketch over at CAS Colours and Sketches - I'm also linking up with the team over at TGIF Challenges where their challenge this week is also all things baby:

   #tgifc99 Baby! Oh, Baby!

I couldn't wait to ink up my 'Moon Baby' stamp set again for my cards today - take a look, here's the baby boy card:


And here is the baby girl card:


Here's the low-down on today's cards:

Twinkle, Twinkle Little Star - I stamped the moon baby onto Shimmery White cardstock and watercoloured them using my inks and aquapainters. I used my Stitched Shape Framelits to cut out my circle and added a layer of Clear Wink of Stella for added sparkle to my moon. I also added a gold metallic shape star to each of my cards for a fun detail.

Tone on Tone - To add interest to my background, I stamped the trio of stars randomly in the same colour ink as my cardstock base. This is a great way to add extra detail and interest whilst still keep your card clean and simple.

Blue For A Boy, Pink For A Girl - I used a duo of light and dark colours for each of my cards, with the darker colour for my card base and the lighter colour picked up in the banner. Here is my colour combination if you would like to save it:

Here is the visual summary of the key products used on today's project for you to pin for easy reference:


You can see all of my Product and 'How To' summaries on my 'How To - Tips and Techniques' Pinterest board in case you've missed any. 

I just love the images in the 'Moon Baby' stamp set - it makes for such cute baby cards! I can't decide which of these colour combinations I like the most - if you have a preference, why not let me know in the comments below - I love to hear your thoughts!

Before you reach for your ink and papers, check out what our amazing team has created to inspire you this week:

The Paper Players Design Team
 
 
Here's a quick recap of our challenge rules:
 
1.  Create a new paper project
2.  Upload your creation to your blog with a link back to us and provide a direct link to the post featuring your challenge submission.
3.  Please link your card to no more than four challenges, TOTAL.
4.  Have FUN! 


I look forward to seeing your clean and simple creations in the gallery this week. Enjoy the rest of your weekend - the James household is busy today with one of the James Juniors playing in a hockey tournament, whilst the other is attending a skills day in connection with school which will see him learning shooting and fencing (I think I'll be taking cover!!)

I'll be back tomorrow with another project; until then, happy stampin'!


Stampin' Up! Supplies Used: 

Table built using Product Table Builder by The Crafty Owl - Independent Stampin' Up! Demonstrator.

Thankful Thoughts Meets Succulent Garden

by Joanne James12. March 2017 09:00

It's Sunday and time for this week's new challenge over at The Paper Players! It's the turn of the wonderful Jaydee to host this week and she has a fun colour challenge for us to work with:


I love green, especially bright greens - Cucumber Crush is one of my all time favourites! - but for today's challenge I decided to go with an altogether more subtle green in Mint Macaron - take a look:


Here's the low-down on today's card:

Succulent Garden - I chose to use a 'tricky' piece of designer series paper on my card today from the Succulent Garden pack. I have been at a loss as to how I should use some of the papers and patterns in this pack and I felt that this sheet in particular lent itself to a monochromatic card in green and white, so used is to cover my entire card front.

A Bold Sentiment - With such a busy paper pattern, I needed a simple, bold sentiment so I chose this bold thank you from the 'Thankful Thoughts' stamp set. I stamped in Mint Macaron onto Whisper White and I used my Stitched Shape Framelits to add a little interest to my otherwise plain circle. With the exception of my row of stamped cacti inside my card and on the front of my co-ordinating envelope, this is all the stamping to feature on my card.

Triple Banners That Sparkle - I added a trio of banners to anchor my sentiment circle, one each in green and white and the third in Mint Macaron glimmer paper, the latest in the Sale-A-Bration free product offering. The sparkle and texture of the glimmer paper introduces another element yet is still in keeping with the overall monochromatic feel of my card.

Here is the visual summary of the key products used on today's project for you to pin for easy reference:


You can see all of my Product and 'How To' summaries on my 'How To - Tips and Techniques' Pinterest board in case you've missed any. 

So a super simple card today, but one with a very calming colour scheme that I hope Jaydee will appreciate.

Before you reach for your ink and papers, check out what our amazing team has created to inspire you this week:

The Paper Players Design Team
 
 
Here's a quick recap of our challenge rules:
 
1.  Create a new paper project
2.  Upload your creation to your blog with a link back to us and provide a direct link to the post featuring your challenge submission.
3.  Please link your card to no more than four challenges, TOTAL.
4.  Have FUN! 


I look forward to seeing what you create with this week's colour palette. Enjoy the rest of your weekend as it will be over all too quickly; I'll be back tomorrow with another project; until then, happy stampin'!


Stampin' Up! Supplies Used: 

Table built using Product Table Builder by The Crafty Owl - Independent Stampin' Up! Demonstrator.

Carousel Circle Trio Birthday Card

by Joanne James1. March 2017 12:00

I've had a busy couple of days making costumes for World Book Day which is today and helping with some fundraising project that Rebecca is involved with so no time to blog. Good news is though I'm back today and I'm sharing a card using items from the Cupcakes and Carousels Suite - take a look:


Here's the low-down on today's card:

All The Fun Of The Fair - Cupcakes and Carousels Suite is described in the Stampin' Up! literature as 'funfair imagery with vintage flair'. This is one of those sets that didn't overly appeal to me at first glance, but having seen so many lovely things made with it by fellow demonstrators my mind was changed. The carousel horse is a definite favourite and I love how the images work together with the unusual retro styling of the fonts.  

An alternative Approach to Layers - Today's card is based on this week's Paper Players sketch. You can see my Design Team card here in Sunday's post; I also created this one still with three images, but as the images were larger I decided to stamp the ferris wheel directly onto the background paper, then added a vanilla doily behind the carousel horse image on the medium sized circle before finishing with the smallest one up front.

A Colourful Combo - The colour scheme for my card was inspired by the starburst-style sheet of designer series paper I chose from the Cupcakes and Carousels Paper Stack. Rich tones of Early Espresso, with the bright red and orange along with a hint of vanilla - feel free to save this combination if it's one that appeals to you:


Here is the visual summary of the key products used on today's project for you to pin for easy reference:


You can see all of my 'How To' summaries on my 'How To - Tips and Techniques' Pinterest board in case you've missed any. 

In addition there is still time to play along with our challenge over at The Paper Players - you can get the full details here.

Enjoy your day and I'll be back tomorrow with another project. Until then, happy stampin'!


Stampin' Up! Supplies Used:

Table built using Product Table Builder by The Crafty Owl - Independent Stampin' Up! Demonstrator.

Baking Makes Life Sweeter - Perfect Mix Card

by Joanne James26. February 2017 09:00

It's Sunday and time for this week's new challenge over at The Paper Players! My good friend LeAnne is the hostess this week and she has a sketch for us to work with:


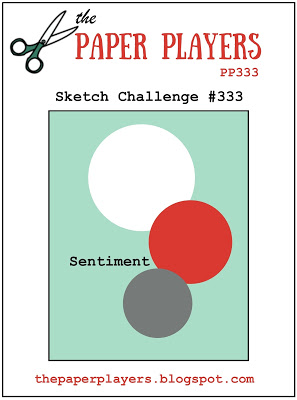
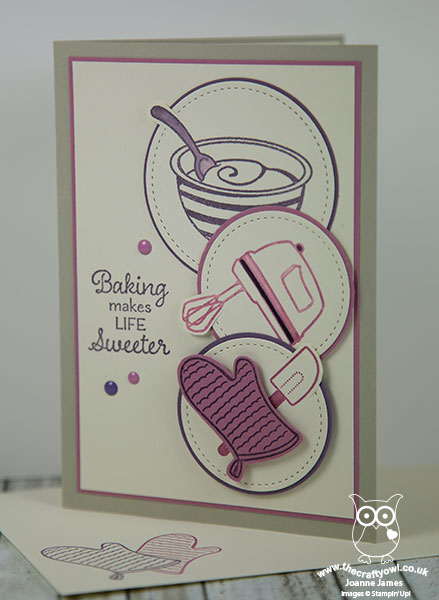
Now you know me - I love a good sketch and this one is a keeper! I had a couple of ideas for this sketch and made two quite different cards. The one I'm sharing today is very much in keeping with my style (maybe that's why it won the James family vote 2 to 1 when I conducted a quick poll!) I went with my signature 'clean and layered' style and took the opportunity to make another card using my 'Perfect Mix' stamp set - take a look:


Here's the low-down on today's card:

It's In The Detail - My card today is my usual clean and layered style. I toyed with adding some additional background pattern or even designer series paper, however the size of my circle elements would have made this too busy. Instead I opted to create detail in other ways: I used my circle Stitched Shape Framelits to cut out my stamped images and layered these onto some punched circles to add a thin border of colour. I also used the partial die cutting technique to add interest by allowing part of the image to overhang the circle. The mixer I inked using my Stampin' Write marker so that I could omit the sentiment that goes with it. I also stamped my oven glove onto coloured cardstock and fussy cut it before popping up on a dimensional for added colour and impact.

Rule of Threes - It is a known principle that things that come in threes are somehow more satisfying or more effective than other numbers. LeAnne's sketch uses three circular elements; I also added a trio of enamel shapes to echo my layered circles and continue the harmony of my card.

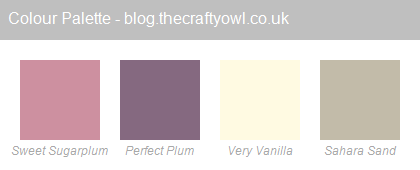
A Perfectly Purple Colour Combination - I love purple but it's not a colour I use often on a card, so I chose to use a combination of purples and neutrals today for a change - here it is if you'd like to try it too:


This is such a great stamp set! I love the punny sentiments but if you, like me, are a baker then you will find so many uses for these images.

Here is the visual summary of the key products used on today's project for you to pin for easy reference:

 **To be updated - Stampin' Up! Website currently unavailable due to overrunning maintenance work. Online ordering currently offline.**

You can see all of my Product and 'How To' summaries on my 'How To - Tips and Techniques' Pinterest board in case you've missed any. 

Before you reach for your ink and papers, check out what our amazing team has created to inspire you this week:

The Paper Players Design Team
 
 
Here's a quick recap of our challenge rules:
 
1.  Create a new paper project
2.  Upload your creation to your blog with a link back to us and provide a direct link to the post featuring your challenge submission.
3.  Please link your card to no more than four challenges, TOTAL.
4.  Have FUN! 


I look forward to seeing what you create with our sketch this week. Enjoy the rest of your weekend as it will be over all too quickly; I'm off to spend the day at the swimming pool as Rebecca is racing in her rescheduled Counties Competition. I don't know which I'd rather - the gale-force icy winds I experienced as I stood outside watching her play in her netball match yesterday morning or the sauna-like temperatures of the swimming pool today! The things us mothers do for love!. I'll be back tomorrow with another project; until then, happy stampin'!


Stampin' Up! Supplies Used:

To be updated - Stampin' Up! Website currently unavailable due to overrunning maintenance work.

Sale-A-Bration Hey Chick Peek A Boo Card

by Joanne James19. February 2017 22:00

I know technically it's still Sunday, but this is Monday's post as I want to link up to the Stamp Ink Paper challenge which closes late this evening - so I'm early! Here's their colour palette this week:


I'm also linking up with CAS Colours and Sketches as I used their sketch for my card, SUO Challenges who are looking for projects featuring Sale-A-Bration sets and the ladies over at TGIF Challenges where they have a 'birds of a feather' theme that my chickens are perfect for! I thought it was about time I broke out the most popular of all this year's Sale-A-Bration free gifts this year  - take a look:


This is the outside of my card - read on for more details and a fun reveal inside! Here's the low-down on today's card:

Hey, Chick - What's better than a new stamp set? Well, it has to be a new FREE stamp set, right? The comical chicks in the 'Hey, Chick' stamp set are proving the runaway success of this year's Sale-A-Bration promotion and could be yours free too with a purchase of £45 or more. I cropped the two large, feathered birds top and bottom using my Stitched Shape Framelits looking up and down respectively on the little 'egg on legs' and coloured with my Stampin' Write markers.

Peek A Boo - There is another chicken that features in this set, perhaps my most favourite of all - the crazy-haired Polish Frizzle Bantam White. Where's mine? Well, take a look inside my card where all will be revealed:


 As the card is opened, the shutters pull back to reveal the funky chicken that I like to think hatched out of that egg - isn't that just the most fun? I like this card so much it's made the cut for my next Sale-A-Bration class - you can see details of my class listings here and I would love you to join me!

Playful Palette - Some Playful Palette designer series paper and some Bermuda Bay stitched satin ribbon complete my card.

Here is the visual summary of the key products used on today's project for you to pin for easy reference:


You can see all of my 'How To' summaries on my 'How To - Tips and Techniques' Pinterest board in case you've missed any. 

I'll be back on Tuesday with another project. Until then, enjoy the start to your week and happy stampin'!


Stampin' Up! Supplies Used:

Table built using Product Table Builder by The Crafty Owl - Independent Stampin' Up! Demonstrator.

You're One In A Dozen

by Joanne James11. February 2017 20:00

I've had a rare relaxing day today: mostly about food, family fun and a little stamping time too. I made a card for this week's challenge over at Freshly Made Sketches where there have a great sketch this week:


Here's my card:


Here's the low-down on today's card:

A Perfect Mix - I got this set for the little baking images; as a keen baker I knew I would have lots of fun with these. I love the punny sentiments too and they make for some cute little love notes - I couldn't resist the 'one in a dozen' for my card today.

A Stitched Rectangle - I used one of the square Stitched Shape Framelits to create my elongated stitched rectangle. This is really easy to do and a great way to get even more value out of your framelits. All you need to do is cut your cardstock to the required width, then place your square stitched framelit at one end and partially cut, stopping before the end, then move the framelit to the other end and partially cut again towards the middle.

A Little Foxy - I was originally going to use the grey heart pattern on the reverse of the sheet of A Little Foxy designer paper on my card, to accentuate the blue of my egg. On something of a whim I flipped it over before I glued it and decided I liked this diagonal lined pattern better with the added colour. Well, we can all change our minds!

I think this would make a fun masculine Valentine or just a note to let someone know how special they are.

Here is the visual summary of the key products used on today's project for you to pin for easy reference:


You can see all of my 'How To' summaries on my 'How To - Tips and Techniques' Pinterest board in case you've missed any. 

I'll be back tomorrow with this week's card for a new challenge over at The Paper Players. Until then, happy stampin'!


Stampin' Up! Supplies Used:

Table built using Product Table Builder by The Crafty Owl - Independent Stampin' Up! Demonstrator.

Mini Catalogue

BROWSE THE CATALOGUE

The mini catalogue is now live! Read and download your copy here.

Shop Online

Access my online shop 24 x 7, 365 days of the year:

Current March hostess code:

S9F2XJJW

Shop Online

Join My Team

It's always a great time to join Stampin’ Up! New team members can get £130 worth of products for only £99 + free business supplies + free shipping + all the fun being a part of Stampin’ Up! Stampin' Up! has something for everyone: join my growing team and benefit from my support to enjoy Stampin' Up! however you choose.

If you're interested, call me for a chat to understand how I can help you realise your goals. Alternatively, if you have already decided to sign up and you just can't wait, please click here for the link to the online form where you can sign up and order your starter kit right away! 

Latest Kit!

Stampin Cut and Emboss

The Rock Legend Kit has all you need to make 8 cards with coordinating envelopes. Along with the new Panda Friends Kit, both are available from January 4th for just £14 each - get yours here!

2023-24 Annual Catalogue

BROWSE THE CATALOGUE

Click on the catalogue for a full list of current SU! supplies - if you would like to order any of the items featured, please drop me a line at [email protected] or give me a call on 07773 421446 - I'd be happy to help.

New Online Exclusives

There will be new products available exclusively in the online store from 5 March - check them out here.

About Me

Hi I'm Joanne and live in Northampton and when I'm not looking after my husband and two beautiful children, am an avid crafter with a passion for all things Stampin' Up!

I must confess that I have never been a big rubber stamper - until I discovered Stampin' Up! that is. I love the fact that I can get such great results with co-ordinating stamps, inks, papers and punches - the possibilities are endless! Join me on my stamping journey as I share the things I love and be inspired to create amazing things yourself!

Follow Me

Monthly Newsletter

Box Builder

Click the button above to use Box Buster to create your custom box design using the Envelope Punch Board!

Kits Collection Now Available!

Stampin Cut and Emboss

The new Kits Collection from Stampin' Up! is now available!

Click here to see the current kits available and order yours online today.

I Design For


Stampin' Up Stuff

This is my personal blog and is not endorsed by Stampin’ Up! I hope you find it a plentiful source of ideas and personal inspiration but please don't copy my designs for contest submission or use for classes, publication or sale without express permission.