by Joanne James19. February 2016 20:51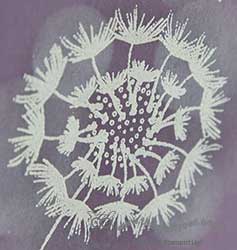
Good evening lovely blog readers! It's finally Friday - yay! I've been enjoying the last day of the half-term holiday with the James Juniors today and haven't managed to squeeze in any crafting time (no matter - there's always tomorrow!) so I'm sharing a couple of cards I made earlier in the week for this week's Less Is More challenge, which is to create a one layer card with a stem. Now I'll be quite honest - I had something specific in mind when I created these cards and I'm not sure I achieved it. But since I haven't had time to 'try again' and I missed last week's LIM link up for the birthday white-on-white challenge (you can see my card here if you missed it), I wasn't going to miss playing along today! So here is the first of two cards:
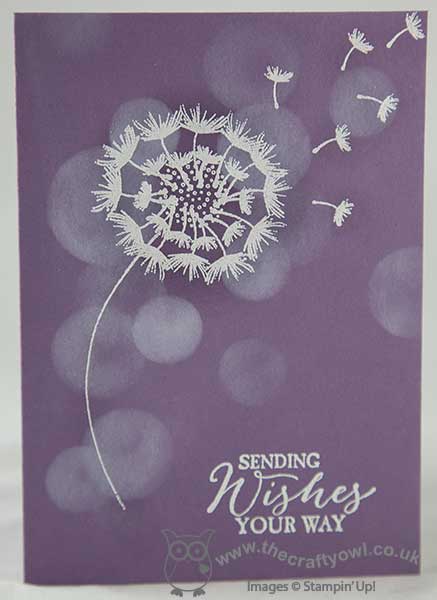
I was keen to play with the dandelion seed stamp in the 'Balloon Celebration' set so for my first card I stamped a stem, centre and seeds in Versamark and heat embossed them in white, along with a sentiment from Butterfly Basics which works really nicely with it. I sponged a little Perfect Plum ink into the centre of my seed head then took some circle templates and sponged in some white kraft ink to create a soft bokeh effect.
For my second card I used the same basic design, but doubled the stem, ommitted the centre and heat embossed my dandelion in silver onto Shimmery White cardstock and watercoloured in a background wash using Pool Party ink:
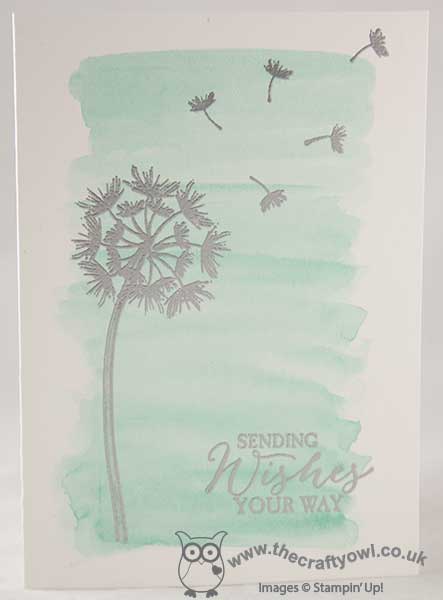
This card is much brighter than the first and in real life has a lovely shimmer, but I do feel that for both cards there is something missing; my urge to add layers was overwhelming! I'd love to know what you think - do leave me a little comment below with any thoughts you have on today's cards.
I'll be back tomorrow with another project; until then, happy stampin'!
Stampin' Up! Supplies Used:
by Joanne James18. February 2016 10:00A day late as I was out all day and evening yesterday - here are this week's new Wednesday Weekly Deals! These offers are valid for one week only. As always, a new collection of deals will be announced next Wednesday.
If you want to take advantage of any of the deals on offer, you can support my business by placing your order online by clicking here or using the link to my store on the right hand side of my blog page where it says 'Shop Online' or with me in person. Don't forget to add the new Hostess Code for February UYGWGF4W if your order is under £150 and be sure to make sure that you don't check the 'no contact' box if you'd like to be kept updated with the progress of you order and receive a little thank you in the post from me.
Here's a summary of this week's one-week only Wednesday deals - click on each item to go to the online store to purchase:
Some great offers on this week - the cute Bear Hugs framelits, as used by my good self to create the little Valentine's table favours at the weekend that I shared over on my Facebook page (you can see them here if you missed them - do give my page a 'like' if you'd like to keep up to date with all the fun over there too!) Very useful Tags and Labels framelits dies, along with the Petite Petals stamp set, as voted for by one of my customers last week as 'the best stamp set EVER!' (hello Jane!) and the product that always gets my vote for the top spot: The Envelope Punch Board. When used in conjunction with my Envelope Expert and Box Buster tools, a tool that offers limitless possibilities. Always a bargain in my view even at its full price of £18, but at £13.50 it's an absolute steal!!! If you haven't got one, what on earth are you waiting for???!!!
Don't forget that for every £45 you spend you are entitled to a free Sale-A-Bration item too - and this week there are three new ones added to the range too. In case you missed it, you can find full details here.
Back later with today's creative project; until then, happy shopping!
063402aa-bafd-4b05-ab70-5c00a58f1271|0|.0|96d5b379-7e1d-4dac-a6ba-1e50db561b04
Tags: Promotions, Shop online, Shop Stampin' Up online, Stampin' Up, Stampin' Up Card, Stampin' Up Card ideas, Stampin' Up Supplies, Wednesday Weekly Deals, Box Buster, Envelope Expert, Envelope Punch Board, Bear Hugs, Petite Petals, Confetti Stars Punch, Tags and Labels Framelits
Promotions | Shop Online | Stamping
by Joanne James18. February 2016 08:05
Today it's time for a new challenge over at Create With Connie and Mary and this week we have a colour combination for you:
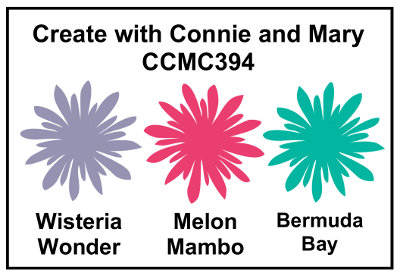
This colour combination is straight out of the Have A Cuppa Designer Series Paper Stack and whilst not one I would naturally be drawn to, I decided to create a colour-blocked card using a selection of the papers and the trio of cups stamp from the co-ordinating 'A Nice Cuppa' stamp set:
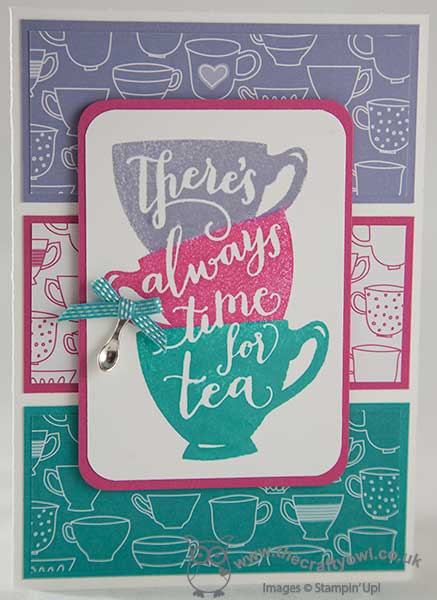
I selectively inked each of the cups in the trio in each of the challenge colours, then created a trio of panels featuring cups in each of the same colours to go behind each one and made a short technique video tutorial to show you how I did it, which you can see here:
I added a tiny teaspoon charm from the Have A Cuppa Embellishments set to a Bermuda Bay stitched ribbon bow and attached this to one of the cup handles as a finishing touch. Isn't that teaspoon just the cutest?! I think this cup stamp looks great stamped in a single colour, however inking in a variety of colours adds definition to the shape of the individual cups. The busy paper makes a good background too, as there isn't much of it on show so it doesn't overwhelm.
Do visit the other Design Team members to see what they did with this week's colours; there's lots of inspiration over on their blogs too!
Enjoy your day and I'll be back tomorrow with another project; until then, happy stampin'!
Stampin' Up! Supplies Used:
- Have A Cuppa Designer Series Paper Stack
- A Nice Cuppa Photopolymer Stamp Set
- Have A Cuppa Cardstock Pack
- Have A Cuppa Embellishments
- Bermuda Bay 1/8" Stitched Ribbon
- Whisper White A4 Thick Cardstock
- Wisteria Wonder Classic Stampin' Pad
- Melon Mambo Classic Stampin' Pad
- Bermuda Bay Classic Stampin' Pad
- Punch Corner Project Life
by Joanne James16. February 2016 19:02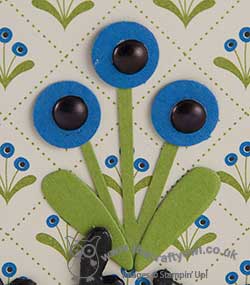
Hello everyone and a happy Tuesday to you! Today I have a card for this week's challenge over at CAS(E) This Sketch and Addicted To CAS:
I saw the sketch over at CAS(E) This Sketch this week and for a minute I was wondering where to start; then I remembered one of my favourite patterns in the Pretty petals stack and I just knew where I wanted to take it. Here's my card:
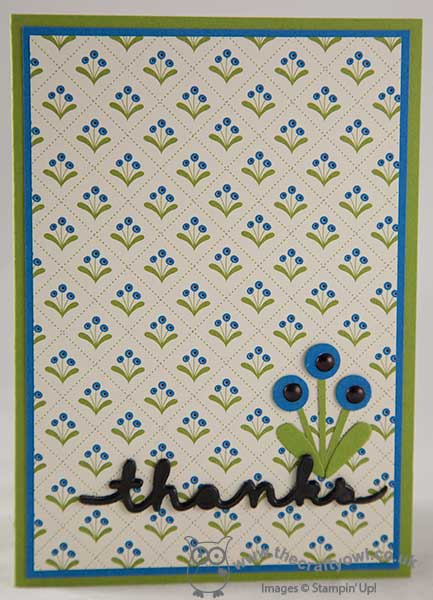
This lovely pattern includes the diagonals that are so like the sketch so I knew it had to be my starting point. Whilst I'll admit it did much of the hard work, I decided that this card needed two more things: a bold sentiment - I layered three 'thanks', cut with my Greetings Thinlits, then coated in Versarmark and heat embossed clear to give a glossy finish; the second thing was a sprig of flowers just like the ones in the pattern. I fussy cut the stems, punched three Pacific Point circles and added a trio of enamel dots that I coloured black with a Sharpie and off-centred slightly, some fussy cut stems and a couple of leaves made from ... left-over pieces from the wings of a butterfly cut with my Butterfly Thinlits! I just love the bright colours and pattern of this paper - and the addition of my bloom is the perfect accompaniment!

Other news today: whilst we say goodbye to the first set of limited time Sale-A-Bration offers, we say 'hello' to some new ones: there are two new stamp sets and some rather lovely glimmer tape that have just been added to the Sale-A-Bration free product offering - here are some samples made with the new product:
Like the other items in the Sale-A-Bration catalogue, these items will be available free with each £45 spend from now until the end of the Sale-A-Bration period, 31st March. You can see full details for each of the new product on the new Sale-A-Bration flyer here.
Back tomorrow with this week's Wednesday Weekly Deals and a new project; until then, happy stampin'!
Stampin' Up! Supplies Used:
by Joanne James15. February 2016 10:39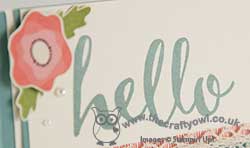
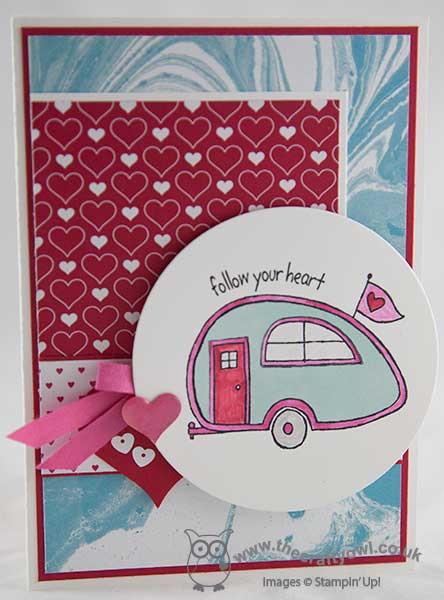
Happy Monday everyone! I hope you all enjoyed a wonderful Valentine's Day yesterday with your loved ones - I certainly did. I shared some of the fun of my day over on my Facebook page - be sure to follow me there for more adhoc Crafty Owl fun! As well as today's card today, I have some important reminders for you: today is your last chance to purchase the limited time Sale-A-Bration gifts: Perfectly Artistic designer series paper and the 'Sky is the Limit' and 'Hello' stamp sets. Here are a few of my projects featuring these items to remind you - all of them have been very popular free gifts so far during the Sale-A-Bration promotion:

For my card today I am using my favourite of these sets, 'Hello', once again. This is my card for this week's colour challenge over at Pals Paper Arts; I also used this week's Retrosketches sketch:


The lovely Katy McGloin chose the colour palette over at Pals Paper Arts this week and whilst this isn't a colour palette I would have put together myself, I loved the design team cards so decided I should have a go! This is what I came up with:
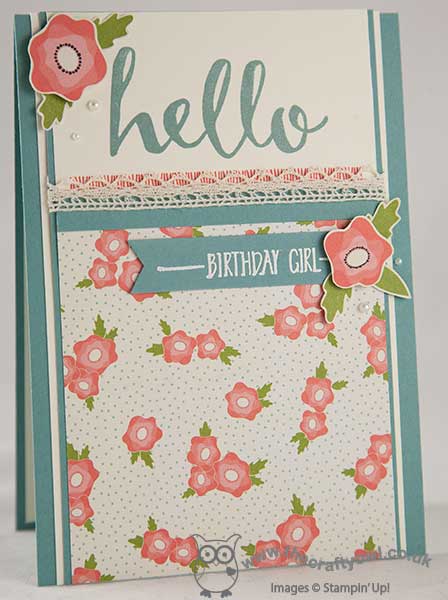
I chose to feature a piece of the Pretty Petals designer series paper for my main panel, stamping the 'Hello' stamp in Lost Lagoon with a Calypso Coral border on the top panel of Very Vanilla and layering this with a piece of Venetian crochet trim across the join. I heat embossed the 'birthday girl' portion of my sentiment onto a banner of Lost Lagoon and fussy cut some co-ordinating flowers and leaves from another of the papers in the Pretty Petals DSP stack, along with a few pearls, to embellish my card. As my regular readers will know, I'm not one for vintage or shabby chic generally, but I absolutely love the softness of this card that this colour palette gives - what a great combination! This stamp set is so very versatile - I just know it will be a 'keeper' for me.
If you want to get your hands on this set, or one of the other limited time offer items, you will need to place an order for £45 or more today. If you miss this deadline the good news is there are three new limited sets arriving tomorrow; pop back then for more information!
Enjoy the rest of your day; I'll be back tomorrow with another project, until then happy stampin'!
Stampin' Up! Supplies Used:
6dd221c1-f5d3-44e5-8798-1608a266e96a|0|.0|96d5b379-7e1d-4dac-a6ba-1e50db561b04
Tags: Hello, Sale-A-Bration 2016, Promotions, Pretty Petals, Shop online, Shop Stampin' Up online, Stampin' Up, Stampin' Up Card, Stampin' Up Card ideas, Stampin' Up Supplies, Earn Free Product
Cards | Promotions | Sale-a-bration | Shop Online | Stamping
by Joanne James14. February 2016 22:00I'm a little late sharing this week but here are this week's Wednesday Weekly Deals! These offers are valid for one week only. As always, a new collection of deals will be announced next Wednesday.
If you want to take advantage of any of the deals on offer, you can support my business by placing your order online by clicking here or using the link to my store on the right hand side of my blog page where it says 'Shop Online' or with me in person. Don't forget to add the new Hostess Code for February UYGWGF4W if your order is under £150 and be sure to make sure that you don't check the 'no contact' box if you'd like to be kept updated with the progress of you order and receive a little thank you in the post from me.
Here's a summary of this week's one-week only Wednesday deals - click on each item to go to the online store to purchase:
Some great bargains in there this week: the ever-popular Work of Art stamp set and my personal favourite, the Simply Scored Metric Scoring Plate down to just £8.25. I use mine for scoring card bases for card classes all the time!
These offers will be around for just a couple more days, so if you want to take advantage then you'll need to act fast.
Back tomorrow with a new creative project; until then, happy shopping!
by Joanne James14. February 2016 09:00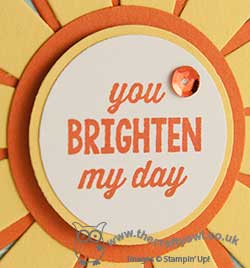
Happy Valentine's Day everyone! It's Sunday and time for a new challenge over at The Paper Players! This week it is the turn of the queen of die-cuts, the lovely Laurie, to host and she has a colour challenge for you to play along with:

This week's colours are about as far from Valentines as you could possibly get, but this colour palette offers some great opportunities for bright cards on a cold Winter's day. For my card this week I was inspired to use my new Sunburst Thinlits to create a layered sunburst, paired with some patterned cloud paper:
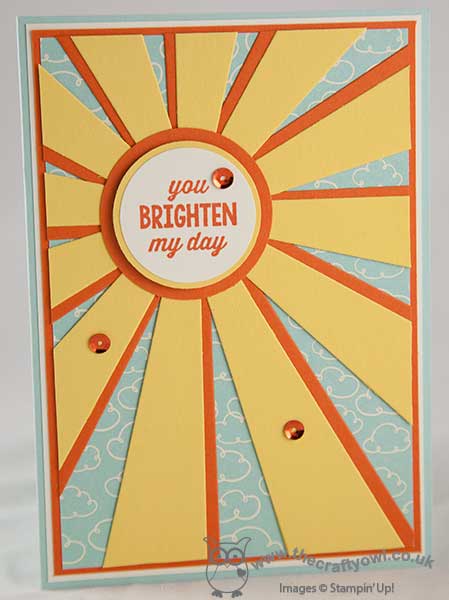
To create my sunburst I cut two sunbursts, one in Daffodil Delight to fit my card panel and the other full size in Tangelo Twist. To get a perfect 'shadow' I cut the orange one into three pieces to give equal shadow lines on each ray, then trimmed the ends to fit flush with the yellow one. I mounted my sunburst onto a piece of Pool Party cloud paper, taken from the Sweet L'il Things designer series paper stack. I stamped my sentiment in Tangelo Twist onto Very Vanilla and layered the circles to create the centrepiece for my sun. Finally, I added a trio of orange Brights sequins to finish. Quite a simple card to look at, but consisting of nine layers in total, each of which adds to the finished look and feel of the card. I love the bright colours of this week's colour palette -so cheery and sure to brighten everyone's day!
Before you reach for your ink and papers, check out what our amazing team has created to inspire you this week:
The Paper Players Design Team
Here's a quick recap of our challenge rules:
1. Create a new paper project
2. Upload your creation to your blog with a link back to us and provide a direct link to the post featuring your challenge submission.
3. Please link your card to no more than four challenges, TOTAL.
4. Have FUN!
I look forward to seeing what you create with this week's colours. We have a restful day planned today, with a sport-free day as it's the start of the half-term holiday for the James Juniors. Pretty much a whole week of lie-ins - bliss!
Back tomorrow with another project; until then, happy stampin'!
Stampin' Up! Supplies Used:
77bb6803-9cab-4a31-b52d-cea456777506|0|.0|96d5b379-7e1d-4dac-a6ba-1e50db561b04
Tags: Shop Stampin' Up online, Shop online, Stampin' Up, Stampin' Up Card ideas, Stampin' Up Supplies, Stampin' Up Card, The Paper Players, Sunburst Thinlit Dies, Sweet L'il Things, Sunburst Sayings, circle punch
Cards | Shop Online | Stamping
by Joanne James13. February 2016 20:00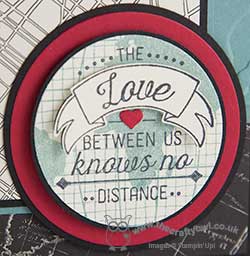
Good evening lovely readers! It's the big day tomorrow so in anticipation I have one last Valentine card for you, and unlike many of my others, this one has a distinctly masculine feel. Today's card uses this week's sketch over at the Global Design Project and I am also linking up with The Friday Mashup (I chose Valentine, but not with candy!) and Just Add Ink where the challenge is something beginning with 'v':

I decided that this sketch was perfect for the globe in the 'Going Global' stamp set, paired with some of the map patterns in the 'Going Places' designer series paper stack. Take a look:
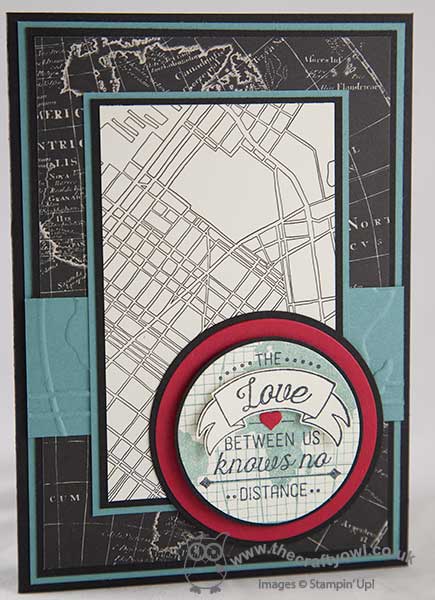
I layered my background and mats with Basic Black and Lost Lagoon, and used a piece of atlas patterned paper for the base layer and a piece of the street map paper for the top layer. Did you know that the papers in the Going Places stack are actual maps of real places? The street map here is of Brooklyn in New York, USA. I added a strip of Lost Lagoon embossed with the World Traveller embossing folder across the centre then for the focal point circle, I stamped the globe in Lost Lagoon onto Very Vanilla, having stamped off once so that it wouldn't overpower my over-stamped sentiment. I stamped the 'love' banner element again separately and fussy cut this and popped it up on dimensionals. I also punched a red heart from of Confetti Hearts Border punch and added over the stamped one and decided to create a mat for my circle element in red, to add a contrasting pop of colour and really draw you in - I know it's a masculine card, but it is Valentines, right? There are lots of layers on this card and I'm really pleased with how it came together.
That's all from me today; I'm looking forward to an early Valentines dinner this evening and will be back tomorrow with this week's new challenge over at The Paper Players. Until then, happy stampin'!
Stampin' Up! Supplies Used:
81b180ba-b1c2-44af-bb80-e8e5a3b5f2c3|0|.0|96d5b379-7e1d-4dac-a6ba-1e50db561b04
Tags: Going Global, Going Places, World Traveler TIEF, Stampin' Up, Shop online, Shop Stampin' Up online, Stampin' Up Card, Stampin' Up Card ideas, Stampin' Up Supplies, Valentines, Valentine's, Big Shot, circle punch, Circles Framelits
Cards | Shop Online | Stamping
by Joanne James12. February 2016 21:18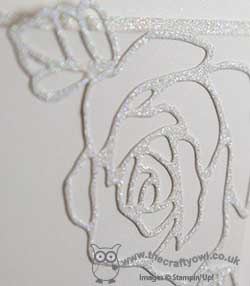
Yay it's Friday - the weekend is almost here! I'm looking forward to mine, especially as it heralds the start of half-term and a welcome break from the routine of school, even if for just one week. Today I'm sharing a card that I made for this week's challenge over at Less Is More - one of my favourite challenges and this week it is celebrating it's 5th Birthday - amazing! Chrissie and the rest of the Design Team really are the friendliest bunch and do a tremendous job inspiring the masses each week. As it happens I am too late to join in the celebrations, the theme of this week being 'white on white', however I wanted to share my card anyway. I decided to make a wedding card using the Rose Garden framelits and co-ordinating Rose Wonder stamp set for my sentiment. Here is my card:
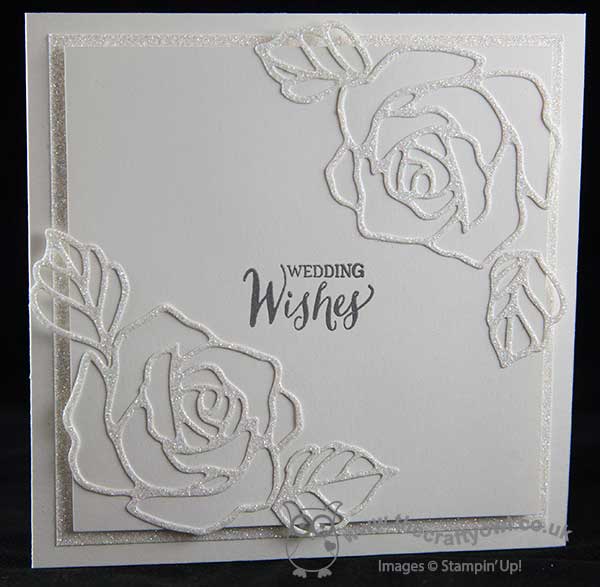
When making a white-on-white card, you have to use either shades of white or texture to add interest and contrast. I decided that texture and sparkle was the way to go, so using a base of Shimmery White cardstock, I added a layer of white Dazzling Diamonds glimmer paper, then another layer of Shimmery White onto which I added two diecut roses and leaves to opposing corners, allowing them to overhang the edge slightly. I added a simple sentiment, which I stamped in Versamark and heat embossed in silver along with a lovely verse inside to finish my card.
This is one of those cards that looks so very pretty in real life - all shimmer and sparkle. Tricky to photograph though, so I hope you get the idea! I love these thinlits too and am really looking forward to making more projects with them. They are also going to be featured in one of my April technique classes, so if you live in or around Northampton and would be interested in attending, do get in touch for more details. I'm also linking today's card up with CAS Colours and Sketches as I used their sketch for my layout and Stamps Ink Paper where the theme is 'love' - a wedding definitely celebrates that!


So happy birthday Less is More - hope you continue to inspire for the next 5 years and beyond. Back tomorrow with another project; until then, happy stampin'!
Stampin' Up! Supplies Used:
by Joanne James11. February 2016 10:00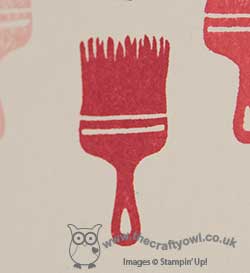
I've an extra card for you today; my spot of crafting yesterday gave me just enough time to squeeze in this fun card for this week's CAS(E) This Sketch:


I also used the colour palette over at Fab Friday, which seemed rather appropriate given the sentiment on today's card - after all, as the saying goes 'Let's paint the town red' right?
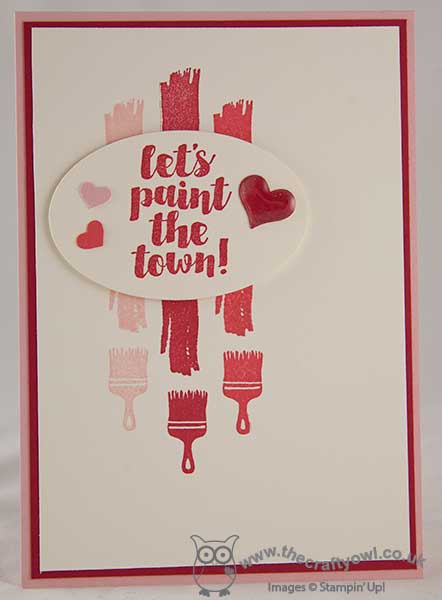
I used the hostess set 'Love You Sew' for my card today. The paint brushes and swish of paint stamp made the perfect backdrop for my sentiment; I stamped each paint swish twice on my mat of Very Vanilla and overlapped them beneath my sentiment oval in order to extend their length. I cut out my sentiment using my Big Shot and Oval Framelits and popped it up on a couple of dimensionals. A few punched hearts and an epoxy sticker on the largest heart finished my card.
This hostess set is a great set for crafters and non-crafters alike - I just love the fun sentiments and creative possibilities. Whilst this sentiment isn't a particular 'love' themed one, I think my card could be used as a fun invitation to a loved one or group of friends perhaps. 'Love You Sew' is exclusively available to customers who host a Stampin' Up! party or place a single order that qualifies for Stampin' Rewards. Sale-A-Bration is a great time to host a party with extra hostess rewards available for qualifying party sales. If you would like to host a party, do get in touch; I have a few slots left before the end of March if you would like to take advantage of these great offers. in addition, for all of my customers who host a party between now and the end of Sale-A-Bration, I will provide them with a free 'to go' tutorial to make a set of fun cards using the 'Love You Sew' hostess stamp set. So what are you waiting for? Make the call!
That's all from me today; back tomorrow with another project. until then, happy stampin'!
Stampin' Up! Supplies Used: