Mosaic Madness and Two New Colours

by Joanne James28. June 2013 21:24

All is well in the James household today, so it has been a day of catch-up crafting with the opportunity to tick a few things off my 'to do' list and also have another play with some new goodies! One of the best things about being a Stampin' Up! demonstrator is that we get the opportunity to purchase items before the new catalogue goes live and in some instances even receive new product free.

For today's 'sneak peak, I've made a card that showcases some fabulous new mosaic products - take a look:

The word 'mosaic' means 'to create images with a collection of small pieces of glass, stone or other materials' and the products I've used in today's card are great for paper ones. There is a patterned embossing folder, a stamp set and a co-ordinating punch that makes it so easy to create these mosaic shapes in super-quick time. For my card, I embossed the background and then stamped and punched a variety of patterned mosaic shapes, interspersing these with one of the smaller images from the stamp set stamped straight onto the background. I cut away the outer edge to show the profile of these tile pieces and anchored the banner with a final mosaic piece on dimensionals and finished with a coloured rhinestone. Here's a close up of the detail:

I also took the opportunity to play with two new colours: the card base is one of the new in colours, Coastal Cabana, and the yellow I used is the returning Regals colour Crushed Curry. I love this colour combo. I hope you like this card as I think the set is called 'Mosaic Madness' for a reason - I am brimming with ideas on how to use it, so there will be lots more where this came from. There is a co-ordinating set of designer series paper too - a blog post for another time though!

Back tomorrow with another project; until then, happy stampin'!


Stampin' Up Supplies:

Stamps: Mosaic Madness, Happy Day

Cardstock: Coastal Cabana, Night of Navy, Whisper White

Ink/Stampin' Write Markers: Coastal Cabana, Crushed Curry, Night of Navy

Tools: Mosaic Embossing Folder, Mosaic Punch

Finishing Touches: Basics Rhinestones


Tags: , , , , , , , ,

Cards | Stamping

Oh, Whale! Party Invitations

by Joanne James17. June 2013 22:00

So something different today - birthday invitations! I was going to share a birthday card with you today but changed my mind (bloggers prerogative!) As already mentioned this week, it was Rebecca's 8th birthday last Saturday. She is having a swimming pool party next Sunday to celebrate with her friends and so water-themed invitations were the order of the day. She decided that 'Oh, Whale' was to be the stamp set of choice for the task, I saw this lovely Valentine card here and loved the layout, so decided to use this as the basis for my party invitation design. Here are the finished invitations:

I switched out the hearts, went for a darker blue whale and couldn't miss the opportunity to use my Cloudy Day Embossing Folder to add texture to the circle behind the whale. I really like the mix of circle styles on this card and the way the DSP, punched circle and paper piercing bring the whole design together. I then used the 'Make a Wish' set to make light work of the details on the inside of the card (no photo of this though - oops!)

Back tomorrow with another project; until then, happy stampin'!


Stampin' Up Supplies:

Stamps: Oh Whale, Make a Wish

Cardstock: Whisper White, Real Red, Polka Dot Parade Designer Series Paper (Marina Mist)

Ink/Stampin' Write Markers: Night of Navy, Marina Mist, Real Red

Tools: Circles #2 Originals Die, Cloudy Day Textured Embossing Folder, Small Heart Punch, Essentials Paper Piercing Pack, Stamp-a-ma-jig


Dad - You Are The Best!

by Joanne James16. June 2013 20:09

Today is Father's Day and I can finally share the Father's Day card that I made for the James Juniors to give to Daddy on Father's Day. This has been something of a closely guarded secret in our house, but we managed to get to the official envelope-opening before he saw it, so that's pretty good going! I tried something new for this card and broke into my This and That Washi Tape for the first time - take a look:

It is so easy to tape and reposition this tape and it's great for card detail, as well as to hold photos and keepsakes into your journal. Wondering where I got the sentiment from? The 'To My Dad' is from the soon-to-be retired 'For My Family' set (can't believe this set is going - it is SO useful for card personalisation!) but the 'You are the best' is a combination of words taken from a couple of the 'Feel Goods' stamps - with careful use of my trusty stamp-a-ma-jig and some selective colouring with my Basic Grey marker pen, I created my very own sentiment that summed up exactly what I wanted to say. Some stars, linen thread and designer button, along with a co-ordinating envelope, finished off the card worthy of the best Dad - in our eyes, anyway! And as if to prove the point, it has to be said his day was very similar to most Sundays and with the exception of a card and gift, he wasn't treated any differently to any other day - but in his own words, every day is his day so he was fine with that. I can't promise the same will be said next time Mother's Day comes round, but there we go!

So Happy Father's Day - to my husband and Daddy to my children, to my own Dad and everyone else who shares this day.

Back tomorrow with another birthday project - until then, happy stampin'!


Stampin' Up Supplies:

Stamps: For My Family, Feel Goods

Cardstock: Crumb Cake, Very Vanilla, Calypso Coral, basic Grey, This and That Designer Series Paper

Ink/Stampin' Write Markers: Basic Grey

Tools: Stamp-a-ma-jig, Merry Minis Punch (star)

Finishing Touches: Basics Designer Buttons, Linen Thread, This and That Washi Tape, 1/8" Mini Brads

Let's Whale-A-Brate!

by Joanne James15. June 2013 20:51

Today's the day - my beautiful princess turns eight years old. Where did the last year, or eight even, disappear? I can't believe how quick she's growing and changing into a (very!) young lady, but a young lady none the less. She may be another year older, but she is still my water baby and as always, there is a strong aquatic theme to our celebrations: a swimming pool birthday cake, pool party next week and in keeping with this, an 'Oh, Whale' birthday card with a difference:

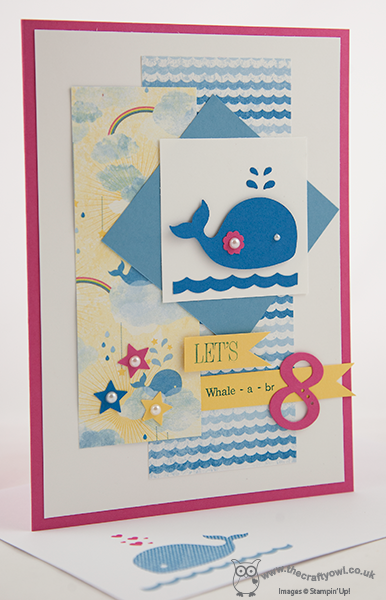
I liked a similar card using this stamp set that Mary Fish had done using a Paper Pals sketch layout a while ago (you can see her card here) and knew that this layout would enable me to make the most of the patterned papers in the Sunshine and Sprinkles set, but I wanted a special sentiment for my card and this proved to be a challenge! There is a photo in the Spring-Summer Seasonal catalogue that shows a play on the word 'celebrate', where the '-ate' is replaced with a number 8 and I really liked this and wanted to incorporate something similar in my card. So armed with a couple of stamp sets, my Typeset Alphabet and my trusty stamp-a-ma-jig, I came up with 'Let's Whale-A-Br8'. Here's a close up of the detail on the flags:

Pretty cute, even if I say so myself! We really did have a great day; here's hoping the next 12 months don't fly by quite so quickly.

I'll be back tomorrow with my husband's Father's Day card, but will have some other birthday-related cards and invitations to share early next week. Until tomorrow, happy stampin'!


Stampin' Up Supplies:

Stamps: Oh Whale, Make a Wish

Cardstock: Whisper White, Melon Mambo, Marina Mist, Daffodil Delight, Pacific Point, Sunshine and Sprinkles Designer Series Paper

Ink/Stampin' Write Markers: Pacific Point

Tools: Oh Whale Clearlits, 1/16" Handheld Circle Punch, Scallop Edge Border Punch, Stamp-a-ma-jig, Itty Bitty Punches (flower)

Finishing Touches: Basics Pearls

Remember When...?

by Joanne James13. June 2013 22:37

Last night's card class was fun as always but too late for a blog post and today has been another busy day making birthday cards for the young lady of the house and some Father's Day cards, ahead of the big birthday weekend. I'll share these in the next few days, but meanwhile tonight I thought I'd share the last of the Golden Anniversary cards I made recently. This one is quite different to the previous two; instead of leading with a 50th Anniversary sentiment, I used one of the stamps from the retiring Word Play set as the focus:

I've never used this stamp before, as it never seemed right for anything I was designing. I have toyed with using it as a feature stamp on a scrapbook page (a project for another time though!) then as I was thinking about what it would be like to celebrate 50 years of marriage myself (believe me, that is a LONG way off!) and it struck me how appropriate this stamp would be for a milestone anniversary card - 50 years is a lot of memories!

I decided to use white and brushed gold cardstock again and leave the layout quite simple, with Oval and Label Framelits making light work of the layered front. You can see the lovely gold embossing in this photo too - it adds a real shine. I finished the front with a fussy organza double bow then stamped the inside with my congratulatory anniversary message:

So that's all my Golden Anniversary cards for the time being - which one do you prefer? The other big news of the day is that registration for this year's Stampin' Up! European Convention opened today. Better still, this year convention is being held in Manchester in the UK. I've signed up already; if you would like to enjoy two days of stampin' fun from 22nd-23rd November, contact me for a chat about this and the other benefits being a Stampin' Up! demonstrator can offer.

Back tomorrow with another project - until then, happy stampin'!


Stampin' Up Supplies:

Stamps: Word Play, Memorable Moments

Cardstock: Whisper White, Brushed Gold

Ink/Stampin' Write Markers: Versamark

Tools: Ovals Framelits, Labels Framelits, Stamp-a-ma-jig

Finishing Touches:  Gold Embossing Powder, Whisper White 5/8" Organza Ribbon

Hearts of Gold

by Joanne James11. June 2013 22:48

Very late post from me today, but having had a day out on a geography field trip, one of the children's classmates round for tea and a Parents' Association fete planning meeting, this feels like the first time I've sat down since breakfast! I've the second of my Golden Wedding Anniversary cards to share today, this one using the Hearts A Flutter stamps and framelits:

For this card I used a white card base with a raised brushed gold and white layered panel, with two gold embossed hearts. I have used the Hearts A Flutter stamps and framelits in many ways and love the versatility of this set. I used more gold embossing for the sentiment across the bottom of the card. So, quite different to yesterday's card but this is also on it's way to another couple celebrating 50 years of marriage - some achievement, for sure.

Back tomorrow with the last of the golden anniversary cards; until then, happy stampin'!


Stampin' Up Supplies:

Stamps: Hearts A Flutter, Memorable Moments

Cardstock: Whisper White, Brushed Gold

Ink/Stampin' Write Markers: Versamark

Tools: Hearts a Flutter Framelits, Stamp-a-ma-jig

Finishing Touches:  Gold Embossing Powder, Whisper White 5/8" Organza Ribbon

Tags: , , , , , , , , ,

Cards | Stamping

Golden Wedding Anniversary

by Joanne James10. June 2013 21:53

Better late than never today, but lots going on in the James household this week: the first of this week's monthly card classes this afternoon, followed by a school field trip tomorrow and an 8th birthday to prepare for at the end of the week. So on to today's card! I've had three Golden Wedding Anniversary cards to make this month and although none of the recipients are known to each other, I made three different cards for each. I'm sharing the first of these with you today. This is the most simple of the 3 finished designs:


I used brushed gold card for the base and die cut number 50, which I popped on dimensionals so that it would stand out a little; this card has a lovely matt shimmer to it, which is somewhat lost in the photograph. I then used gold embossing powder and heat embossed the 'Happy Anniversary' either side of this. I used the Delicate Designs embossing folder and large scallop edgelits die to create a layered edge, finished with a piece of white Organza ribbon. So nothing too fussy, but classic (and post-friendly).

Back tomorrow with another of my Golden Anniversary cards I think; until then, happy stampin'!


Stampin' Up Supplies:

Stamps: Memorable Moments

Cardstock: Whisper White, Brushed Gold

Ink/Stampin' Write Markers: Versamark

Tools: Large Scallop Edgelits Die, Delicate Designs Embossing Folder, Typeset Alphabet Die, Stamp-a-ma-jig

Finishing Touches:  Gold Embossing Powder, Whisper White 5/8" Organza Ribbon


Welcome to Your New Home

by Joanne James8. June 2013 18:55

The changeover in annual catalogues brings with it mixed feelings; excitement at the thought of lots of new stamp sets and accessories to play with, but it's also a time to say goodbye to some old ones. Today I'm sharing a 'Welcome to your new home' card that I made recently for my fellow crafty friend Issy recently when she moved house. The card uses the Hoop La La stamp set and the Comfort Café designer series papers:

This set appeals to me because it reminds me of my other hobby, cross stitch, and there are some lovely little images in this set, including a needle and embroidery hoop. I coloured the house image with markers in colours that coordinated with the Comfort Café paper, using my Stamp-a-ma-jig to get them perfectly aligned, then created a focal point by making a feature of the final house placing on a raised circle and adding a cute little heart from my trusty owl punch for good measure. This time I even remembered to decorate the envelope too - something I often intend to do, but often forget when I'm busy focusing on the card itself.

Back tomorrow with another project; until then, happy stampin'!


Stampin' Up Supplies:

Stamps: Hoop La La

Cardstock: Very Vanilla, Midnight Muse, Summer Starfruit, Cajun Craze, Comfort Café DSP

Ink/Stampin' Write Markers: Midnight Muse, Pool Party, Cajun Craze, Summer Starfruit

Tools: Stamp-a-ma-jig, 1 3/4" circle punch, Circles #2 Originals Die, Owl Punch


Bird Cages - Without the Birds!

by Joanne James1. June 2013 20:39

This week is turning out to be busy, busy, busy! Yesterday the list of retiring stamp sets and accessories were announced: these featured in yesterday's post and the lists can be found in the box on the right hand side of my page. I will be sad to see some of these sets go; I'll be sharing cards featuring some of these retiring sets in my posts this month and first up I want to share a card made with the Aviary stamp set:

So, bird cages but no birds?! Bird cages are very 'on trend' in home décor right now, and after seeing an amazing display at a recent wedding fair with a table centre made with a bird cage filled with flowers, I was keen to try and achieve the same effect on a card. This design is actually not where I started out at all, but after several iterations this is the design I settled on and am post happy with. Three simple bird cages, then using the flower stamp from the Create a Cupcake stamp set I used my marker pens to colour and stamp flowers randomly through the cages. I left this card sentiment-free, as I sometimes do until I'm ready to send.

A post about the Aviary stamp set really wouldn't be complete without a card that shows some birds too - here's a wedding invitation I designed a while ago, that would also make a lovely Valentine's or anniversary card:

Remember the sets on the retiring list are only available until 1st July or whilst stocks last, so if you don't own the Aviary stamp set and it's on your wish list, contact me to place your order before it's too late.

Back soon with more exciting news from the world of Stampin' Up! Until then, happy stampin'!


Stampin' Up Supplies:

Stamps: Aviary (card 1&2), Create a Cupcake (card 1)

Cardstock: Rose Red, Whisper White (card 1); Pool party, Island Indigo, Whisper White (card 2)

Ink/Stampin' Write Markers: Rose Red, Baja Breeze, Bashful Blue, Pink Pirouette, So Saffron, Perfect Plum, Wild Wasabi (card 1); Basic Grey, Pool Party, Night of Navy, Rose Red (card 2)

Tools: Stamp-a-ma-jig


Tags: , , , , , , ,

Cards | Stamping

Fabulous You Pink Birthday Shoe

by Joanne James30. May 2013 15:33

An earlier than usual post from me today, but busy day and evening planned so didn't want to miss the opportunity to share a quick card with you today. Or you could just assume I'm getting more organised - you choose! Today's card is a 'Fabulous You' shoe card that I made for a friend of mine who celebrated her birthday this week. She is someone who has a great collection of fabulous shoes, so this seemed like an appropriate choice. Also, the only woman in a house of men so I deliberately went with a very pink and girly colour scheme. Here it is:

This card needed to be post-friendly, so again light on the embellishments, but by using lots of shades of pink on the shoe itself and a variety of pink papers, it has plenty of detail. I also used the fine tip of my Melon Mambo marker pen to highlight the detail of the sentiment lettering.

Before I go today, I just wanted to remind you of a number of important promotion deadlines:

  • Today is your last chance to take advantage of the bigger starter kit offer if you sign up as a Stampin' Up! demonstrator - £155 worth of products of your choice for just £99. You have until 10pm this evening to sign up - just click on the link in my side bar to sign up and join my growing team!
  • Tomorrow is your last chance to buy the This and That Journal bundle at the discounted price of £29.24 -that's a 15% discount on the price of the items when purchased individually. These items will be available after tomorrow, but the bundle will revert to its full price.
  • Tomorrow also sees the launch of the Retiring Products List - all those items that will be retiring on 1st July to make way for lots of new and exciting products in the 2013-14 annual catalogue, which launches on 2nd July. I will post a copy on my blog as soon as it is available.

Back tomorrow with another project - until then, happy stampin'!


Stampin' Up Supplies:

Stamps: Fabulous You

Cardstock: Melon Mambo, Whisper White, Brights Designer Series Papers

Ink/Stampin' Write Markers:  Basic Grey, Melon Mambo, Rose Red, Pink Pirouette, Wild Wasabi

Tools: Stamp-a-ma-jig, Blender Pen

Tags: , , , , , , ,

Cards | Promotions | Stamping

Mini Catalogue

BROWSE THE CATALOGUE

The mini catalogue is now live! Read and download your copy here.

Shop Online

Access my online shop 24 x 7, 365 days of the year:

Current March hostess code:

S9F2XJJW

Shop Online

Join My Team

It's always a great time to join Stampin’ Up! New team members can get £130 worth of products for only £99 + free business supplies + free shipping + all the fun being a part of Stampin’ Up! Stampin' Up! has something for everyone: join my growing team and benefit from my support to enjoy Stampin' Up! however you choose.

If you're interested, call me for a chat to understand how I can help you realise your goals. Alternatively, if you have already decided to sign up and you just can't wait, please click here for the link to the online form where you can sign up and order your starter kit right away! 

Latest Kit!

Stampin Cut and Emboss

The Rock Legend Kit has all you need to make 8 cards with coordinating envelopes. Along with the new Panda Friends Kit, both are available from January 4th for just £14 each - get yours here!

2023-24 Annual Catalogue

BROWSE THE CATALOGUE

Click on the catalogue for a full list of current SU! supplies - if you would like to order any of the items featured, please drop me a line at [email protected] or give me a call on 07773 421446 - I'd be happy to help.

New Online Exclusives

There will be new products available exclusively in the online store from 5 March - check them out here.

About Me

Hi I'm Joanne and live in Northampton and when I'm not looking after my husband and two beautiful children, am an avid crafter with a passion for all things Stampin' Up!

I must confess that I have never been a big rubber stamper - until I discovered Stampin' Up! that is. I love the fact that I can get such great results with co-ordinating stamps, inks, papers and punches - the possibilities are endless! Join me on my stamping journey as I share the things I love and be inspired to create amazing things yourself!

Follow Me

Monthly Newsletter

Box Builder

Click the button above to use Box Buster to create your custom box design using the Envelope Punch Board!

Kits Collection Now Available!

Stampin Cut and Emboss

The new Kits Collection from Stampin' Up! is now available!

Click here to see the current kits available and order yours online today.

I Design For


Stampin' Up Stuff

This is my personal blog and is not endorsed by Stampin’ Up! I hope you find it a plentiful source of ideas and personal inspiration but please don't copy my designs for contest submission or use for classes, publication or sale without express permission.