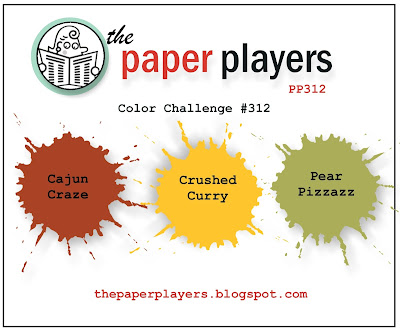
It's Sunday and time for a new challenge over at The Paper Players! It's the turn of my good friend LeAnne to host this week and she has a great set of colours for you to work with:

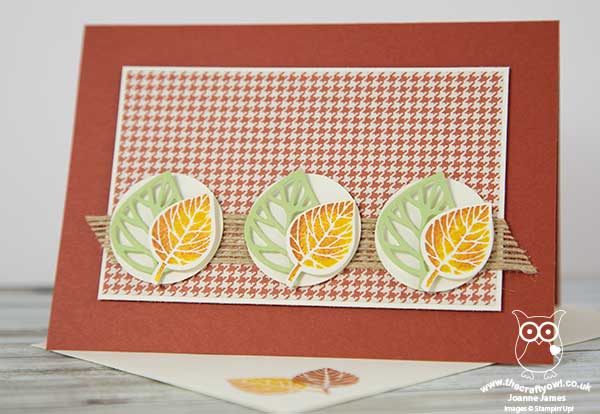
I used the sketch over at TGIF Challenges for the layout of my card today. These colours screamed 'autumn' to me and I immediately reached for all my leaf sets! This is what I ended up with: - take a look:
Here's the low-down on today's card:
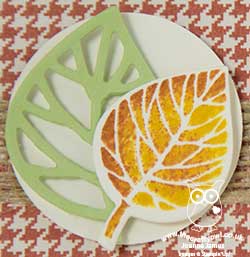
Thoughtful Branches - I decided to use the leaf from the Thoughtful Branches stamp set as the focal point for my card today, stamped in Crushed Curry and with a little Cajun Craze added with a sponge dauber to create the variegated effect. I cut these leaves out with the co-ordinating Beautiful Branches thinlits dies and also cut out a few of the double-leafed stem in Pear Pizzazz, and snipped off a single leaf from each to place behind my stamped one. I love the pop of colour this diecut leaf adds, along with the addition of texture. Each of my leaf duos was backed with a 1 3/8" punched circle. Don't forget the Thoughtful Branches bundle is still available while stocks last - snap up yours if you haven't already before it's too late!
Petals and Paisleys Houndtooth - The centre panel of my card features another of the Petals and Paisleys Specialty Designer Series Paper designs, this time a Cajun Craze and Very Vanilla houndstooth pattern. This paper exudes warmth and adds interest without detracting from the leaves as the focal point.
Sentiment-Free - Today's card is one of those few that is sentiment-free, on the outside at least. I debated whether or not to run a horizontal sentiment banner across the front of the leaves instead of adding the burlap ribbon behind, or stamping one onto the base frame of the card, but in the end decided against it. I didn't want to disturb the symmetry or form of my leaves so kept with a clean, uncluttered front. This also means that I can add a sentiment of my choice when I come to send my card.
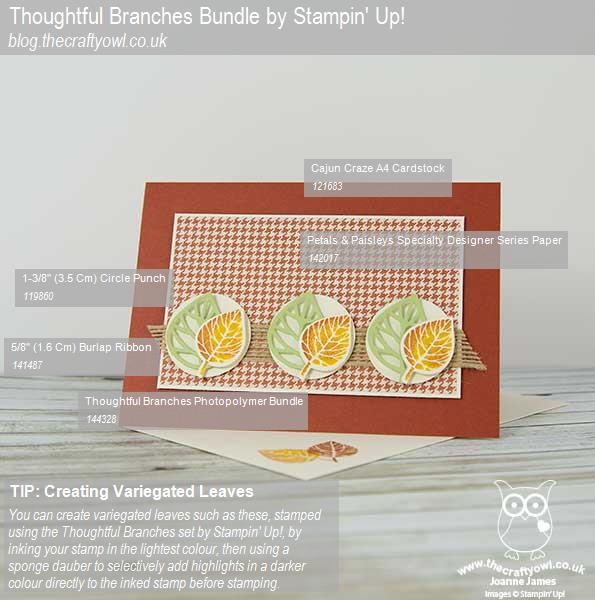
Here is the visual summary of the key products used on today's project for you to pin for easy reference:
You can see all of my 'How To' summaries on my 'How To - Tips and Techniques' Pinterest board in case you've missed any.
Before you reach for your ink and papers, check out what our amazing team has created to inspire you this week:
The Paper Players Design Team
Here's a quick recap of our challenge rules:
1. Create a new paper project
2. Upload your creation to your blog with a link back to us and provide a direct link to the post featuring your challenge submission.
3. Please link your card to no more than four challenges, TOTAL.
4. Have FUN!
I look forward to seeing what you create with this week's colours. I'm hoping for better weather today as I have some gardening jobs to see to - yesterday was so miserable, although it didn't dampen the spirits of Ben and his fellow classmates who played in their first rugby match of the season. They managed a 4-4 draw too, so were feeling rather chuffed as they strolled in to their post-match tea! Today also heralds the start of the hockey season an a return to basketball, so sporting weekends are once again about to become the James family norm!
Back tomorrow with another project; until then, happy stampin'!
Stampin' Up! Supplies Used: