The Most Clean And Simple Card EVER and A Farmhouse Christmas

by Joanne James20. November 2021 21:43

A very late post from me today but I wanted to share a couple of cards with you that I made with a few challenges in mind. My first card was inspired by the following:


It is unusual for me to get my inspiration from so many sources, but I couldn't resist those colours at Color Throwdown - navy, gold and white is one of my favourite colour combinations. I had already decided that navy would be perfect for a silhouette for Less Is More this week and I found the perfect image that enabled me to fulfil the brief over at AAA Cards of 'One Inchie' - take a look:


My silhouette angel from the retired 'Joyful Nativity' stamp set was perfect to fit into a slightly less than one inch square, just enough to allow for a gold foil scalloped square mat beneath it:


I left the whole of the remainder of my white cardbase blank - as the da Vinci quote over at Time Out states, "Simplicity is the ultimate sophisitcation' - hence my link up there too. So what do you think? Is my simple inchie silhouette too simple or seriously sophisticated? Do let me know in the comments below - I'd love to hear your thoughts!

I had a little extra time this morning and made another card that was totally inspired by Kim's fabulous sketch over at Freshly Made Sketches this week and the wonderful photo at The Card Concept:


I took my inspiration in the photo from the deep red and vanilla gingham chair, the large rustic snowflake in the background and overall country feel for my clean and layered card:


I used some retired Farmhouse Christmas designer paper for the base and the sentiment strip and added some Cherry Cobbler twine and a wooden snowflake embellishment to finish:


This card came together really easily and I love the rustic feel. I also love Kim's sketch - I've another card using this layout to share tomorrow.

No supplies list as I was on a 'use it up' day - hope they still inspire you to create something similar with your supplies, old or new. I'll be back tomorrow with my card for this week's new challenge over at The Paper Players. Until then, happy stampin'!


Important Stampin' Up! News: Purple Posy Ink Pad Discontinued With Immediate Effect

by Joanne James5. November 2019 22:00


Today I have an update from you regarding Purple Posy ink from Stampin' Up, which I have pretty much copied for the news release, as follows:

Despite Stampin' Up!'s efforts to resolve issues with Purple Posy ink, we have learned that the ink colour is still shifting over time. This means that the colour is coordinating more loosely than we typically allow with our colours. Due to these ongoing challenges, we have decided to discontinue Purple Posy classic ink. As of 5 November 2019, the following items will no longer be available to purchase:

  • Purple Posy Classic Stampin’ Pad (item 150084)
  • Purple Posy Classic Stampin’ Ink Refill (item 150091)
  • 2019–2021 In Color Classic Stampin’ Pad Assortment (item 150087)

We are unable to replace Purple Posy ink pads for customers who have already received them. However, anyone with concerns regarding the colour shifting properties of their Purple Posy ink pads should contact Demonstrator Support directly to arrange for a £7.00 coupon code as compensation. 

All other Purple Posy products (such as Purple Posy Stampin’ Write Marker, Purple Posy Cardstock, Purple Posy Stampin’ Blends, etc.) will remain available for purchase.

All of Stampin’ Up!’s exclusive ink colours are run through a vigorous series of tests to get ahead of challenges like this, and to ensure colours are accurate and meet our standards of coordination. Purple Posy did pass regular testing standards in time-simulating ovens, but we have now identified that it fell short when it came to actual time passing. The colour begins to shift once the ink has rested in the ink pad for about six weeks.

It is rare for Stampin’ Up! or our ink manufacturer to have such persistent issues with ink; Purple Posy has certainly been an anomaly. We completed full testing on 11 distinct batches of Purple Posy Classic Stampin’ Ink before releasing the current version. We are now confident that no additional efforts would uphold our coordination needs over time. 

So there it is - Purple Posy ink and ink refills are no more. If anyone has any issues with an existing ink pad that they would like to report, please get in touch. Fortunately for us, the other non-ink products in the range will still be available until June 2021, so there will be lots more opportunity to enjoy this lovely colour. 

This seems like a good opportunity to share the latest set of cards that the ladies in my in-colour club received, which were in fact a CASE  of a card made by my dear friend and AYSI teamie Jan Clothier of Thinking Stamping, who made this lovely card a while ago and I liked it so much I cased it for my ladies with her permission - you can see Jan's original card here and you can find a close up of my Purple Posy version below:

I hadn't used the 'Love What You Do' set for a while so it was good to ink it up again. Here's a shot showing all of the cards in the 2019-21 In-Color set:

So pretty - thank you Jan for the inspiration!

Here is the visual summary of the key products used on today's project that you can still buy for you to pin for easy reference:


Apologies that this is in Purple Posy, but I'd made and photographed these cards before the Stampin' Up! announcement was made. Whilst I did use Purple Posy ink for the blooms on my card, you could colour these with Stampin' Write markers and achieve a pretty similar effect. Such creativity will still be required if we are to enjoy colour coordination with this delicate soft purple from now on. You can see all of my 'How To' summaries on my 'How To - Tips and Techniques' Pinterest board in case you've missed any. 

Enjoy your day and I'll be back tomorrow with another project. Until then, happy stampin'!


Stampin' Up! Supplies Used:

Table built using Product Table Builder by The Crafty Owl - Independent Stampin' Up! Demonstrator.

Jolly Holly Christmas Card With The Christmas Traditions Punch Box

by Joanne James26. November 2018 11:10

Another Monday, another week! Hope you all had lovely weekends -  did you spend them shopping for Black Friday deals? I did start my Christmas shopping at last - I'm suddenly feeling under pressure to start ticking things off that particular list. i can't quite believe that one month today will be Boxing Day!! Anyway, let's not dwell on that - today I'm sharing a card using this week's sketch over at Freshly Made Sketches:

The lovely Kim has a great sketch this week, with lots of creative possibilities. I decided my card was going to be all about the holly - take a look:


Here's the low-down on today's card:

A Jolly Holly Christmas - I decided that holly was going to be the theme for my card today and used the square shape to feature a piece of the holly patterned paper from the Santa's Workshop designer series paper and tied my sentiment and holly embellishment (one of the self-adhesive pieces from the Santa's Workshop Memories & More card pack) into my theme. I even carried it over to the inside of my card and added a stamped sprig of holly alongside my sentiment from the super-useful Merry Christmas To All stamp set:

Christmas Traditions - I found the perfect holly-related sentiment for my card in the Christmas Traditions Punch Box that is featured on pages 2-3 of the Autumn/Winter catalogue: 


Just like the Darling Label Punch Box in the annual catalogue (which incidentally has 10% off in the current stamp and kit sale as part of today's Online Extravaganza - order yours here), this festive-themed tin is choc-full of crafting goodies for creating through the festive season: with a block, two ink spots, set of 6 stamps and a Christmas Traditions Punch, all you need is to add some cardstock and adhesives and you are all set for some festive fun! Perfect for tags, cards and embellishments for your home-baked goodies, this set would make a lovely seasonal gift for a crafter or someone who likes to add a personal touch to their packages during the festive season. 

Lots of Layers - I added some texture to my card base with the Subtle Dynamic Textured Impressions Embossing Folder, but otherwise all of the detail and interest on today's card is focused around the square element. In order to really draw the eye to it, I stacked the base behind the holly DSP with 3 layers, made easy with the Layering Square Framelits, using the base colours of the paper and adding a piece of Poppy Parade ribbon for a pop of red - so festive!

Here is the visual summary of the key products used on today's project for you to pin for easy reference:


You can see all of my 'How To' summaries on my 'How To - Tips and Techniques' Pinterest board in case you've missed any. 

I hope you like today's card - tomorrow's card also features the Christmas traditions Punch Box, so be sure to come back and check it out. I have a few more errands before I get back into my painting and decorating - it's a long job! Enjoy your day and I'll be back tomorrow with another project. Until then, happy stampin'!


Stampin' Up! Supplies Used:

Table built using Product Table Builder by The Crafty Owl - Independent Stampin' Up! Demonstrator.

Carols Of Christmas Folded Corner Card

by Joanne James22. August 2017 10:00

Today I'm sharing my second card in a row for the current colour challenge over at As you See It:


As I mentioned in yesterday's post, this was the first card I made using these colours and the Carols of Christmas bundle - take a look:


Here's the low-down on today's card:

Carols of Christmas - I used the other large sentiment from the Carols Of Christmas stamp set on my card today, again inking the sentiment in Elegant Eggplant and Real Red, using the rock 'n' roll ink technique to blend the colour across the centre of the stamp for a two-tone effect. I layered my stamped panel using my Layering Squares Framelits for a little extra colour and detail.

A Fancy Fold - The real interest on today's card is the fancy fold. This is called a Folded Corner Card, although I adapted the fold to the centre as I wanted a wide border that was equal and opposite to the inside edge, where I decorated the border with stamped and cut out poinsettias.

Paper-Pieced Poinsettias - For the opposing corner, I used the detail of the poinsettia corner thinlit and paper-pieced the flowers, berries and leaves, finishing off with a few pearl centres. It was a little fiddly, especially the berries, however worth it to show both of the poinsettia pieces.

So what do you think? Which one do you prefer - yesterday's card which you can see here if you missed it or today's? I'd love to hear your thoughts. 

Here is the visual summary of the key products used on today's project for you to pin for easy reference:


You can see all of my 'How To' summaries on my 'How To - Tips and Techniques' Pinterest board in case you've missed any. 

I have the second of my technique classes this month this morning so I will be busy. Hopefully I'll be back tomorrow with another project - perhaps I'll share something from today's class. Until then, happy stampin'!


Stampin' Up! Supplies Used:

Table built using Product Table Builder by The Crafty Owl - Independent Stampin' Up! Demonstrator.

Beautiful Bouquet Three Ways From Simple to Stepped Up

by Joanne James4. August 2017 08:00

Happy Friday everyone! School holidays have got the better of me this week and with an all-day technique class too and pre-order of my seasonal goodies from the new Autumn-Winter catalogue, I've just not had the opportunity for blogging. I've plenty of makes to share with you though and today to thank you for your patience this week I thought I would show you not one, not two but three cards - another trio from simple to stepped up, this time featuring the Beautiful Bouquet Bundle that you can find on pages 92-93 of the 2017 Annual Stampin' Up! catalogue.

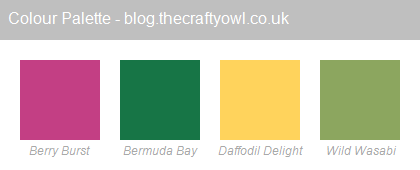
The Beautiful Bouquet stamp set has a wonderful collection of both florals and sentiments that are suitable for a wide variety of occasions and when paired with the co-ordinating Bouquet Bunch Framelits Dies can be used to make the most amazing 3D floral bouquets. The set really does offer something for every kind of crafter; I started out with the following basic colour combination and set to work:
 

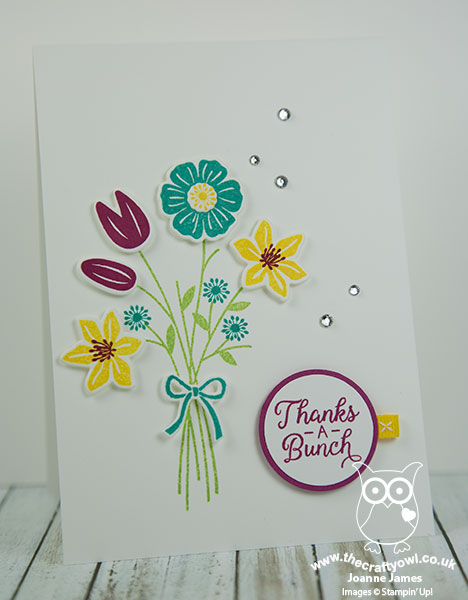
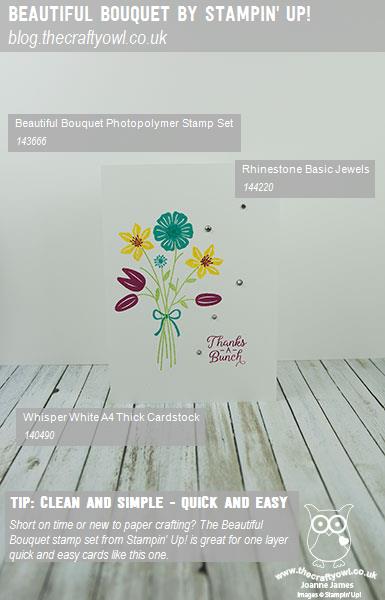
Clean and Simple - Quick And Easy - If you're short on time or new to crafting, this set is great for a simple one layer card like this one:
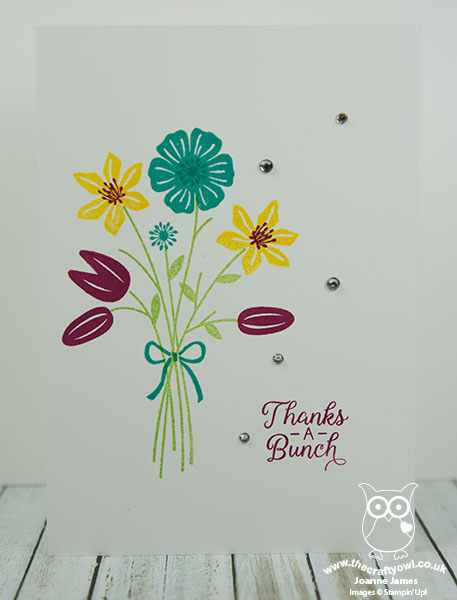
 

All you need to do is take a sheet of Extra Thick Whisper White for your card base, stamp your stems and a few carefully chosen blooms directly onto the card front along with a sentiment of your choice, add a few rhinestones and your card is done. Bright colours that compliment each other and some contrasting flower centres really help this simple card to have a big impact.

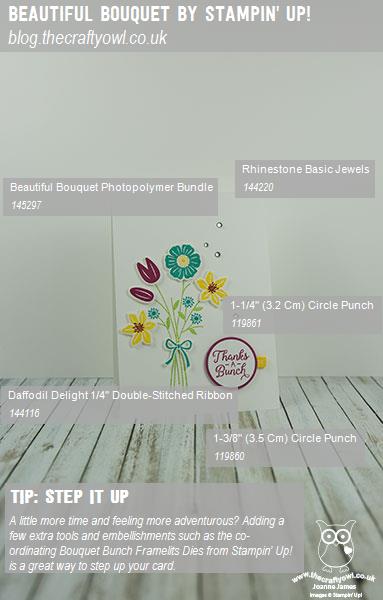
Step It Up - If you have a bit more time and are feeling more adventurous, using a few extra tools and embellishments will allow you to 'step up' your card and create something with a little more depth and detail, whilst still relatively easy to make:
 

My second card follows the same basic layout as the first, however this time I've used the framelits to cut out the bow and the flower heads and popped them up on dimensionals, and some circle punches to punch out my sentiment and layer it onto some Berry Burst cardstock for extra pop. In addition to the rhinestones, I've added a little tab of Daffodil Delight Double-Stitched Ribbon to my sentiment circle for an extra touch.

Going For Gold - Stepped Up To The Max - If you have the time and want to really explore a wide range of techniques, tools and embellishments, it's possible to use the Beautiful Bouquet Bundle to create something really special:
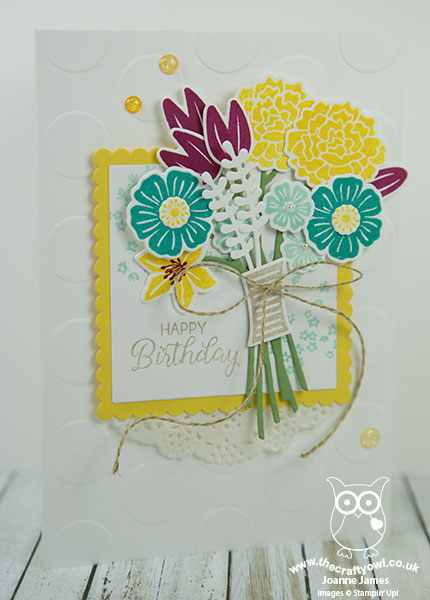
 

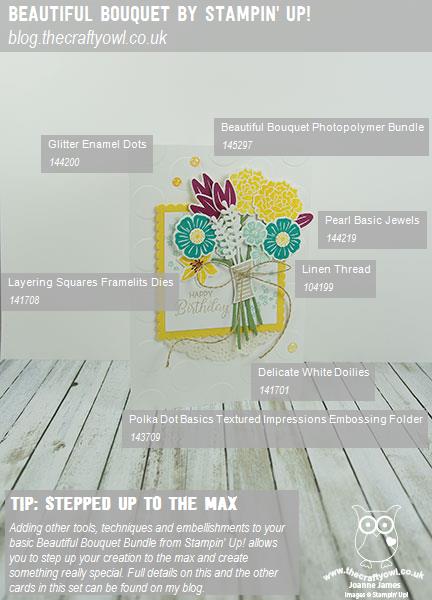
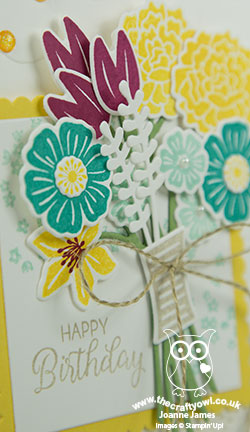
My third card is a CASE of the card on page 93 of the Stampin' Up! catalogue and really goes to town: the framelits have been used to diecut the entire bouquet, having stamped the flower heads first, and layered onto some background-stamped squares cut with the Layering Squares Framelits and an embossed background (my card uses the retired Large Polka Dot TIEF but you could of course use the current Polka Dot Basics Textured Impressions Embossing Folder as per the catalogue sample). There are some additional colours, doilies, linen thread and a sprinkling of the gorgeous glitter enamel dots that really help to make this card something special.

Here are the visual summaries of the key products used on today's projects for you to pin for easy reference:


You can see all of my 'How To' summaries on my 'How To - Tips and Techniques' Pinterest board in case you've missed any. 

So which of the above cards is your favourite? Do leave me a comment below, I'd love to hear your thoughts. I love them all and as I have the bundle, like the fact that I can choose my style depending on how the mood - or in my case time available - takes me! I have a few more cards to share using this set, so stay tuned next week if florals are your thing.

Enjoy your day and I'll be back tomorrow with another project, quite possibly with something of a more seasonal nature. Until then, happy stampin'!


Stampin' Up! Supplies Used:

Table built using Product Table Builder by The Crafty Owl - Independent Stampin' Up! Demonstrator.

This Little Piggy ... Is So Cute!

by Joanne James28. May 2017 10:00

It's Sunday and time for this week's new challenge over at The Paper Players! The awesomely talented Laurie is the hostess this week and she has a sketch for us to work with:


I love a good sketch and this one was perfect for me to open a new stamp set that I won at Onstage in April but hadn't inked up yet - take a look:


Isn't that little piggy cute?! Here's the low-down on today's card:

This Little Piggy - This fun set of animated pigs in a variety of poses is set to be hugely popular if the 'oohs' and 'aahs' that accompanied Charlotte Harding's demonstration at Onstage are anything to go by. Who doesn't love a pig or know someone who does? The excitement in the room when this set was offered up as a prize patrol was palpable, but that was nothing compared to how I reacted when I won it - I think it's fair to say I gave a piggy squeal of delight! I've used the 'serious' pig on my card today, that can be paired with one of two sentiments. I stamped the image and sentiment separately on my card and completed the sentence inside my card, complete with kisses:


Isn't that sweet? A perfectly fun anniversary card for this week's challenge over at As You See It too - this card is perfect for my hubby!

Lots Of Layers - I took the opportunity to add some layers to my focal image with a mix of stitched shapes and layered squares. On this card I punched my sentiment out with the classic label punch, rather than stamp it directly onto the patterned paper layer as I did on the card below.

Paper Pick 'n' Mix - I'm taking the opportunity to use up my retiring papers so this card features some polka dots from the Brights stack as well as some Pop of Pink DSP for the horizontal band. I also created a second card using the Playful Palette DSP stack papers with an alternative sentiment pairing - take a look:


And here's the inside:


Here is the visual summary of the key products used on today's project for you to pin for easy reference:


Here's the details for my second card:


You can see all of my Product and 'How To' summaries on my 'How To - Tips and Techniques' Pinterest board in case you've missed any. 

Before you reach for your ink and papers, check out what our amazing team has created to inspire you this week:

The Paper Players Design Team
 
 
Here's a quick recap of our challenge rules:
 
1.  Create a new paper project
2.  Upload your creation to your blog with a link back to us and provide a direct link to the post featuring your challenge submission.
3.  Please link your card to no more than four challenges, TOTAL.
4.  Have FUN! 


I look forward to seeing what you create with our sketch this week. Do leave me a comment and let me know which of these little pigs you prefer and if they are on your wishlist too! Enjoy the rest of your weekend - we have a Bank Holiday on Monday so an extra long one, which is great. I am hoping for a continuation of this lovely weather and another BBQ, possibly followed by a bike ride. I'll be back tomorrow with another project; until then, happy stampin'!


Stampin' Up! Supplies Used:

Table built using Product Table Builder by The Crafty Owl - Independent Stampin' Up! Demonstrator.

A Playful Palette Happy Birthday

by Joanne James16. June 2016 08:05

I'm back from a special day yesterday: Rebecca celebrated her 11th birthday - wherever did that time go?! She was slightly disappointed that it was a school day, although genuinely touched by the number of children that came up to her to wish her a happy birthday yesterday, and two little juniors who even came and sang to her - how sweet! It seems when you're Head Girl everyone knows when it's your birthday!

Anyway - today it's time for a new challenge over at Create With Connie and Mary and this week we have a sketch for you:


For my card today I decided on a showcase of in-colours and one of the new designer series paper stacks - take a look:

Here's the low-down on today's card:

A Playful Palette of Colour - The designer series papers featured on my card today feature four of the five new in-colours (only Dapper Denim is absent) and are one of the products featured in the Playful Palette suite - modern and colourful designs, inspired by brushstrokes and artwork. Here's a photo showing other items in this creative suite:


Layering Squares - I cut each of my four squares with my new Layering Squares framelits and chose to highlight one of the squares with a narrow scalloped border in Peekaboo Peach. These layered squares are great for creating perfectly aligned borders, frames and shaker cards and can be used in endless different combinations to achieve a different effect each time.

Hello You Happy - I finished my card with a sentiment comprising a little banner using words from the 'Crazy About You' stamp set and a die cut 'happy' using one of the 'Hello You' thinlits. I diecut my 'happy' in Emerald Envy, dipped it in Versamark and then heat embossed it with clear embossing powder and repeated the process 3 times to get a smooth and glossy finish. It really stands out against the patterned papers and the Sweet Sugarplum base  - I love it!

Here is the visual summary of the key products used on today's project for you to pin for easy reference:


You can see all of my 'How To' summaries on my 'How To - Tips and Techniques' Pinterest board in case you've missed any. 

Do visit the other Design Team members to see what they did with this week's sketch; there's lots of inspiration over on their blogs too!

Enjoy your day; I'm getting together with some of my team for a catch-up, which should be fun. I'll be back tomorrow with another project; until then, happy stampin'!


Stampin' Up! Supplies Used:

  • Playful Palette Designer Series Paper Stack
  • Hello You Thinlits Dies
  • Layering Squares Framelits Dies
  • Crazy About You Stamp Set
  • Sweet Sugarplum A4 Cardstock
  • Peekaboo Peach A4 Cardstock
  • Emerald Envy A4 Cardstock
  • Very Vanilla A4 Cardstock
  • Tuxedo Black Memento Ink Pad
  • Versamark Pad
  • Clear Stampin' Emboss Powder
  • Heat Tool (Uk)

Scrapbooking

Stampin' Up! has introduced a new range of 12x12" scrapbooking product and kit - the full range is now available to purchase online. To download a copy of the new digital Scrapbooking Catalogue click here.

Mini Catalogue

BROWSE THE CATALOGUE

'Tis The Season - the new Stampin' Up! Mini Catalogue is here! For more details and to download your copy click here

Shop Online

Access my online shop 24 x 7, 365 days of the year:

Current September hostess code:

JQEHTZGK

Shop Online

2024-25 Annual Catalogue

BROWSE THE CATALOGUE

Click on the image to download your copy of the 2024-25 annual catalogue. For a full list of current SU! supplies, go to my online store. If you would like any help or advice, please drop me a line at joanne@thecraftyowl.co.uk or give me a call on 07773 421446 - I'd be happy to help.

Join My Team

It's always a great time to join Stampin’ Up! New team members can get £130 worth of products for only £99 + free business supplies + free shipping + all the fun being a part of Stampin’ Up! Stampin' Up! has something for everyone: join my growing team and benefit from my support to enjoy Stampin' Up! however you choose.

If you're interested, call me for a chat to understand how I can help you realise your goals. Alternatively, if you have already decided to sign up and you just can't wait, please click here for the link to the online form where you can sign up and order your starter kit right away! 

Latest Kits!

Stampin Cut and Emboss

The Christmas Ornaments Kit and Card Keeper Kit are the latest kits that will be arriving in the online store later this month - get yours here!

New Online Exclusives

There are new products available exclusively in the online store from 3 July - check them out here.

About Me

Hi I'm Joanne and live in Northampton and when I'm not looking after my husband and two beautiful children, am an avid crafter with a passion for all things Stampin' Up!

I must confess that I have never been a big rubber stamper - until I discovered Stampin' Up! that is. I love the fact that I can get such great results with co-ordinating stamps, inks, papers and punches - the possibilities are endless! Join me on my stamping journey as I share the things I love and be inspired to create amazing things yourself!

Follow Me

Monthly Newsletter

Box Builder

Click the button above to use Box Buster to create your custom box design using the Envelope Punch Board!

Kits Collection Now Available!

Stampin Cut and Emboss

The new Kits Collection from Stampin' Up! is now available!

Click here to see the current kits available and order yours online today.

I Design For


Stampin' Up Stuff

This is my personal blog and is not endorsed by Stampin’ Up! I hope you find it a plentiful source of ideas and personal inspiration but please don't copy my designs for contest submission or use for classes, publication or sale without express permission.