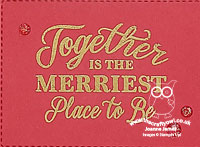
Merriest Frames Snowy White Velvet Christmas Card

by Joanne James12. December 2022 09:00

Today I've a quick post to share a card for the current challenges over at Time Out where the theme is 'Winter/Holiday Season' and at SUO Challenges where the theme is Christmas:

    SUO Challenges -

I love to make an all-white card and I hadn't made any this year, so I decided that the theme of 'Winter' along with the sub-zero temperatures here in the UK  - and waking to snow on the ground this morning were the perfect inspiration - take a look:


Here's the low-down on today's card:

I used some retiring favourites for today's card: Snowy White velvet sheets and the Merriest Moments stamp set and hybrid embossing folder. I went with some simple layers: First I ran a piece of velvet paper through with the embossing folder, then added this to my card front. Then I used the embossing folder with the embossing die to cut the large base foliage design out of white glimmer paper and adhered it to my cardbase. I then added another diecut and embossed foliage layer, this time using the smaller detailed foliage die and Snowy White velvet paper. I cut a rectangle of white glimmer paper and used this to back a diecut stitched rectangle of white cardstock, onto which I heat-embossed my sentiment in silver: 


I added a trio of opal rounds to complete my design. This is a card of many layers and wonderful texture, but was actually quick and easy to execute. I will miss Merriest Moments for sure!

Here is the visual summary of the key products used on today's project for you to pin for easy reference:


You can see all of my 'How To' summaries on my 'How To - Tips and Techniques' Pinterest board in case you've missed any. 

Enjoy your day and I'll be back tomorrow with another project. Until then, happy stampin'!


Painted Christmas Country Wreaths TTT188

by Joanne James17. November 2022 15:00

It's Thursday and time for a new challenge over at TicTacToe! It's the turn of Team X to host this week and the lovely Felicita is our featured designer this week. This is the fun board that we are playing along with: 


I have been having a lot of fun with my Cottage Wreaths bundle so decided to take the right hand column and use any shape die, wreath and gold foil/glitter for my card today - take a look:


Here's the low-down on today's card:

I love the sketch over at TGIF Challenges this week and decided that it would be perfect for a little of 'something old, something new' - I layered a stamped and diecut wreath from the Cottage Wreaths bundle over a panel of Soft Sea Foam. embossed with the retired but gorgeous Seasonal Wreath embossing folder. This has so much detail and dimension yet makes a pretty, subtle background. I also added some stamped and diecut holly leaves, red rhinestones and an antique gold foiled bow to my Christmassy Cottage Wreath, along with a fussy cut sentiment:

All of this was against a background of the returning favourite, painted Christmas Designer Series Paper, with a couple of red glimmer borders thrown in. The prettiness doesn't stop there though - I also decorated both the inside of my card, and the envelope - no naked envelopes here:

I'll be sharing this with the lovely ladies over at Just Us Girls where it's trend week and this is the trend Lisa has chosen. I love to decorate an envelope and the inside of my card to co-ordinate with the card front; I think it's a great way to add a finishing detail and I like to think that a patterned envelope makes the recipient smile before they've even opened it. 

Here is the visual summary of the key products used on today's project for you to pin for easy reference:


You can see all of my Product and 'How To' summaries on my 'How To - Tips and Techniques' Pinterest board in case you've missed any. 

A tictactoe board offers so many creative possibilities - how does this week's board inspire you? Why not have a go? We would love to see you in the gallery and who knows - you might be selected for Designer's Choice and be eligible to be a guest designer on a future challenge. 

Enjoy your day; I am heading out to Sixth Form Options Evening with the youngest of the James Juniors at school this evening; this does at least mean dinner out, due to the logistics of trying to get everywhere on time - what a treat! I'll be back tomorrow with another project. Until then, happy stampin'!


Stampin' Up! Supplies Used: 

Table built using Product Table Builder by The Crafty Owl - Independent Stampin' Up! Demonstrator.

Merriest Moments Christmas Card For A Friend CCS 489

by Joanne James27. September 2022 12:00

It's Tuesday and time for a new challenge over at CAS Colours & Sketches. Today we have Valerie's final sketch challenge: 


Feel free to flip or rotate the sketch when making your card. I thought this was a great sketch and perfect to enable me to play along with a few other challenges too: the ladies over at Just Add Ink have a 'Choose 2' challenge this week, at Less is More the theme is 'friendship' and since over at CAS on Friday the theme is Christmas, I am playing there too! So - to my card:


Here's the low-down on today's card:

Masked Merriest Moments - I decided to properly rise to the challenge over at Just Add Ink this week and would use not just two but all three of their options! For my foliage and masking, I used the Merriest Moments stamp set - one of my all-time Christmas festive favourites. I used a circle framelit to cut a circle of masking paper, then stamped a selection of festive foliage around the edge, masking the individual pieces too to create a sense of depth and dimension. Once the masking paper was removed, I stamped my sentiment in the clear circle in the centre and used a thin (retired) gold hoop embellishment to outline the edge of my masked circle, then added some diecut red berries and a poinsettia to the front of the hoop - I like the subtle depth that this gives and pop of additional colour amongst the greens of the foliage:


Words of Friendship - My festive friendship sentiment comes from the 'Christmas To Remember' stamp set - a set of sayings perfect for this time of year. I used another two to add detail to the inside of my card, along with a little more festive foliage decoration:

Simple as that! I wish in hindsight I'd taken step by step photos of the construction process for this card, because whilst easy to explain contained a fair number of steps to achieve the desired effect. I really like the finished card though and I know that when one of my oldest, dear friends who I don't see often, but is always in my thoughts, receives this card she will love it too!

Here is the visual summary of the key products used on today's project for you to pin for easy reference:


You can see all of my 'How To' summaries on my 'How To - Tips and Techniques' Pinterest board in case you've missed any. 

Enjoy your day and I'll be back tomorrow with another project. Until then, happy stampin'!


Stampin' Up! Supplies Used:

Table built using Product Table Builder by The Crafty Owl - Independent Stampin' Up! Demonstrator.

Merriest Moments CAS Poinsettia CCS 449

by Joanne James7. December 2021 13:00

It's Tuesday and time for a new challenge over at CAS Colours & Sketches. Patricia is our host for the month of December and our first challenge this month is a colour challenge: 


I decided these colours would perfectly suit a Christmas festive poinsettia, so stamped and cut one from the Merriest Moments stamp set along with some festive holly and used it to frame my simple sentiment that I inset using one of my Layered Circle Dies:


I added a sentiment and little extra stamping using the same set to the inside of my card:


 A trio of Cherry Cobbler matte dots for an extra pop of red complete my clean and simple card:


 I'm not sure this is a combination I would have chosen, but I really like the deep red against the fresh Mint Macaron base, with just the tiniest amount of yellow for good measure.

Here is the visual summary of the key products used on today's project for you to pin for easy reference:


You can see all of my 'How To' summaries on my 'How To - Tips and Techniques' Pinterest board in case you've missed any. 

I'm also linking today's card up over at The Alphabet Challenge where the current theme is 'R if for Red' - I think my poinsettia qualifies on that front!

As a reminder, for our colour challenges, you must use all of the stated challenge colours. You may also use neutral colours; however, the challenge colours should be the most noticeable ones featured on your card. We use Stampin' Up! color names for reference, but you are welcome to use any other companies' products as long as you match the challenge colours as closely as possible.

Enjoy your day and I'll be back tomorrow with another project. Until then, happy stampin'!


Stampin' Up! Supplies Used:

Table built using Product Table Builder by The Crafty Owl - Independent Stampin' Up! Demonstrator.

Painted Christmas PP569

by Joanne James28. November 2021 08:00

Today it's Sunday and time for this week's new challenge over at The Paper Players! It's the turn of the fabulous Anne Marie to host this week and she has my favourite, a sketch challenge for you to work with:


I struggled a little to decide what to do about the split background layer on today's card; I eventually decided to use a single, bright patterned paper from the Painted Christmas pack - take a look:


There are some gorgeous patterns in the Painted Christmas pack, all with a loose watercoloured feel. I love this red and white pattern but it needed an otherwise uncluttered card to show it off to best advantage. So I split the panel into three as per the sketch, then added a red label with a white heat-embossed sentiment, accented with some holly and foliage stamped with the Christmas Season stamp set, some loops of sheer red ribbon and some red sparkly gems to finish:

This card was actually quite straightforward to put together, but I spent ages procrastinating about which paper or papers to feature so seemed to take forever to design!! I really like the pop of red against the white though, with just a little green foliage too. I used one of the sentiments from 'Merriest Moments' - this is most certainly my favourite sentiment set in the current catalogue.

Here is the visual summary of the key products used on today's project for you to pin for easy reference:


You can see all of my Product and 'How To' summaries on my 'How To - Tips and Techniques' Pinterest board in case you've missed any. 

I'm also linking today's card up over at Global Design Project #GDP319 where the theme is 'Christmas'.

Before you reach for your ink and papers, check out what our amazing team has created to inspire you this week:

Here's a quick recap of our challenge rules:
 
1.  Create a new paper project
2.  Upload your creation to your blog with a link back to us and provide a direct link to the post featuring your challenge submission.
3.  Please link your card to no more than four challenges, TOTAL.
4.  Have FUN!

You can see all of my 'How To' summaries on my 'How To - Tips and Techniques' Pinterest board in case you've missed any. 

Enjoy your day; we have had a freezing few days here in the UK so today I will most definitely be staying indoors, keeping warm and might even indulge in a spot of festive baking! I'll be back tomorrow with another project. Until then, happy stampin'!


Stampin' Up! Supplies Used: 

Table built using Product Table Builder by The Crafty Owl - Independent Stampin' Up! Demonstrator.

Merriest Moments Simple One layer and a Fancy Technique

by Joanne James14. October 2021 11:10

Today I'm sharing a couple of cards with you. I held my monthly class online at the start of the week and it featured the Merriest Moments bundle and following the discussions we had on the call I wanted to share another couple of cards featuring the most versatile of bundles. My first card is for the current challenge over at The Alphabet Challenge Blog, where they are on 'N is for No Layer'. I made the simplest of cards using a festive red and white colour combination - take a look:
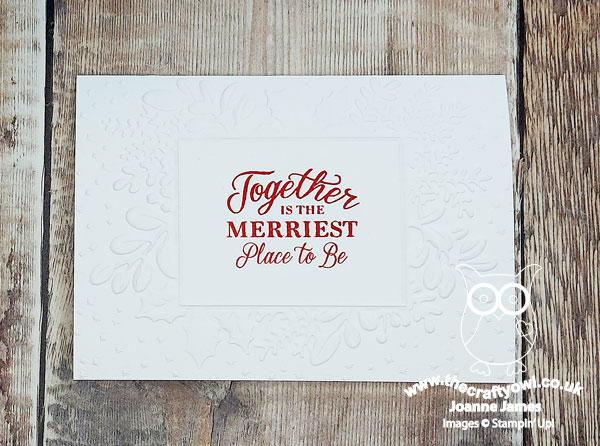
 

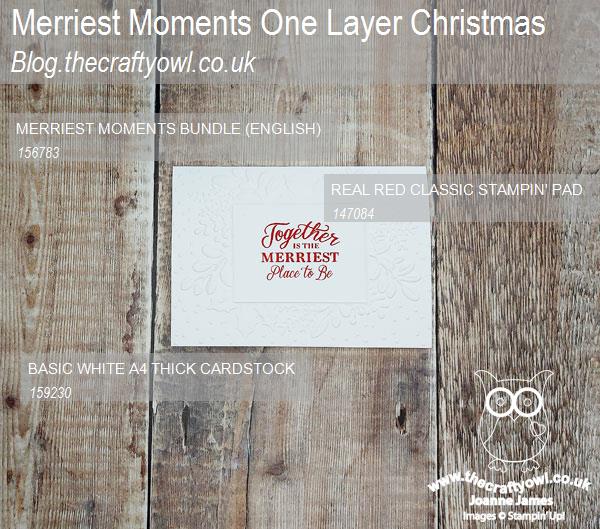
I embossed my thick basic white card base directly with the Merriest Frames Hybrid Embossing Folder and stamped my sentiment directly into the frame centre in Real Red. This embossing folder really is so pretty and whilst I did try a version adding some colour to the foliage, I didn't like it anywhere near as much as the 'naked' version - the detail of the embossing is stunning and I'm not sure that the photos do it justice:
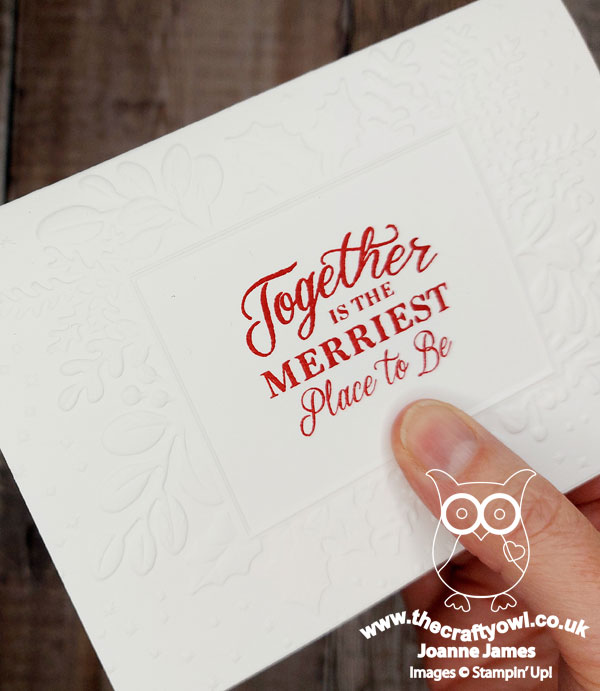
 

This really is one of the easiest cards to make and would be great both for cards that need to be sent overseas and weight is an issue for example, or you simply want an impressive design that can be produced in multiples really quickly.

For my second card, I wanted to use the same embossing folder to join this week's trend week challenge over at Just Us Girls where they are asking us to experiment with a technique called heat embossed embossing folders:

If you've never tried this technique before, you should definitely watch Jennifer McGuire's video on it where she gives a thorough overview and lots of examples - you can see her video here. I've never tried it before, but though the Merriest Frames Hybrid Embossing Folder would be a great one to experiment with. For this card, I went bold with a festive Real Red and metallic gold colour combination - take a look:
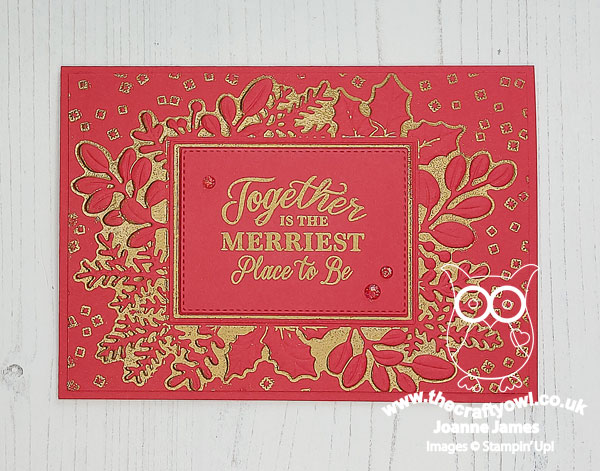
 

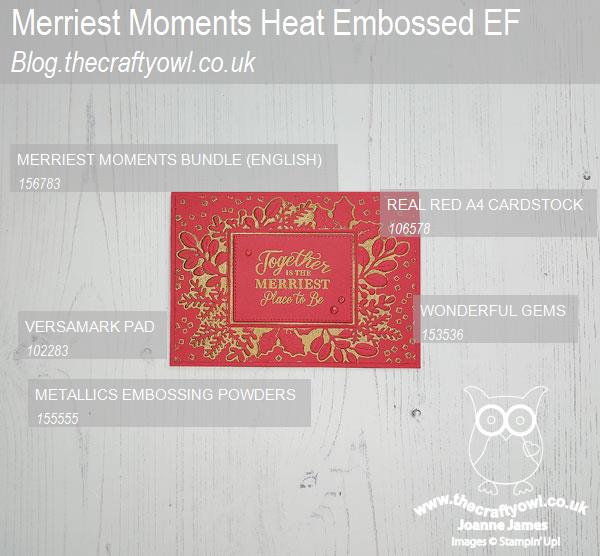
I decided to use the whole embossing folder and not cut out the foliage frame, as I wanted the background detail too. I added my red panel to a red card base, and also heat embossed my sentiment into gold onto a red stitched rectangle which I popped up on dimensionals in the centre of the frame, adding a trio of red sparkly faceted dots for good measure. Check out the detail that the heat embossing adds to the foliage:
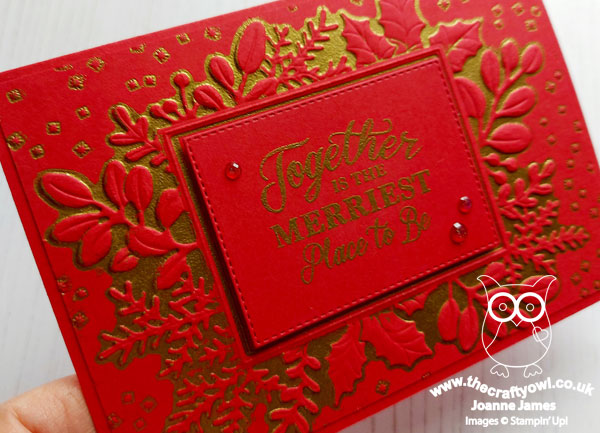
 

This was a really fun technique to try and I have to say I think the key to getting a good finish is to use a traditional rubber brayer to ink the flat side of your embossing folder with the Versamark - this way you don't get it into areas where you don't want to see the heat embossed detail and it picks out the surrounding space easily. This was my first attempt and will definitely be experimenting with other versions (and embossing folders!) If this technique is something that interests you, you should definitely check out the Just Us Girls DT samples and the gallery, where you will also see another sample using this embossing folder made by one of my lovely class attendees, Deborah Wheeler - how great that we were both inspired following my class!

I was asked by one of my customers last week, "If you could only choose one new bundle this Christmas, which one would it be?" This was a question that required much thought before answering, not least because I have never been known to buy just one stamp set and the beauty of being a Stampin' Up! demonstrator is that I acquire lots and lots of stamp sets cheaply or even for free! I decided that if I was only buying one bundle, it would have to be something that was versatile; I would want to be able to do lots of things with it and not get bored due to a lack of creative opportunities. The answer I gave to that customer? The Merriest Moments Bundle - it absolutely delivers on all fronts!

Here is the visual summary of the key products used on today's projects for you to pin for easy reference:


You can see all of my 'How To' summaries on my 'How To - Tips and Techniques' Pinterest board in case you've missed any. 

Enjoy your day and I'll be back tomorrow with another project. Until then, happy stampin'!


Stampin' Up! Supplies Used:

Table built using Product Table Builder by The Crafty Owl - Independent Stampin' Up! Demonstrator.

Penguins Playmates Christmas Card

by Joanne James23. September 2021 11:25

Today I'm sneaking in a card that I should have shared yesterday but got to the end of my day and was simply too tired to blog! Check out this cute card I made inspired by this week's theme over at TGIF Challenges:


So many lovely free items available during the current Sale-A-Bration promotion and I chose one of my favourites for my card  - take a look:


Here's the low-down on today's card: 

I have lots of little characters from the Penguin Playmates designer series paper - free with a £45 purchase - that I fussy cut whilst sat watching TV one evening, so I wanted to use some of them on my card today. I added a panel of stripes, also from the paper set, and a sentiment and strategically placed my animals and snowman around it:

The best bit? A number of these characters are incomplete and were cut from the edge of the paper; you should never throw these away though as designs like this one, where they peek around the sentiment panel are the perfect way to use them without anyone being any the wiser. Well, obviously you all know because I told you, but you get where I'm coming from, right?! Here is the visual summary of the key products used on today's project for you to pin for easy reference:


You can see all of my 'How To' summaries on my 'How To - Tips and Techniques' Pinterest board in case you've missed any. 

Enjoy your day and I'll be back later with another project, this time for our new challenge over at TicTacToe. Until then, happy stampin'!


Stampin' Up! Supplies Used:

Table built using Product Table Builder by The Crafty Owl - Independent Stampin' Up! Demonstrator.

Painted Christmas Clean and Simple Holly Card

by Joanne James20. September 2021 15:30

Another Monday, another week! Today I'm sharing a couple of cards that I made using this week's Freshly Made Sketches layout that I'm also linking up over at Addicted to CAS where the codeword is 'leaf':


This week's FMS sketch is courtesy of Cecile Ribon. If you are not a regular follower of Freshly Made Sketches, you should make a point of checking out her cards; I am in awe of her beautifully clean, elegant designs! I didn't get a chance to make a card to play along until today, but couldn't resist the opportunity to channel my 'inner Cecile' and have a go - take a look at what I came up with:


Here's the low-down on today's card:

Painted Christmas - I decided to use designer paper for the trio of squares on the sketch and chose a selection of soft watercoloured patterns from the painted Christmas papers. I went mostly with patterns in greens and white with small designs, with one square that had red in too, which I picked up in my simple 'Joy' sentiment from the 'Merriest moments' stamp set. These papers are so pretty but not too overpowering - perfect in small amount for a clean and simple card.

White Holly - I chose to accent my card with a sprig of diecut holly in white; this was a deliberate move, albeit an unusual one for me. I used the (retired) Sweetest Borders Dies as I wanted to have something that was the right size with a little diecut detail, but there are plenty of current dies that could be adapted to achieve the same effect:

I was aiming for a single leaf for my Addicted to CAS entry, but because I used holly ended up with two; is it just me, but do you ever see holly leaves in ones? I only ever place them in pairs!

Finishing Touches - I added a trio of clear faceted gems and a silver twine bow to my white foliage for some simple finishing touches, along with a simple sentiment on the inside:


I liked this card and sketch so much, I made a second one too, this one with the centre square being the uppermost and popped up on dimensionals, rather than overlapped as per Cecile's original sketch:


I chose a couple of other prints too, with a little more pale green in the print pattern:


So what do you think? I love both of these cards and loved trying to channel my 'inner Cecile' to create my FMS entry this week!

Here is the visual summary of the key products used on today's project for you to pin for easy reference:


You can see all of my 'How To' summaries on my 'How To - Tips and Techniques' Pinterest board in case you've missed any. 

My day has been a topsy-turvy one, with plans upended and rejigged due to changes in school activities such that the restful day of crafting I had planned didn't quite materialise. No matter though - sometimes you have to roll with it and tomorrow may bring less upheaval; here's hoping! Enjoy the rest of your day and I'll be back tomorrow with another project. Until then, happy stampin'!

Stampin' Up! Supplies Used:

Table built using Product Table Builder by The Crafty Owl - Independent Stampin' Up! Demonstrator.

Merriest Moments Black, White and Blue Christmas Card

by Joanne James11. August 2021 08:00

I so enjoyed making the card I shared with you on Sunday, that I decided to make another card using the Merriest Moments bundle for the challenge over at Just Add Ink, this time inspired by the modern colour palette over at TGIF Challenges


I just loved that colour palette and thought it would work well for a modern Christmas card. I also changed the orientation for today's card - take a look:


Here's the low-down on today's card:

A chalkboard style sentiment, this time surrounded with a white frame cut from the Snowy White Velvet sheets - these are amazing! I hope you can see some of the gorgeous embossed detailing on the velvet below:


It's so pretty in real life! I used some Pattern Party patterned paper for my background, and centred my Coastal-Cabana stamped poinsettias with some of my favourite black matte dots too.


A few loops of Coastal Cabana (retired) sheer ribbon for an added pop of blue complete my card, with a little extra stamping on the inside:


Before you think I'm completely mad choosing to feature these traditionally red or cream flowers in bright blue, a quick internet search showed that blue poinsettias are actually a thing - who knew?! I absolutely love this card - I'm definitely going to make a few more in this colourway.

Here is the visual summary of the key products used on today's project for you to pin for easy reference:


You can see all of my 'How To' summaries on my 'How To - Tips and Techniques' Pinterest board in case you've missed any. 

Enjoy your day; today is the youngest of the James Juniors 14th birthday and we have a fun day of activities planned, all to be finished off with an Oreo cookie ice cream cake! I'll hopefully be back tomorrow with another project. Until then, happy stampin'!


Stampin' Up! Supplies Used:

Table built using Product Table Builder by The Crafty Owl - Independent Stampin' Up! Demonstrator.

Merriest Moments Traditional Christmas Card PP553

by Joanne James8. August 2021 08:00

Today it's Sunday and time for this week's new challenge over at The Paper Players! It's the turn of the fabulous Claire to host this week and she has a colour challenge for you to work with:


These colours immediately made me think of florals, then Christmas and since I had just taken delivery of some new goodies that ticked both boxes I couldn't wait to try them out - take a look:


Here's the low-down on today's card:

Merriest Moments - Merriest Moments, like the Art in Bloom bundle in the annual catalogue, is a 3 in 1 bundle comprising a stamp set, dies and a hybrid embossing folder that enables you to get beautifully textured die-cut images in seconds.

Perfect for the challenge over at Just Add Ink this week, where they are asking us to 'use a frame' on our cards, the Merriest Moments hybrid embossing folder adds a beautifully textured frame, choc full of festive foliage. I embossed my card base, then embossed and cut my frame and I added some sponged white kraft ink to give it some highlighting:


I added a sentiment panel and a trio of red and yellow Christmas poinsettias to accent it. I also stamped another flower and a sentiment inside my card to finish:


This bundle has everything you need to make your Christmas cards in one go - just add your colours and create! This bundle will feature in my class on October 11th so if it appeals to you, then do drop me a line to be added to class list. Meanwhile, I can't wait to create more cards with this bundle!

Here is the visual summary of the key products used on today's project for you to pin for easy reference:


You can see all of my Product and 'How To' summaries on my 'How To - Tips and Techniques' Pinterest board in case you've missed any. 

Before you reach for your ink and papers, check out what our amazing team has created to inspire you this week:

Here's a quick recap of our challenge rules:
 
1.  Create a new paper project
2.  Upload your creation to your blog with a link back to us and provide a direct link to the post featuring your challenge submission.
3.  Please link your card to no more than four challenges, TOTAL.
4.  Have FUN!

You can see all of my 'How To' summaries on my 'How To - Tips and Techniques' Pinterest board in case you've missed any. 

Enjoy your day; I am looking forward to a catch-up day today, since I've been out of action decorating for the last few days. I'm hoping to squeeze in a little crafting too so that I can be back tomorrow with another project. Until then, happy stampin'!


Stampin' Up! Supplies Used: 

Table built using Product Table Builder by The Crafty Owl - Independent Stampin' Up! Demonstrator.
 

Mini Catalogue

BROWSE THE CATALOGUE

The mini catalogue is now live! Read and download your copy here.

Shop Online

Access my online shop 24 x 7, 365 days of the year:

Current March hostess code:

S9F2XJJW

Shop Online

Join My Team

It's always a great time to join Stampin’ Up! New team members can get £130 worth of products for only £99 + free business supplies + free shipping + all the fun being a part of Stampin’ Up! Stampin' Up! has something for everyone: join my growing team and benefit from my support to enjoy Stampin' Up! however you choose.

If you're interested, call me for a chat to understand how I can help you realise your goals. Alternatively, if you have already decided to sign up and you just can't wait, please click here for the link to the online form where you can sign up and order your starter kit right away! 

Latest Kit!

Stampin Cut and Emboss

The Rock Legend Kit has all you need to make 8 cards with coordinating envelopes. Along with the new Panda Friends Kit, both are available from January 4th for just £14 each - get yours here!

2023-24 Annual Catalogue

BROWSE THE CATALOGUE

Click on the catalogue for a full list of current SU! supplies - if you would like to order any of the items featured, please drop me a line at [email protected] or give me a call on 07773 421446 - I'd be happy to help.

New Online Exclusives

There will be new products available exclusively in the online store from 5 March - check them out here.

About Me

Hi I'm Joanne and live in Northampton and when I'm not looking after my husband and two beautiful children, am an avid crafter with a passion for all things Stampin' Up!

I must confess that I have never been a big rubber stamper - until I discovered Stampin' Up! that is. I love the fact that I can get such great results with co-ordinating stamps, inks, papers and punches - the possibilities are endless! Join me on my stamping journey as I share the things I love and be inspired to create amazing things yourself!

Follow Me

Monthly Newsletter

Box Builder

Click the button above to use Box Buster to create your custom box design using the Envelope Punch Board!

Kits Collection Now Available!

Stampin Cut and Emboss

The new Kits Collection from Stampin' Up! is now available!

Click here to see the current kits available and order yours online today.

I Design For


Stampin' Up Stuff

This is my personal blog and is not endorsed by Stampin’ Up! I hope you find it a plentiful source of ideas and personal inspiration but please don't copy my designs for contest submission or use for classes, publication or sale without express permission.