by Joanne James9. June 2024 08:00
Today it's Sunday and time for this week's new challenge over at The Paper Players! It's my turn to host this week and I have a pretty colour challenge for us to work with:


When I chose these colours, I didn't have anything in particular in mind - I just love the combination of blue and yellow. That said, when it came down to it I had no idea how to use them - go figure! After playing around with a few ideas, I finally settled on some slightly unconventionally coloured florals using the Country Flowers bundle. I loved Amy's sketch over at Freshly Made Sketches this week so I used that for my layout and set to work. This is what I came up with:

Here's the low-down on today's card:
Eyelet Embossing - I decided to use a Lemon Lolly card base and embossed the whole of the card front using the new Eyelet 3D embossing folder. I love the design of this folder and I love the texture and detail it adds to a project.
Countryside Inn - I used a small panel of Countryside Inn designer series paper in Night of Navy for one of the rectangle elements of the sketch. Did you realise that the Countryside Inn paper is still available? It's one of a few that carried over from last year's annual catalogue. The pattern is subtle and doesn't look out of place with the embossed background detail.
Country Flowers - The focal point for today's card is my bucket of flowers from the 'Country Flowers' stamp set. I used the three challenge colours for my unconventional floral bouquet, along with some additional diecut white leaves and flowers, and used Smoky Slate as my fourth colour for my metal bucket that they are standing in - check out the detail below:

I finished my card with a sentiment from the same set, wrapped with a little Boho Blue thread pulled from a ribbon to anchor it.
The Country Flowers bundle is one of those that is discounted by a further 10% until the end of June - that's in addition to the usual 10% bundle discount, so a whopping 20% off. There's never been a better time to add a bundle to your shopping basket!
Here is the visual summary of the key products used on today's project for you to pin for easy reference:

You can see all of my Product and 'How To' summaries on my 'How To - Tips and Techniques' Pinterest board in case you've missed any.
Before you reach for your ink and papers, check out what our amazing team has created to inspire you this week:
The Paper Players Design Team
Here's a quick recap of our challenge rules:
1. Create a new paper project
2. Upload your creation to your blog with a link back to us and provide a direct link to the post featuring your challenge submission.
3. Please link your card to no more than four challenges, TOTAL.
4. Have FUN!
Enjoy your day; I'll be back later this week with another project. Until then, happy stampin'!
Stampin' Up! Supplies Used:

754c15a3-5bb9-4b76-b4d8-4bd6cae8dc3a|5|3.0|96d5b379-7e1d-4dac-a6ba-1e50db561b04
Tags: Shop Stampin' Up! Online, Stamping Shop Stampin' Up online, Shop online, Stampin' Up, Stampin' Up Card ideas, Stampin' Up Supplies, Stampin' Up Card, The Paper Players, Country Flowers, Eyelet 3D Embossing Folder, Countryside Inn, Blends
Cards | Promotions | Shop Online | Shop Stampin' Up! Online | Stamping
by Joanne James1. March 2024 13:00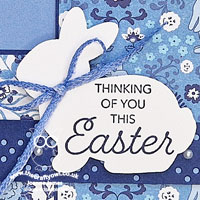
It's the 1st of March: Sale-A-Bration is over for another year and to any fellow Welsh readers out there - Happy St David's Day! No daffodils here though; today I'm sharing my design team card for our new challenge over at As you See It where it's time for a seasonal theme challenge chosen by me:
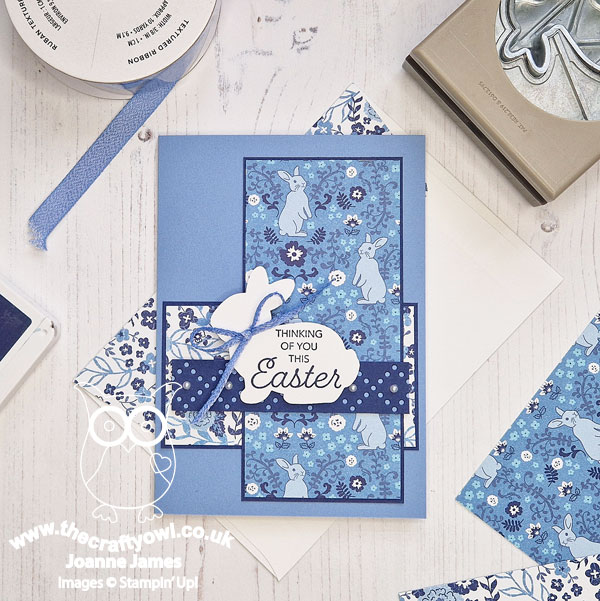
I thought Easter would be a good theme for our challenge this week given that it's at the end of this month, although it did mean I had to get creative as I haven't purchased any new Easter sets and I don't have the Easter Bunny set in the annual catalogue either. Never fear though - I got creative! This is what I came up with:
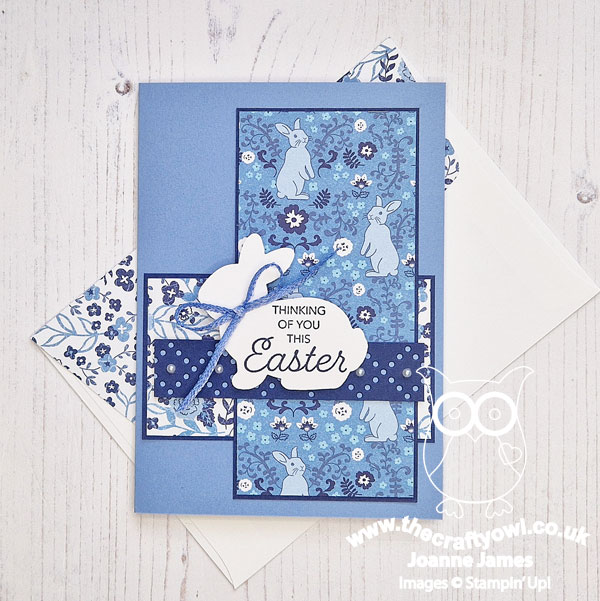
Here's the low-down on today's card:
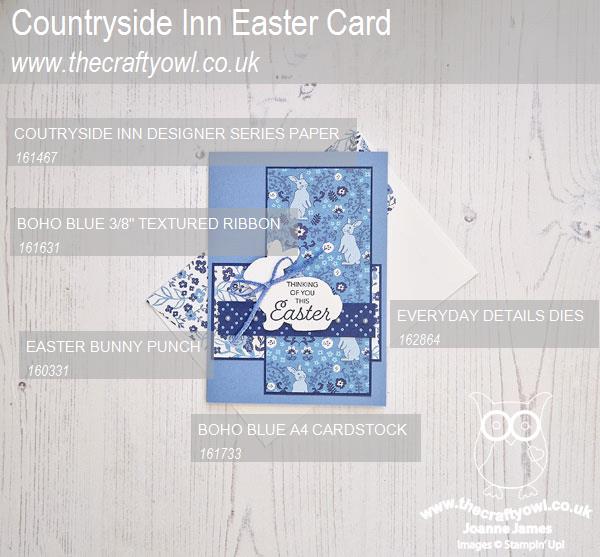
Countryside Inn - I noticed that one of the papers in the Countryside Inn pack has a rabbit in the pattern that I thought would make a sweet background for an Easter card and this set the tone for my whole card. I used a Boho Blue card base and balanced it with another of the patterns in the pack.
Easter Bunny - I used a simple white rabbit punched with the Easter Bunny Punch as my focal point and stamped my greeting onto it directly - for those of you that picked up the 'Heartfelt Hellos' stamp set during Sale-A-Bration, this is where this sentiment comes from. A trimmed ribbon bow was all the decoration my rabbit needed:

Everyday Details - You may recognise the layout of my card: it's this week's Paper Players layout that I used for my card on Sunday. The rabbit is in place of the hot air balloon, and on today's card instead of a row of clouds, I created a layered border using one of the Everyday Details Dies, adding pearls to the diamond centres for a little added detail.
I'm pleased with how my card finished up; it's also a great way to show how the same layout can be used in different ways.
Here is the visual summary of the key products used on today's project for you to pin for easy reference:
You can see all of my 'How To' summaries on my 'How To - Tips and Techniques' Pinterest board in case you've missed any.
Here's a summary of our challenge rules:
- Create any card, scrapbooking page, 3D project or packaging project that fits the challenge.
- Please include the challenge graphic and link back to the challenge in your blog post. Turn off word verification so we can leave you lots of lovely comments. Make sure you link the post not the whole blog to the Linky. Use #AYSIXXX when uploading to a public gallery.
- If you’re unsure about ‘the rules’, check the details under the Challenge Guidelines tab on the As You See It Challenge homepage.
We look forward to seeing your creations in the AYSI gallery.
Enjoy your day; I am taking a well-earned break today following my final trips to both my local charity shop and waste tip respectively, which signify the end of my loft clearance project this week. Hopefully I will make it back into my craft room and I'll have something to come back and share with you tomorrow. Until then, happy stampin'!
bebca4da-1569-4d98-bc04-58fa7abede1c|0|.0|96d5b379-7e1d-4dac-a6ba-1e50db561b04
Tags: Stampin' Up, Stampin' Up Card, Stampin' Up Card ideas, Stampin' Up Supplies, Shop online, Shop Stampin' Up online, Shop Stampin' Up! Online, As You See It Challenge, Easter, Easter Bunny Punch, Countryside Inn, Everyday Details, Heartfelt Hellos
Cards | Shop Online | Shop Stampin' Up! Online | Stamping
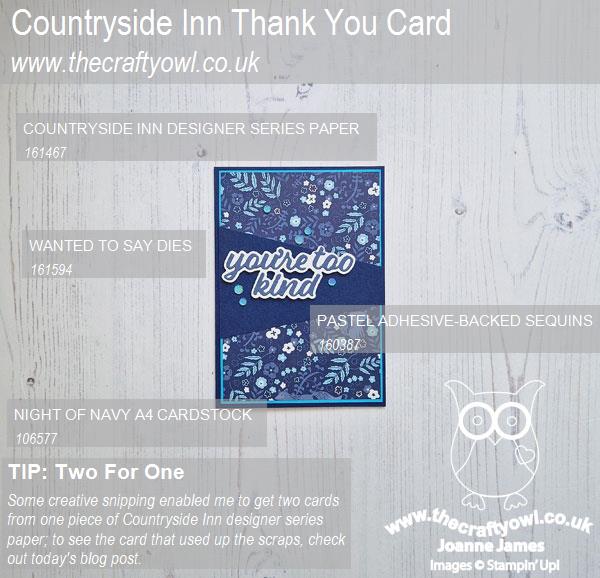
by Joanne James26. June 2023 10:17
Today I'm sharing two cards, both inspired by Jen B's layout over at Freshly Made Sketches this week:


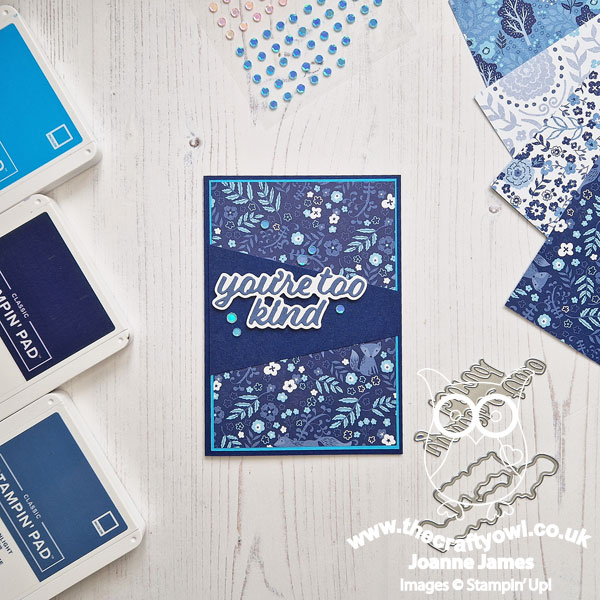
I thought this was the perfect layout to showcase a piece of the Countryside Inn designer series paper - the only question was which sheet to choose! Eventually I settled on a busy, dark blue floral - take a look:
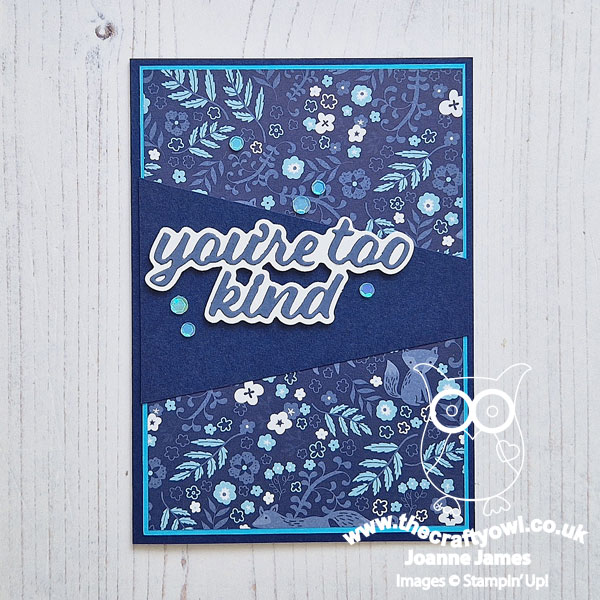
Here's the low-down on today's card:
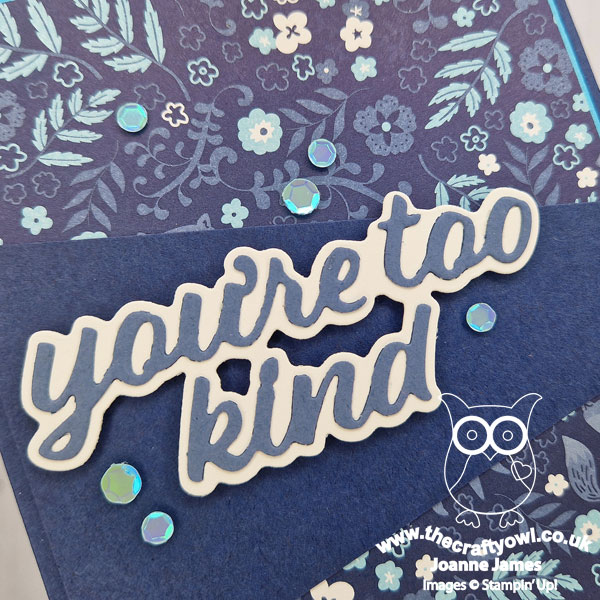
I kept my card really simple with some layering to pick up on the colours in the paper and I finished with a diecut sentiment that I haven't yet used from the Wanted To Say Dies and a sprinkle of self-adhesive sequins:
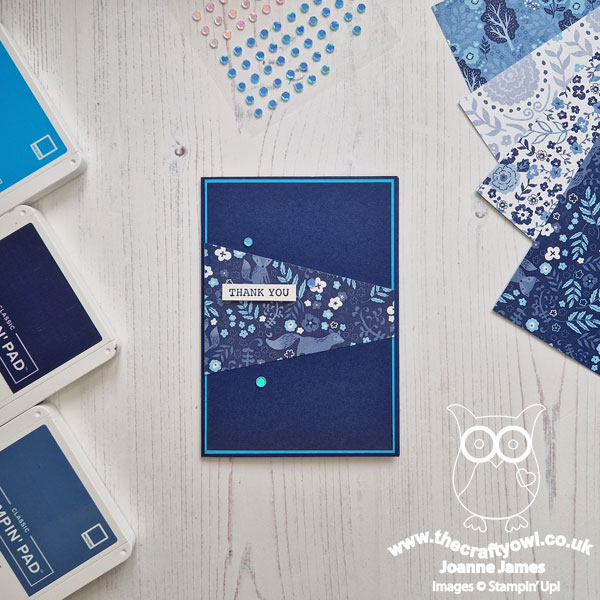
This style of sketch is great if you have a 'busy' paper design as it really allows it to shine. Before I constructed my card though, as I worked out where I wanted to place my diagonal lines, I decided I couldn't allow the central section to be 'hidden' under my navy panel, so I snipped it out. This gave me an odd-shaped scrap, but one that was perfect to create a second card by layering it onto a navy panel:
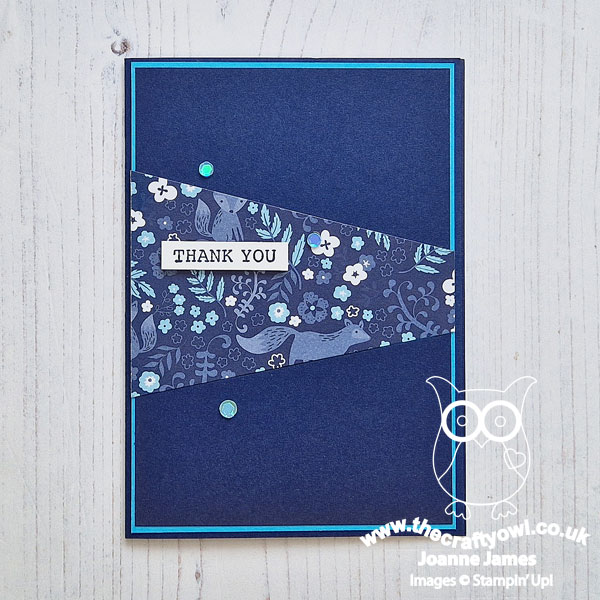
For my second card I added a simple stamped sentiment from the 'Gorgeously Made' stamp set that I stamped in Night of Navy on a scrap of Basic White cardstock and again added a few blue sequins to highlight the pretty blue in the paper:
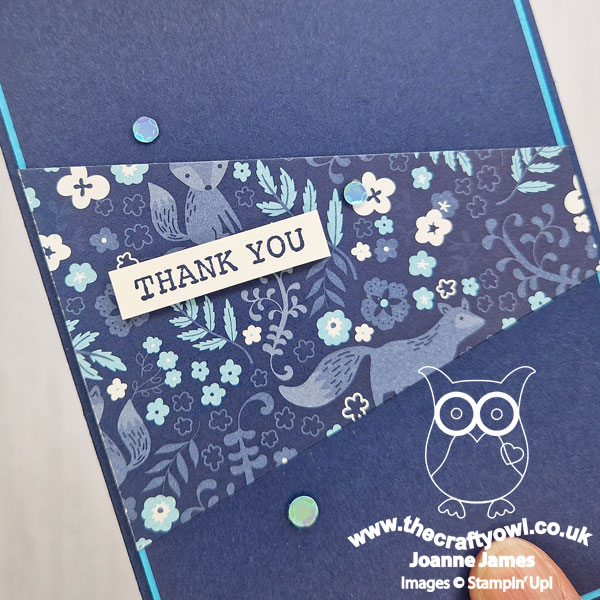
These sequins are supposed to be Balmy Blue but I think they look much more like Tahitian Tide, especially when paired with this paper. A great #simplestamping card - a couple of scraps and a few more sequins and an additional card, from just one piece of designer series paper. I'm linking my second post up over at Just Add Ink where they are looking for us to use two of scraps, strips and sequins; I went with scraps and sequins, although I had a strip of leftover DSP too which I added to the inside of my card - no need for wastage!
Here's one final photo of both cards together:
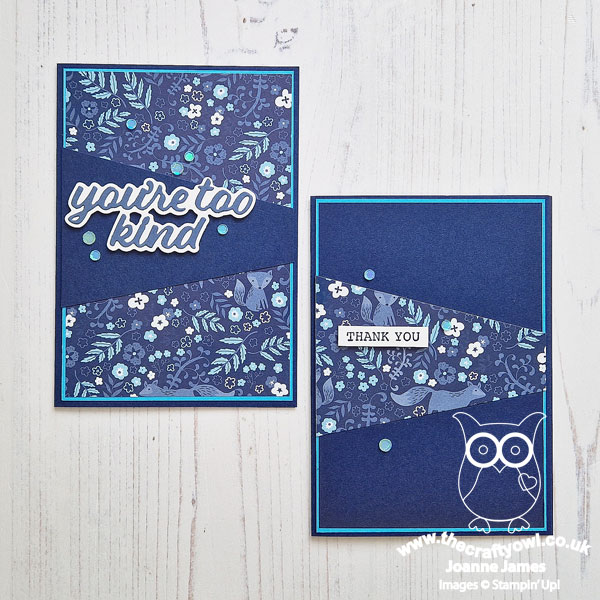
Which one do you prefer? I must say I like them both in their own way. That paper is so pretty - and all the better for being on offer this month as part of the designer series paper sale!
Here is the visual summary of the key products used on today's project for you to pin for easy reference:
You can see all of my 'How To' summaries on my 'How To - Tips and Techniques' Pinterest board in case you've missed any.
Enjoy your day. I'm spending mine doing some admin whilst the James Juniors delight in having a big tidying session, throwing away all of their notes and revision materials in a celebration of post-scholastic freedom! I'll be back tomorrow with another project. Until then, happy stampin'!
Stampin' Up! Supplies Used: