by Joanne James30. October 2015 09:00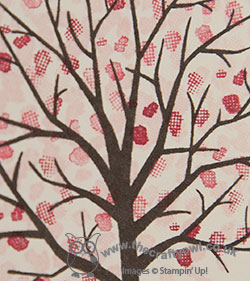
Today I have a change from Christmas cards; I wanted to use this week's sketch over at Less is More and I am also playing along with the challenge over at The Card Concept:

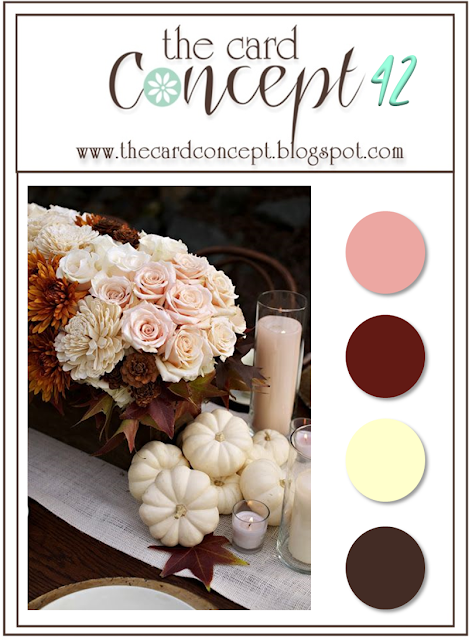
I decided that the colours over at The Card Concept would make a pretty thank you card so here's my card for today:
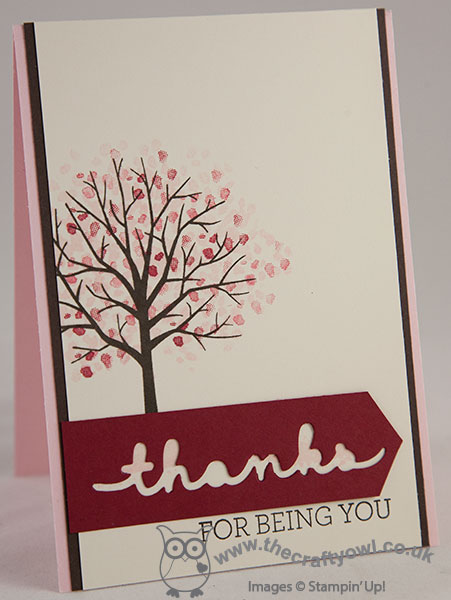
I've been seeing some wonderful autumnal cards made with the Sheltering Tree stamp set so I thought I would use it on this card, although I think my card looks more Spring-like than autumnal! I used a base of Pink Pirouette with a mat of Early Espresso, and stamped my tree off the edge of the panel in Early Espresso onto Very Vanilla cardstock. I overstamped the blossom in Pink Pirouette with a little Cherry Cobbler, then for my sentiment used a combination of my 'thanks' Greeting thinlits die for the negative die cut in my Cherry Cobbler banner, with 'For Being You' stamped in Early Espresso using the 'Crazy About You' stamp set.
Clean and simple with a hint of cherry blossom - a nice change from the autumnal, Halloween and Christmas cards of late!
Back tomorrow with another project; until then, happy stampin'!
Stampin' Up! Supplies Used:
by Joanne James29. October 2015 08:05
Today it's time for a new challenge over at Create With Connie and Mary and this week we have a great sketch challenge for you:
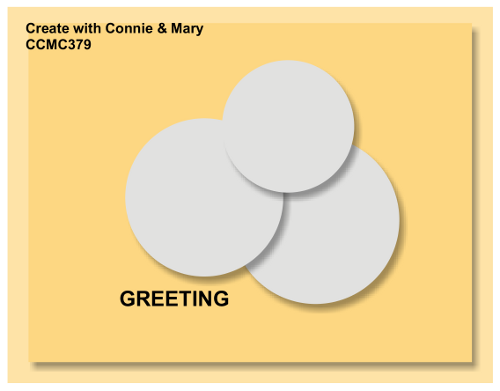
I saw this sketch layout and immediately thought 'snowflakes' so dug out my 'Festive Flurry' stamp set and some Lost Lagoon cardstock, a colour that I haven't used much this season. Here's my card:
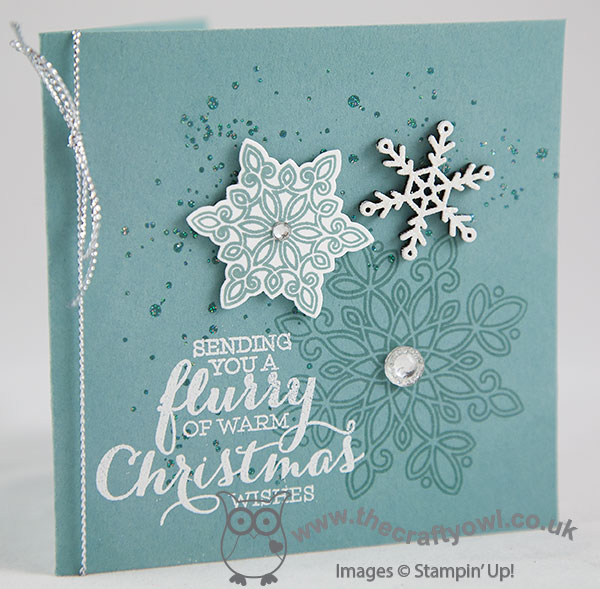
I decided to go with a square card today and worked directly onto my card base, as I wanted my snowflakes to add the layers. I stamped my first snowflake in Lost Lagoon directly onto my card base and centred it with an iced rhinestone , then stamped my sentiment in Versamark overlapping this and heat embossed it in white. Before adding my punched snowflakes, I also stamped the splatter stamp from Gorgeous Grunge in Versamark onto the background and heat embossed this in Iridescent Ice; it looks quite dark in the photo but is actually really sparkly. For the remaining circular elements of the sketch, I stamped one of the smaller snowflakes in Lost Lagoon on Whisper White, added a rhinestone to the centre and punched it out using the co-ordinating punch, then for the remaining circle I used one of the natural snowflake elements that I stamped in versamark and heat embossed in white, then stamped it again in versamark and heat embossed it in Iridescent Ice so that it is super-sparkly. lastly, I added some silver cord trim to the folded edge.
I just love this card - so very sparkly and Christmassy, all rolled into one! I love the combination of snowflakes to add a little flavour of collage to my card today.
Do visit the other Design Team members to see how they used this week's challenge sketch; there's lots of inspiration over on their blogs too!
Enjoy your day and I'll be back tomorrow with another project; until then, happy stampin'!
Stampin' Up! Supplies Used:
- Flurry Of Wishes Photopolymer Bundle
- Gorgeous Grunge Clear-Mount Stamp Set
- Snowflake Elements
- Iced Rhinestone Embellishments
- Silver Cording Trim
- Embossing Buddy
- Versamark Pad
- White Stampin' Emboss Powder
- Heat Tool (Uk)
- Iridescent Ice Stampin' Emboss Powder
- Whisper White A4 Cardstock
- Lost Lagoon Classic Stampin' Pad
- Lost Lagoon A4 Cardstock
by Joanne James28. October 2015 09:00
As promised today I have a card using another of the stamps in the lovely hostess set 'Six Sayings', this time using the Halloween stamp and this week's CAS(E) This Sketch for inspiration:

I'm also linking up with this week's challenge over at Addicted to CAS since my card has a definite 'spooky' feel to it today - take a look:
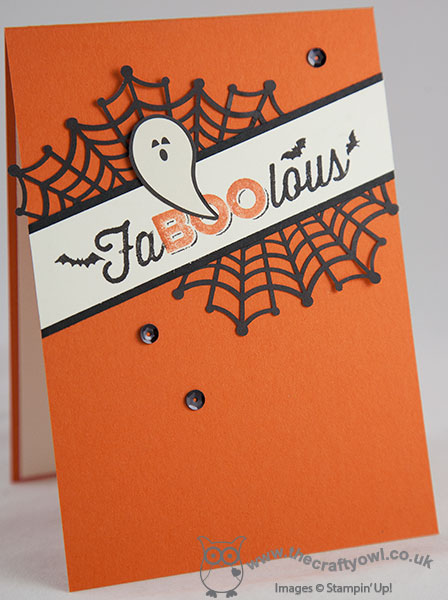
I used Tangelo Twist as my card base and stamped my sentiment onto Very Vanilla using my Stampin' Write markers, so that I could colour the main word in Basic Black and highlight the 'BOO' in Tangelo Twist. I cut out the sentiment on the diagonal and backed it with a mat of Basic Black, but before adhering to my card I added in a couple of pieces of Spider Web doilies top and bottom - I just love these for adding a spooky touch to projects and a pack seriously lasts for ages!! To add to the theme, I fussy cut one of the ghosts from a sheet of the Happy Hauntings Designer Series Paper and placed him as if he was floating out of the 'O' of the 'BOO' - cute and spooky at the same time, right?! A sprinkle of black sequins finishes my card.
Another winner from the 'Six Sayings' hostess set - don't forget this set will only be available until the seasonal catalogue end on 4th January, so if it's on your wishlist then contact me about hosting a party before it;s too late!
Back tomorrow with my card for this week's new challenge over at Create With Connie and Mary; until then, happy stampin!
Stampin' Up! Supplies Used:
by Joanne James28. October 2015 07:00It's Wednesday and you know what that means: a new collection of Wednesday Weekly Deals! These offers are valid for one week only. As always, a new collection of deals will be announced next Wednesday.
If you want to take advantage of any of the deals on offer, you can support my business by placing your order online by clicking here or using the link to my store on the right hand side of my blog page where it says 'Shop Online' or with me in person. Don't forget to add the new Hostess Code for October 9JGQEYWJ if your order is under £150 and be sure to make sure that you don't check the 'no contact' box if you'd like to be kept updated with the progress of you order and receive a little thank you in the post from me.
Here's a summary of this week's one-week only Wednesday deals - click on each item to go to the online store to purchase:
Three more great products on offer this week: In Colour Blossom Accents add a great touch to projects and whilst Sea Street is a favourite stamp set of mine, For All Things is the perfect set to create those Autumn and fall projects that we are all making at present. What better time to pick up a bargain?
Back later with today's creative project; until then, happy shopping!
by Joanne James27. October 2015 10:23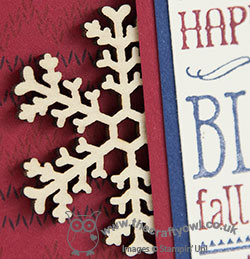
Good morning everyone - another nice early post from me for a change! I had a lovely day yesterday making Halloween treats with all the little ones at the fundraiser that I attended; today it's all about music, with piano lessons and some last minute revision for Rebecca's music theory exam next week, along with completion of our holiday homework music project (I live in hope!) Anyway, enough about my plans for the day - I have a Christmas card to share with you today, for the current sketch challenge over at Pals Paper Arts:

I haven't played along with this challenge for a while - for some reason their posts stopped showing up in my blog feed - although I've sorted it now and this week's sketch intrigued me and so I had to play along. I decided to use the Christmas stamp in the new seasonal hostess set called 'Six Sayings' for my card today:
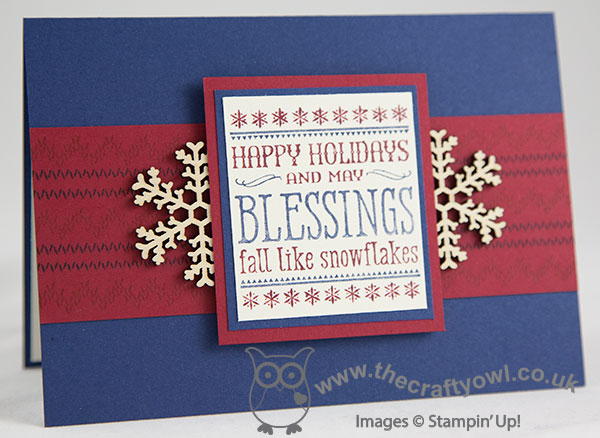
I love the saying on this cute Christmas stamp and I chose my colour scheme of Very Vanilla, Cherry Cobbler and Night of Navy as I thought it would work perfectly with my natural Snowflake Elements - yes, I actually left them in their undecorated glory today - no heat embossing or glitter in sight! I inked the stamp using my Stampin' Write Markers, alternating the lines for contrast, and for the Cherry Cobbler strip across the centre of my card, I also stamped it with the knit-pattern stamps from the current Project Life Seasonal Snapshot 2015 stamp set to add a sweater-feel to my card.
The wooden snowflake embellishments add a little bulk to this otherwise flat card, but at the same time this is an interesting way to use them and the use of the dark colours really allows them to stand out. As for the stamp set: 'Six Sayings' has a lovely selection of stamps that suit a variety of occasions and is exclusively available to be purchased with Stampin' Rewards to party hostesses or individual customers who place an order of £150 or more. There is still time to take advantage of the current promotion to earn an extra 3% of Stampin' Rewards on qualifying party sales before 9th November, so if this is something of interest to you, please do get in touch with me for more information.
That's all from me today; back tomorrow with news of this week's Wednesday deals and a little Halloween fun for you using another of the stamps in this lovely hostess set. Until then, happy stampin'!
Stampin' Up! Supplies Used:
baf61450-ba79-45bb-afe0-72b053d05d0e|0|.0|96d5b379-7e1d-4dac-a6ba-1e50db561b04
Tags: Host a Party, Shop Stampin' Up online, Shop online, Stampin' Up, Stampin' Up Card, Stampin' Up Card ideas, Stampin' Up Supplies, Six Sayings, Project Life Seasonal Snapshot 2015, Snowflake Elements, Christmas
Cards | Host a Party | hosting | Shop Online | Stamping
by Joanne James26. October 2015 07:30
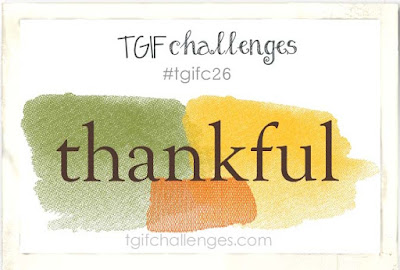
Today I have a card that I made with this week's Freshly Made Sketches challenge in mind and uses the colours over at Fab Friday and just so happens to suit the theme over at TGIF Challenges too:
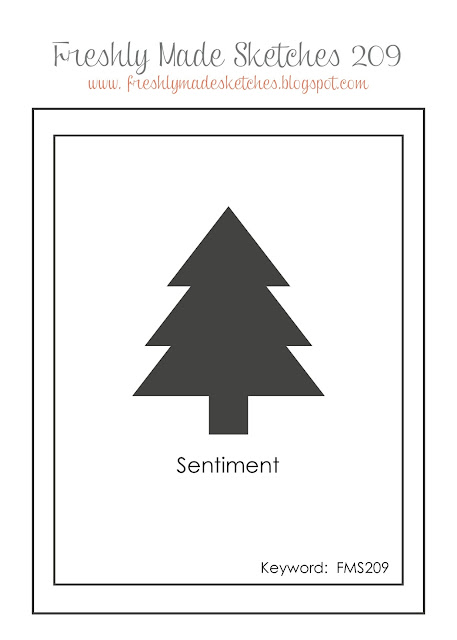

As soon as I saw the sketch I knew that I wanted to create something with my Lighthearted Leaves set and Leaflets Framelits and I wanted to create something bold with bright colours and contrast, so the colours were a perfect choice. Here's my card:
I used a base of extra thick Whisper White and a mat of Basic Black, then stamped my leaf in Memento Black onto a piece of Tangelo Twist, then coloured certain areas of the leaf in white with my chalk marker. I cut the co-ordinating leaf shape out of my Bermuda Bay layer then popped this on top using dimensionals. I used the Greetings Thinlits and my Big Shot for the 'thanks', cutting it out twice, once in white and once in black than layering them, one slightly offset against the other, beneath my leaf, with a candy dot for a pop of orange (it's Pumpkin Pie, but you can't tell it's not an exact match so far away from the base layer - I won;t tell if you won't ;-)!)
Rather simple, yet the layers and graphic nature of this card, combined with the bold, bright colours and one of my favourite stamp sets make this one of those cards that I would love to receive.
That's all from me today; I'm off to make some Halloween crafts at my friends coffee morning to raise funds for the Outspan School in Uganda. Back tomorrow with another project; until then, happy stampin'!
Stampin' Up! Supplies Used:
by Joanne James25. October 2015 11:00
It's Sunday and time for a new challenge over at The Paper Players! This week it is the turn of my wonderful friend LeAnne to host and she has my favourite type of challenge, a sketch, for us to work with this week:
This is a sketch with lots of possibilities; I eventually settled on a silver and white snowflake-themed card - here it is:
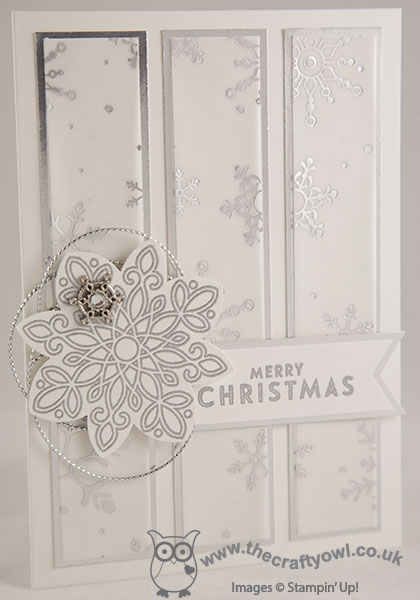
I used a piece of extra-thick Whisper White cardstock for my base and for the three vertical panels, used three pieces of the silver snowflake Holidays Fancy Foil vellum, adhered to three pieces of Whisper White on to three mats of silver foil cardstock. I stamped my sentiment from the 'Flurry of Wishes' stamp set in Versamark onto Whisper White and heat embossed it in silver and matted this onto a piece of silver foil too, having flagged both ends with my Triple Banner Punch. For the circle element of the sketch, I took a bit of a liberty and stamped the medium sized snowflake from 'Flurry of Wishes' in Versamark and heat embossed in silver and punched it out using the Flower Medallion Punch. I adhered this to my card using dimensionals, with some loops of silver cord trim underneath it. For the final element of the sketch, I added one of the Winter Wonderland Embellishments to the point of my snowflake.
I adore this card - it is so wonderfully sparkly and shimmery in real life, although it is so white it was quite difficult to photograph and the picture definitely doesn't do it justice! The Holidays Fancy Foil Vellum is just gorgeous and a little definitely goes a long way.
Before you reach for your ink and papers, check out what our amazing team has created to inspire you this week:
The Paper Players Design Team
Here's a quick recap of our challenge rules:
1. Create a new paper project
2. Upload your creation to your blog with a link back to us and provide a direct link to the post featuring your challenge submission.
3. Please link your card to no more than three challenges, TOTAL.
4. Have FUN!
I look forward to seeing how you interpret our sketch this week. The children are back this morning so I will be collecting Ben from basketball and then we are having Granny over for lunch. In the afternoon we are going to start looking at Rebecca's music assignment - half term homework, boo hoo!
Back tomorrow with another project; until then, happy stampin'!
Stampin' Up! Supplies Used:
44a7c9f7-00e2-4b4a-9ece-6d8aafa61fa0|0|.0|96d5b379-7e1d-4dac-a6ba-1e50db561b04
Tags: Stampin' Up, Stampin' Up Card, Stampin' Up Card ideas, Stampin' Up Supplies, The Paper Players, Shop online, Shop Stampin' Up online, Flurry of Wishes, Christmas, Winter Wonderland, Flower Medallion Punch
Cards | Shop Online | Stamping
by Joanne James24. October 2015 19:57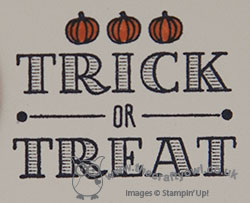
Yay, it's the weekend! I've had a child-free day today as the James juniors are at Grannies for a couple of days, which has meant a whole day of crafting and lots of things made and ready to share with you for the forthcoming week.
Today I have a fun Halloween card with some paper-pieced pumpkins, inspired by the inspiration over at The Challenge and Curtain Call, where the theme is patterned pumpkins, and The Friday Mashup where they are looking for projects with either a Halloween theme or featuring ribbon, or both (which I managed this week!):


I went with a sketch layout that you've seen me use previously on my reindeer Christmas card here as it was perfect for my paper-pieced pumpkins - take a look:
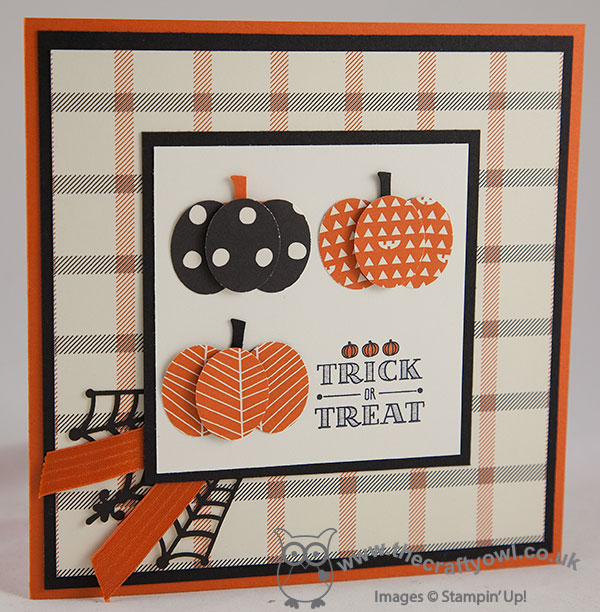
My card is something of a showcase of the Happy Haunting Designer Series Paper today: I created my base layer using the plaid pattern on a mat of Basic Black and a card base of Tangelo Twist, then for my centre square created a trio of paper-pieced pumpkins, each one featuring a different paper pattern, using my retired small oval punch and a stalk from a punched acorn top. My sentiment is from the 'A Little Something' set, stamped in Memento Black ink and the trio of little pumpkins coloured in with my tangelo Twist Stampin' Write marker. I adhered my central square to my card base using dimensionals, having first added a piece of spider's web doily and retired Tangelo Twist satin ribbon to my corner treatment.
The papers in the Happy Haunting pack are great and not just useful for Halloween - three of the four paper patterns I've used on today's card would work equally well on non-Halloween themed projects.
That's all from me today; back tomorrow with a stunning Christmas creation (even if I say so myself!) for our new challenge over at The Paper Players. Until then, happy stampin'!
Stampin' Up! Supplies Used:
128fb55e-ede3-4f5d-af6a-98164a92a001|0|.0|96d5b379-7e1d-4dac-a6ba-1e50db561b04
Tags: A Little Something, Happy Haunting, Acorn Builder Punch, oval punch, Halloween, Shop online, Shop Stampin' Up online, Stampin' Up, Stampin' Up Card, Stampin' Up Card ideas, Stampin' Up Supplies
Cards | Shop Online | Stamping
by Joanne James23. October 2015 21:24
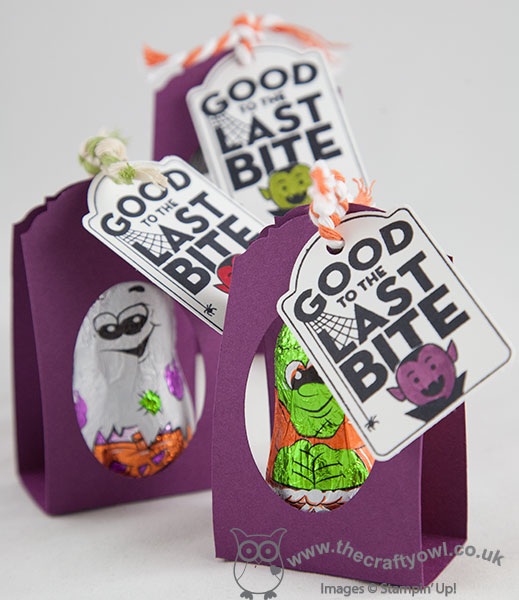
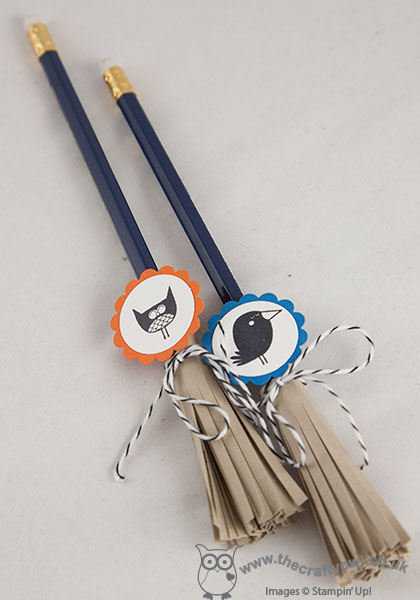
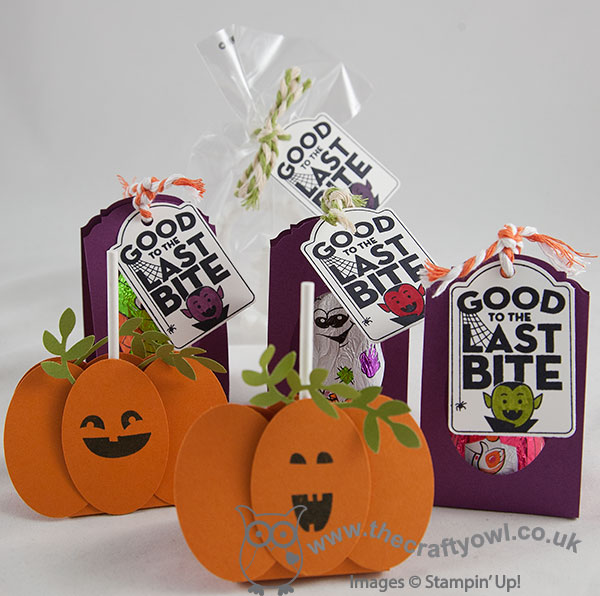
A quick post today to share some fun little Halloween treats that I've been preparing for a fundraiser that I'm attending next week. A friend of mine is raising funds for the Outspan School in Uganda where she sponsors a student and she invited me along to do a little crafting with the children and raise a few pennies.
We will be making a selection of sweet treats and fun Halloween favours, some of which I've shared with you before, such as these fun Halloween chocolate characters, with their Merry Everything Note Tag punched tags:
Some broomstick pencils, made with fringe scissor toppers:
Along with some pumpkin lollipops, made with the oval punch and some bird punch leaves:

A fun selection of treats that I'm sure we will have lots of fun making.
Back tomorrow with another project; until then, happy stampin'!
Stampin' Up! Supplies Used:
bc400e84-9d12-4654-a86b-91f284361968|0|.0|96d5b379-7e1d-4dac-a6ba-1e50db561b04
Tags: Halloween, On Point TIEF, Ornate Tag Topper Punch, Merry Everything, Note Tag Punch, bird builder punch, Fringe Scissors, Shop online, Shop Stampin' Up online, Stampin' Up, Stampin' Up Card, Stampin' Up Card ideas, Stampin' Up Supplies
Cards | Shop Online | Stamping
by Joanne James22. October 2015 08:05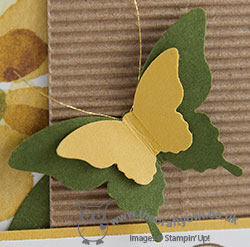
Today it's time for a new challenge over at Create With Connie and Mary and this week we have a great colour challenge for you:

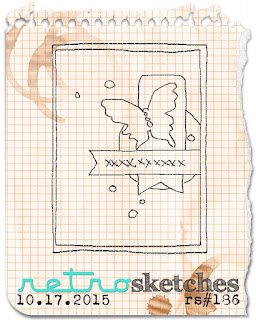
When I sat down to work on my card this week I realised that all of the challenge colours could be found in the lovely English Garden Designer Series Paper, so it seemed like the perfect opportunity to showcase it. I also used this week's sketch over at Retrosketches as the basis for my layout. Here's my card:
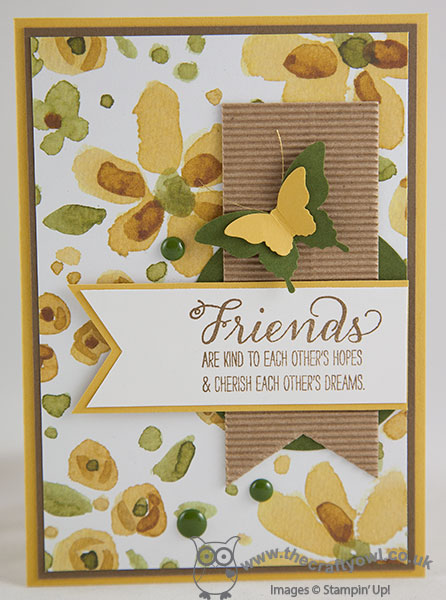
I used a base of Hello Honey with a mat of Soft Suede, then covered my cardfront with a piece of floral patterned paper featuring all of the colours. I added a 2" circle of Mossy Meadow and cut my banner from a piece of neutral kraft corrugated paper, to add texture and detail without detracting from the pattern. I stamped my sentiment from the 'Garden In Bloom' set in Soft Suede on Whisper White and matted this on a banner of Hello Honey, both of which I punched with my Triple Banner Punch. I considered using the butterfly from this set too as my embellishment, however it was a little too small to really stand out. I decided to go with a simple layered butterfly instead, punched using my Bitty Butterfly and Elegant Butterfly punches, with a couple of strands of gold metallic thread for antennae. To finish, I added a trio of Mossy Meadow enamel dots. This is one of those cards that really is 'all about the paper' - the English Garden papers are so very pretty though, they deserve to take centre stage.
Do visit the other Design Team members to see how they used this week's challenge colours; there's lots of inspiration over on their blogs too!
Enjoy your day and I'll be back tomorrow with another project; until then, happy stampin'!
Stampin' Up! Supplies Used:
- Garden In Bloom Photopolymer Stamp Set
- English Garden Designer Series Paper
- Soft Suede Classic Stampin' Pad
- Soft Suede A4 Cardstock
- Hello Honey A4 Cardstock
- Mossy Meadow A4 Cardstock
- Gold Metallic Thread
- 2" Circle Punch
- Banner Triple Punch
- Bitty Butterfly Punch
- Elegant Butterfly Punch
- Kraft And White Corrugated Paper
96b780a5-fc4c-4b52-aef9-56c4d0faa2c7|0|.0|96d5b379-7e1d-4dac-a6ba-1e50db561b04
Tags: Create With Connie And Mary, Stampin' Up, Stampin' Up Card, Stampin' Up Card ideas, Stampin' Up Supplies, English Garden, Garden In Bloom, Triple Banner Punch, Elegant Butterfly punch, circle punch, Bitty Butterfly Punch
Cards | Shop Online | Stamping