by Joanne James10. June 2019 20:30I had a lovely class this morning with a group of ladies featuring the Stitched Labels bundle and spent the rest of the day running errands in the rain - a typical day of British weather here in the UK today! Today I'm sharing a card that was inspired by the photo over at Fusion and the fun technique that the team over at Just Add Ink are playing with this week and uses the new sketch over at Fab Friday:
Those rainbow birds were sugary sweet an I wanted to see what I could create inspired by them with my 'Free As A Bird' set - take a look:
Here's the low-down on today's card:
The emboss resist technique was perfect for creating my rainbow panel. I stamped the birds in Versamark onto Whisper White cardstock then heat embossed them with clear embossing powder. I then sponged my rainbow using a selection of inks and finally rubbed the whole of the image with white craft ink to soften the colours slightly, before removing any excess ink and allowing the white cardstock beneath the clear embossed lines of the bird image to shine through. I added a little tag greeting and some Gorgeous Grape striped ribbon, along with a diecut border from the Flourish die set in the same colour.
I really like this pretty card; I love it when a challenge (or three!) pushes you beyond your comfort zone and makes you create something different.
Here is the visual summary of the key products used on today's project for you to pin for easy reference:
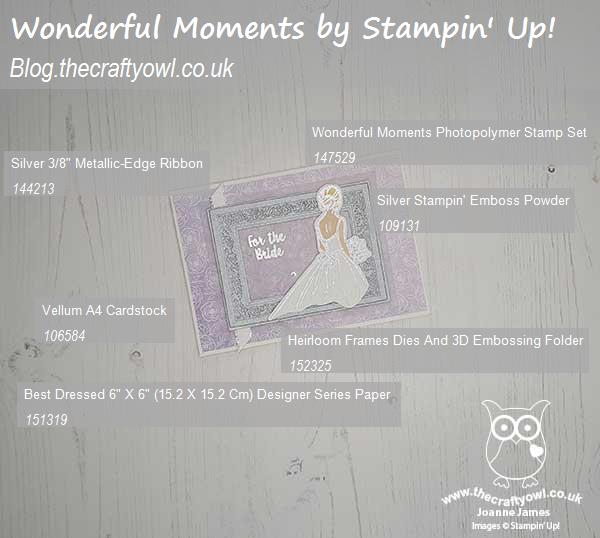
You can see all of my 'How To' summaries on my 'How To - Tips and Techniques' Pinterest board in case you've missed any.
Enjoy your evening and I'll be back tomorrow with another project. Until then, happy stampin'!
Stampin' Up! Supplies Used:
by Joanne James9. June 2019 09:00I've had a busy few days with the launch of the new Stampin' Up! catalogue and lots going on in the world of the James family and no time to blog, however today it's Sunday and time for this week's new challenge over at The Paper Playersso here I am! It's the turn of the fabulous Anne-Marie to host this week and she has a colour challenge for you to work with:
Anne Marie's palette choice includes three of my favourite colours and I couldn't wait to create with them this week! Using this week's Freshly Made Sketches layout I decide to go for a fresh and summery card featuring the gorgeous new stamp set from the Bird Ballad Suite - take a look:
Here's the low-down on today's card:
I stamped the birds from the 'Free As A Bird' stamp set and coloured them with my Stampin' Blends and added a sentiment from the same set to a stitched rectangle in Highland Heather. I also added a piece of Highland Heather gingham paper behind to add a hint of contrasting colour and some texture to the base using the Subtles embossing folder. I'm not sure if you can get purple birds with yellow tummies, but I guess when they are being coloured, anything goes!
Here is the visual summary of the key products used on today's project for you to pin for easy reference:
You can see all of my Product and 'How To' summaries on my 'How To - Tips and Techniques' Pinterest board in case you've missed any.
Before you reach for your ink and papers, check out what our amazing team has created to inspire you this week:
The Paper Players Design Team
Here's a quick recap of our challenge rules:
1. Create a new paper project
2. Upload your creation to your blog with a link back to us and provide a direct link to the post featuring your challenge submission.
3. Please link your card to no more than four challenges, TOTAL.
4. Have FUN!
You can see all of my 'How To' summaries on my 'How To - Tips and Techniques' Pinterest board in case you've missed any.
Enjoy your day; I will be spending mine getting some jobs done and preparing for the busy week ahead: tomorrow is the first of this month's card classes and the oldest of the James Juniors has 3 performances of Andrew Lloyd Webber's 'CATS' to perform in at school this week (she is playing the role of Gus, the Theatre Cat). We also have cricket, summer hockey, a visit from my parents, 3 birthdays and Father's Day this week amongst other things - I think it's going to be a busy one! I'll be back tomorrow with another project featuring these feathered friends, so do pop by and take a look. Until then, enjoy your day and happy stampin'!
Stampin' Up! Supplies Used:
by Joanne James4. June 2019 08:00The wait is over - it's June 4th and the new 2019-20 Stampin' Up! Annual Catalogue is here! I will be updating my links on the right hand side of my blog and you will find a permanent link to the new catalogue there, but for today you need look no further than the picture below which will take you straight to the new catalogue:
The new catalogue is fantastic, with so many great new products to choose from. I've sent paper copies to everyone who has shopped with me in the last 12 months; a digital copy of the new catalogue can be accessed via the image above and it will be permanently linked via my blog on the right hand side if you don’t have a paper copy and wish to browse. If you have your paper copy and just want to go straight to the shop to place your order, click here - ordering systems have now fully transitioned from the old stock items to the new so you are good to go! Also, remember to add the current hostess code for June TBSAWQXE if your order is less than £150 and ensure your preferences are set to 'contactable' to receive a thank you in the post from me.
There are a few items that due to unexpected shipping delays will not be immediately available and the main product I need to flag with you in the new in-color Purple Posy; there have been issues with the quality of the ink and so will be unavailable until these have been resolved. Rest assured I will post more information on this as soon as this comes online. There is plenty that is available though, so you can always add these items to your 'next time' list!
I'll be sharing my favourite items from the new catalogue in a blog post soon. Also, in addition to my Annual Catalogue Open House Drop-in Session tomorrow Wednesday 5th June from 10am-1pm, I have decided for the first time to hold an all-day online annual catalogue launch party on Saturday 22nd June on my Facebook Page. This is a great opportunity for you to see some of the products, take advantage of my BOGOF sale of retired stamp sets, and have some fun even if you don't love in or around Northampton! RSVPs to my online event will be required as it will be held in a closed group so if you are interested and would like access then do get in touch!
I also have a number of classes lined up in coming months featuring products from the new catalogue - the first of which are detailed below:
- 20th June - Bird Ballad Suite
- 8th July -Daisy Lane Bundle
Full details for these classes can be found on my Facebook Events Page or alternatively under the 'Events/classes' tab on my website.
That's a lot of information for one post; if I were you I would put the kettle on, put your feet up and get comfy and settle down with your new catalogue for a browse and start creating that all-important wish list!
Back tomorrow with a new project; until then, happy shopping!
by Joanne James2. June 2019 09:00Today it's Sunday and time for this week's new challenge over at The Paper Players! It's the turn of the fabulous Ann to host this week and she has a timely theme challenge for you to work with:
I went clean and simple this week so will also be playing along over at CASology where the cue card is 'Summer'. I used my Waterfront stamp set to create a beach scene reminiscent of my favourite Caribbean vacations - take a look:
Here's the low-down on today's card:
A Waterfront Beach - Waterfront is one of those sets that I don't feel I've used anywhere nearly enough and I'm so glad it's carrying over into the new annual catalogue. It's a great set for creating unique scenery and landscapes for all seasons so was perfect for my bright beach huts on the shore under the bright sun and shade of the palm trees. I decided to feature the 2018-20 In Colours on my card today; these are such a great co-ordinating set of brights they were just perfect for my card today.
A Nested Label - Did you spot the new label I used for the scene on my card? It's from the Stitched Nested Labels that co-ordinate with the Bird Ballad Suite in the upcoming new catalogue and they have such pretty stitched border detail. The whole label is symmetrical; I cut the point off mine on the right side as I wanted my label to align to the right of my card.
Making Waves - I added a little interest and texture to my Blueberry Bushel background by running it through the retiring Seaside embossing folder. I love this embossing folder and use it lots so will be sad to see it go.
And that's all there is to it, other than to say do you think if I wish hard enough I could jump into my card and find myself relaxing on that sunny beach too?!
Here is the visual summary of the key products used on today's project for you to pin for easy reference:
You can see all of my Product and 'How To' summaries on my 'How To - Tips and Techniques' Pinterest board in case you've missed any.
Before you reach for your ink and papers, check out what our amazing team has created to inspire you this week:
The Paper Players Design Team
Here's a quick recap of our challenge rules:
1. Create a new paper project
2. Upload your creation to your blog with a link back to us and provide a direct link to the post featuring your challenge submission.
3. Please link your card to no more than four challenges, TOTAL.
4. Have FUN!
You can see all of my 'How To' summaries on my 'How To - Tips and Techniques' Pinterest board in case you've missed any.
Enjoy your day; ... I'll be back tomorrow with another project. Until then, happy stampin'!
Stampin' Up! Supplies Used:
by Joanne James1. June 2019 07:00Happy weekend everyone! Today I'm sharing another of my Needlepoint Nook cards from a previous class that really showcases the co-ordinating designer series paper - take a look:
Here's the low-down on today's card:
Embroidered Paper - The Needlepoint Nook Suite is perfect for creating the look of handcrafted embroidery with much less effort and has stamps, papers, accessories and framelits that fit the theme. The papers in this suite are so pretty, they look almost as if they have been hand embroidered. I love the multi-coloured pattern I used on this card - so pretty!
Hand-Stitched Stamping - The floral elements in the Needle & Thread stamp set are distinctive stamps that have the almost photographic appearance of embroidered flowers. I used a combination of ink pads and Stampin' Write Markers to create a bright spray of flowers, adding in a few additional diecut pieces too.
A Stitch in Time - There's more stitching with the stitched border but my favourite is definitely the stitched sentiment label that conveniently fits the Pretty Label Punch.
Here is the visual summary of the key products used on today's project for you to pin for easy reference:
You can see all of my 'How To' summaries on my 'How To - Tips and Techniques' Pinterest board in case you've missed any.
Enjoy your day and I'll be back tomorrow with another project. Until then, happy stampin'!
Stampin' Up! Supplies Used:
f2c4b5f3-a2ee-4b1a-bafe-d76ae65642fc|0|.0|96d5b379-7e1d-4dac-a6ba-1e50db561b04
Tags: Shop Stampin' Up! Online, Stamping Shop Stampin' Up online, Shop online, Stampin' Up, Stampin' Up Card ideas, Stampin' Up Supplies, Stampin' Up Card, Needle and Thread, Needlepoint Elements Framelits, Needlepoint Nook, Pretty Label Punch
Cards | Classes | Shop Online | Shop Stampin' Up! Online | Stamping
by Joanne James30. May 2019 20:00This is today's second post; if you missed the notification about the discounts on retiring products that Stampin' Up! announced today please click here. Today I'm sharing a couple of cards from a class I held much earlier in the year featuring the Serene Garden bundle. I shared one of the other cards we made here in case you missed it. This bundle is retiring next week so I thought I ought to get around to sharing the other two! Both of these cards were a CASE (Copy and Share Everything or Copy and Selectively Edit, depending on your interpretation of the cards on page 166 of the annual catalogue. Here's the first one:
And here's the second one:
This is such a beautiful bundle; the Garden Scene Framelits allow for some fabulous layering, especially when paired with the Big Shot Embossing Mats - check out the emboss detail on the cards above. It's also a great set if you like to colour, as the second card illustrates.
Here are the visual summaries of the key products used on today's projects for you to pin for easy reference:
You can see all of my 'How To' summaries on my 'How To - Tips and Techniques' Pinterest board in case you've missed any.
Enjoy your evening and I'll be back tomorrow with another project. Until then, happy stampin'!
Stampin' Up! Supplies Used:
(if you need further information on any of the other elements used please leave a comment or email me directly):
by Joanne James30. May 2019 08:00I received some good news from Stampin' Up! HQ this morning and wanted to pop by to quickly share it with you: as we approach the end of our Last-Chance Products promotion, Stampin' Up! has announced that it has now identified some items that can be discounted by up to 25% - yay for a last-minute bargain!
Click here to see the list of discounted items from the Spring-Summer Catalogue.
Click here to see the list of discounted items from the 2018 Annual Catalogue.
The discount pricing will go into effect at 7:00 p.m. (UK) time this evening Thursday, 30 May. For anyone local to me, I will be putting through one last order which you are welcome to add to if you would like to save on P&P, but you need to message me by 8pm this evening.
Many thanks and happy bargain hunting!
by Joanne James29. May 2019 20:00I'm later posting today - it's been a busy day! I had a class last month featuring the Needlepoint Nook Suite and made a few additional cards featuring these products whilst everything was out on my desk that I've still to share. This suite is retiring with the new catalogue so time to get to it! One of the cards I made focuses on paper piercing (not to be mistaken with paper piecing!). The dies from the Needlepoint Elements Framelits that are just perfect for this - take a look:
Here's the low-down on today's card:
Paper Piercing - No need for a paper-piercing tool and stencil for this card: The detail of the largest of the Needlepoint Elements Framelits provides easy paper-piercing detail with one roll through the Big Shot.
A Stitch In Time - I decided to highlight some of the detail on the paper-pierced panel by adding some stitching to the design. I used some copper metallic thread and a needle from my sewing box to outline the main flower and add detail to the centre. When I started out, I had intended to stitch the whole design; the small portion I did achieve took a lot longer than I expected though, so in the end I decided to stop at the flower. I do like the effect; a project for another time, perhaps!
All About Copper - Navy, white and copper is one of my favourite metallic colour combinations. Today's card features a few different copper elements: a copper foil stitched border, copper embossed sentiment, copper metallic thread and a copper sequin to finish my flower. Most of these are carrying over, with the exception of the copper metallic thread - I will miss it!
Here is the visual summary of the key products used on today's project for you to pin for easy reference:
You can see all of my 'How To' summaries on my 'How To - Tips and Techniques' Pinterest board in case you've missed any.
Enjoy your evening and I'll be back tomorrow with another project. Until then, happy stampin'!
Stampin' Up! Supplies Used:
3fa5c983-3fd7-47ab-93e5-3db6a9f5c370|0|.0|96d5b379-7e1d-4dac-a6ba-1e50db561b04
Tags: Needle and Thread, Needlepoint Elements Framelits, Be Mine Stitched Framelits, Paper Piercing, Shop online, Shop Stampin' Up online, Shop Stampin' Up! Online, Stampin' Up Supplies, Stampin' Up Card ideas, Stampin' Up, Stampin' Up Card
Cards | Shop Online | Shop Stampin' Up! Online | Stamping
by Joanne James28. May 2019 08:00Today I'm sharing a card for the current challenge over at Fusion where they have a great sketch and fun photo inspiration of a hedgehog on a scooter:
Whilst I don't have any scooters, I do have a sweet hedgehog in my collection so I paired him with some retired Painted Seasons Designer Series Paper to create today's card - take a look:
Not much to say about today's card as it's a nice easy make with some layers and a horizontal masked sentiment to show off that pretty paper and sweet coloured hedgehog - a hedgehug to brighten someone's day!
Here is the visual summary of the key products used on today's project for you to pin for easy reference:
You can see all of my 'How To' summaries on my 'How To - Tips and Techniques' Pinterest board in case you've missed any.
The James Juniors are on half term this week so we will be hoping for sunshine and looking forward to a week away from the books and some outdoor fun, in addition to the obligatory trips to the dentists and hairdressers! Enjoy your day and I'll be back tomorrow with another project. Until then, happy stampin'!
Stampin' Up! Supplies Used:
by Joanne James27. May 2019 13:00Today is a two card day!You can see my earlier post here. I'm sharing another card using this week's sketch over at Freshly Made Sketches:
This sketch is definitely a 'keeper' - so many possibilities! I made another quick notelet card using some other retiring products - take a look:
Here's the low-down on today's card:
Farewell Delightfully Detailed - I used one of the Delightfully Detailed Notelets as the base for my card. It seemed almost a shame to cover up some of the beautiful watercoloured front with my piece of Mint Macaron, but I do love the soft washed tones that show through my circle window aperture (punched with my retired 2 1/2" circle punch). These notecards are useful for a standby quick card as the pretty base is ready prepared for you.
...and Delightfully Detailed - The Delightfully Detailed Notecards are designed to work with the Delightfully Detailed Designer Series Paper, a collection of pretty laser-cut sheets that can be cut up to fit your card fronts exactly. I had snipped one of the full sheet designs into smaller pieces to use on cardfronts and had some small pieces unused and these were perfect to place inside my window and also for a couple of leaves/buds to place behind my sentiment.
Petal Palette Wishes - To finish my card, I added a simple sentiment from the Petal Palette stamp set that was the perfect size and fit. Another great set that is heading into retirement with this catalogue end - time to snap it up this week whilst you still can!
Here is the visual summary of the key products used on today's project for you to pin for easy reference:
You can see all of my 'How To' summaries on my 'How To - Tips and Techniques' Pinterest board in case you've missed any.
Enjoy the rest of your day and I'll be back tomorrow with another project. Until then, happy stampin'!
Stampin' Up! Supplies Used: