It's Sunday and time for a new challenge over at The Paper Players! This week it is the turn of the lovely Sandy to host and she has a timely clean and simple theme for you to play along with:
For my card this week I was inspired to use the Sale-A-Bration set ''Sky is The Limit' to create my clean and simple Valentine's card - I was so keen to make a card with a red bi-plane! Here it is:

I used a base of Soft Sky and a piece of diagonal striped black and white paper from the neutrals paper stack for a mat, then took a piece of watercolour paper that I washed with my aqua painter and some Soft Sky and Pool Party inks for a hint of colour. Once my sky panel was thoroughly dry, I stamped the clouds and smoke trail in Versamark and heat embossed them in white, the stamped the sentiment and heat embossed that in black. I then went back to my clouds and smoke trail and used the effect I shared with you previously on this card here, where I filled in the space with Tombo, covered in White embossing powder and then heat embossed until the powder set and the glue bubbled. This effect not only works for snow as on my previous card but for clouds and smoke trails too!
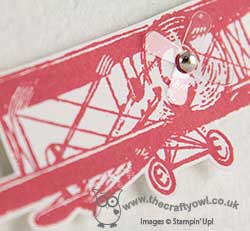
I also added a touch of Melon Mambo within the heart to make it stand out a little. Finally, I stamped my bi-plane in Real Red onto a piece of Whisper White cardstock and fussy cut it out, adding a small piece of window sheet cut using my flower builder punch (the stamen) and a silver mini-brad to accentuate the propeller, before popping it on a couple of dimensionals and adding to my card - here's a close up:
Isn't that fun? I hope you like today's card - this is a set with so many uses, not just Valentines. It's a limited time Sale-A-Bration offer and is only available until 15th February. Plenty of time to get it in order to make a love-themed card for a special person though, so don't forget to add it to your next £45 order for free!
I've edited today's post to include a little video tutorial that I filmed this afternoon that shows exactly how I created the effect I described above:
I hope you enjoyed that - I haven't made a video in ages but there have to be some advantages to waking up to snow on the ground - more time to craft!
Before you reach for your ink and papers, check out what our amazing team has created to inspire you this week:
The Paper Players Design Team
Here's a quick recap of our challenge rules:
1. Create a new paper project
2. Upload your creation to your blog with a link back to us and provide a direct link to the post featuring your challenge submission.
3. Please link your card to no more than four challenges, TOTAL.
4. Have FUN!
I look forward to seeing what you create with this week's theme. We have no hockey due to the freezing weather here in the UK and a frozen pitch; in fact, snow on the ground meant that snowball fights even won out over basketball today. As for me - the results of my endeavours are included above!!
Back tomorrow with another project; until then, happy stampin'!
Stampin' Up! Supplies Used: