Let's Whale-A-Brate!

by Joanne James15. June 2013 20:51

Today's the day - my beautiful princess turns eight years old. Where did the last year, or eight even, disappear? I can't believe how quick she's growing and changing into a (very!) young lady, but a young lady none the less. She may be another year older, but she is still my water baby and as always, there is a strong aquatic theme to our celebrations: a swimming pool birthday cake, pool party next week and in keeping with this, an 'Oh, Whale' birthday card with a difference:

I liked a similar card using this stamp set that Mary Fish had done using a Paper Pals sketch layout a while ago (you can see her card here) and knew that this layout would enable me to make the most of the patterned papers in the Sunshine and Sprinkles set, but I wanted a special sentiment for my card and this proved to be a challenge! There is a photo in the Spring-Summer Seasonal catalogue that shows a play on the word 'celebrate', where the '-ate' is replaced with a number 8 and I really liked this and wanted to incorporate something similar in my card. So armed with a couple of stamp sets, my Typeset Alphabet and my trusty stamp-a-ma-jig, I came up with 'Let's Whale-A-Br8'. Here's a close up of the detail on the flags:

Pretty cute, even if I say so myself! We really did have a great day; here's hoping the next 12 months don't fly by quite so quickly.

I'll be back tomorrow with my husband's Father's Day card, but will have some other birthday-related cards and invitations to share early next week. Until tomorrow, happy stampin'!


Stampin' Up Supplies:

Stamps: Oh Whale, Make a Wish

Cardstock: Whisper White, Melon Mambo, Marina Mist, Daffodil Delight, Pacific Point, Sunshine and Sprinkles Designer Series Paper

Ink/Stampin' Write Markers: Pacific Point

Tools: Oh Whale Clearlits, 1/16" Handheld Circle Punch, Scallop Edge Border Punch, Stamp-a-ma-jig, Itty Bitty Punches (flower)

Finishing Touches: Basics Pearls

Welcome to Your New Home

by Joanne James8. June 2013 18:55

The changeover in annual catalogues brings with it mixed feelings; excitement at the thought of lots of new stamp sets and accessories to play with, but it's also a time to say goodbye to some old ones. Today I'm sharing a 'Welcome to your new home' card that I made recently for my fellow crafty friend Issy recently when she moved house. The card uses the Hoop La La stamp set and the Comfort Café designer series papers:

This set appeals to me because it reminds me of my other hobby, cross stitch, and there are some lovely little images in this set, including a needle and embroidery hoop. I coloured the house image with markers in colours that coordinated with the Comfort Café paper, using my Stamp-a-ma-jig to get them perfectly aligned, then created a focal point by making a feature of the final house placing on a raised circle and adding a cute little heart from my trusty owl punch for good measure. This time I even remembered to decorate the envelope too - something I often intend to do, but often forget when I'm busy focusing on the card itself.

Back tomorrow with another project; until then, happy stampin'!


Stampin' Up Supplies:

Stamps: Hoop La La

Cardstock: Very Vanilla, Midnight Muse, Summer Starfruit, Cajun Craze, Comfort Café DSP

Ink/Stampin' Write Markers: Midnight Muse, Pool Party, Cajun Craze, Summer Starfruit

Tools: Stamp-a-ma-jig, 1 3/4" circle punch, Circles #2 Originals Die, Owl Punch


The Big 40 Mark Two - Post Friendly Version

by Joanne James28. May 2013 20:26

This evening I'm sat wrapped up against the elements, having taken my little ones to buy summer sandals today on another thoroughly wet day - I must be mad! Never mind, time to party on - as promised yesterday, I'm back today to share the second of my big 40 birthday cards this week, this time a post-friendly version:


I stayed with the same Patio Party background, but as I needed a design without buttons, I decided to make more of a feature of the number forty and cut it out of silver glimmer paper. I layered this with a circle and scallop circle and an alternative 'Happy Birthday' sentiment. So another take on the '40' theme.

Back tomorrow with another patio party card, but no numbers this time - until then, happy stampin'!


Stampin' Up Supplies:

Stamps: Sassy Salutations

Cardstock: Primrose Petals, Whisper White, Raspberry Ripple, Midnight Muse

Ink/Stampin' Write Markers: Midnight Muse

Tools: 1 3/4" Circle Punch, 2 3/8" Scallop Circle Punch, Large Scallop Edgelit, Typeset Alphabet Die

Finishing Touches: Silver Glimmer Paper

Giraffe Punch Art

by Joanne James24. May 2013 21:19

As promised, I'm back today with the last of the owl punch cards from this month's class. Our last card was another alternative use for this versatile punch; this time, to make a cute giraffe punch art card:


To make this card, the owl's body (minus his feet!) becomes the giraffe's head - clever, right?! We then used a variety of circle punches and the large oval punch to create the rest of him. The edges of the finished giraffe were sponged in So Saffron ink to add dimension and I placed him inside the card looking out, for added interest. The oval aperture was easy to make using an oval framelit and a few branches from the Bird Builder punch were added to give the giraffe something to munch on. I finished this card with embossed clouds and an 'Oh Hello' sentiment highlighted with a Cute Clip (love these!), but you could just as easily use a happy birthday greeting - I think this would make a lovely card for a little person.

I hope you like the finished card - there were a few interesting adaptations to this card by the ladies at my class: everything from hearts added to the sentiment banner to eyelashes on the giraffe. That's one of the things I love about teaching classes - whilst I scope out the original design, it can still be adapted or customised to make it individual to you. If you would like to attend my stamping classes, please do get in touch via [email protected] for more details. Next month's class is a One Sheet Wonder class using the Secret Garden stamp set and framelits. 

Back tomorrow with another project - until then, happy stampin'!


Stampin' Up Supplies:

Stamps: Oh Hello

Cardstock: Whisper White, Marina Mist, Pink Pirouette, So Saffron, Chocolate Chip, Basic Black, Certainly Celery

Ink/Stampin' Write Markers: Early Espresso

Tools: Owl Punch, Cloudy Day Textured Impressions Embossing Folder, 1" Circle Punch, 3/4" Circle Punch, Bird Builder Punch, Oval Framelits, Itty Bitty Shapes Punch (circle), Large Oval Punch

Finishing Touches: Cute Clip


Oh Baby Washing Line

by Joanne James23. May 2013 21:26

Busy day revolving around my little ones today with music recitals, class assemblies, ballet lessons and visiting friends for tea - I swear my two have a better social life than me! Anyway, finally sitting down to share another card from this month's class with you - today, a cute baby card, complete with washing line:

I used the lovely Twitterpated designer paper for the dresses and dungarees, as the largely pastel colours suit a new baby card. I must confess to using some now retired ribbon that was lurking at the back of my drawer to edge the dresses because the pleated edge was perfect for the dress edge. The dresses and dungarees are all made from the 'waistcoat' section of the owl punch, with a few nips and tucks here and there. My most favourite thing about this card is the mini-brad dungaree buttons - I love them!

I've added a pink 'oh baby' sentiment circle to this card, but in class we made two: one pink and one blue, so that they could be added at a later stage when the recipient was known; now that's what you call organised! Back tomorrow with my last class card - until then, happy stampin'!


Stampin' Up Supplies:

Stamps: Ciao Baby!

Cardstock: Whisper White, Old Olive, Island Indigo, Baja Breeze, Pink Pirouette, Twitterpated DSP

Ink/Stampin' Write Markers: Baja Breeze, Pink Pirouette

Tools: Owl Punch, Cloudy Day Textured Impressions Embossing Folder, Simply Scored Borders Scoring Plate, 7/8" Scallop Circle Punch, 1" Circle Punch

Finishing Touches: 1/8" Mini Brads, Island Indigo Baker's Twine, Ruffled Ribbon (retired)

Oh Hello Mr Owl

by Joanne James21. May 2013 20:54

I've been busy card making today, but I thought it was about time I shared some of the cards that we made in this month's card class, featuring the owl punch. The class centred around the versatility of this punch and with the exception of the card I'm sharing today, the other cards we made were about using the punch to make things other than a straight forward owl. So on to today's card! This is the somewhat unassuming front of the card:


A nice woodgrained stamped tree trunk with a someone peeping out to say 'Oh Hello'. Open up the card and this is what you find:

A cute pair of owls keeping each other company, balancing on a branch. I chose to use bright colours for the owls so that they would stand out against the neutral Crumb Cake background. This would make a great card for a good friend, or even an anniversary card for your 's'owl' mate' (apologies - couldn't resist the pun!)

Back tomorrow with another owl card - until then, happy stampin'!


Stampin' Up Supplies:

Stamps: Oh Hello, Bloomin' Marvelous (Sale-A-Bration - retired), Woodgrain

Cardstock: Whisper White, Basic Black, Crumb Cake, Chocolate Chip, Island Indigo, Raspberry Ripple, More Mustard, Old Olive

Ink/Stampin' Write Markers: Island Indigo, Raspberry Ripple

Tools: Owl Punch, 1 3/4" Scallop Circle Punch, 1 1/4" Circle Punch, Bird Builder Punch


Four Legged Friends

by Joanne James14. May 2013 21:32

Today I thought I'd share a couple of projects that I made for my good neighbour and friend and fill you in on the story that goes with them. My neighbour is MAD about dogs! Not just a dog-lover - I mean, head-over-heels, mad about her canine friends (and other animals too, but that's a whole other story!) Anyway, anyone reading this who knows me, knows that I am SO not like this; it's not that I don't like animals, it's just that I've never really had a pet and I don't really understand the pet-owner bond; combined with my OCD cleaning obsession this means that I can't imagine having a four legged friend running round the house, as much as my children plague me to get one. As a consequence, I have been known to say the wrong thing on occasion as far as pets are concerned; I would like to think I've learned from some of my previous faux-pas though, so when my neighbour's beloved great dane, Chelsea, passed away recently I decided to do something special to remember her. I decorated a box frame to house a favourite picture of her and this is the finished result: 

You might think it a bit pink, but for all her size and stature, she was a real girly dog if there is such a thing, with a bright pink collar and always to be seen wearing a bright pink necktie. The sentiment, 'You're in my thoughts, you're in my heart" seemed so appropriate in the circumstances. Whilst Chelsea will never be forgotten, her passing has been followed by the arrival of a new neighbour; a beautiful grey baby great dane puppy called Storm. To welcome her, I made a card, similar to one I'd seen designed by Mary Fish. You can see her card here; and this is my version:

I did add some grey stitched grosgrain ribbon across the front too, but I can't find the photo with ribbon so you'll just have to use your imagination! I stayed with the pink theme toned in with grey - I love the punch art paw print, don't you? Lastly, for all you other many dog lovers reading this, I thought you might like to see a picture of the new puppy - so here she is, Storm in all her glory:

Isn't she just the cutest?! That's all for today - back tomorrow with another project. Until then, happy stampin'!


Stampin' Up Supplies:

Stamps: Word Play, Sassy Salutations

Cardstock: Regal Rose, Melon Mambo, Basic Grey, Whisper White, Pretty in Pink, Rose Red

Ink/Stampin' Write Markers:  Melon Mambo, Basic Grey

Tools: Full Heart Punch, Owl Punch, 3/4" Circle Punch, Large Scallop Edgelits

Finishing Touches: Basics Rhinestones

The Aliens Have Landed!

by Joanne James10. May 2013 21:16

Good evening, blog followers! Apologies for the lack of blog post yesterday; things have been very busy in the world of the Crafty Owl this past few days and yesterday just ran away with me. Anyway, back today with a card I wanted to share in advance of next week's card class featuring my favourite punch of all time - the owl punch. This punch really is so versatile; there are many examples of alternative uses for this punch.  Today I'm sharing an alien pop-up card, inspired by the many examples found on Pinterest - this is the outside: 

Recognise the alien in the spaceship? An upside-down owl with one eye, along with some punch art planets and stars. When you open it up, the inside looks like this: 

A trio of aliens pop up to wish you a happy birthday! This kind of card is such fun - you can customise your aliens and make them different every time. perfect for a birthday that's 'out of this world'! The owl punch is the feature punch for this month's card class - if you live in Northampton and the surrounding areas and would be interested in attending one of my classes, do get in touch for more details. Right - I'm done with the alien puns; I'm off to try and schedule tomorrow's blog post as I'll be on a Stampin' Up! regional training day in Telford all day - should be fun! Until tomorrow, happy stampin'!


Stampin' Up Supplies:

Stamps: Happiest Birthday Wishes (retired)

Cardstock: Whisper White, Rich Razzleberry, Tempting Turquoise, Pacific Point, Pumpkin Pie, Basic Black, Concord Crush (retired), Poppy Parade (retired) 

Ink/Stampin' Write Markers: Concord Crush (retired)

Tools: Owl Punch, Large Oval Punch, Small Oval Punch, 1" Circle Punch, 1 1/4" Circle Punch, Oval Framelits, Bitty Banners

Red, Orange, Yellow, Green, Blue!

by Joanne James5. May 2013 21:33

Today's card is one I made a while ago when I was going through my Spring Sampler workout, but lost the photograph so had to take it again. This is a great birthday card for a 'little person' and would work for either a boy or a girl:

This type of card is so easy to make and really lends itself to a stamp set of small single images. Are you wondering how I got the curved edges on the coloured panels? I cut my strips to length and made them slightly narrower than 1 1/4", then fed the end into my 1 1/4" circle punch from the top so that only the end was punched, not a whole circle. I hope this makes sense - as I've tried to explain it I think I should have taken a picture as it would have been much clearer!

Back tomorrow with another project - until then, enjoy your Bank Holiday weekend and happy stampin'!


Stampin' Up Supplies:

Stamps: Spring Sampler

Cardstock: Whisper White, Real Red, Tangerine Tango, Daffodil Delight,  Gumball Green, Tempting Turqouise, Crumb Cake

Ink: Real Red, Tangerine Tango, Daffodil Delight, Gumball Green, Tempting Turqouise

Tools: 1" Circle Punch, 1 1/4" circle punch

Finishing Touches: Sycamore Street Ribbon (Sale-A-Bration - retired)

Tags: , , , , ,

Cards | Stamping

Angry Bird in Action - Masculine Swap Card

by Joanne James15. April 2013 21:20

As I mentioned in yesterday's post, I was on a team training day yesterday. One of the things we like to do at these events is share 'swaps', where we each make multiples of a card or 3D project with a particular theme in mind and then 'swap' with each other. This is a great way to share in each others creativity, inspire others and to be inspired and also gives lots of items to share with customers at parties and classes. The theme for yesterday's swaps was 'masculine' and whilst I often struggle with 'grown-up' masculine, having a 5 year old son gives me plenty of opportunity to design for 'young' masculine and I'm never short of ideas. As you can see in yesterday's post, Angry Birds is an ever-popular theme at the moment, so with this in mind I worked up a slightly altered version to a card that I seem to make quite a lot of these days. Here's my original card that I've made a number of times:

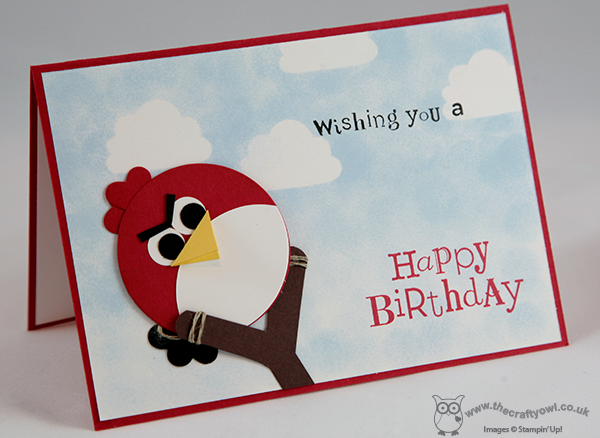
And here's the slightly altered version that I made for my swaps yesterday - can you spot the key difference?

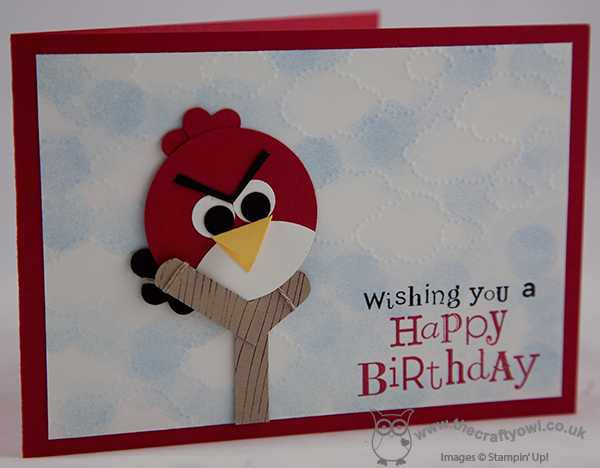
Did you spot it? Instead of sponging around a template for clouds as in the first card (I use the top of the cupcake from the Cupcake Builder Punch for this  - it makes a great cloud!) I partially embossed the background using the new Cloudy Day Textured Impressions Embossing Folder and sponged blue in between the clouds, leaving the bottom right hand corner un-embossed to allow me to stamp my sentiment onto a flat card surface. Another small difference is that instead of using Chocolate Chip cardstock for the slingshot, I used Crumb Cake, stamped in Chocolate Chip ink with the Woodgrain stamp. This last decision was prompted more by the fact that I had a large number of Crumb Cake card offcuts from a previous project that were perfect for use here (if you're reading this Chris P, this one's for you - I told you I'd find a use for those Crumb Cake offcuts!!) Punch art is great for using up all those odds and ends of cardstock left over from other projects, although having set out to make 30 of these, I did wonder if I should have chosen something a little more straightforward!

Anyway, I was really pleased with the way the all turned out. The design of this bird is slightly different to the red bird on yesterday's bookmark - I think the eyebrows make him look angrier. Here's a close up of the detail:

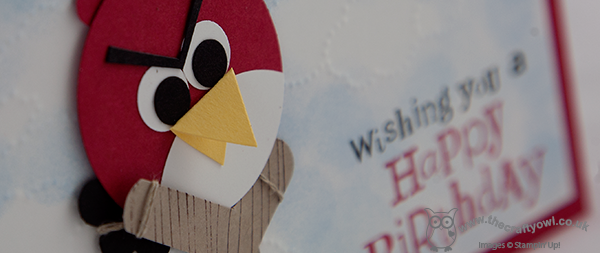
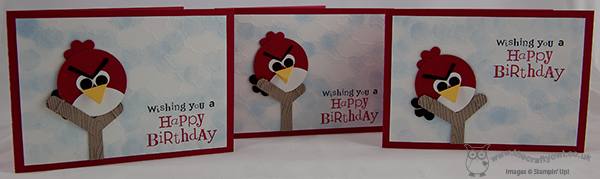
I love the beak too - there's just so much going on in this card, even after making so many I don't really tire of it. All my swaps were exchanged yesterday so I can't show you a photo of all 30, however I did make a few extras for some upcoming birthdays so I'll leave you with this last group shot of the little red fellas getting ready to be launched from their slingshots:

On that happy note, I'm off to start prepping; the Easter holidays are finally over and the children are back to school tomorrow. i'll be sad to see them go, but on the up side I'll have more time to spend in my craft room and I have lots there to keep me busy. I'll be back tomorrow with a new project - and possibly a 'sneak peek' of one of the cards we will be making in Wednesday's card class. So come back tomorrow and check it out; until then, happy stampin'!


Stampin' Up Supplies:

Stamps: Wacky Wishes (Hostess), Woodgrain

Cardstock: Real Red, Daffodil Delight, Basic Black, Whisper White, Crumb Cake

Inks: Real Red, Basic Black, Chocolate Chip, Bashful Blue

Tools: 1 3/4" Circle Punch, Small Heart Punch, Owl Punch, Itty Bitty Shapes Punch (circle), Big Shot, Cloudy Day Textured Impressions Embossing Folder, Sponge Dauber, Stamp-a-ma-jig

Finishing Touches: Linen Thread

Mini Catalogue

BROWSE THE CATALOGUE

The mini catalogue is now live! Read and download your copy here.

Shop Online

Access my online shop 24 x 7, 365 days of the year:

Current March hostess code:

S9F2XJJW

Shop Online

Join My Team

It's always a great time to join Stampin’ Up! New team members can get £130 worth of products for only £99 + free business supplies + free shipping + all the fun being a part of Stampin’ Up! Stampin' Up! has something for everyone: join my growing team and benefit from my support to enjoy Stampin' Up! however you choose.

If you're interested, call me for a chat to understand how I can help you realise your goals. Alternatively, if you have already decided to sign up and you just can't wait, please click here for the link to the online form where you can sign up and order your starter kit right away! 

Latest Kit!

Stampin Cut and Emboss

The Rock Legend Kit has all you need to make 8 cards with coordinating envelopes. Along with the new Panda Friends Kit, both are available from January 4th for just £14 each - get yours here!

2023-24 Annual Catalogue

BROWSE THE CATALOGUE

Click on the catalogue for a full list of current SU! supplies - if you would like to order any of the items featured, please drop me a line at [email protected] or give me a call on 07773 421446 - I'd be happy to help.

New Online Exclusives

There will be new products available exclusively in the online store from 5 March - check them out here.

About Me

Hi I'm Joanne and live in Northampton and when I'm not looking after my husband and two beautiful children, am an avid crafter with a passion for all things Stampin' Up!

I must confess that I have never been a big rubber stamper - until I discovered Stampin' Up! that is. I love the fact that I can get such great results with co-ordinating stamps, inks, papers and punches - the possibilities are endless! Join me on my stamping journey as I share the things I love and be inspired to create amazing things yourself!

Follow Me

Monthly Newsletter

Box Builder

Click the button above to use Box Buster to create your custom box design using the Envelope Punch Board!

Kits Collection Now Available!

Stampin Cut and Emboss

The new Kits Collection from Stampin' Up! is now available!

Click here to see the current kits available and order yours online today.

I Design For


Stampin' Up Stuff

This is my personal blog and is not endorsed by Stampin’ Up! I hope you find it a plentiful source of ideas and personal inspiration but please don't copy my designs for contest submission or use for classes, publication or sale without express permission.