Mosaic Mood Framed Birthday Card PP488

by Joanne James26. April 2020 09:00

Today it's Sunday and time for this week's new challenge over at The Paper Players! It's the turn of the lovely Laurie to host this week and she has my favourite, a sketch challenge for you to work with:


I pondered Laurie's sketch this week and resisted the urge to go clean and simple and instead went for lots of layers and details. I'm on a mission to use up some of my designer series paper (well, I need to justify buying the new designs when the new catalogue arrives!) so decided I would make one the focus of my card - take a look:


Here's the low-down on today's card:

Mosaic Mood - I received a free pack of Mosaic Mood paper at Onstage when the current catalogue was launched and I have to confess it wasn't a pattern that I was immediately drawn to. I didn't like the accompanying stamp set and left to my own devices I probably would not have purchased it at all. Truth is, this paper has surprised me - I have had lots of fun with it, cutting out the patterns and stripes and have made lots of projects with it. It was a good choice for my card today - I chose a background pattern and then a floral for the framed centre and decorated my frame with a fussy cut rose and leaves. Funny how things work out, right?

Heirloom Frames - I used one of the embossed Heirloom Frames to separate my two designs. The texture adds interest and detail to the layers on my card.

A Well Written Sentiment - The team over at TGIF Challenges are featuring diecut sentiments on their projects for the current challenge and that was just what I needed for my sentiment still to have impact and be seen. I chose to use the 'birthday' from the Well Written Framelits - they are perfect paired with the 'Well Said' stamp set, both of which are carrying over into the new catalogue I am pleased to say - these are keepers!

Here is the visual summary of the key products used on today's project for you to pin for easy reference:


You can see all of my Product and 'How To' summaries on my 'How To - Tips and Techniques' Pinterest board in case you've missed any. 

Before you reach for your ink and papers, check out what our amazing team has created to inspire you this week:

Here's a quick recap of our challenge rules:
 
1.  Create a new paper project
2.  Upload your creation to your blog with a link back to us and provide a direct link to the post featuring your challenge submission.
3.  Please link your card to no more than four challenges, TOTAL.
4.  Have FUN!

You can see all of my 'How To' summaries on my 'How To - Tips and Techniques' Pinterest board in case you've missed any. 

Enjoy your day; I spent the morning crafting yesterday so have lots to share with you this week! Yesterday turned into a glorious day of sunshine so we enjoyed time outside and an evening BBQ, with a welcome break from online lessons. Hopefully today will allow for more of the same! I'll be back tomorrow with another project. Until then, happy stampin'!


Stampin' Up! Supplies Used: 

Table built using Product Table Builder by The Crafty Owl - Independent Stampin' Up! Demonstrator.

Not Just For Grandmas - Tricolour Birthday Card JAI476

by Joanne James2. October 2019 10:30

No post from me yesterday I'm afraid as I was out hosting a Stampin' Up! party at the lovely Jane's house for her and all her friends and I didn't get a chance to post before I left. We had a fun evening of Christmas crafting, with delicious cake thrown in (the refreshments at Jane's always make the visit worthwhile!) I'm back to it today and just have time to squeeze in an entry for this week's challenge over at Just Add Ink

I loved this week's inspiration photo and it led me to create a card with a rather modern twist take a look:


Here's the low-down on today's card:

A Word About Inspiration - As my regular readers know, sketches are often my 'go to' starting point when I make a card, however sometimes inspiration comes from other areas. When it's a photo such as the one that inspired today's card, it can be interpreted in so many different ways. I knew I wanted to use florals, ideally tulips, and bright colours. It struck me that the photo had clearly defined lines of tulips within the borders and I decided it might be fun to use this idea on my card too. So I chose to create three distinct rows of flowers in each of the colours on the photo (I stamped them tone-on-tone then heat embossed them with clear embossing powder; difficult to see on the photo, but gives a lovely texture and shine) and backed them with a pale green Soft Sea Foam panel and a white card base. Using the cardstock in each of the colours, rather than stamping the flowers onto white and/or colouring them gives a strong, graphic feel to my card. Check out the JAI gallery to see how the DT team and other participants interpreted this week's inspiration! 

Not Just For Grandmas - My flower borders are made up by repeat-stamping the stamp featuring a trio of flowers (one is a tulip!) from the 'Grandma's House' stamp set. Whilst this set is all about the love of and for Grandmas, both this flower stamp and the house stamp in the set open up other creative possibilities - general birthdays, new home or pretty much anything that a flower can be used for! It's worth taking a second look at this kind of set, as they are often more versatile than they first appear.

The Perfect Pair - I finished my card with a diecut sentiment using the 'Well Written' framelits, paired with the super useful 'Well Said' stamp set. Together they can be used to create a ton of different sentiments for a wide variety of occasions - here's a peek at the inside of my card where you can see how I used it to finish my card: 


So what do you think - does this design work or would you have preferred a more traditional take on the photo inspiration? Do leave me a comment below - I would love to hear your thoughts!

Here is the visual summary of the key products used on today's project for you to pin for easy reference:


You can see all of my 'How To' summaries on my 'How To - Tips and Techniques' Pinterest board in case you've missed any. 

Enjoy your day; mine's a busy one. The youngest of the James Juniors is captaining his school rugby team this afternoon, hopefully to victory. Either way, I'm sure he will have a great time and one things for sure - there will be a fair amount of muddy kit heading my way this evening! I'll be back tomorrow with another project. Until then, happy stampin'!


Stampin' Up! Supplies Used:

Table built using Product Table Builder by The Crafty Owl - Independent Stampin' Up! Demonstrator.

Happiness Blooms birthday Card for PP434

by Joanne James24. March 2019 09:00

Today it's Sunday and time for this week's new challenge over at The Paper Players! It's my turn to host this week and I have my favourite challenge, a sketch, for you to work with:


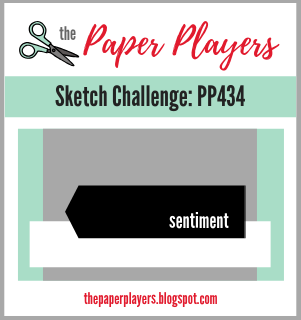
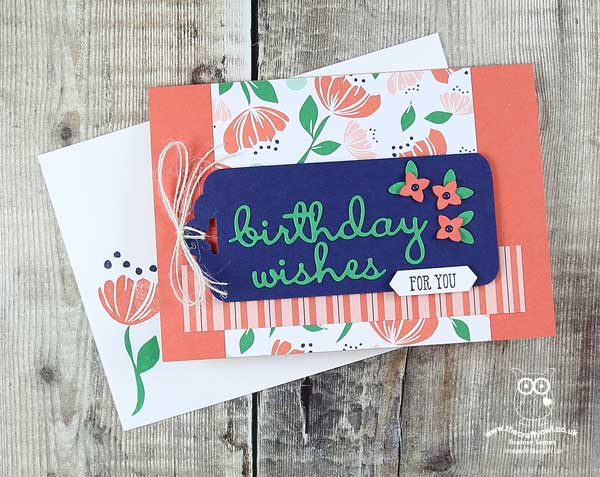
I chose something with layers and whilst the uppermost layer with the sentiment on is arrow-shaped, any horizontal shape would work in this space. I actually have a couple of cards to share with you today. Firstly the card I actually made for today's challenge using my favourite papers for the Spring-Summer catalogue - take a look:


Here's the low-down on today's card:

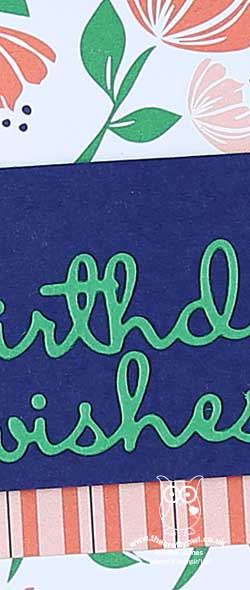
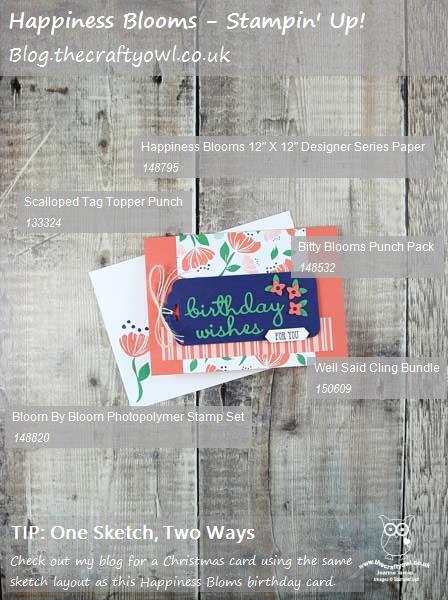
A Well Written Tag - I made the top layer of my card into a tag using my Scalloped Tag Topper Punch and used it as the focal point for my main greeting cut using the Well Written Framelits, finished with a tiny bit of stamping that I punched out and shortened with my Classic Label Punch. I added a few flowers from the same set, finished with some Bitty Blooms punched leaves and some navy enamel dot centres.

Happiness Blooms - The gorgeous bold and bright florals of the Happiness Blooms Designer Series Paper set the tone and colour scheme for my card today. I resisted the urge to use my favourite navy pattern in this set and instead chose the gorgeous Calypso Coral/Night Of Navy/Call Me Clover/ Whisper White combo, with a contrasting striped design for my second layer of pattern. I finished off the inside of my card and envelope with another sentiment from the 'Well Said' stamp set and some stamped flowers using 'Bloom by Bloom'. Such a colourful and cheerful card - very me! 

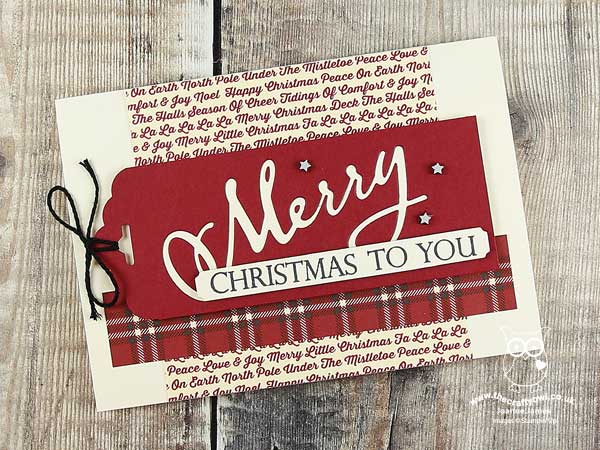
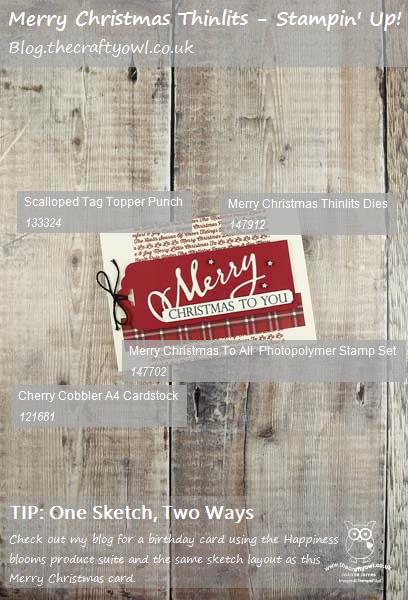
My Original Inspiration - I actually designed this sketch before Christmas and used it for a card in one of my monthly technique classes. I realised during an exchange of messages with my fellow PP teamie the lovely Claire that I hadn't actually blogged that card, and whilst the papers that I used (Festive Farmhouse) are no longer available, the Merry Christmas Thinlits Dies and Merry Christmas To All stamp set are on carryover from the Autumn-Winter catalogue and still available, so I thought I would share with you too so that you can see how it looks with an alternative product set:


So two for one today! Which one do you prefer? I'd love you to leave a comment below.

Here is the visual summary of the key products used on today's project for you to pin for easy reference:


And for the Christmas version:

You can see all of my Product and 'How To' summaries on my 'How To - Tips and Techniques' Pinterest board in case you've missed any. 

Before you reach for your ink and papers, check out what our amazing team has created to inspire you this week:

Here's a quick recap of our challenge rules:
 
1.  Create a new paper project
2.  Upload your creation to your blog with a link back to us and provide a direct link to the post featuring your challenge submission.
3.  Please link your card to no more than four challenges, TOTAL.
4.  Have FUN!

You can see all of my 'How To' summaries on my 'How To - Tips and Techniques' Pinterest board in case you've missed any. 

I'm looking forward to visiting your blogs to see what you make of my sketch this week. Enjoy your day; I will be packing up the youngest of the James Juniors in readiness for a week-long school trip tomorrow and preparing for the imminent arrival of a German exchange student who is visiting to spend time improving her English language skills with the other one! I'll be back tomorrow with another project. Until then, happy stampin'!


Stampin' Up! Supplies Used:

Table built using Product Table Builder by The Crafty Owl - Independent Stampin' Up! Demonstrator.
 
 
Table built using Product Table Builder by The Crafty Owl - Independent Stampin' Up! Demonstrator.

Lovely Lattice Kraft Birthday Card

by Joanne James11. March 2019 09:00

T

Happy Monday everyone! Today is the start of my class week, so it will b a busy one Chez James! Today's card is one I made that uses the current sketch layout over at Just Add Ink and the colour palette at Color Throwdown:


I thought these colours would be perfect for a birthday card featuring one of the Sale-A-Bration stamp sets, Lovely Lattice - take a look:


 Here's the low-down on today's card:

Lovely Lattice - There is lots you can do with this stamped image - many ways to colour it, and lots of options to cut it out and build layers and dimension with the flowers too - but I like it because the main image is one of those that can fill the card and there isn't much else required. I heat embossed my image in white onto Crumb Cake cardstock which really does show the detail of the lattice behind the flowers beautifully. For a free stamp set, this one really is rather pretty - and still available if you'd like to get your hands on it with a spend of £45 or more. Who doesn't love FREE product?!

Colour on Kraft - I decided to colour the image using my watercolour pencils, but dry with no added water for blending, as I wanted to see the pencil strokes; I used a combination of Gorgeous Grape, white and Basic Grey pencils, with a tiny spot of Crushed Curry for the flower stamens. 

Birthday Wishes - The 'Lovely Lattice' stamp set is sentiment-free, so I reached for one of my favourites from the current Spring-Summer catalogue that you haven't seen me use much here on my blog but rest assured they will be a keeper for me, regardless of whether or not they carry over to this year's new annual catalogue: the Well Said bundle. The' Well Said' stamp set combined with the Well Written Framelits dies really are the perfect pair and allow you to create endless sentiment combinations. I added a piece of Gorgeous Grape mini striped ribbon behind my layered sentiment and a sprinkling of pearls to complete my card. 

Here is the visual summary of the key products used on today's project for you to pin for easy reference:


You can see all of my 'How To' summaries on my 'How To - Tips and Techniques' Pinterest board in case you've missed any. 

Enjoy your day and I'll be back tomorrow with another project. Until then, happy stampin'!


Stampin' Up! Supplies Used:

Table built using Product Table Builder by The Crafty Owl - Independent Stampin' Up! Demonstrator.


Mini Catalogue

BROWSE THE CATALOGUE

The mini catalogue is now live! Read and download your copy here.

Shop Online

Access my online shop 24 x 7, 365 days of the year:

Current April hostess code:

VDKNV7BH

Shop Online

Join My Team

It's always a great time to join Stampin’ Up! New team members can get £130 worth of products for only £99 + free business supplies + free shipping + all the fun being a part of Stampin’ Up! Stampin' Up! has something for everyone: join my growing team and benefit from my support to enjoy Stampin' Up! however you choose.

If you're interested, call me for a chat to understand how I can help you realise your goals. Alternatively, if you have already decided to sign up and you just can't wait, please click here for the link to the online form where you can sign up and order your starter kit right away! 

Latest Kit!

Stampin Cut and Emboss

The Rock Legend Kit has all you need to make 8 cards with coordinating envelopes. Along with the new Panda Friends Kit, both are available from January 4th for just £14 each - get yours here!

2023-24 Annual Catalogue

BROWSE THE CATALOGUE

Click on the catalogue for a full list of current SU! supplies - if you would like to order any of the items featured, please drop me a line at [email protected] or give me a call on 07773 421446 - I'd be happy to help.

New Online Exclusives

There are new products available exclusively in the online store from 5 March - check them out here.

About Me

Hi I'm Joanne and live in Northampton and when I'm not looking after my husband and two beautiful children, am an avid crafter with a passion for all things Stampin' Up!

I must confess that I have never been a big rubber stamper - until I discovered Stampin' Up! that is. I love the fact that I can get such great results with co-ordinating stamps, inks, papers and punches - the possibilities are endless! Join me on my stamping journey as I share the things I love and be inspired to create amazing things yourself!

Follow Me

Monthly Newsletter

Box Builder

Click the button above to use Box Buster to create your custom box design using the Envelope Punch Board!

Kits Collection Now Available!

Stampin Cut and Emboss

The new Kits Collection from Stampin' Up! is now available!

Click here to see the current kits available and order yours online today.

I Design For


Stampin' Up Stuff

This is my personal blog and is not endorsed by Stampin’ Up! I hope you find it a plentiful source of ideas and personal inspiration but please don't copy my designs for contest submission or use for classes, publication or sale without express permission.