Waterfront Almost One Layer CAS Card

by Joanne James19. June 2023 17:32

Today I have a super quick post since I'm sneaking in a last minute entry over at Freshly Made Sketches - I couldn't resist Kim's fabulous sketch! 


I'm also playing over at Just Us Girls where you will see immediately how their photo inspired my clean and simple card - take a look:


Here's the low-down on today's card:

When I saw Kim's sketch I was still in 'one layer card' mode and I decided to make a super simple beachfront scene using my retired 'Waterfront' stamp set, with each of the horizontal elements represented by the sea, sandy beach and the row of beach huts. I stamped the beach and sea and for each of my beach huts, used my Stampin' Write markers to colour and add each one individually:


I masked them off and added a hint of blue sky behind using my blending brush to complete my scene. I decided in the end to not make this a one layer card, and snipped my stamped 'HELLO' sentiment from the 'Gorgeously Made' stamp set and popped it up on dimensionals to complete my clean and simple card.

Enjoy your day and I'll be back tomorrow with another project. Until then, happy stampin'!


Stampin' Up! Supplies Used:

Table built using Product Table Builder by The Crafty Owl - Independent Stampin' Up! Demonstrator.

A Waterfront Sunset TTT68

by Joanne James11. June 2020 09:00

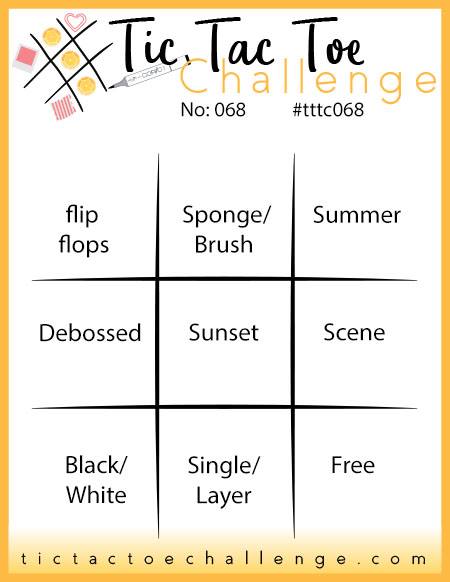
It's Thursday and time for a new challenge over at TicTacToe! It's the turn of Team X to host this week and the lovely Felicita is our featured designer this week. This is the fun board that we are playing along with: 


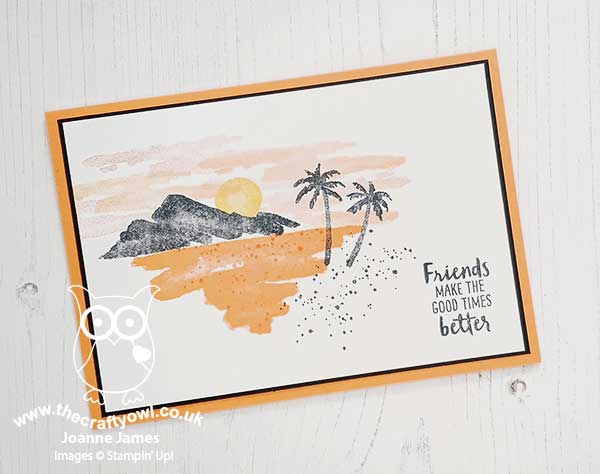
My card fits the vertical column - summer, scene, free - and also the diagonal - summer, sunset, black/white (although not exclusively) - and for today's card I decided to challenge myself to use a set I haven't used much to create a peaceful scene - take a look:


Here's the low-down on today's card:

Build A Scene - I decided to get creative with my 'Waterfront' stamp set for today's card. Just like 'My Meadow' and 'Snowfront', this is a build-a-scene stamp set with so many creative possibilities. I think for me that is sometimes the problem though; I am so attracted to these sets, but then struggle to make something that I'm happy with. The miserable weather here in the UK this week though got me thinking of sunnier climes and holidays gone by in sunny St Lucia, so I decided to create a sunset over the famous Pitons. Once I'd got started, it was actually really easy and a lot of fun! I stamped my mountains first, then the sea and then everything else, having created a simple post-it note mask over my mountains to maintain perspective.

Sunset Colours - I did reach for some retired Grapefruit Grove cardstock for my cardbase, because I found Pumpkin Pie too 'orange' with my Petal Pink and Calypso Coral colours. But You could vary this - the great thing about these kinds of sets is that you can create in whatever colours you have to hand and create a different look and feel to you scene each time.

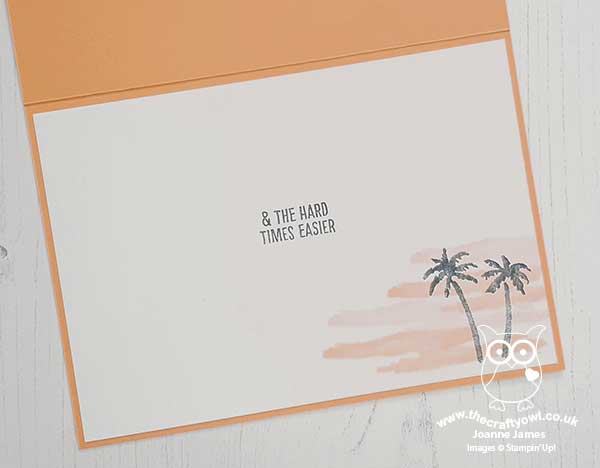
Don't Forget The Inside - I added a little additional detail to the corner of the inside of my card too, just carrying the tropical feel into the inside:


I'm also linking up with the ladies over at Just Us Girls this week where the code word is 'sunshine' so I'm hoping that extends to sunsets too! You should definitely check out their gallery this week - it's so full of light and sunshine!

Here is the visual summary of the key products used on today's project for you to pin for easy reference:


You can see all of my Product and 'How To' summaries on my 'How To - Tips and Techniques' Pinterest board in case you've missed any. 

A tictactoe board offers so many creative possibilities - how does this week's board inspire you? Why not have a go? We would love to see you in the gallery and who knows - you might be selected for Designer's Choice and be eligible to be a guest designer on a future challenge. 

Enjoy your day; I am trying to catch up on indoor chores as the weather outside really is frightful! I shall be dreaming of Caribbean beaches as I go! I'll be back tomorrow with another project. Until then, happy stampin'!


Stampin' Up! Supplies Used: 

 Table to follow.


Snow Front Christmas Card for JAI472

by Joanne James3. September 2019 09:00

Today I'm sharing a card for this week's sketch challenge over at Just Add Ink:

I was intrigued with the angled lines of this sketch, and whilst my instinct was to reach for my beloved designer series papers and start layering, I resisted and instead reached for another new Christmas stamp set and continued with my clean and simple streak - take a look:


 Here's the low-down on today's card:

Snow Front - If you are a lover of the 'Waterfront' set that features in the annual catalogue, then the 'Snow Front' set in the new Autumn-Winter catalogue will most certainly make it onto your wish list. With similar brushstroke designs and lots of scenic motifs, this set offers great creative possibilities. The stamp set I used for my snow is actually from the Waterfront set - go figure!

A Clean And Simple Scene - I decided to use the angular lines of the sketch as the basis for the structure of my scene. I used a row of trees for the back point, then a combination of a large pine tree and a path in the snow for the point at the front. I decided to make a feature of my log cabin and stamp it on a stitched circle to accentuate it, before adding in to my scene. I really let the stamps do the talking on today's card - I did add some clear Wink of Stella to the tops of my trees, the falling snow, the roof of my log cabin and snowman, but whilst it looks very pretty in real life, is nigh on impossible to see in the photo so you'll have to take my word for it.

A Pop of Red - I used a predominantly neutral palette for my card with the exception of Shaded Spruce and even after stamping my sentiment I still felt it needed something else. I settled for a red bird balanced on the word 'Christmas' and a thin red mat border for a pop of additional festive colour.

Here is the visual summary of the key products used on today's project for you to pin for easy reference:


You can see all of my 'How To' summaries on my 'How To - Tips and Techniques' Pinterest board in case you've missed any. 

I have a day of errands today combined with pre-season rugby practice for the youngest of the James Juniors who is back to school tomorrow. Whatever you have planned, I hope you enjoy your day and I'll be back tomorrow with another project and the launch of the new Stampin' Up! 2019 Autumn-Winter catalogue - woohoo! Until then, happy stampin'!


Stampin' Up! Supplies Used:

Table built using Product Table Builder by The Crafty Owl - Independent Stampin' Up! Demonstrator.

Waterfront Caribbean Beach Friend Card for PP444

by Joanne James2. June 2019 09:00

Today it's Sunday and time for this week's new challenge over at The Paper Players! It's the turn of the fabulous Ann to host this week and she has a timely theme challenge for you to work with:


I went clean and simple this week so will also be playing along over at CASology where the cue card is 'Summer'. I used my Waterfront stamp set to create a beach scene reminiscent of my favourite Caribbean vacations - take a look:


Here's the low-down on today's card:

A Waterfront Beach - Waterfront is one of those sets that I don't feel I've used anywhere nearly enough and I'm so glad it's carrying over into the new annual catalogue. It's a great set for creating unique scenery and landscapes for all seasons so was perfect for my bright beach huts on the shore under the bright sun and shade of the palm trees. I decided to feature the 2018-20 In Colours on my card today; these are such a great co-ordinating set of brights they were just perfect for my card today. 

A Nested Label - Did you spot the new label I used for the scene on my card? It's from the Stitched Nested Labels that co-ordinate with the Bird Ballad Suite in the upcoming new catalogue and they have such pretty stitched border detail. The whole label is symmetrical; I cut the point off mine on the right side as I wanted my label to align to the right of my card. 

Making Waves - I added a little interest and texture to my Blueberry Bushel background by running it through the retiring Seaside embossing folder. I love this embossing folder and use it lots so will be sad to see it go. 

And that's all there is to it, other than to say do you think if I wish hard enough I could jump into my card and find myself relaxing on that sunny beach too?!

Here is the visual summary of the key products used on today's project for you to pin for easy reference:


You can see all of my Product and 'How To' summaries on my 'How To - Tips and Techniques' Pinterest board in case you've missed any. 

Before you reach for your ink and papers, check out what our amazing team has created to inspire you this week:

Here's a quick recap of our challenge rules:
 
1.  Create a new paper project
2.  Upload your creation to your blog with a link back to us and provide a direct link to the post featuring your challenge submission.
3.  Please link your card to no more than four challenges, TOTAL.
4.  Have FUN!

You can see all of my 'How To' summaries on my 'How To - Tips and Techniques' Pinterest board in case you've missed any. 

Enjoy your day; ... I'll be back tomorrow with another project. Until then, happy stampin'!


Stampin' Up! Supplies Used: 

Table built using Product Table Builder by The Crafty Owl - Independent Stampin' Up! Demonstrator.

Three Ks and Three Colours

by Joanne James25. September 2018 07:00

Today I'm sharing a card that I designed for this week's challenge over at Just Add Ink. I also used this week's CAS(E) This Sketch layout and coincidentally my card also features the current colour palette over at the Global Design Project:


Here's my card that I created - take a look:


Here's the low-down on today's card:

Just Add K - I have been enjoying playing along with the team over at Just Add Ink lately but must confess that this week I nearly did not rise to the challenge! Just Add K - despite their helpful suggestions and lovely design team cards, when it came down to it, nothing beginning with K came to mind. Intrigued, since this really did now feel like a challenge, I got a pencil and paper and got my thinking cap on. Not only did I come up with one K, but three. Can you spot them? Yes, my three Ks are Kindness, Kraft and Knots! 

A Label For Everyday - The K for Kindness comes from the sentiment that can be found in the Waterfront stamp set. I stamped it in Blakberry Bliss onto Mint Macaron cardstock and punched it out with my Everyday Label Punch, snipping off the bottom piece and slipping it behind my horizontal coloured strip.

Three Colours - The three colours on my card were inspired by the Nature's Twine that I used for my knots around contrasting strips of coloured cardstock. I also used a piece of Nature's Poem Blackberry Bliss patterned paper for my mat layer. My third and final K is for Kraft (a handy storecupboard neutral). I found this piece of clear pre-embossed kraft cardstock in my scraps box (its retired and I can't remember what it was called) that I decided to use for my central panel for subtle pattern and interest. 

Here is the visual summary of the key products used on today's project for you to pin for easy reference:


You can see all of my 'How To' summaries on my 'How To - Tips and Techniques' Pinterest board in case you've missed any. 

So what do you think of this card? Whilst it was fun to solve the 'k conundrum', I'm not sure about the end result. The knots are a little rustic for me and this trio of colours is a little harsh. Oh and did I mention that every time I look at the sentiment label I see a tombstone?! Must be the time of year!! Not my finest creation perhaps but I figured I'd share with you anyway to see what you think. Do leave me a comment below - I'm really interested to hear your thoughts!

Enjoy your day and I'll be back tomorrow with another project. Until then, happy stampin'!


Stampin' Up! Supplies Used:

Table built using Product Table Builder by The Crafty Owl - Independent Stampin' Up! Demonstrator.

Mini Catalogue

BROWSE THE CATALOGUE

The mini catalogue is now live! Read and download your copy here.

Shop Online

Access my online shop 24 x 7, 365 days of the year:

Current March hostess code:

S9F2XJJW

Shop Online

Join My Team

It's always a great time to join Stampin’ Up! New team members can get £130 worth of products for only £99 + free business supplies + free shipping + all the fun being a part of Stampin’ Up! Stampin' Up! has something for everyone: join my growing team and benefit from my support to enjoy Stampin' Up! however you choose.

If you're interested, call me for a chat to understand how I can help you realise your goals. Alternatively, if you have already decided to sign up and you just can't wait, please click here for the link to the online form where you can sign up and order your starter kit right away! 

Latest Kit!

Stampin Cut and Emboss

The Rock Legend Kit has all you need to make 8 cards with coordinating envelopes. Along with the new Panda Friends Kit, both are available from January 4th for just £14 each - get yours here!

2023-24 Annual Catalogue

BROWSE THE CATALOGUE

Click on the catalogue for a full list of current SU! supplies - if you would like to order any of the items featured, please drop me a line at [email protected] or give me a call on 07773 421446 - I'd be happy to help.

New Online Exclusives

There will be new products available exclusively in the online store from 5 March - check them out here.

About Me

Hi I'm Joanne and live in Northampton and when I'm not looking after my husband and two beautiful children, am an avid crafter with a passion for all things Stampin' Up!

I must confess that I have never been a big rubber stamper - until I discovered Stampin' Up! that is. I love the fact that I can get such great results with co-ordinating stamps, inks, papers and punches - the possibilities are endless! Join me on my stamping journey as I share the things I love and be inspired to create amazing things yourself!

Follow Me

Monthly Newsletter

Box Builder

Click the button above to use Box Buster to create your custom box design using the Envelope Punch Board!

Kits Collection Now Available!

Stampin Cut and Emboss

The new Kits Collection from Stampin' Up! is now available!

Click here to see the current kits available and order yours online today.

I Design For


Stampin' Up Stuff

This is my personal blog and is not endorsed by Stampin’ Up! I hope you find it a plentiful source of ideas and personal inspiration but please don't copy my designs for contest submission or use for classes, publication or sale without express permission.