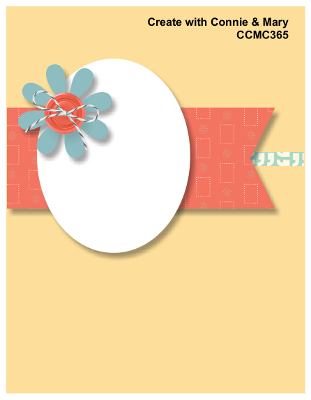
by Joanne James20. August 2015 08:05 Today it's time for a new challenge over at Create With Connie and Mary and this week we have a great sketch challenge for you:
As I'm still excited to be working may way through my box of seasonal preorder goodies, I have another Christmas card to share with you today using the All Ye Faithful stamp set and Winter Wonderland Specialty Designer Sseries Paper and washi tape. Here's my card:
My colour scheme today was inspired by the Winter Wonderland product suite - a mix of black, white and gold, with foil accents and real sparkle. Using Basic Black for my base with a mat of gold foil, then used a piece of Winter Wonderland DSP with a crackle-glaze pattern for the front of my card. I edged a piece of Whisper White with gold striped washi tape, then stamped my sentiment in Memento Black on the right hand edge. This sentiment does actually come on one line, so in order to make it work for my card and the sketch I carefully masked off parts of it to enable me to stamp it in three separate sections. For the oval, I stamped Mary and Joseph in Versamark onto Basic Black card and heat embossed it in gold. I backed this with an oval that was cut to the same size using my Big Shot and Ovals Framelits, then cut in half vertically; this then creates a frame that enables the oval to stand out, but isn't too wide, as it would have been if I'd used the next size framelit up. To finish, I added a trio of flags punched using my Tripe Banner Punch, featuring more of the patterns in the Winter Wonderland DSP suite.
Whilst this isn't a colourway I would necessarily have been drawn to of my own accord, it is very on-trend and I do love the way the entire suite of products make co-ordination so easy - good old Stampin' Up! I love the All Ye Faithful stamp set too - one of my favourite religious sets in the new catalogue, it comes with two other feature stamps and a verse sentiment too that I used on the inside of my card:
I hope you like today's card. Do visit the other Design Team members to see how they used this week's challenge sketch; there's lots of inspiration over on their blogs too!
Enjoy your day and I'll be back tomorrow with another sneak-peek project, one for Halloween this time. Until then, happy stampin'!
Stampin' Up! Supplies Used:
* All Ye Faithful - available September 1st
* Winter Wonderland Specialty Designer Series Paper - available September 1st
*Winter Wonderland Washi Tape - available September 1st
- Big Shot
- Magnetic Platform
- Ovals Collection Framelits Dies
- Banner Triple Punch
- Gold Foil Sheets
- Whisper White A4 Cardstock
- Embossing Buddy
- Versamark Pad
- Gold Stampin' Emboss Powder
- Heat Tool (Uk)
- Basic Black A4 Cardstock
- Tuxedo Black Memento Ink Pad
ce7c5f2c-dfb8-4703-91c7-b6bb6f392bfe|0|.0|96d5b379-7e1d-4dac-a6ba-1e50db561b04
Tags: Create With Connie And Mary, Stampin' Up, Stampin' Up Card, Stampin' Up Card ideas, Stampin' Up Supplies, All ye Faithful, Winter Wonderland, Christmas, Ovals Framelits, Magnetic Platform, Big Shot, Triple Banner Punch
Cards | Shop Online | Stamping
by Joanne James17. August 2015 09:49Happy Monday everyone! Today I have a card for a couple of challenges: Freshly Made Sketches and Colour Q:
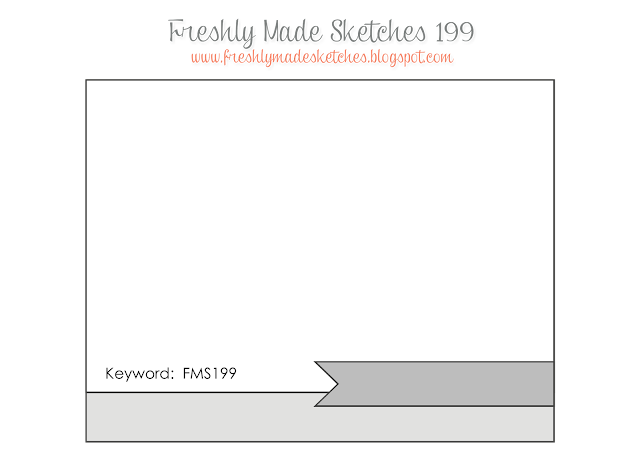

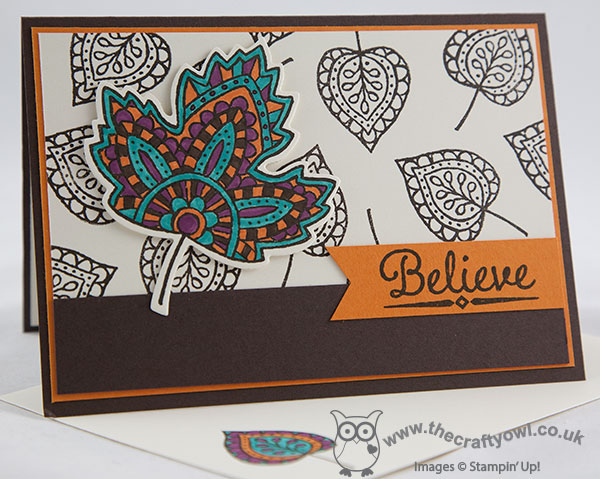
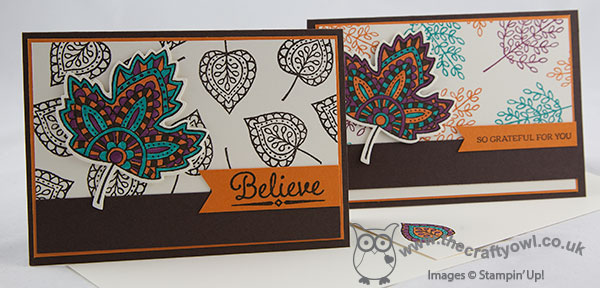
I love the Colour Q colours this week and I was inspired by the pattern in the inspiration photo and since this week's Freshly Made Sketch can be interpreted in so many ways, I decided to marry the two together with my Autumn-inspired cards. Yes, not one but two cards today - both similar but different and showcasing one of my favourite non-Christmas sets from the new seasonal catalogue - Lighthearted Leaves. Here is my first card:
So time for a confession: I have been mourning the loss of my Blendabilities for months now and as a result haven't done much colouring. However, this set made me decide I needed to snap out of it and revisit my Stampin' Write markers properly and get down to some serious colouring. I spent a pleasant few hours on Saturday just colouring in and was pleasantly reminded of just how relaxing it can be to just sit and colour.
Colouring in is a proven and recommended activity to de-stress (you can read an interesting article about the benefits of colouring as a method of relaxation here) and with our dual-tipped, refillable Stampin' Write markers, in a rainbow of 48 colours to choose from, it's not tricky to get amazing results! For the card above, I used a base of Early Espresso with a mat of Pumpkin Pie, followed by a mat of Very Vanilla which I background stamped with one of the small leaf designs from the set. The new permanent Basic Black and Basic Grey archival inks that are arriving with the seasonal catalogue are perfect for stamping images to colour in (especially if you want to watercolour - more on those another day!), however to tone in with my card I stamped the large maple leaf in Early Espresso on a separate piece of Very Vanilla cardstock and cut it out with my Big Shot and the co-ordinating Leaflets Framelits (gotta love co-ordinating framelits!) and coloured this leaf in each of the challenge colours. After adhering a panel of Early Espresso along the bottom of the panel, and my sentiment stamped onto a banner flag of Pumpkin Pie, I adhered my maple leaf with dimensionals to the front of my card.
I also created another card using the same set but with an alternative sentiment and a background created with one of the other leaves in the set:
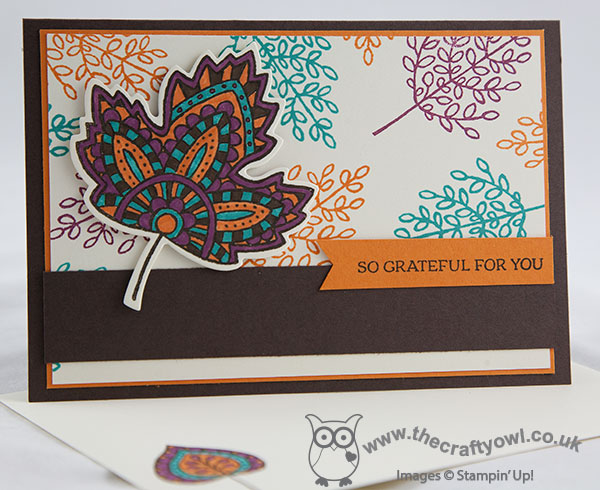
This was actually the first card I created and is slightly more inspired by the Colour Q photo, but I decided I wanted a background that was more neutral to allow my multi-coloured leaf to stand out more. I so enjoyed myself, I even stamped and coloured the inserts and co-ordinating Very Vanilla envelopes for both cards - how about that?! Opinion in my house is divided though as to which one is preferred, with the card above proving slightly more popular than the one I'm entering for the challenges today. So what do you think? Which one is your favourite? Do let me know today in your comments below.
I am enjoying a week of child-free mornings this week, as both James Juniors are taking part in Basketball Camp each day, so hopefully this will mean nice early blog posts and that I can get ahead of myself a little for once. I'm making the most of a few hours of me-time each day - a rare thing during the summer holiday season!
Back tomorrow with another card and a sneak-peek of some great new Christmas products. until then, happy stampin'!
Stampin' Up! Supplies Used:
* Lighthearted Leaves - available September 1st
by Joanne James16. August 2015 11:00It's Sunday and you know what that means: time for a new challenge over at The Paper Players! This week it is the turn of my good friend the super-talented LeAnne to host and she has a great clean and simple challenge for you:


With the arrival of my Autumn-Winter seasonal catalogue pre-order goodies last week I have been catapulted forwards into the festive season and this card was a challenge, especially since the weather in the UK has been anything but summery this week! In an effort to bring me back to summer, I got to thinking about what the beach means to me: on the one hand it conjures up memories of warm Carribean seas and scuba diving on coral reefs, but on the other hand where my children are concerned, it's all about paddling in the waves, sandcastles, stripy deckchairs and beach huts, so often found along UK beaches. So whilst my card doesn't feature sun, sand or sea this week, it does feature a couple of beach huts and some stripy paper reminiscent of old fashioned deck chairs. Here's my card, using the challenge sketch over at Fab Friday for my layout:
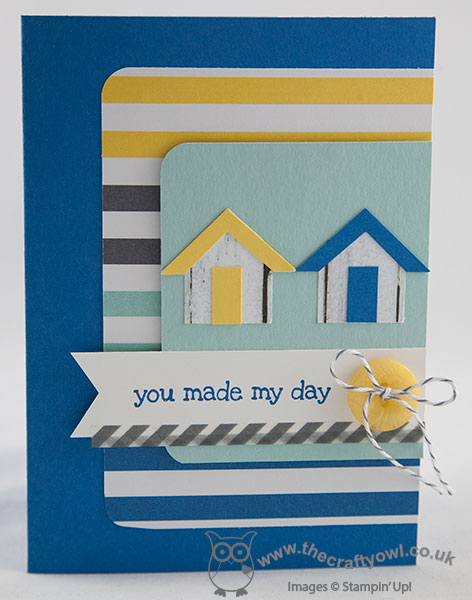
I used Pacific Point for my base, and used a piece of Schoolhouse DSP for my stripy layer (this so reminds me of deckchairs!) I followed this with a panel of Pool Party on which I placed my punch art paper-pieced beach huts: I punched two huts using the now-retired Arrows Punch (you could just as easily cut freehand though or combine square and triangle punch shapes) from the whitewashed woodgrain pattern in the Farmers Market DSP then added brightly coloured roofs and doors. A simple sentiment banner edged with some retired Epic Day washi tape and finished with a Daffodil Delight button and grey baker's twine finishes my card. My card does have a few more layers than I would like for a truly CAS card, but I kept my design simple with minimal embellishments, so I'm hoping I've more or less managed to meet the brief!
Before you reach for your ink and papers, check out what our amazing team has created to inspire you this week:
The Paper Players Design Team
Here's a quick recap of our challenge rules:
1. Create a new paper project
2. Upload your creation to your blog with a link back to us and provide a direct link to the post featuring your challenge submission.
3. Please link your card to no more than three challenges, TOTAL.
4. Have FUN!
For my international readers who may never have seen beach huts along the UK coast before, here's an old photo of mine at the seaside when my daughter was small - you can see the colourful little beach huts along the edge of the beach in the background:
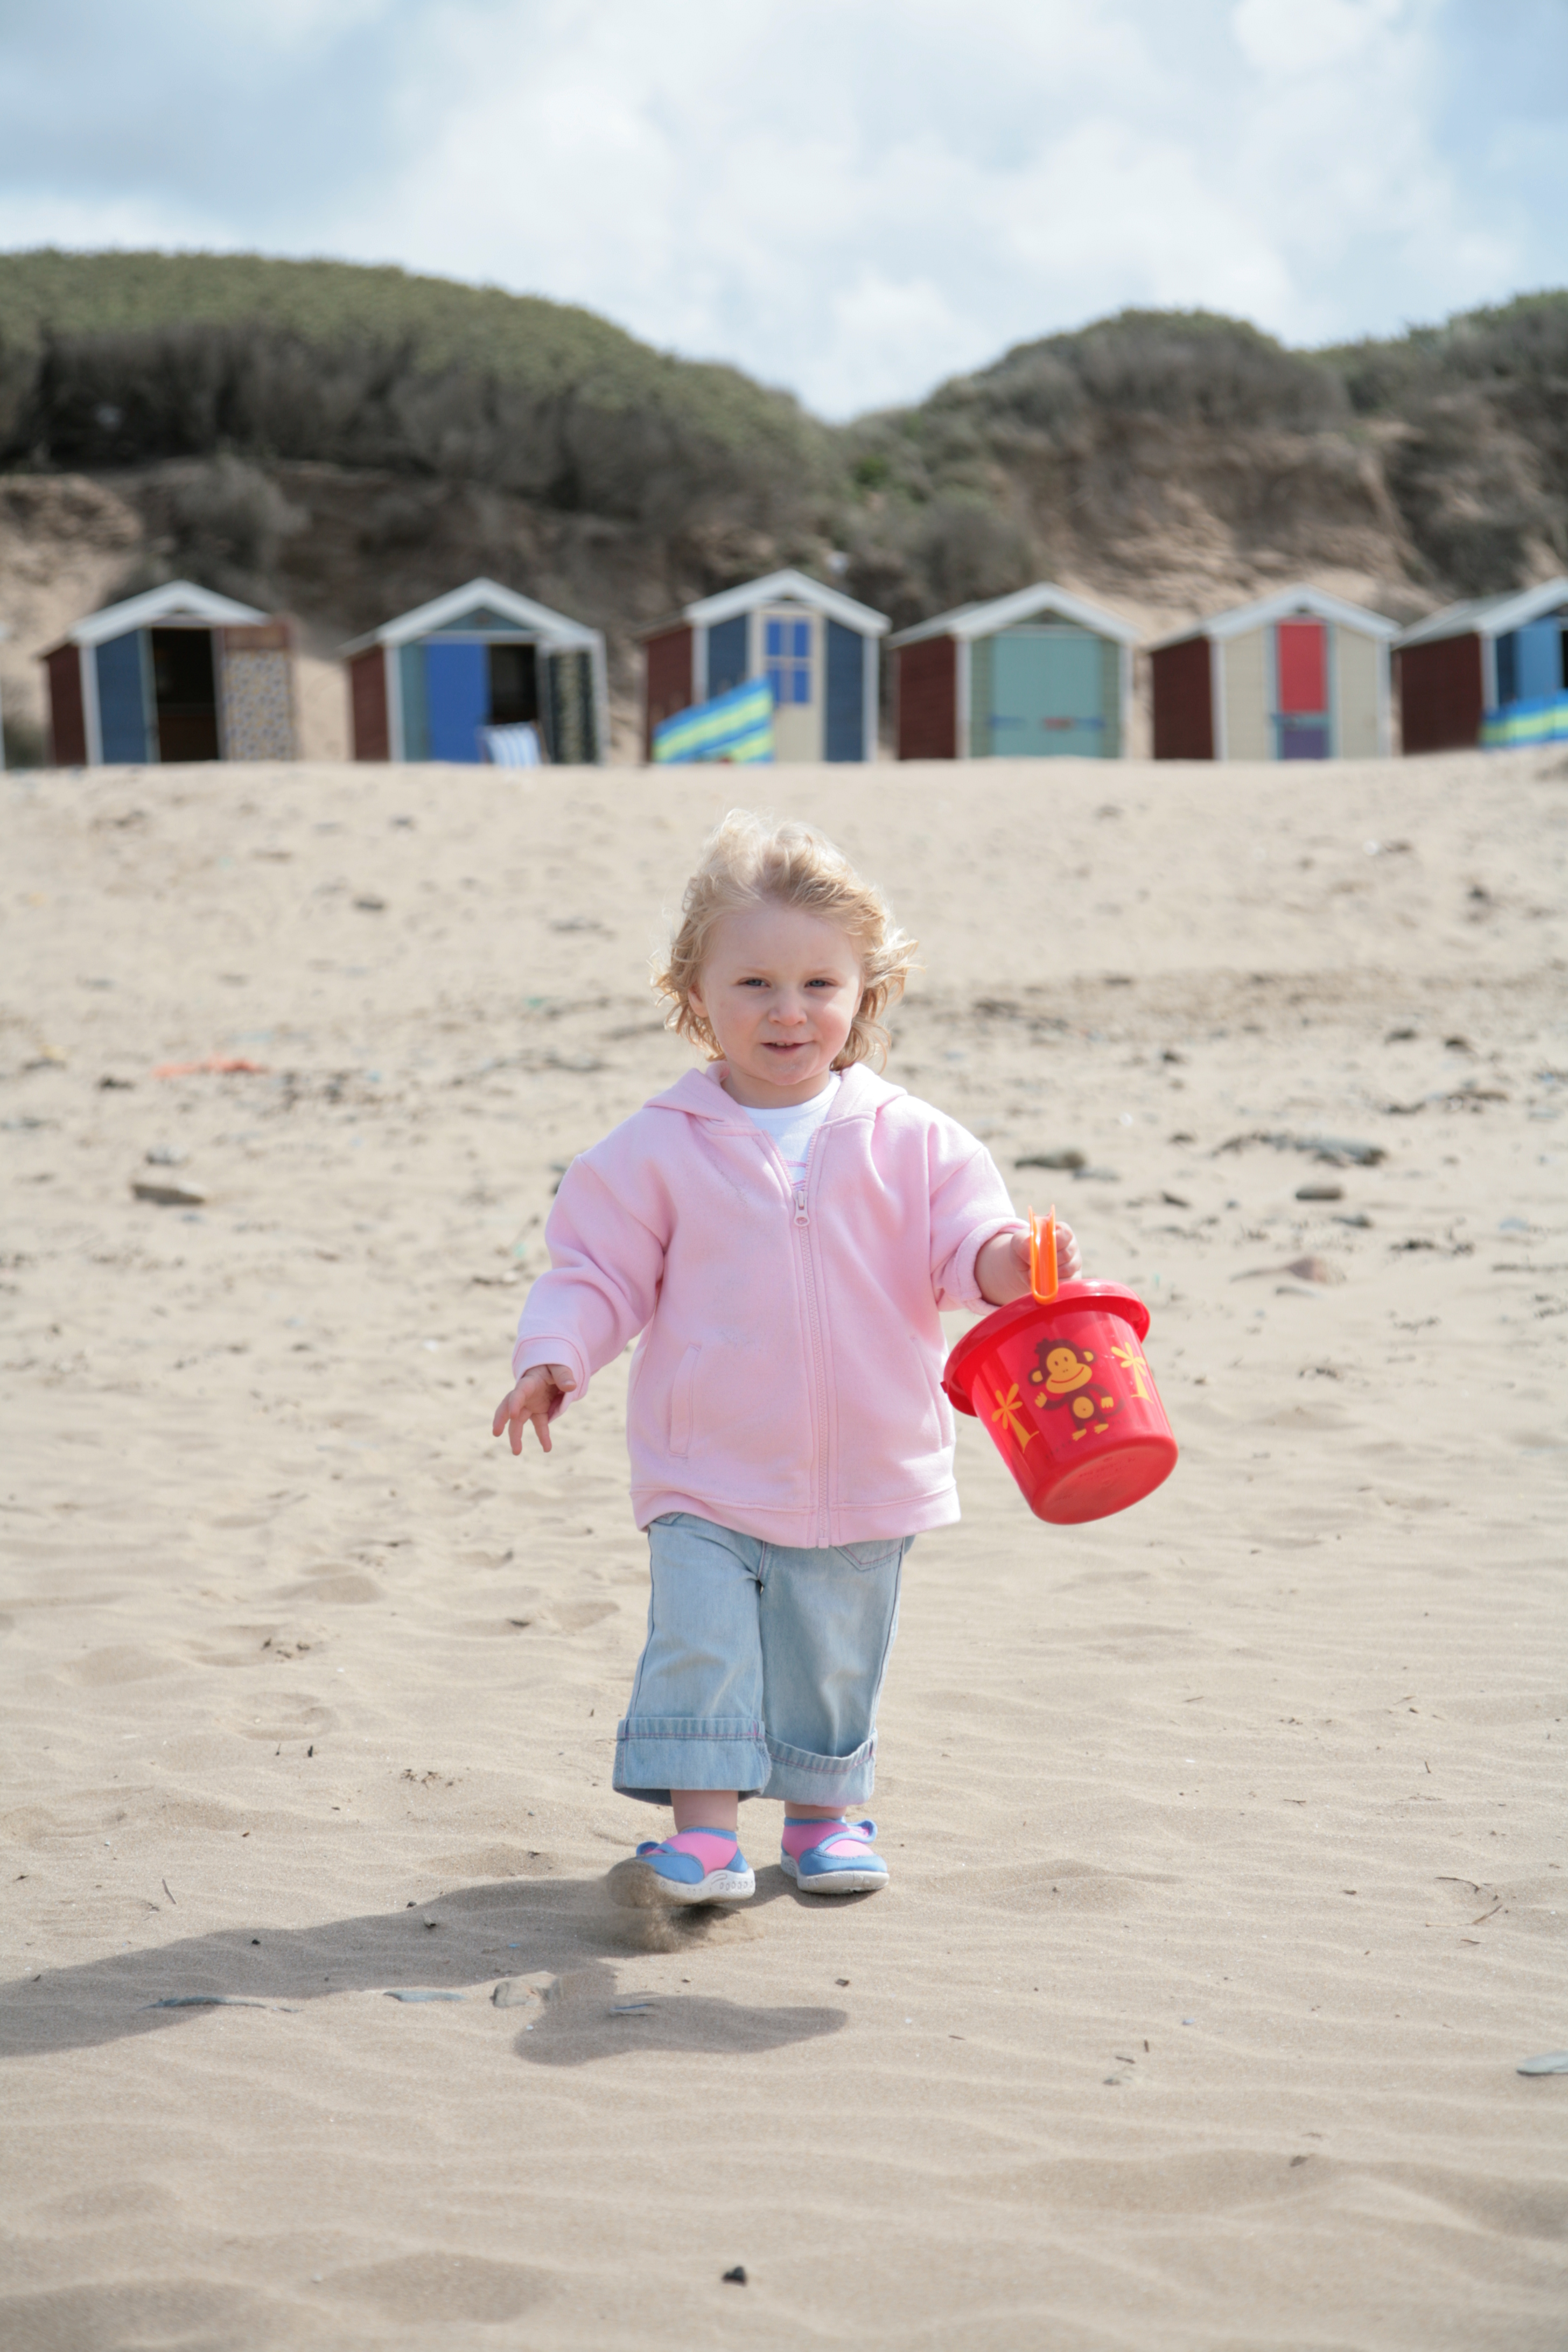
Happy days! So what images does the beach conjure up for you? I look forward to seeing your clean and simple beach-themed creations in the gallery this week. I'm having a relaxing day at home today with the family. I'll be back tomorrow with another card (or two!). Until then, happy stampin'!
Stampin' Up! Supplies Used:
3cd7ce7d-8d26-423d-a0bd-421e9a2ae8b7|0|.0|96d5b379-7e1d-4dac-a6ba-1e50db561b04
Tags: Shop online, Shop Stampin' Up online, Stampin' Up, Stampin' Up Card, Stampin' Up Card ideas, Stampin' Up Supplies, The Paper PlayersFarmer's Market, A Dozen Thoughts, Arrow Punch, Triple Banner Punch, Punch Art
Cards | Shop Online | Stamping
by Joanne James10. August 2015 08:00Happy Monday everyone! I am starting my week with a fun birth congratulations card for the challenges over at Freshly Made Sketches and Pals Paper Arts this week:


I love the sketch but was initially perplexed when I saw the PPA colours this week as I wasn't sure I could make the Mint Macaron and Pool Party work together; I loved the colour combo though so thought I'd give it a bit more consideration and this is what I came up with:
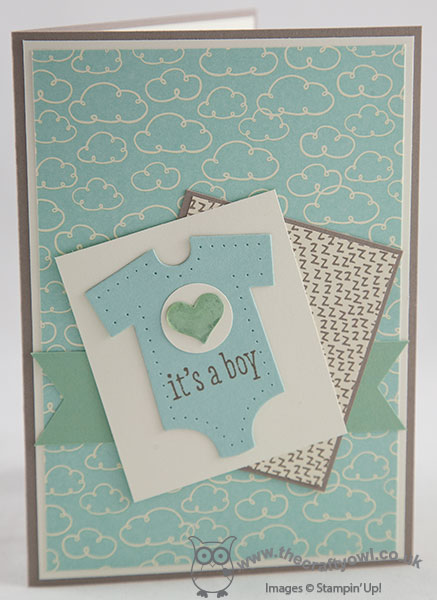
With both Pool Party and Tip Top Taupe featuring in the Sweet L'il Things Designer Series paper pack, I decided to go with a new baby card - a boy of course! I just love the cloud pattern on the DSP sheet (it comes in the alternate colourway of Pool Party cloud outlines on Very Vanilla too) and whilst this is by no means only of use for a baby card, it provided the perfect backdrop for my little panel of 'zzzzz's' and my Very Vanilla panel with cute Pool Party babygro cut using my Baby's First Framelits. I paper-pierced the babygro to add interest and added a 3/4" Very Vanilla circle with a Mint Macaron punched heart, that I covered with one of the heart-shaped Itty Bitty Accents Epoxy Stickers - this looks so lovely in real life! The heart and banner were just enough Mint Macaron I think with the other two colours and I'm so pleased with my final card. It also made me realise just how much I love Tip Top Taupe - this isn't a colour I've used much at all to date, yet its soft tones work so well with pastels and paler colours, I must try and use it more often.
That's all from me; I am expecting a visit from my parents today, which is making Ben very excited since with his birthday tomorrow he is virtually assured of presents! - and I'm also expecting the arrival of my pre-order of SU! goodies from the new seasonal catalogue. I am beyond excited!!!
Back tomorrow with another project; until then, happy stampin'!
Stampin' Up! Supplies Used:
c7626a34-8631-443f-888b-46798e3e44f2|0|.0|96d5b379-7e1d-4dac-a6ba-1e50db561b04
Tags: Baby cards, A Dozen Thoughts, Big Shot, Baby's First, Sweet L'il Things, Triple Banner Punch, Stampin' Up, Stampin' Up Card, Stampin' Up Supplies, Shop online, Shop Stampin' Up online, Eclectic Paper Piercing Template
Cards | Shop Online | Stamping
by Joanne James28. July 2015 08:00Good morning everyone! Today I have another of the cards from my July technique lass featuring the stamp set 'You've Got This':
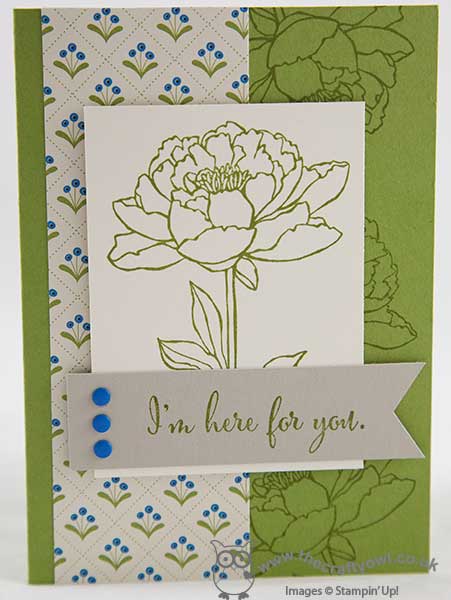
I was inspired by this card of Patsy Waggoner's and wanted to create a similar card showing how the focal flower could also be used as a background stamp to create an alternative effect. Of course I had to pair mine with my most favourite Pretty Petals DSP with that cute Pacific Point flower, which I then used in the candy dots of the same colour to bring focus to the sentiment banner - a cinch to create with my Triple Banner punch. Pacific Point and Old Olive seem an unlikely colour combo, yet the Pretty Petals DSP shows how they work so perfectly together, especially when teamed with Very Vanilla as the neutral.
This card was another success with the ladies at my technique class; combined with the third card (this one - the card that started it all!) which was the most complicated of the three, we managed to make three cards to be proud of.
Back tomorrow with a new set of Wednesday Weekly Deals - don't forget you still have one more day to take advantage of my Weekly Deals Giveaway this week - to remind yourself of the offer, please click here! Until tomorrow, happy stampin'!
Stampin' Up! Supplies Used:
by Joanne James23. July 2015 08:00Today it's time for a new challenge over at Create With Connie and Mary and this week we have a great sketch for you:
This is such a versatile sketch with so many possibilities, in the end though I settled for something that is a little unusual for me - take a look at today's card:
I was keen to use another of the papers on the Pretty Petals DSP stack as my background layer, so matted this on a base of Old Olive and Mint Macaron. I used Calypso Coral for my banner, effortlessly punched with my Triple Banner Punch (how did I ever manage without this in my life?!) and tucking a sliver of retired Old Olive ribbon beneath it (there is not a single ribbon in this colour in the current catalogue - let's hope that the Winter seasonal brings us something here in this staple colour!) I coloured my sentiment, from the 'A Whole Lot Of Lovely' hostess set (chat to me about booking a party or joining my next hostess club if you would like to own this set too!) in Pacific Point, Mint Macaron and Calypso Coral Stampin' Write markers and stamped onto Very Vanilla cardstock, that I cut out with my Big Shot and Oval Framelits.
Then for the bit that really isn't my usual style - I covered the back of the oval with Tear and Tape (how great is this product?! No more static red peel to stick to you!)and ruched some Mint Macaron lace trim all the way around the edge before adhering to my card front. I really love this pale green colour however was finding myself not really using is much in my card making, unlike it's counterparts Watermelon Wonder and Cucumber Crush (how did I ever live without these in my stamping cupboard?!) so this card is the first that seeks to rectify that. To finish, I added an Old Olive flower punched with the Petite Petals punch as leaves for the base of my Watermelon Wonder blossom accent - whilst not Calypso Coral, it is sufficiently close to compliment the coral elsewhere on my card.
So definitely more frilly than usual and this card would work just as well without the lace trim (and be more post-service friendly) but nice for a change I think! Do visit the other Design Team members to checkout their interpretations of this week's challenge sketch; and if you didn't read my Weekly Deals post yesterday, do check it out here - it contains a special offer exclusive to my customers!
Right, I'm off to top up my tan! Enjoy your day and I'll be back tomorrow with another project; until then, happy stampin'!
Stampin' Up! Supplies Used:
- A Whole Lot Of Lovely Clear-Mount Stamp Set
- Pretty Petals Designer Series Paper Stack
- Big Shot
- Ovals Collection Framelits Dies
- Mint Macaron A4 Cardstock
- Mint Macaron 1" Dotted Lace Trim
- 2015-2017 In Color Stampin' Write Markers
- 2015-2017 In Color Blossom Accents
- Old Olive A4 Cardstock
- Calypso Coral Stampin' Write Marker
- Calypso Coral A4 Cardstock
- Brights Stampin' Write Markers
- Very Vanilla A4 Cardstock
- Petite Petals Punch
- Banner Triple Punch
2869fbc5-7eb8-4234-85e8-0ba74f07d9a8|0|.0|96d5b379-7e1d-4dac-a6ba-1e50db561b04
Tags: A Whole Lot of Lovely, Big Shot, Create With Connie And Mary, Ovals Framelits, Triple Banner Punch, Pretty Petals, Shop Stampin' Up online, Shop online, Stampin' Up, Stampin' Up Card, Stampin' Up Card ideas, Stampin' Up Supplies, Host a Party
Cards | Host a Party | hosting | Stamping
by Joanne James27. June 2015 21:18It's the weekend and following a glorious day here in the UK, today I have a card to share for this week's Mojo Monday challenge where this week's sketch is all about the layers:

The minute I saw this sketch I knew exactly what I was going to do with the central circle; I bought the 'Hello Life' stamp set for the big feature sentiment but don't get to use it often on cards because it's quite large, so this layout gave me the perfect opportunity:
I stamped my sentiment in Watermelon Wonder onto Very Vanilla and decided to use another of the pieces of Designer Series Paper from the Sweet L'il Things pack as my background, then used the featured colours as bold blocks of colour for my rectangular layers and my banner. I love the patterns in this pack - whilst this does feature some cute animals, I think it is quite a fun pattern, that works for non-baby cards too. Truth is, as I was perusing I decided this paper makes me happy - so I went with it!
Short and sweet from me today; I'll be back tomorrow with a card for this week's new challenge over at The Paper Players. Until then, happy stampin'!
Stampin' Up! Supplies Used:
b928be2e-2807-4b33-907f-d7195f85e3d9|0|.0|96d5b379-7e1d-4dac-a6ba-1e50db561b04
Tags: Big Shot, Circles Framelits, Hello Life, Stampin' Up, Stampin' Up Card, Stampin' Up Card ideas, Stampin' Up Supplies, Sweet L'il Things, Triple Banner Punch, Shop online, Shop Stampin' Up online
Cards | Stamping
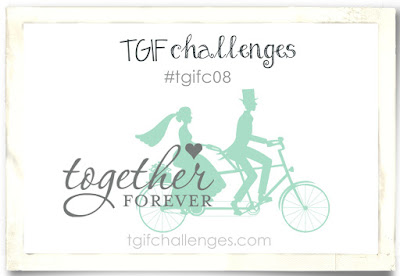
by Joanne James22. June 2015 09:09Good morning everyone - it's Monday! I am saying that with more optimism than I feel, but as usual there is lots to achieve this week so I'd best get on! Today I'm here with a card that I made for the challenge over at TGIF Challenge! this week, however firstly a big thank you to James Weber and the TGIF Team for choosing me as their TGIF Fave for my Build a Birthday card last week:

If you missed it, you can see my winning card here. I am honoured to be a fave pick of this talented bunch of designers; I also got a shout out for my rule-breaking card for the TGIF Throwdown challenge; you can see my card here. There is still the rest of the month to enter this one, so watch this space for my bona fide entry which is still to come! Meanwhile onto today's card which is as mentioned for this week's TGIF Challenge where the theme is 'Togetherness', so weddings, anniversaries and the like; I also used this week's Colour Q colour palette and the sketch over at Pals Paper Arts as inspiration for my card:


Without further ado, let me get to today's card:
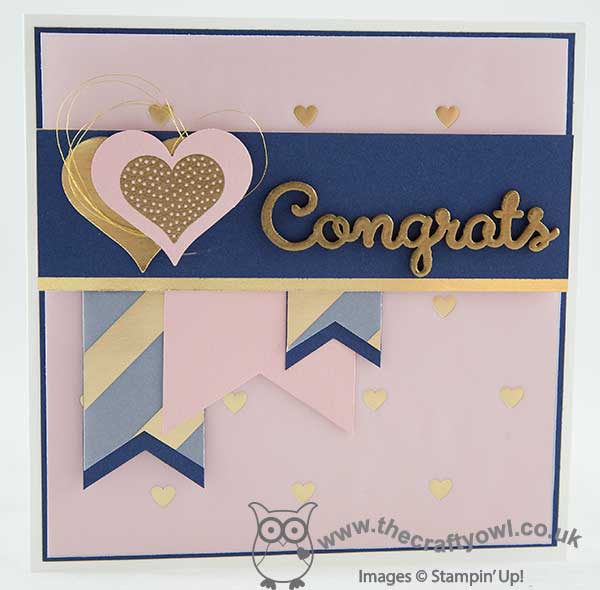
I saw the Colour Q colours this week and thought they would work really well for a wedding or engagement card and I was particularly inspired by the inspiration photo of those patterned straws, which immediately took me to my gold Fancy Foil Designer Vellum. I used the new Whisper White Thick cardstock for my base (p. 149 of the catalogue with the speciality cardstocks in case you missed it) - did I tell you already how much I LOVE this cardstock? It makes such great card bases and is beautifully thick for one layer cards. I used a mat of Night of Navy and another of Blushing Bride, before adhering a layer of heart-embossed gold foil vellum over the top. This mutes the pink slightly and creates a real feeling of luxury, which I think is important for a wedding or celebratory card. I layered my banners, all punched with the new triple banner punch, again layering vellum over the navy ones, this time in gold stripes and leaving the bottoms visible for contrast. My cross panel is Night of Navy layered on a piece of Gold Foil Sheet, with two offset layered hearts - one gold foil, one Blushing Bride with one of the heart stamps from the 'Hello Life' set embossed in gold in the centre and some of the lovely new gold metallic thread wound in between. To finish, I added my sentiment which is the thing I probably love most on this card: it's one of the new Expressions Natural Elements wooden diecuts, which I decided to double heat-emboss in gold to tie in with the rest of my card. I love these in their natural wood finish, but they are fun to jazz up too!
This is one of those cards that I didn't have a clear idea about when I started work and it sort of evolved as I went along. I love it though - I just need someone to announce their engagement or get married so that I can send it now!
I hope you like today's card' I'll be back tomorrow with another project, so stay tuned. Until then, happy stampin'!
Stampin' Up! Supplies Used:
by Joanne James21. June 2015 10:00It's Sunday, my favourite day of the week and time for a new challenge over at The Paper Players. Thank you to everyone who played along with Sandy's colour challenge last week - so many fabulous cards in the gallery. This week it is the turn of my talented good friend Claire who has a great clean and simple challenge for us:
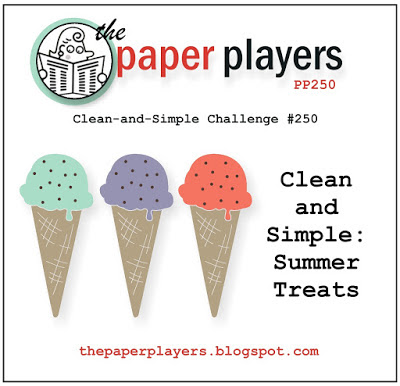

Summer treats - yum! When I started thinking about my card, I was all set to go down the ice-cream route, as in our lovely badge this week. Then two things happened: I saw this week's sketch over at Freshly Made Sketches and I received my SU! order containing some new DSP. Let me show you my card and I will explain what I mean:
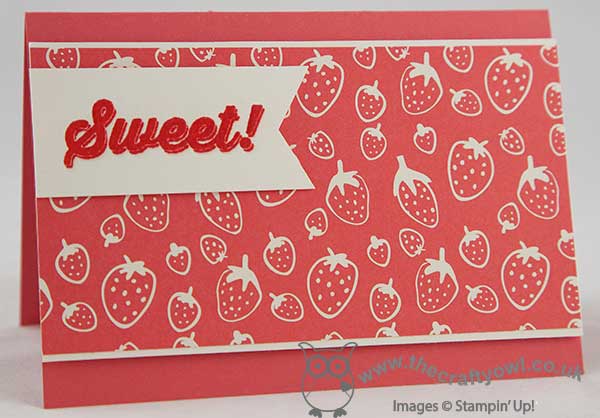
I was swooning over my new DSP purchases, determined to open and use more of it than ever before (hoarding is no longer allowed!) when I came across the strawberry pattern - hidden away in the 'Sweet L'il Things' DSP. I say hidden away, because when I saw this pack I thought the papers would be very baby-themed, yet this really isn't the case - there are some lovely patterns in there that can be used on all kinds of cards. For me, strawberries and cream are a quintessential part of the British summer and with the Wimbledon Tennis Tournament just around the corner we will all be eating them in vast quantities! The sketch layout was perfect for a CAS card to showcase this paper - a simple Very Vanilla mat and a banner stamped with my sentiment, from the 'Bravo' stamp set (I stamped it in Watermelon Wonder on Very Vanilla then stamped it again in Versamark over the top and heat embossed it with clear embossing powder for added shine).
So that's my CAS take on a summer treat! Before you reach for your ink and papers, check out what our amazing team has created to inspire you this week:
The Paper Players Design Team
Here's a quick recap of our challenge rules:
1. Create a new paper project
2. Upload your creation to your blog with a link back to us and provide a direct link to the post featuring your challenge submission.
3. Please link your card to no more than three challenges, TOTAL.
4. Have FUN!
I look forward to seeing your summer treats in the gallery this week. I have a reasonably relaxing day planned today, which will make a nice change. Although today is Father's Day of course, so there will be a fair amount of pampering of the Dad in our household. Happy Father's Day to all the other Dads out there!
Back tomorrow with another project; until then, happy stampin'!
Stampin' Up! Supplies Used:
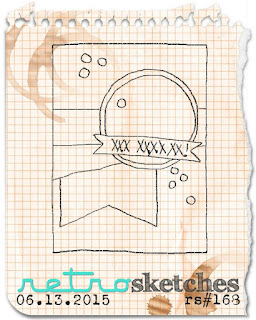
by Joanne James19. June 2015 07:00It's Friday - the end of the week already! The somewhat strange title of my blog post today is as a result of the card that I'm sharing. it's another Sprinkles of Life birthday card, this time using the sketch over at Retrosketches, which has lots of layers this week:
I decided to go for a real mix and match approach with my Cherry on Top DSP stack - this is what I came up with:
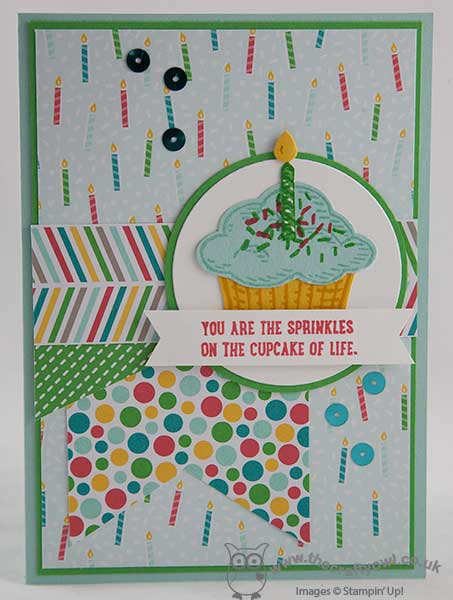
A Pool Party base and borders of Cucumber Crush are the perfect background for the birthday candles paper. For the banner and layers, I chose some of the bold patterns in the pack and kept my cupcake in solid colours with a few sprinkles to tie the cake in with the rest of my card. A paper-pieced candle, some sequin sprinkles and done! I made this card for Ben to give to Rebecca on her birthday earlier this week - she has a real love for bold patterns and colours and is not afraid to mix and match so this card is very her.
That's all from me today; I am treating myself to a rare day of pampering with a couple of friends, with whom I am visiting the spa to enjoy a day of relaxation. Back tomorrow with another project; until then, happy stampin'!
Stampin' Up! Supplies Used:
7cc46842-17a4-410f-82e0-8a87d9b254b0|0|.0|96d5b379-7e1d-4dac-a6ba-1e50db561b04
Tags: circle punch, Circles Framelits, Cherry on Top, Shop online, Shop Stampin' Up online, Stampin' Up Supplies, Stampin' Up Card ideas, Stampin' Up Card, Stampin' Up, Sprinkles Of Life, Triple Banner Punch
Cards | Stamping