May The Magic Of The Season Fill Your Heart and Home

by Joanne James19. December 2015 21:30

Good evening lovely blog readers! Christmas preparations are full steam ahead here in the James household and now that the Juniors have broken up from school for the holidays I'm sure there will be even less crafting time than usual; so tough when there is a huge big box of pre-order Spring-Summer seasonal goodies sitting in the corner of my office! Luckily for you I still have some Christmas cards and projects that I haven't shared with you. So today I'm sharing one of the cards from my all day Christmas stamp-a-stack back in September - this one features the Home for Christmas DSP and one of the stamps from the Cozy Christmas set and was a favourite for the ladies who attended:

The Pacific Point really makes the colours on this card pop and the addition of the gold corded trim and the red glimmer paper poinsettia cut out using the framelit from the Delicate Ornament Thinlit Dies set adds a lovely touch of sparkle to this card. If you are in need of some last minute Christmas cards, you could knock a few of these out in no time. This sentiment is one of my absolute favourites - it says everything that is good about the holidays for me.

That's all from me tonight; The Paper Players team and I are taking a couple of weeks break over the Christmas period but fear not - I will be back tomorrow with another festive project that I think you'll like. Until then, happy stampin'!


Stampin' Up! Supplies Used:

Table built using Product Table Builder by The Crafty Owl - Independent Stampin' Up! Demonstrator.


Tags: , , , , , ,

Cards | Stamping

Pantone-Inspired Dove of Peace

by Joanne James5. December 2015 23:02

Another late post from me today! I have had a non-stop day with grocery shopping, homework and a spot of cardmaking this morning and then Winter Fayre at school this afternoon and a swimming gala this evening. I'm not complaining though: I won first prize in the raffle at school, I won another prize in the swimming gala raffle and my superstar swimmer Rebecca put in an amazing time on her 50m breaststroke and qualified for County trials. So all in all a fantastic day! 

Today's card is for a few challenges: I've had the Dove of Peace stamp for ages and not once inked it up, so when I saw the Merry Monday Challenge this week I knew it was time to remedy that. I also wanted to enter The Challenge, where this week Lesley and the team would like us to create a Christmas card in non-traditional colours.


Well, you can't get more non-traditional than this:

Pastel Pink Pirouette and Wisteria Wonder, inspired by two of the new Pantone colours announced for Spring 2016 (see the full palette and trend report here). I decided on simple blocks of colour and plenty of white space to allow my dove to really take centre stage. I stamped both my sentiment and dove in Versamark and heat embossed them in silver, then coloured the patterns on my dove using my Stampin' Write markers and fussy cut it (so easy with Stampin' Up!'s paper snips) before adding to my card and popping it up on dimensionals. I also added a wide band of silver glimmer paper for some festive sparkle. An unusual colour combination, granted, but I must say I really do quite like it and it still has a definite festive feel I think.

That's all from me today; I will be back tomorrow much earlier with my card for this week's challenge over at The Paper Players where we have a fun theme courtesy of the lovely Claire. Until then, happy stampin'!


Stampin' Up! Supplies Used:

Table built using Product Table Builder by The Crafty Owl - Independent Stampin' Up! Demonstrator.


Nutcracker Christmas Greetings

by Joanne James4. December 2015 22:59

It's Friday and mine has been a busy one! I have another Christmas card for you today, this time using the sketch over at Mojo Monday where it's 'tall and skinny' week:

   SIP Any Challenge 25 800

I'm also linking up with the peeps over at Stamps, Ink and Paper since my card today uses a stamp from my current favourite set - Sparkly Season. Take a look:


I used the striped Home for Christmas designer series paper as the inspiration for the colour scheme for my card and chose Pacific Point blue as the dominant colour; an unusual Christmas colour, but combining it with red and a touch of green definitely makes it worthy. I coloured my little scene with my Stampin' Write markers and finished my framed image with a cute bow cut using my Big Shot from the Mini Treat Bag Thinlits set. I heat embossed my minimalist sentiment in black on one of my two banners and added a Mossy Meadow enamel dot to finish. 

My finished card measures 4" x 8 1/4" so of course needed a custom envelope, easily achieved with a sheet of red envelope paper, my trusty Envelope Punch Board and my Envelope Expert tool - a winner every time! If you haven't yet tried it or my Box Buster tool you should check them out - custom envelopes and boxes with perfect results every time!

I'll be back tomorrow with another project; until then, happy stampin'!


Stampin' Up! Supplies Used:

Table built using Product Table Builder by The Crafty Owl - Independent Stampin' Up! Demonstrator.


White Christmas Clean And Simple!

by Joanne James5. November 2015 08:05

Today it's time for a new challenge over at Create With Connie and Mary and this week we have a great colour challenge for you:


I used the sketch over at CAS(E) This Sketch as the basis for my card today - a largely one layered card, except for the banners and it also showcases a fun new technique:


I used extra thick Whisper White cardstock for my base and stamped two of the three trees from the White Christmas stamp set onto the bottom corner of my card in Memento Black. I coloured the trees in with my Smoky Slate Stampin' Write marker and added a couple of cardinals, coloured in Real Red for a little colour. Now for the fun technique! This was shown to me recently by the lovely Monica Gale who used it on a card stamped with the Wonderland set. for the snow on my trees and on the ground, I added a thin line of Tombo glue, then sprinkled this with Dazzling Diamonds glitter and then white embossing powder, then heated it gently with my heat tool. This causes the glue to puff up and produce wonderfully textured and sparkling snow - such a neat effect. To finish my card, I cut a reverse banner using my Triple Banner Punch - I simply fed the paper in from the underside of the punch and used the piece which normally you would throw away - from a scrap of Merry Moments designer series paper that has Real Red and Smoky Slate stripes. Finally to add a little extra sparkle, I added a thin banner of red glimmer paper - I just love this stuff!

I spent ages working up different cards for this week's colours and eventually settled on this one. It's very pretty in real life and has lots of texture for a predominantly white card, but it was incredibly difficult to photograph and I'm not sure that the picture really does it justice. 

Do visit the other Design Team members to see how they used this week's challenge colours; there's lots of inspiration over on their blogs too!

Enjoy your day and I'll be back tomorrow with another project; until then, happy stampin'!


Stampin' Up! Supplies Used:

  • White Christmas Photopolymer Stamp Set
  • Embossing Buddy
  • White Stampin' Emboss Powder
  • Heat Tool (Uk)
  • Dazzling Diamonds Stampin' Glitter
  • Multipurpose Liquid Glue
  • Merry Moments Designer Series Paper
  • Tuxedo Black Memento Ink Pad
  • Banner Triple Punch
  • Whisper White A4 Thick Cardstock
  • Red Glimmer Paper
  • Smoky Slate Stampin' Write Marker
  • Real Red Stampin' Write Marker

English Garden In Bloom Friendship Card

by Joanne James22. October 2015 08:05

Today it's time for a new challenge over at Create With Connie and Mary and this week we have a great colour challenge for you:


When I sat down to work on my card this week I realised that all of the challenge colours could be found in the lovely English Garden Designer Series Paper, so it seemed like the perfect opportunity to showcase it. I also used this week's sketch over at Retrosketches as the basis for my layout. Here's my card: 


I used a base of Hello Honey with a mat of Soft Suede, then covered my cardfront with a piece of floral patterned paper featuring all of the colours. I added a 2" circle of Mossy Meadow and cut my banner from a piece of neutral kraft corrugated paper, to add texture and detail without detracting from the pattern. I stamped my sentiment from the 'Garden In Bloom' set in Soft Suede on Whisper White and matted this on a banner of Hello Honey, both of which I punched with my Triple Banner Punch. I considered using the butterfly from this set too as my embellishment, however it was a little too small to really stand out. I decided to go with a simple layered butterfly instead, punched using my Bitty Butterfly and Elegant Butterfly punches, with a couple of strands of gold metallic thread for antennae. To finish, I added a trio of Mossy Meadow enamel dots. This is one of those cards that really is 'all about the paper' - the English Garden papers are so very pretty though, they deserve to take centre stage. 

Do visit the other Design Team members to see how they used this week's challenge colours; there's lots of inspiration over on their blogs too!

Enjoy your day and I'll be back tomorrow with another project; until then, happy stampin'!


Stampin' Up! Supplies Used:

  • Garden In Bloom Photopolymer Stamp Set
  • English Garden Designer Series Paper
  • Soft Suede Classic Stampin' Pad
  • Soft Suede A4 Cardstock
  • Hello Honey A4 Cardstock
  • Mossy Meadow A4 Cardstock
  • Gold Metallic Thread
  • 2" Circle Punch
  • Banner Triple Punch
  • Bitty Butterfly Punch
  • Elegant Butterfly Punch
  • Kraft And White Corrugated Paper


Garden In Bloom Friends Card

by Joanne James24. September 2015 08:05

Today it's time for a new challenge over at Create With Connie and Mary and this week we have a great colour challenge for you:


These colours have a real ombre feel to them and I decided to go with something pretty and floral today using the 'Garden in Bloom' stamp set. Here's my card: 


I used a Very Vanilla base and a mat of Calypso Coral to set off my Pretty Petals striped DSP. I punched a 2" wide banner of Blushing Bride with my Triple Banner Punch and overlaid this with a piece of Very Vanilla satin ribbon, then for my focal panel I stamped the sentiment and flower outlines in Watermelon Wonder and 'coloured' them in with the other two challenge colours. I love this stamp set and in photopolymer, it makes light work of two-step stamping for sure!

Do visit the other Design Team members to see how they used this week's challenge colours; there's lots of inspiration over on their blogs too!

Enjoy your day and I'll be back tomorrow with another project; until then, happy stampin'!


Stampin' Up! Supplies Used:

  • Very Vanilla A4 Cardstock
  • Garden In Bloom Photopolymer Stamp Set
  • Pretty Petals Designer Series Paper Stack
  • Banner Triple Punch
  • Watermelon Wonder Classic Stampin' Pad
  • Blushing Bride Classic Stampin' Pad
  • Blushing Bride A4 Cardstock
  • Calypso Coral Classic Stampin' Pad
  • Calypso Coral A4 Cardstock
  • Very Vanilla 5/8" Satin Ribbon


'Tis The Season Holly Christmas Card

by Joanne James12. September 2015 21:43

Today I have another Christmas card for you! I used this week's Mojo Monday sketch as my inspiration:


This is such a great sketch - I can see me using it for lots of cards. Today I combined it with the Merry Monday Challenge that I haven't played along with for a while - this week we are challenged to use holly on our card and I immediately reached for my favourite new Home For Christmas DSP. Holly is also the theme over at Happy Little Stampers, so I'm linking up there too. Here's my card:

I used Real Red for my base, with a piece of striped DSP across the horizontal. I then mounted a piece of the holly patterned DSP onto a mat of Mossy Meadow, then cut a striped banner with my Triple Banner Punch and popped it up on dimensionals in the centre of the holly panel. I then stamped my sentiment, from the super-useful sentiment set 'Oh What Fun', in Mossy Meadow on a piece of Very Vanilla, mounted this on a mat of Real Red and added some red berries (tiny pearls that I coloured red with a Sharpie) to add a little dimension. I rounded the corners of all my mats and panels using my Project Life corner rounder as per the sketch; this softens the sharp lines of the panels, which I rather like.

A rather simple layout, but a great way to use a combination of co-ordinating patterns and I love the added berry detail on the sentiment.

Back tomorrow with a new challenge over at The Paper Players; this week it's a colour challenge and I'm hosting, so come back then and check it out!

Until then, happy stampin'!


Stampin' Up! Supplies Used:

Table built using Product Table Builder by The Crafty Owl - Independent Stampin' Up! Demonstrator.


Festival Of Trees in Green and Gold Christmas Card

by Joanne James11. September 2015 20:51

Yay it's Friday! This has been a busy week, but a good one nonetheless. Today I'm sharing a card that I made earlier this week for this week's Less Is More challenge but am only just getting the opportunity to share - how does that happen?! Anyway, the LIM girls have a challenge this week to use the colours green and gold on your card (with lots of white space!) and I just couldn't resist. Here's my card:

I decided to use Cucumber Crush as my green as I think it has a real vibrancy with the gold and white for a Christmas card. I heat embossed the pattern on my tree using the Festival of Trees stamp set in gold and combined this with a piece of Cherry on Top check DSP, my sentiment which is a combination of a gold foil 'merry' cut using the new Christmas Greetings thinlits and the stamped 'Christmas' from the Holly Jolly Greetings on a white banner. I added a couple of loops of gold corded trim and a sprinkle of gold star sequins - on offer on weekly deals this week and so easy to adhere with my new fine tip glue pen! - and that's my card done. 

A super modern CAS Christmas card that would be easy to mass-produce and in tradition colours. Maybe this will make the 'shortlist for mass production' pile this holiday season!

That's all from me today; my week has worn me out! Back tomorrow with another project. Until then, happy stampin'!


Stampin' Up! Supplies Used:

Table built using Product Table Builder by The Crafty Owl - Independent Stampin' Up! Demonstrator.


Watermelon Wonder Sprinkles of Life Shadow Box Card

by Joanne James31. August 2015 11:00

I'm a day late with my post for this week's new challenge over at The Paper Players! My lack of internet access in Norfolk completely got the better of me yesterday and I didn't get my post loaded, but hey I'm here now!

This week it is the turn of the fabulous Nance, so creative and the heroine of The Paper Players team, to host and she has a fun tic-tact-toe challenge to get our creative juices flowing:


I actually have something fun to share with you today and even a slight confession - today's card was designed by me but made by ... my 10 year old daughter! At my last technique card class we were making some fun fold cards featuring the Sprinkles Of Life RMHC set. Since it is school holidays, Rebecca was keen to join in and whilst everyone else's shadow box cards, including mine, were in a blue colourway, Rebecca was determined to make her's stand out from the crowd. Here it is:


The basic construction of a shadow box card is quite simple: two pieces of cardstock, mine measure 4 1/4" x 5 1/2", scored at 1/2" and 1" from each side to create the box shape. The front of the card is a piece of Watermelon Wonder patterned paper from the Cherry on Top DSP stack, with a 2 1/2" hole punched out of the front. The cupcake case was stamped in Crushed Curry then the cake top stamped and punched out of Watermelon Wonder with the co-ordinating Tree Builder punch. The sprinkles were stamped in Cucumber Crush and the candle stamped, fussy cut and added to the cake, and the sentiment strip flagged with the Triple Banner Punch. When I was busy working on my card for this week, Rebecca reviewed the grid and suddenly said "I have an idea!" Off she ran to get her class card, added a row of gold sequins and said "There - now my card is finished, I knew it needed something!" So true for the child who loves anything that sparkles! Since her card was fulfilling the top line of the tic-tact-toe grid, I couldn't resist the pleading eyes (she is always asking me to put her creations on my blog!) and this time I agreed!

Just in case you were curious as to what my card looked like, here it is (not a patch on Miss Rebecca's though, I'm sure you'll agree!):

Before you reach for your ink and papers, check out what our amazing team has created to inspire you this week:

The Paper Players Design Team
Anne Marie Hile - on leave
 
 
Here's a quick recap of our challenge rules:
 
1.  Create a new paper project
2.  Upload your creation to your blog with a link back to us and provide a direct link to the post featuring your challenge submission.
3.  Please link your card to no more than three challenges, TOTAL.
4.  Have FUN! 


I look forward to seeing what combinations you come up with on your cards in the gallery this week. I am home again and fully wifi'd again, so look forward to visiting your blogs and catch up on some serious creating this week!

Back tomorrow with another project; until then, happy stampin'!


Stampin' Up! Supplies Used:

Table built using Product Table Builder by The Crafty Owl - Independent Stampin' Up! Demonstrator.


Howl-o-ween Treat Halloween Card For The Paper Players

by Joanne James23. August 2015 10:00

It's Sunday and you know what that means: time for a new challenge over at The Paper Players! This week it is my turn to host and I have my very first sketch challenge for you:
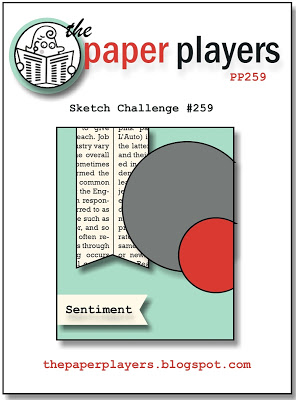
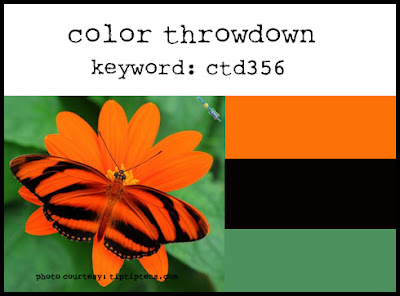
    

You know how much I love a sketch challenge - it's so exciting to have designed my first one for you to play along with this week! I am still pre-occupied with my pre-order goodies, so I decided to use this week's Color Throwdown colours to create not something floral as per the inspiration photo, rather a decidedly spooky Halloween treat for you. Here's my card:
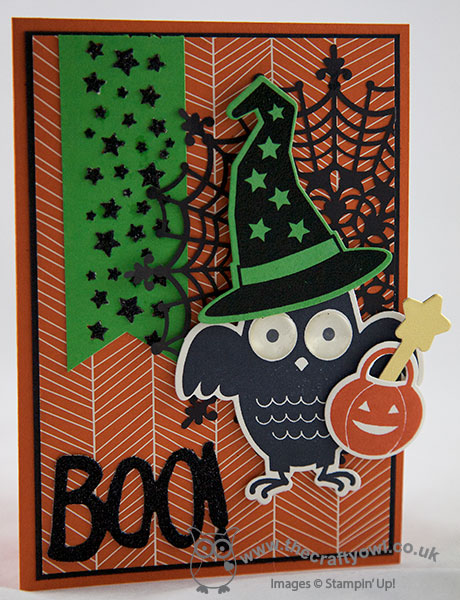
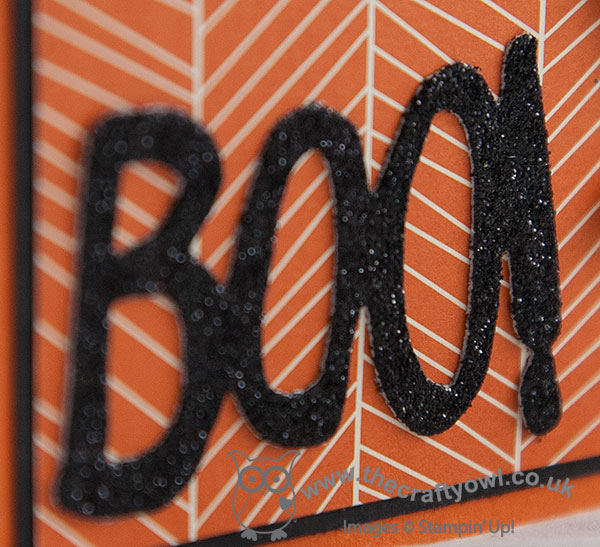
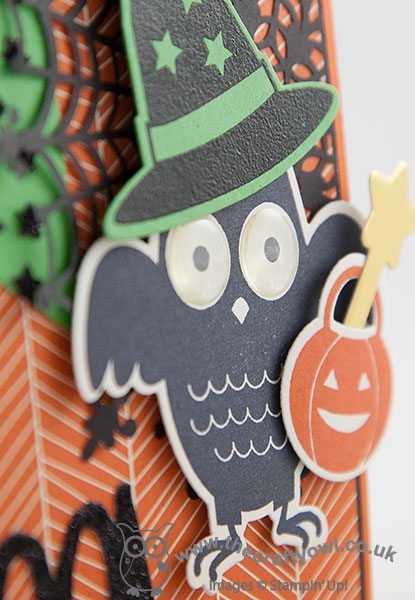
So many lovely things to share on my card this week! The background paper is a piece of the new Halloween DSP pack 'Happy Haunting' - there are some great patterns in this pack. For the large circle on my sketch, I used one of the new Spider Web doilies - I think these may be my actual most favourite Halloween product in the new catalogue! They are so dramatic and such great value, at just £4.25 for a pack of 24. I will be using these everywhere! for the smaller circle, I just had to use the owl from the Howl-o-ween Treat set - isn't he adorable?! The stamp set comes with a co-ordinating set of 'Boo To You' framelits dies and what's more they are available as a bundle too - great news! The framelits are a must as they make cutting out the shapes, such as the wand, the pumpkin basket and the hat, so easy. This card is choc full of texture too: I accented the eyes with a couple of round Itty Bitty Epoxy Sticker Accents and stamped the hat in Versamark and heat embossed it in black to add a lovely shine against the Cucumber Crush cardstock of the hat - you can see it better here in this close-up photo:
I also used the awesome new black glimmer paper for my sentiment, again cut out using my Big Shot and the 'Boo To You' framelits. Just look at how sparkly it is: 

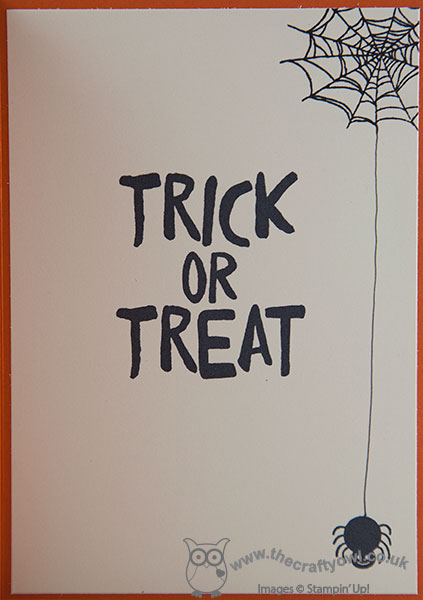
Lastly, I added a Cucumber Crush banner punched with my Triple Banner Punch and the Confetti Stars Border Punch and I infilled the star shapes by paper-piecing with black glimmer paper stars for added sparkle. I also decorated the inside of my card and what's more, remembered to take a photo of it:
How cute is that?! I hope you like today's Halloween card and that it has you even more excited for the fun things still to come in the new seasonal catalogue. Before you reach for your ink and papers, check out what our amazing team has created to inspire you this week:

The Paper Players Design Team
Anne Marie Hile - on leave
 
 
Here's a quick recap of our challenge rules:
 
1.  Create a new paper project
2.  Upload your creation to your blog with a link back to us and provide a direct link to the post featuring your challenge submission.
3.  Please link your card to no more than three challenges, TOTAL.
4.  Have FUN! 


I look forward to seeing how you choose to interpret my sketch on your cards in the gallery this week. I'll be spending today in the garden; yesterday's BBQ and vegetarian menu was a huge success, so today we are following that with another lunch of vegetables from our garden - with sausages too though, of the meat variety! 

Back tomorrow with another project; until then, happy stampin'!


Stampin' Up! Supplies Used:

* Howl-o-ween treat - available September 1st

* Boo To You Framelits - available September 1st

* Spider Web Doilies - available September 1st

* Happy Haunting Designer Series Paper - available September 1st

* Black Glimmer Paper - available September 1st

Table built using Product Table Builder by The Crafty Owl - Independent Stampin' Up! Demonstrator.


Scrapbooking

Stampin' Up! has introduced a new range of 12x12" scrapbooking product and kit - the full range is now available to purchase online. To download a copy of the new digital Scrapbooking Catalogue click here.

Mini Catalogue

BROWSE THE CATALOGUE

'Tis The Season - the new Stampin' Up! Mini Catalogue is here! For more details and to download your copy click here

Shop Online

Access my online shop 24 x 7, 365 days of the year:

Current September hostess code:

JQEHTZGK

Shop Online

2024-25 Annual Catalogue

BROWSE THE CATALOGUE

Click on the image to download your copy of the 2024-25 annual catalogue. For a full list of current SU! supplies, go to my online store. If you would like any help or advice, please drop me a line at joanne@thecraftyowl.co.uk or give me a call on 07773 421446 - I'd be happy to help.

Join My Team

It's always a great time to join Stampin’ Up! New team members can get £130 worth of products for only £99 + free business supplies + free shipping + all the fun being a part of Stampin’ Up! Stampin' Up! has something for everyone: join my growing team and benefit from my support to enjoy Stampin' Up! however you choose.

If you're interested, call me for a chat to understand how I can help you realise your goals. Alternatively, if you have already decided to sign up and you just can't wait, please click here for the link to the online form where you can sign up and order your starter kit right away! 

Latest Kits!

Stampin Cut and Emboss

The Christmas Ornaments Kit and Card Keeper Kit are the latest kits that will be arriving in the online store later this month - get yours here!

New Online Exclusives

There are new products available exclusively in the online store from 3 July - check them out here.

About Me

Hi I'm Joanne and live in Northampton and when I'm not looking after my husband and two beautiful children, am an avid crafter with a passion for all things Stampin' Up!

I must confess that I have never been a big rubber stamper - until I discovered Stampin' Up! that is. I love the fact that I can get such great results with co-ordinating stamps, inks, papers and punches - the possibilities are endless! Join me on my stamping journey as I share the things I love and be inspired to create amazing things yourself!

Follow Me

Monthly Newsletter

Box Builder

Click the button above to use Box Buster to create your custom box design using the Envelope Punch Board!

Kits Collection Now Available!

Stampin Cut and Emboss

The new Kits Collection from Stampin' Up! is now available!

Click here to see the current kits available and order yours online today.

I Design For


Stampin' Up Stuff

This is my personal blog and is not endorsed by Stampin’ Up! I hope you find it a plentiful source of ideas and personal inspiration but please don't copy my designs for contest submission or use for classes, publication or sale without express permission.